
As defined by Amazon Web Services (AWS), Amplify is a set of products and tools with which mobile and front-end web developers can build and deploy AWS-powered, secure, and scalable full-stack apps. Also, you can efficiently configure their back ends, connect them to your app with just a few lines of code, and deploy static web apps in only three steps. Historically, because of their performance issues, managing images and videos is a daunting challenge for developers. Even though you can easily load media to an S3 bucket with AWS Amplify, transforming, compressing, and responsively delivering them is labor intensive and time consuming.

Enter Cloudinary as an effective cloud-based media-management platform, with which you can efficiently and seamlessly create, manage, and deliver satisfactory experiences to all browsers and devices, regardless of their bandwidth. Uploading media to Cloudinary is effortless, after which it dynamically transforms them on the fly, largely heading off infrastructure- and maintenance-related concerns. Furthermore, Cloudinary offers software development kits (SDKs) for all popular programming languages.

This post shows you how to build a blog, host it with Amplify, and transform its videos with Cloudinary. The code repository is on GitHub.
As a prerequisite, set up an AWS account. For reference, see the Amplify documentation and this Amplify tutorial. Follow the steps below:
-
Add Amplify to your terminal. Type:
npm install -g @aws-amplify/cli -
Configure the new project. Type:
amplify configure -
Create a React app as a starting point for the project. Type:
npx create-react-app amplify-jamstack-cloudinary-videoThis step takes a while, after which you’ll see output on the Yarn commands you can run from the project directory. For more details, see this writeup on React toolchains.
-
Go to the project directory and start the React app. Type:
cd amplify-jamstack-cloudinary-videoyarn start
To see the demo running, run the local server with the command npm start.
When the app finishes running, React displays its rotating icon.
Tip: If you cannot connect to the correct instance, go to the ~/.aws directory and verify that the credentials you entered match those listed there. For more details, see the AWS documentation on named profiles.
Now turn your React app into an AWS Amplify app. First, configure your AWS account with the connections required for your app. Type:
amplify init
In case of no response from Amplify, type ctrl+c to ensure that you have exited your local server.
Amplify then displays the following prompts. Respond to each of them by typing Enter to select the default as shown. Below are my responses for your reference.
? Enter a name for the project amplifyjamstackcloud
? Enter a name for the environment dev
? Choose your default editor: Visual Studio Code
? Choose the type of app that you're building javascript
Please tell us about your project
? What javascript framework are you using react
? Source Directory Path:  src
? Distribution Directory Path: build
? Build Command:  npm run-script build
? Start Command: npm run-script start
Using default provider awscloudformation
? Do you want to use an AWS profile? Yes
? Please choose the profile you want to use (Use arrow keys)
❯ default
If this is your first time you set up an AWS account profile, I suggest you pick the defaults for your settings. However, if you’re on another AWS-related project that uses the AWS SDK, you might have a separate profile already. Ensure that you specify the correct one.
Afterwards, AWS displays a confirmation:
Adding backend environment dev to AWS Amplify Console app: d2hxdxps86f74m
Go to AWS Amplify and you’ll see your new app amplifyjamstackcloud there, assuming that’s the name you specified.

If you don’t see your app, you might be in the wrong geographical region. To double-check, pull down the drop-down menu in the upper-left corner.

Now that your app is in the cloud, click General in the left navigation and note these details:
- The app, called d2hxdxps86f74m, is identical to the one in the console.
- The back end of this project and its location are displayed under Backend environments (see the screenshot below). AWS Amplify leverages AWS CloudFormation under the hood, a technique known as back end as code (BaC).


aws-amplify is the main library that works with Amplify in apps. The @aws-amplify/ui-react package contains React-specific UI components, which you’ll leverage. Install it with this command:
npm install aws-amplify @aws-amplify/ui-react
Next, have React import Amplify and configure it according to the settings created with Amplify’s CLI tool, which is located in ./aws-exports. Type the following commands:
import awsExports from "./aws-exports";
Amplify.configure(awsExports);
Code language: JavaScript (javascript)
Your app is now ready to call Amplify and, inherently, the AWS SDK.
I suggest adopting GraphQL, which sends real-time notifications, as the database layer for your app. Feel free to use the REST API instead if you prefer.
To add a database layer, type:
amplify add api
Amplify then displays several prompts. Below is my suggestion of the responses at the end of each of the prompts.
To take this demo further later on, respond with multiple objects.
? Please select from one of the below mentioned services: GraphQL
? Provide API name: amplifyjamstackcloud
? Choose the default authorization type for the API API key
? Enter a description for the API key: sample
? After how many days from now the API key should expire (1-365): 365
? Do you want to configure advanced settings for the GraphQL API No, I am done.
? Do you have an annotated GraphQL schema? No
? Choose a schema template: Single object with fields (e.g., “Todo” with ID, name, description)
When prompted “Do you want to edit the schema now? (y/n),” typing y opens your default editor for the schema file. I typed n and ran the command below instead, opening all the project files in VSCode.
code .
The code for the back end you’re creating resides in the amplify directory. The newly created schema, which is in amplify/backend/api/amplifyjamstackcloud/schema.graphql, reads like this:
  id: ID!
  name: String!
  description: String
}
Code language: JavaScript (javascript)
Replace Todo with Video and rename the file Videos.
  id: ID!
  name: String!
  description: String
}
Code language: JavaScript (javascript)
Next, “push” the schema to the AWS cloud by typing this command:
amplify push
This process contains numerous steps, many of which are reflected in the amplify/backend/api/amplifyjamstackcloud/build directory. Any questions, feel free to contact me.
Amplify then prompts you to reply to the questions below. Respond with the default for each of them.
✔ Successfully pulled backend environment dev from the cloud.
Code language: JavaScript (javascript)
Current Environment: dev
| Category | Resource name | Operation | Provider plugin |
|---|---|---|---|
| Api | amplifyjamstackcloud | Create | awscloudformation |
? Are you sure you want to continue? Yes

The following types do not have '@auth' enabled. Consider using @auth with @model
         - Videos
Learn more about @auth here: <https://docs.amplify.aws/cli/graphql-transformer/directives#auth>

GraphQL schema compiled successfully.

Edit your schema at /Users/ajonp/web/amplify-jamstack-cloudinary-video/amplify/backend/api/amplifyjamstackcloud/schema.graphql or place .graphql files in a directory at /Users/ajonp/web/amplify-jamstack-cloudinary-video/amplify/backend/api/amplifyjamstackcloud/schema
? Do you want to generate code for your newly created GraphQL API Yes
? Choose the code generation language target javascript
? Enter the file name pattern of graphql queries, mutations and subscriptions src/graphql/**/*.js

? Do you want to generate/update all possible GraphQL operations - queries, mutations and subscriptions Yes
? Enter maximum statement depth [increase from default if your schema is deeply nested] 2
⠼ Updating resources in the cloud. This may take a few minutes . . .
After creating and executing CloudFormation in the cloud, the AWS Amplify CLI outputs two credentials and stores them in the src/aws-exports.js file:
GraphQL endpoint: https://<example>.appsync-api.us-east-1.amazonaws.com/graphql
GraphQL API KEY: <example>
Your React app can now connect with GraphQL with the endpoint and API key.
Now create a simple app, largely according to the procedure described in the Amplify tutorial Getting Started. Type this command to start React in your browser:
npm run start

At the bottom of the form are the name and description you added, if any. To see the DynamoDB data and verify that the storage is local, log in to your AWS account and click the table that is displayed for your video name and description.

In case of no such display, verify that you’re in the correct geographical region.
To set up video on demand or streaming, follow the procedure in the tutorial AWS Amplify Video.
Upload the video for this project with Cloudinary’s upload widget. Adopt the signed approach to leverage additional AWS Amplify features and better secure your Cloudinary account.
Add an upload preset in Cloudinary by first clicking the gear icon in your console and then clicking the Upload tab near the top to go to
https://cloudinary.com/console/<your console>/settings/upload.
Scroll down to Upload presets and click Add upload preset. On the screen that is displayed:
- Choose Signed from the pull-down menu under Signing Mode.
- Specify a folder name (e.g.,
example folder) under Folder.

Note the name of the upload preset at the top and your cloud name in your Cloudinary dashboard for use later.

To add the upload code, edit your public/index.html file, as follows:
1. Add Cloudinary’s upload widget by adding this script to the header section:
<script src="<https://widget.cloudinary.com/v2.0/global/all.js>" type="text/javascript"></script>

2. Add the variable below for the upload widget. Be sure to replace my_cloud_name and my_preset with their values.
const uploadWidget = window.cloudinary.createUploadWidget({
    cloudName: 'my_cloud_name',
    uploadPreset: 'my_preset'}, (error, result) => {
      if (!error && result && result.event === "success") {
        console.log('Done! Here is the image info: ', result.info);
      }
    }
  );
3. Add the <button> tag anywhere in the file for opening the widget. I recommend placing that code above that for the Submit button.
<button style={styles.button} onClick={addVideo}>Create Video</button>
4. Add the function below for opening the widget:
    uploadWidget.open();
  }
Code language: CSS (css)
At this point, clicking the Upload Video button might trigger the error message below. That’s because you must first sign this upload for security. See the next section for the procedure.

To obtain a signature from Cloudinary, create an API call with AWS Amplify and a Lambda datasource to enable a return of the request.
First, create a function by running this command:
amplify add function
In response to the top five questions of the nine that are displayed, specify the parameters of the Lambda function (serverless function):
`cloudinarysignature`
`cloudinarysignature`
`NodeJS`
`Hello World`
Respond with No to the bottom four questions. See the screenshot below.

Next, connect the Lamba datasource to your AppSync API by adding the line below to the amplify/backend/api/amplifyjamstackcloud/schema.graphql file:
type Query {
  cloudinarysignature(msg: String): String @function(name: "cloudinarysignature-${env}")
}
${env} in the above code makes available your development environment for use, especially if you’d like to test your code later in a staging or product environment.
Now load the updates to AWS with this command:
amplify push
AWS then displays the output below, showing the new function to be created and the GraphQL API to be updated.

Type Y in response to all the prompts. The process that follows takes a few minutes.
Tip: Type amplify push --y to skip the above questions in the future.
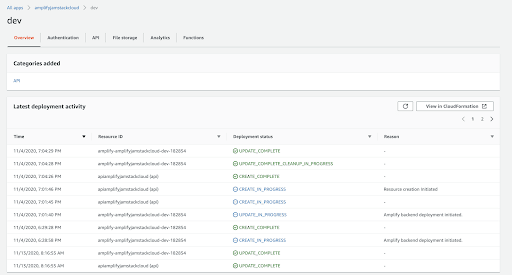
Note that your stack is displayed in both the AWS console and CloudFormation. Below is an example.

For a lighter version (example below), go to Amplify, select your project, and choose backend > dev.
After performing a push, Amplify sends you a message with your GraphQL endpoint and API key, which is also a confirmation that Amplify has updated your code, including your GraphQL values, locally. A new query called cloudinarysignature, with which you call your Lambda function through AppSync, is now in your src/graphql/queries.js file.
Add this code, which calls your GraphQL endpoint, to your App.js file:
// eslint-disable-next-line no-unused-vars
async function fetchCloudinarySignature(cb, params) {
  try {
    const cSign = await API.graphql(graphqlOperation(cloudinarysignature, { msg: JSON.stringify(params) }));
    const data = JSON.parse(cSign.data.cloudinarysignature);
    console.log(`Uploading using key ${data.body}`);
    return data.body;
  } catch (err) {
    console.log("error fetching signature");
  }
}

Then update showWidget to call this post before opening our dialog. You could put this anywhere but I thought this would be easy.
const showWidget = () => {
    fetchCloudinarySignature();
    uploadWidget.open();
  }
Lambda then returns the “Hello from Lambda!” response you requested.
{"data":{"cloudinarysignature":"{statusCode=200, body=\\"Hello from Lambda!\\"}"}}
For details on this topic, see the documentation on Cloudinary’s Node.js SDK.
To update the Lambda function to call Cloudinary, follow these steps:
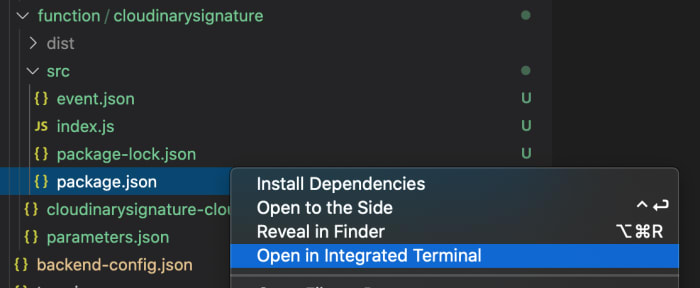
1. Add the Cloudinary SDK by running npm install cloudinary in the directory amplify/backend/function/cloudinarysignature/src. Tip: If you are using VSCode, just type the command and you’ll be taken to that directory.
2. Add the following code to the amplify/backend/function/cloudinarysignature/src/index.js file:
/* eslint-disable no-unused-vars */
/* eslint-disable no-undef */

const cloudinary = require("cloudinary").v2;

exports.handler = async (event) => {
  console.log(event);

  const secret = process.env.CLOUDINARY_API_SECRET;
  const response = {
    statusCode: 400,
    body: `Missing CLOUDINARY_API_SECRET`,
  };
  if (!secret) {
    return response;
  }

  const timestamp = Math.round(new Date().getTime() / 1000);
  const signature = await cloudinary.utils.api_sign_request(
    JSON.parse(event.arguments.msg),
    secret
  );

  response.body = signature;
  return JSON.stringify(response);
};
Clicking the Upload Video button now triggers the error message that your Cloudinary key is missing:
{"data":{"cloudinarysignature":"{statusCode=400, body=Missing CLOUDINARY_API_SECRET}"}}
3. Get the Cloudinary key from your Cloudinary dashboard, go to the AWS Console, and click Lambda > Functions.
4. Click the cloudinarysignature-dev function on the list. Scroll down to the Environment variables section and click Edit.

5. In the Edit environment variables screen (see below), fill in the CLOUDINARY_API_SECRET field with your API key and click Save.
Keep your API key confidential and do not put it in your code repository.


As a test, go to your React app at http://localhost:3000/ and click Upload Video to ensure that React returns your secret key.
Now the call is ready for use with your creatUploadWidget function request. Below is the complete content of the App.js file.
/* src/App.js */
import React, { useEffect, useState } from "react";
import Amplify, { API, graphqlOperation } from "aws-amplify";
import { createVideo } from "./graphql/mutations";
import { listVideos, cloudinarysignature } from "./graphql/queries";

import awsExports from "./aws-exports";
Amplify.configure(awsExports);

const initialState = {
  name: "",
  description: "",
  cloudinary: null,
};

// eslint-disable-next-line no-unused-vars
async function fetchCloudinarySignature(cb, params) {
  try {
    const cSign = await API.graphql(
      graphqlOperation(cloudinarysignature, { msg: JSON.stringify(params) })
    );
    const data = JSON.parse(cSign.data.cloudinarysignature);
    console.log(`Uploading using key ${data.body}`);
    return data.body;
  } catch (err) {
    console.log("error fetching signature");
  }
}

const App = () => {
  const [formState, setFormState] = useState(initialState);
  const [videos, setVideos] = useState([]);

  useEffect(() => {
    fetchVideos();
  }, []);

  function setInput(key, value) {
    setFormState({ ...formState, [key]: value });
  }

  const uploadWidget = window.cloudinary.createUploadWidget(
    {
      cloudName: "ajonp",
      uploadPreset: "dxf42z9k",
    },
    (error, result) => {
      if (!error && result && result.event === "success") {
        console.log("Done! Here is the video info: ", result.info);
        setInput("cloudinary", JSON.stringify(result.info));
      }
      if (error) {
        console.log(error);
      }
    }
  );
  const showWidget = () => {
    uploadWidget.open();
  };

  async function fetchVideos() {
    try {
      const videoData = await API.graphql(graphqlOperation(listVideos));
      const videos = videoData.data.listVideos.items;
      videos.map((video) => {
        video.cloudinary = JSON.parse(video.cloudinary);
      });
      setVideos(videos);
    } catch (err) {
      console.log("error fetching videos");
    }
  }

  async function addVideo() {
    try {
      if (!formState.name || !formState.description) return;
      const video = { ...formState };
      setVideos([...videos, video]);
      setFormState(initialState);
      await API.graphql(graphqlOperation(createVideo, { input: video }));
    } catch (err) {
      console.log("error creating video:", err);
    }
  }

  return (
    <div style={styles.container}>
      <h2>Amplify Videos</h2>
      <button
        style={styles.uploadButton}
        className="cloudinary-button"
        onClick={showWidget}
      >
        Upload Video
      </button>
      <input
        onChange={(event) => setInput("name", event.target.value)}
        style={styles.input}
        value={formState.name}
        placeholder="Name"
        required
      />
      <input
        onChange={(event) => setInput("description", event.target.value)}
        style={styles.input}
        value={formState.description}
        placeholder="Description"
      />

      <button style={styles.button} onClick={addVideo}>
        Add Video to List
      </button>
      {videos.map((video, index) => (
        <div key={video.id ? video.id : index} style={styles.video}>
          <p style={styles.videoName}>{video.name}</p>
          <p style={styles.videoDescription}>{video.description}</p>
          <div style={styles.vids}>
            <video controls muted width="320" height="240">
              <source
                src={video.cloudinary.secure_url}
                type="video/mp4"
              ></source>
            </video>
          </div>
        </div>
      ))}
    </div>
  );
};

const styles = {
  vids: {
    maxWidth: "800px",
  },
  container: {
    width: 400,
    margin: "0 auto",
    display: "flex",
    flexDirection: "column",
    justifyContent: "center",
    padding: 20,
  },
  video: { marginBottom: 15 },
  input: {
    border: "none",
    backgroundColor: "#ddd",
    marginBottom: 10,
    padding: 8,
    fontSize: 18,
  },
  videoName: { fontSize: 20, fontWeight: "bold" },
  videoDescription: { marginBottom: 0 },
  button: {
    backgroundColor: "black",
    color: "white",
    outline: "none",
    fontSize: 18,
    padding: "12px 0px",
  },
  uploadButton: { margin: "22px" },
};

export default App;
Be sure to update your GraphQL by adding Cloudinary’s JSON:
type Video @model {
  id: ID!
  name: String!
  description: String
  cloudinary: AWSJSON
}
type Query {
  cloudinarysignature(msg: String): String @function(name: "cloudinarysignature-${env}")
}
Follow these three simple steps:
1. Build your app. Type:
npm run build
2. Add the hosting capability. Type:
amplify add hosting
Respond to the two prompts that are displayed as follows:

3. Push the content to the web. Type:
amplify publish


That URL at the bottom, https://dev.d2hxdxps86f74m.amplifyapp.com/, is your new app. Feel free to rename it with a custom domain.
Here’s a demo of the app. Also, the tutorial Getting Started With AWS Amplify is a handy reference.
A few suggestions:
- Add the Cloudinary JavaScript loader to spotlight the actual video.
- Add an authentication process to restrict the publishing privilege to the authorized people only.
- Instead of uploading videos with the Cloudinary upload widget, upload to S3 and then update with the Cloudinary SDK from a Lambda trigger.
- For a real-time feel whenever changes occur, update the list through a subscription model.