
In Part 1 of this two-part article, we’ll set up Supabase, Cloudinary, and our backend for data consumption with security. In Part 2, we’ll put everything together by looking at our Next.js 13 repository made for this article and its authentication concepts.
Ensure you have Node.js version 16.4 or above to make Next.js 13 work.
- Clone down my GitHub repository locally. Once cloned, CD into the project directory.
- In your terminal, run these following commands:
npm installnpm install @supabase/auth-helpers-nextjs @supabase/supabase-jsnpm install -D encoding
- Once you do that, create a
.env.local filein the root of your project and add these keys and values, and paste the values in from your Supabase account accordingly. (These are the two values we saved from setting up Supabase in Part 1.) NEXT_PUBLIC_SUPABASE_URL=
NEXT_PUBLIC_SUPABASE_ANON_KEY=
In order to have Next.js optimize images from Cloudinary and use the server actions, which is currently experimental, we’ll set these in our next.config.js file in the root of the project:
/** @type {import('next').NextConfig} */

const nextConfig = {

  images: {

    domains: ["res.cloudinary.com"],

  },

  experimental: {

    serverActions: true,

  },

};

module.exports = nextConfig;
Code language: JavaScript (javascript)Let’s go do a high-level overview of the new features of Next.js 13 before we dive into the project.
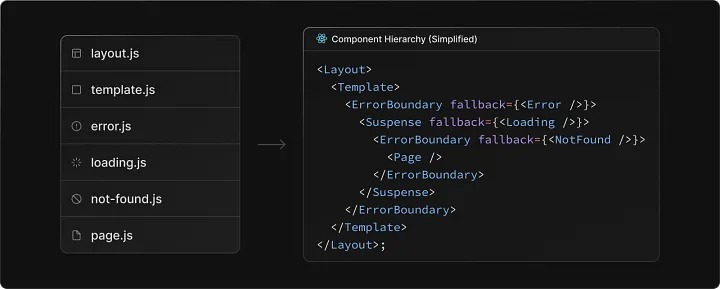
Next.js 13 introduced the new App Router built on top of React Server Components with support for layouts, nested routing, loading states, error handling, and more.
Next.js 13 now gives you the ability to control component states very easily and at a granular level.
Here’s the component hierarchy in a folder:
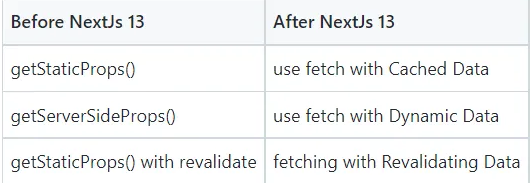
We used to use special functions like getServerSideProps for real-time data and getStaticProps for cached data before Next.js 13 was introduced.
Next.js 13 has removed these functions and replaced them with these fetching formats that are built on top of the native fetch API.
With cache data, Next.js will only do the actual HTTP request once, at the build time. The next time we load the page, Next.js will reply with the initial data and won’t do the request again.
//This request would be cached until manually invalidated.

//Similar to 'getStaticProps'

fetch(API_URL, { cache: 'force-cache' })

//Note :- Use this type of fetching for data that does not change often.
Code language: JavaScript (javascript)When we want to run a new request for each page load, we can use the “no-store” value for the “cache” parameter.
// This request should be refetched on every request.

// Similar to 'getServerSideProps'

fetch(API_URL, { cache: 'no-store' })

//Note :- Use this for data that needs to be updated at each page load.
Code language: JavaScript (javascript)We can achieve a mix between Dynamic Data and Cached Data if we use the revalidate flag:
// This request should be cached with a lifetime of 10 seconds.

// Similar to 'getStaticProps' with the 'revalidate' option.

fetch(API_URL, { next: { revalidate: 10 } });

//Use this for the case when we have data that changes, but now very often.
Code language: JavaScript (javascript)
Below is a comparison for before Next.13 and after:
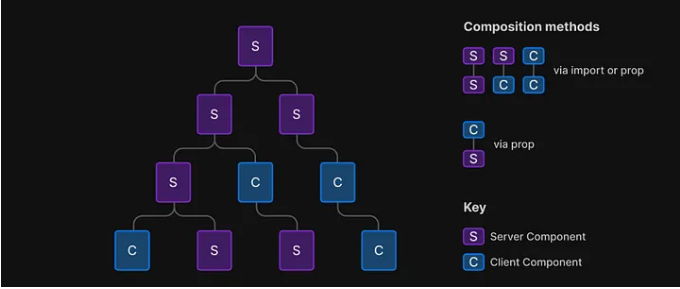
Each component by default are server components. The main benefits of this is the JS bundle is smaller and the rehydration process is quicker since there are fewer components to render on the client.
The other benefit by defaulting and rendering the work on the server is the security aspect of it, which directly relates to our article. You can use access tokens, API keys, and any sensitive information on a server component and it won’t be exposed in the client.
You can combine both as well when interactivity is needed and using client components is a must. Here’s a diagram per the Next.js docs:
There are other features of Next.js 13 that we won’t go over in this article, so please refer to their docs for a complete in depth overview.
Now that we’ve set up our repository, installed the necessary dependencies, and gone over the Next.js 13 features, let’s dive into the code and focus on a few files that make this app work with authentication.
The first file we want to discuss is the AuthForm.jsx file located at app/(auth):
"use client";

import { useState } from "react";

export default function AuthForm({ handleSubmit }) {

  const [email, setEmail] = useState("");

  const [password, setPassword] = useState("");

  return (

    <form onSubmit={(e) => handleSubmit(e, email, password)}>

      <label>

        <span>Email:</span>

        <input

          type="email"

          onChange={(e) => setEmail(e.target.value)}

          value={email}

          required

        />

      </label>

      <label>

        <span>Password:</span>

        <input

          type="password"

          onChange={(e) => setPassword(e.target.value)}

          value={password}

          required

        />

      </label>

      <button className="btn-primary">Submit</button>

    </form>

  );

}
Code language: JavaScript (javascript)
At the top of the file, we have the Next.js 13 directive “use client,” which tells Next.js that this will be a client-side component. In this case, we’ll need to handle this component on the client, since we’re rendering a form for email and password input. When the form is submitted, it handles the state using the React hook useState and the handleSubmit prop.
Once we have this reusable component, we can now import and reuse this in our login and signup route segments. Because we’re using Supbase as our backend, we have the createClientComponent function from that auth helper library specifically for Next.js 13, as you can see here at app/(auth)/login/page.jsx:
"use client";

import { useState } from "react";

import { useRouter } from "next/navigation";

import { createClientComponentClient } from "@supabase/auth-helpers-nextjs";

// components

import AuthForm from "../AuthForm";

export default function Login() {

  const router = useRouter();

  const [error, setError] = useState("");

  const handleSubmit = async (e, email, password) => {

    e.preventDefault();

    setError("");

    const supabase = createClientComponentClient();

    const { error } = await supabase.auth.signInWithPassword({

      email,

      password,

    });

    if (error) {

      setError(error.message);

    }

    if (!error) {

      router.push("/");

    }

  };

  [];

  return (

    <main>

      <h2 className="text-center">Login</h2>

      <AuthForm handleSubmit={handleSubmit} />

      {error && <div className="error">{error}</div>}

    </main>

  );

}
Code language: JavaScript (javascript)
The signup page is similar as well using the client side directive and handling the login and signup on the client with Supabase.
Let’s turn our attention now to the dashboard folder. Within this folder, navigate to (dashboard)/create/CreateForm.jsx:
import SubmitButton from "@/app/components/SubmitButton";

import { addTicket } from "../actions";

export default function CreateForm() {

  return (

    <form action={addTicket} className="w-1/2">

      <label>

        <span>Title:</span>

        <input required type="text" name="title" />

      </label>

      <label>

        <span>Body:</span>

        <textarea required type="text" name="body" />

      </label>

      <label>

        <span>Image URL:</span>

        <textarea required type="text" name="image" />

      </label>

      <label>

        <span>Priority:</span>

        <select name="priority">

          <option value="low">Low Priority</option>

          <option value="medium">Medium Priority</option>

          <option value="high">High Priority</option>

        </select>

      </label>

      <SubmitButton />

    </form>

  );

}
Code language: JavaScript (javascript)
This is a form that allows permission to authenticated users to add content and image URL to the site and supabase backend. The feature that we want to focus on is the server components and the use of server side rendering. Traditionally, this would have been a client side component in Next.js, handling state and events on the browser, but notice that we have neither a useState hook nor do we have an event handler.
Instead, we have a prop called action and we pass in the addTicket function that comes from our actions.js file. The actions.js file has the directive “use server” that tells Next.js to run this function on the server. So, we’re utilizing a pure server component functionality in Next.js with a nested client component that comes from the SubmitButton.jsx file.
This is where the benefits of rendering files, as we stated on the server, come with only the hydration and bundle we need in JavaScript on the client becomes minimal. Those are the keys we’ll focus on in this article. There are a few other files and features in this repository that I encourage you to take a look at in the Next.js 13 documentation to gain more familiarity.
Authentication is an important part of apps and sites. In this article, we used Cloudinary, Supabase, and Next.js 13 to create an app that allows authenticated users to register, log in, read authenticated content, and create content with images.
Here’s the complete Auth app in action that you should see when you run the `npm run` build then `npm run start` and copy an image URL from Cloudinary with some content into your Next.js 13/Supabase app:
I hope you now have a better understanding of how you can combine Cloudinary with authentication. As always, I look forward to seeing what you build out there on the web! Sign up for a free Cloudinary account today to get started.