A timeline visually represents the work required to finish our project. It displays the dates that each activity was completed so we can monitor our progress. On the other hand, it may also convey what’s required to achieve deadlines, helping assignees and stakeholders manage their expectations and assign priorities to projects in the long term.
In this blog post, we’ll build a timeline tracker with Cloudinary and Xata in a Next.js application.
It’s important to note that timeline trackers come in various forms and serve multiple purposes. Tools like Google Maps Timeline can track places visited, offering functionality for mileage logs, while apps like Timelines provide insights into time management through interactive timelines and charts. In Excel, timelines can be created with sub-events, offering a structured event-tracking approach. This post focuses on a custom-built solution, but understanding the broader landscape of timeline tracking tools, such as Toggl Plan, Timely, and Monday, can help tailor a solution to specific needs.
Check out the live demo and the GitHub Repository.
Cloudinary provides a secure and comprehensive API for uploading media files fast and efficiently from the server side, the browser, or a mobile application. We can upload media assets using Cloudinary’s REST API or client libraries (SDKs) which makes integrating with websites and mobile apps more accessible.
Xata is a serverless data platform that enables us to manage, scale, prevent downtime, cache, and maintain our database to improve our development workflow. Additionally, it offers a relational database, an effective search engine, and much more.
Before getting started with this tutorial, we should have the following:
- Basic understanding of ES6 Javascript features
- NodeJs installed in our PC
- Knowledge of React and React hooks
- Yarn or NPM package manager
To proceed, let us clone the starter project in our preferred directory with the git command below:
git clone https://github.com/Olanetsoft/Timeline-Tracker-with-Cloudinary-Xata-and-NextJs/tree/starter
Code language: PHP (php)
Run the following command to install all dependencies using the yarn package manager.
yarn && yarn dev
Or Run the following command to install all dependencies using the npm package manager to start the project on http://localhost:3000.
npm install && npm run dev
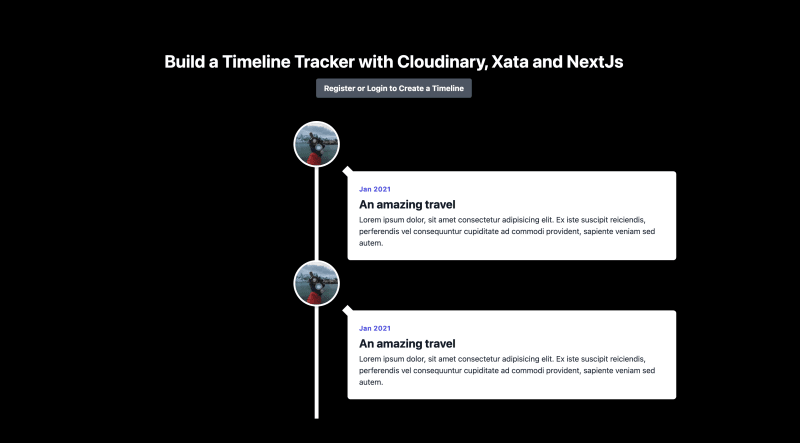
We should have something similar to what we have below.
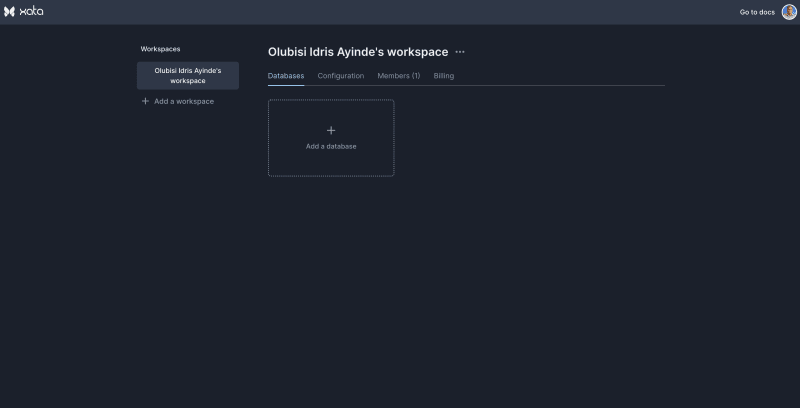
In this section, we will set up a Xata profile by signing up for a new account or log in. We will get redirected to our dashboard after successful sign-up, as shown below.
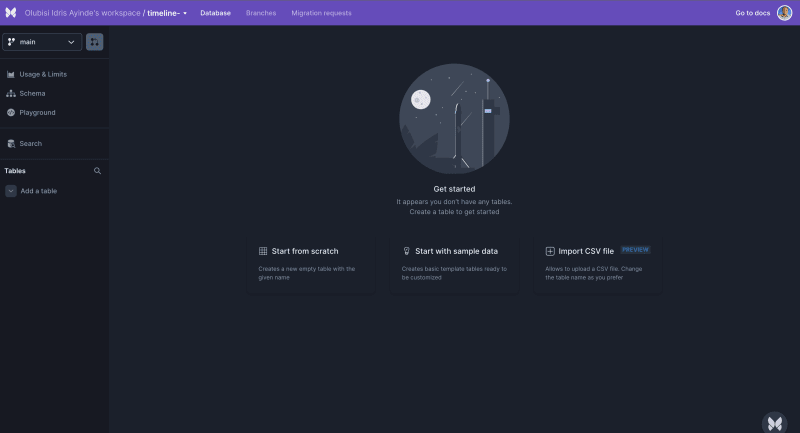
Next, we will click Add a database, enter our preferred database name*, and* click create. We will be redirected to the database page similar to what is shown below.
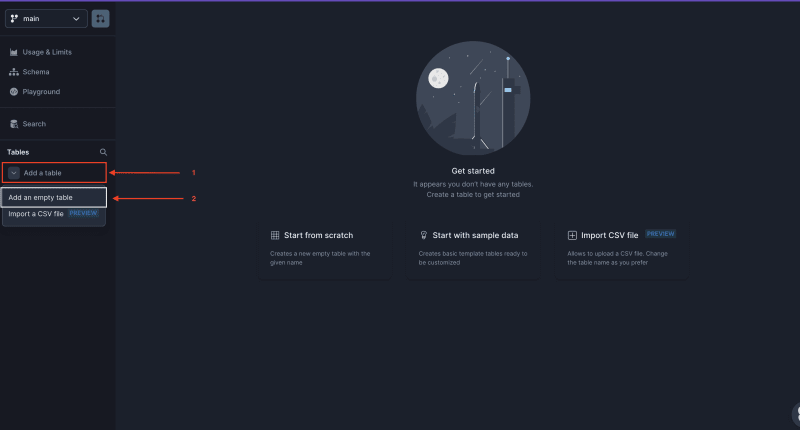
We will create a table called users to save all the records of users that signed up on our platform, as shown below.
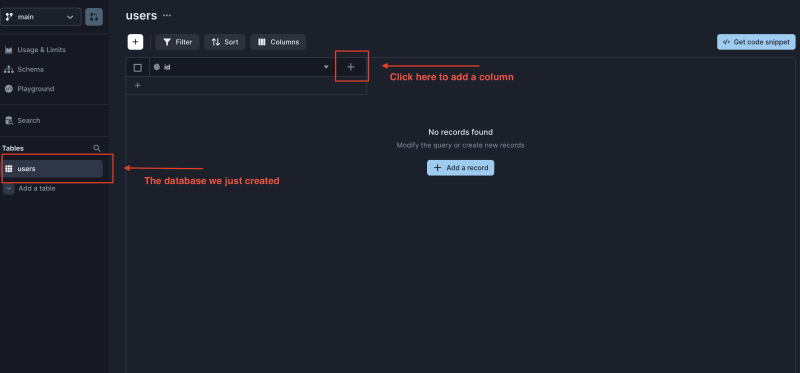
Add the following columns to the users table:
| Column Name | Data Type | Unique |
|---|---|---|
| firstName | String | [ ] |
| lastName | String | [ ] |
| [x] | ||
| password | String | [ ] |
We will repeat the above process to create a new table called timelines with the following columns:
| Column Name | Data Type | Unique | Table |
|---|---|---|---|
| title | String | [ ] | – |
| description | String | [ ] | – |
| timeline | String | [ ] | – |
| image_url | String | [ ] | – |
| user | link | [ ] | users table |
Next, we will connect our app to the remote Xata database we created using the following command below.
# Install the Xata CLI globally
npm i -g @xata.io/cli
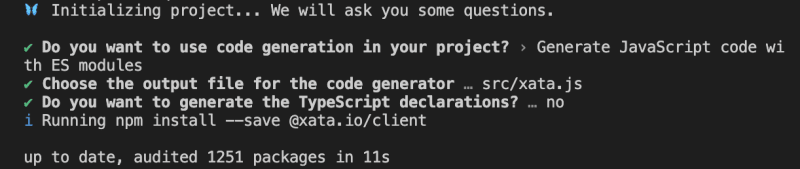
Code language: PHP (php)After installing the Xata CLI globally, we will use the following command to initiate the database instance locally.
xata init --db https://Olubisi-Idris-Ayinde-s-workspace-s.us-east-1.xata.sh/db/timeline
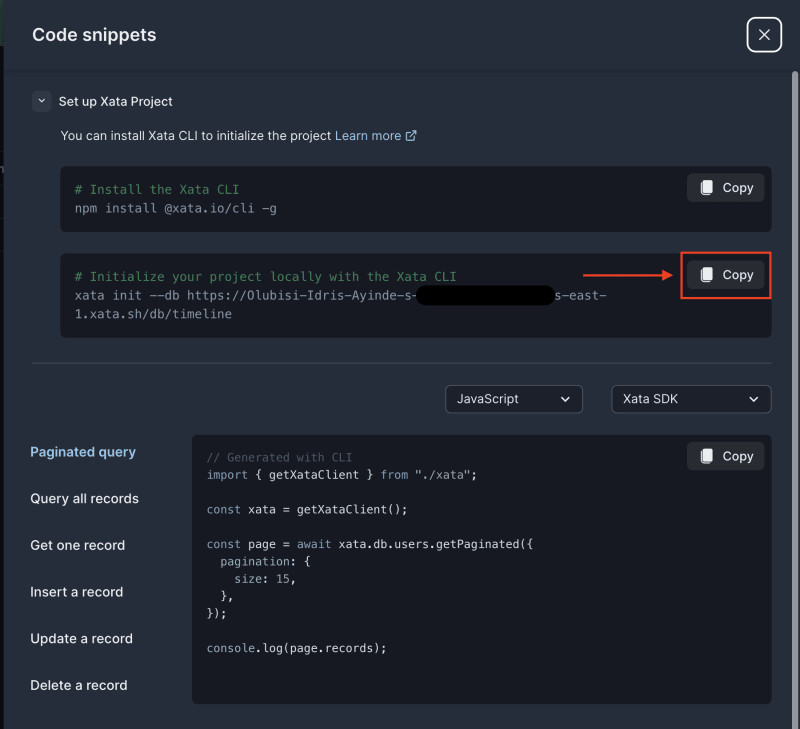
Code language: JavaScript (javascript)To get the above code snippet for our database, go to the user’s table and click Get code snippet, as shown below.

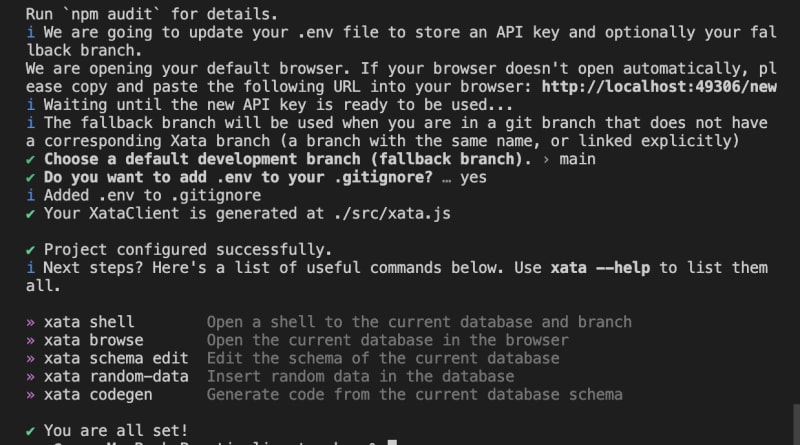
after running the command to initialize the project; we will see a prompt asking us to select a few configurations. Let us choose the following.
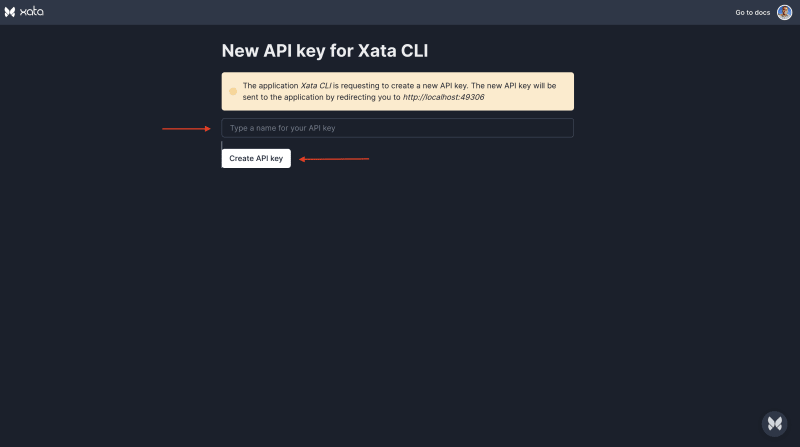
Our browser automatically opens up to set a name for the API key, as shown below. Feel free to choose your preferred name.
On our terminal, we can accept other prompts to add .gitignore and .env, as shown below.
In the root of our project, we will see an env file with our XATA_API_KEY and XataClient inside the directory /src/xata.js.
We have successfully configured Xata in our project.
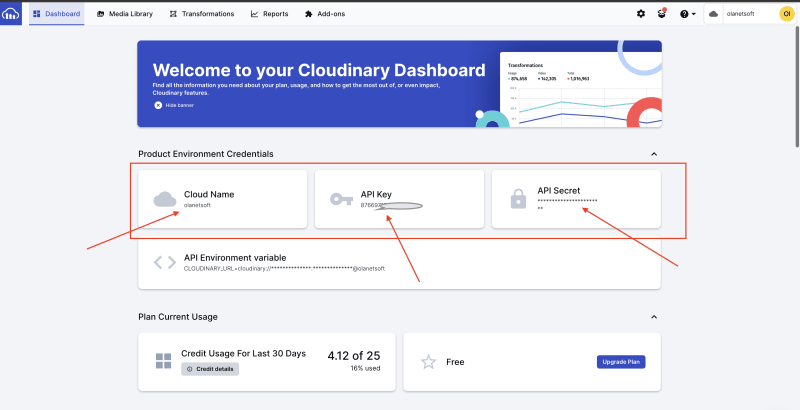
We will be using Cloudinary’s upload media assets. Create a free Cloudinary account to obtain Cloud Name, API Key, and API Secret.
Update the .env file in the root directory of our project.
CLOUDINARY_CLOUD_NAME= '*********************'
CLOUDINARY_API_KEY='****************************'
CLOUDINARY_SECRET= "****************************"
Code language: JavaScript (javascript)
Stop the application from running in the terminal and run yarn dev or npm run dev to restart the server.
In this section, we will implement user authentication functionality to help users register and login on to our application to create a timeline.
Inside the pages/api/ directory, update the register.js file with the following code snippet.
# pages/api/register.js

import { getXataClient } from "../../src/xata";
import { promisify } from "util";
import bcrypt from "bcryptjs"; // bcrypt to hash user password

// Hash password with bcrypt
const hash = promisify(bcrypt.hash);

// initialize XataClient function
const xata = getXataClient();

export default async function register(req, res) {
 // Get user data from request body
 const { firstName, lastName, email, password } = req.body;

 // Fetch user from database using email address as unique identifier if it exists
 const userExist = await xata.db.users.filter({ email }).getFirst();

 // If user exists, return error
 if (userExist) {
     res.status(400);
     throw new Error("User already exists"); // throw error if user with email already exists
 }

 // Create a new user in the database
 const user = await xata.db.users.create({
     firstName,
     lastName,
     email,
     password: await hash(password, 10),
  });

 res.json({ message: "Success" });
   if (!user) {
   res.status(400);
   throw new Error("Invalid user data");
  }
}
Code language: PHP (php)
In the code snippet above, we:
- Created a function called
registerwithreqandresas a parameter - Extracted
firstName, lastName, email, and passwordfrom the request body - Check if a user already exists using their email address
- Hash the user’s password using the bycrypt package
- Create a new user record in our database using the Xata client
getXataClientand return asuccessmessage if the user doedoesn’tist
Next, please navigate the register.js file under the /pages directory and update it with the following code snippet.
import React, { useState } from "react";
import { useRouter } from "next/router";
import Navbar from "../components/Navbar";

const Register = () => {
  const router = useRouter();
  const [firstName, setFirstName] = useState("");
  const [lastName, setLastName] = useState("");
  const [email, setEmail] = useState("");
  const [password, setPassword] = useState("");
  const [error, setError] = useState("");
  const [loading, setLoading] = useState(false);

  const handleSubmit = async (e) => {
    e.preventDefault();
    setLoading(true);

    console.log("Submitting form");
    console.log(email, password, firstName, lastName);

    await fetch("/api/register", {
      method: "POST",
      headers: {
        "Content-Type": "application/json",
      },
      body: JSON.stringify({
        firstName,
        lastName,
        email,
        password,
      }),
    })
      .then((res) => res.json())
      .then((data) => {
        console.log(data);
        if (data.error) {
          setError(data.error);
        } else {
          router.push("/login");
        }
      });

    setLoading(false);
  };

  return (
    <div className="container mx-auto flex justify-center items-center h-screen">
      <div className="w-full max-w-xs bg-white rounded-lg shadow-md overflow-hidden mx-10">
        <h1 className="text-3xl font-bold text-center text-gray-700 mb-4 mt-6">
          Register
        </h1>

        <form
          className="bg-white shadow-md rounded px-8 pt-6 pb-8 mb-4"
          onSubmit={handleSubmit}
        >
          <div className="mb-4">
            <input
              className="form-control block w-full px-2 py-2 text-l font-normal text-gray-700 bg-white bg-clip-padding border border-solid border-gray-300 rounded transition ease-in-out m-0 focus:text-gray-700 focus:bg-white focus:border-blue-600 focus:outline-none mt-2 mb-8"
              type="text"
              name="firstName"
              placeholder="First Name"
              value={firstName}
              onChange={(e) => setFirstName(e.target.value)}
              required
            />

            <input
              className="form-control block w-full px-2 py-2 text-l font-normal text-gray-700 bg-white bg-clip-padding border border-solid border-gray-300 rounded transition ease-in-out m-0 focus:text-gray-700 focus:bg-white focus:border-blue-600 focus:outline-none mt-2 mb-8"
              type="text"
              name="lastName"
              placeholder="Last Name"
              value={lastName}
              onChange={(e) => setLastName(e.target.value)}
              required
            />

            <input
              className="form-control block w-full px-2 py-2 text-l font-normal text-gray-700 bg-white bg-clip-padding border border-solid border-gray-300 rounded transition ease-in-out m-0 focus:text-gray-700 focus:bg-white focus:border-blue-600 focus:outline-none mt-2 mb-8"
              id="email"
              type="email"
              placeholder="Email"
              onChange={(e) => setEmail(e.target.value)}
              value={email}
              required
            />

            <input
              className="form-control block w-full px-2 py-2 text-l font-normal text-gray-700 bg-white bg-clip-padding border border-solid border-gray-300 rounded transition ease-in-out m-0 focus:text-gray-700 focus:bg-white focus:border-blue-600 focus:outline-none mt-2 mb-6"
              id="password"
              type="password"
              placeholder="Password"
              onChange={(e) => setPassword(e.target.value)}
              value={password}
              required
            />

            <button
              className="bg-blue-500 hover:bg-blue-700 text-white font-bold py-2 px-4 rounded focus:outline-none focus:shadow-outline mt-4 mb-4"
              type="submit"
              disabled={loading}
            >
              {loading ? "Loading..." : "Register"}
            </button>
            {error && <p className="text-red-500">{error}</p>}

            <p className="text-center text-gray-500 text-xs">
              <a
                className="text-blue-500 hover:text-blue-700 no-underline hover:underline cursor-pointer text-md mt-6"
                href="/login"
              >
                Already have an account? Login here.
              </a>
            </p>
          </div>
        </form>
      </div>
    </div>
  );
};

export default Register;
Code language: JavaScript (javascript)
In the code snippet above, the handleSubmit function sends the user data to the register API we created earlier, allowing us to create a new user in our database.
Let’s head over to the Navber.js file in the components/ directory and update it with the following code snippet.
import Head from "next/head";
import Image from "next/image";
import Link from "next/link";
import { useRouter } from "next/router";

const Navbar = ({ isAuthenticated }) => {
  const router = useRouter();

  return (
    <div className="relative container mx-auto px-6 flex flex-col space-y-2">
      <div className="flex flex-col space-y-4 pb-10">
        <header className="flex flex-col items-center justify-center space-y-4">
          <h1 className="text-4xl font-bold text-center">
            <Link href="/" className="text-white-600 hover:text-gray-400">
              Build a Timeline Tracker with Cloudinary, Xata and NextJs
            </Link>
          </h1>
          {isAuthenticated ? (
            <button
              className="bg-gray-600 hover:bg-gray-700 text-white font-bold py-2 px-4 rounded focus:outline-none focus:shadow-outline"
              type="button"
              onClick={() => {
                router.push("/upload");
              }}
            >
              Add New Timeline
            </button>
          ) : (
            <button
              className="bg-gray-600 hover:bg-gray-700 text-white font-bold py-2 px-4 rounded focus:outline-none focus:shadow-outline"
              type="button"
              onClick={() => {
                router.push("/register");
              }}
            >
              Register or Login to Create a Timeline
            </button>
          )}
        </header>
      </div>
    </div>
  );
};

export default Navbar;
Code language: JavaScript (javascript)
In the code snippet above, we added isAuthenticated props and a check to only display Register or Login to Create a Timeline when a user is not logged in.
Next, we can update the index.js under the pages/ directory with the following code snippet to implement the isAuthenticated data and retrieve all the timeline records created in our database.
import Head from "next/head";
import Image from "next/image";
import Link from "next/link";
import { useRouter } from "next/router";
import Navbar from "../components/Navbar";
import styles from "../styles/Home.module.css";

import { getXataClient } from "../src/xata";

export default function Home({ records, isAuthenticated }) {
  const router = useRouter();
  const userId = router.query.userId; // retrieve userId

  return (
    <div className={styles.container}>
      <Head>
        <title>Build a Timeline Tracker with Cloudinary, Xata and NextJs</title>
        <meta name="description" content="Generated by create next app" />
        <link rel="icon" href="/favicon.ico" />
      </Head>

      <main className={styles.main}>
        <div className="relative container mx-auto px-6 flex flex-col space-y-2">
          <Navbar isAuthenticated={isAuthenticated} userId={userId} />

          <div className="relative right-40">
            <div className="absolute z-0 w-2 h-full bg-white shadow-md inset-10 left-17 md:mx-auto md:right-0 md:left-0"></div>
            {records.map((record, index) => {
              return (
                <div className="relative z-10" key={index}>
                  <Image
                    src={record.image_url}
                    alt=""
                    className="timeline-img"
                    width={100}
                    height={100}
                  />
                  <div className="timeline-container">
                    <div className="timeline-pointer" aria-hidden="true"></div>
                    <div className="bg-white p-6 rounded-md shadow-md">
                      <span className="font-bold text-indigo-600 text-sm tracking-wide">
                        {record.timeline}
                      </span>
                      <h1 className="text-2xl font-bold pt-1 text-gray-900">
                        {record.title}
                      </h1>
                      <p className="pt-1 text-gray-800">{record.description}</p>
                    </div>
                  </div>
                </div>
              );
            })}
          </div>
        </div>
      </main>
    </div>
  );
}

export const getServerSideProps = async (context) => {
  let isAuthenticated;
  context.req.cookies["token"]
    ? (isAuthenticated = true)
    : (isAuthenticated = false);

  const xata = getXataClient();

  const records = await xata.db.timelines
    .select(["*", "user.firstName", "user.lastName"])
    .sort("title", "desc")
    .getAll();

  return { props: { records, isAuthenticated } };
};
Code language: JavaScript (javascript)
Heading over to our browser, we should have something similar to what is shown below. In the following section, we will implement the Login functionality.

Similar to registering users on our platform, we will validate and log them into our system after registration. Let’s update login.js in the pages/api directory with the following code snippet.
import cookie from "cookie";
import { getXataClient } from "../../src/xata";
import { promisify } from "util";
import bcrypt from "bcryptjs";
import jwt from "jsonwebtoken";
import { use } from "react";

// compare password with bcrypt
const compare = promisify(bcrypt.compare);

// initialize XataClient
const xata = getXataClient();

// Hash password with bcrypt
const KEY = "Our_Super_Secret_JWT_Key_For_Xata";

// Login
const Login = async (req, res) => {
  // Get user data from request body
  const { email, password } = req.body;

  // Fetch user from database using email address as unique identifier if it exists
  const user = await xata.db.users.filter({ email }).getFirst();

  // compare password
  const passwordsMatch = compare(password, user.password);

  if (passwordsMatch) {
    const token = jwt.sign({ email, password }, KEY); // create token

    // Set multiple item in cookie
    res.setHeader(
      "Set-Cookie",
      cookie.serialize("token", token, {
        httpOnly: true,
        secure: "development",
        sameSite: "strict",
        maxAge: 60 * 60 * 24, // 1 day
        path: "/",
      }) +
        cookie.serialize("userId", user.id, {
          httpOnly: true,
          secure: "development",
          sameSite: "strict",
          maxAge: 60 * 60 * 24, // 1 day
          path: "/",
        })
    );

    // return userId
    res.json({ userId: user.id });
  } else {
    res.status(401);
    throw new Error("Invalid email or password");
  }
};

export default Login;
Code language: JavaScript (javascript)
In the code snippet above, we:
- Created a function called
loginwithreqandresas a parameter - Extracted
email and passwordfrom the request body - Check if a user already exists using their email address from the Xata database
- Compare the hashed user’s
passwordusing the bycrypt package - Save the user token and Id in cookies to be used later in the tutorial
Next, we will update the login.js file in the pages/ directory.
import React, { useState } from "react";
import { useRouter } from "next/router";

const Login = () => {
  const router = useRouter();
  const [email, setEmail] = useState("");
  const [password, setPassword] = useState("");
  const [error, setError] = useState("");
  const [loading, setLoading] = useState(false);

  const handleSubmit = async (e) => {
    e.preventDefault();
    console.log("Submitting form");
    console.log(email, password);
    await fetch("/api/login", {
      method: "POST",
      headers: {
        "Content-Type": "application/json",
      },
      body: JSON.stringify({
        email,
        password,
      }),
    })
      .then((res) => res.json())
      .then((data) => {
        console.log(data);
        if (data.error) {
          setError(data.error);
        } else {
          router.push("/");
        }
      });

    setLoading(false);
  };

  return (
    <div className="container mx-auto flex justify-center items-center h-screen">
      <div className="w-full max-w-xs bg-white rounded-lg shadow-md overflow-hidden mx-10">
        <h1 className="text-3xl font-bold text-center text-gray-700 mb-4 mt-6">
          Sign In
        </h1>
        <form
          className="bg-white shadow-md rounded px-8 pt-6 pb-8 mb-4"
          onSubmit={handleSubmit}
        >
          <div className="mb-4">
            <input
              className="form-control block w-full px-2 py-2 text-l font-normal text-gray-700 bg-white bg-clip-padding border border-solid border-gray-300 rounded transition ease-in-out m-0 focus:text-gray-700 focus:bg-white focus:border-blue-600 focus:outline-none mt-2 mb-8"
              type="email"
              name="email"
              placeholder="Email"
              value={email}
              onChange={(e) => setEmail(e.target.value)}
              required
            />

            <input
              className="form-control block w-full px-2 py-2 text-l font-normal text-gray-700 bg-white bg-clip-padding border border-solid border-gray-300 rounded transition ease-in-out m-0 focus:text-gray-700 focus:bg-white focus:border-blue-600 focus:outline-none mt-2 mb-8"
              type="password"
              name="password"
              placeholder="Password"
              value={password}
              onChange={(e) => setPassword(e.target.value)}
              required
            />

            <button
              className="bg-blue-500 hover:bg-blue-700 text-white font-bold py-2 px-4 rounded focus:outline-none focus:shadow-outline"
              type="submit"
              disabled={loading}
            >
              {loading ? "Loading..." : "Login"}
            </button>

            {error && <p className="text-red-500 text-xs italic">{error}</p>}

            <p className="text-center text-gray-500 text-sm mt-6">
              <a
                className="text-blue-500 hover:text-blue-700 no-underline hover:underline cursor-pointer text-md mt-6"
                href="/register"
              >
                Don't have an account? Register here
              </a>
            </p>
          </div>
        </form>
      </div>
    </div>
  );
};

export default Login;
Code language: JavaScript (javascript)In the previous steps, we successfully implemented user authentication; we will proceed in this section to implement the upload functionality to allow logged-in users to create timelines.
In the upload.js file under the pages/api directory, let’s update it with the following code snippet.
import { getXataClient } from "../../src/xata";
import cookie from "cookie";

// import cloudinary
import { v2 } from "cloudinary";

// Cloudinary config
v2.config({
  cloud_name: process.env.CLOUDINARY_CLOUD_NAME,
  api_key: process.env.CLOUDINARY_API_KEY,
  api_secret: process.env.CLOUDINARY_SECRET,
});

const xata = getXataClient();

const uploader = async (req, res) => {
  const cookies = cookie.parse(req.headers.cookie || "");

  // check if user is authenticated
  const isAuthenticated = cookies.token;
  if (!isAuthenticated) {
    console.log("not authenticated");
    res.status(401).end();
    return;
  }

  const { title, description, timeline, image } = JSON.parse(req.body);

  const result = await v2.uploader.upload(image, {
    // upload to cloudinary
    auto_tagging: 0.6,
  });

  await xata.db.timelines.create({
    title,
    description,
    user: cookies.userId,
    image_url: result.secure_url,
    timeline,
  });
  res.status(200).json(result);
};

export default uploader;

// Allow only a specific size limit
export const config = {
  api: {
    bodyParser: {
      sizeLimit: "10mb",
    },
  },
};
Code language: JavaScript (javascript)
In the code snippet above, we implemented an API that allows users to create a new timeline, upload it to Cloudinary and save it into our Xata database.
Next, we will update the upload.js file in the pages/ directory to consume the upload API we just implemented with the following code snippet.
import React, { useState } from "react";
import { useRouter } from "next/router";

const Upload = () => {
  const router = useRouter();
  const [title, setTitle] = useState("");
  const [description, setDescription] = useState("");
  const [timeline, setTimeline] = useState("");
  const [file, setFile] = useState(null);
  const [error, setError] = useState("");
  const [loading, setLoading] = useState(false);

  function handleOnChange(changeEvent) {
    const reader = new FileReader(); // create new reader to read image file as a data URL
    reader.onload = function (onLoadEvent) {
      setFile(onLoadEvent.target.result); // save base64 encoded version of image
    };
    reader.readAsDataURL(changeEvent.target.files[0]);
  }

  const handleSubmit = async (e) => {
    e.preventDefault();

    setLoading(true);

    console.log("Submitting form...");

    await fetch("/api/upload", {
      method: "POST",
      body: JSON.stringify({
        title,
        description,
        timeline,
        image: file,
      }),
    })
      .then((res) => res.json())
      .then((data) => {
        console.log(data);
        if (data.error) {
          setError(data.error);
        } else {
          router.push("/");
        }
      });

    setLoading(false);
  };

  return (
    <div className="container mx-auto flex justify-center items-center h-screen">
      <div className="w-full max-w-xs bg-white rounded-lg shadow-md overflow-hidden mx-10">
        <h1 className="text-3xl font-bold text-center text-gray-700 mb-4 mt-6">
          Create Timeline
        </h1>
        <form
          className="bg-white shadow-md rounded px-8 pt-6 pb-8 mb-4"
          onSubmit={handleSubmit}
        >
          <input
            className="form-control block w-full px-2 py-2 text-l font-normal text-gray-700 bg-white bg-clip-padding border border-solid border-gray-300 rounded transition ease-in-out m-0 focus:text-gray-700 focus:bg-white focus:border-blue-600 focus:outline-none mt-2 mb-8"
            type="text"
            name="Title"
            placeholder="Title"
            value={title}
            onChange={(e) => setTitle(e.target.value)}
            required
          />

          <input
            className="form-control block w-full px-2 py-2 text-l font-normal text-gray-700 bg-white bg-clip-padding border border-solid border-gray-300 rounded transition ease-in-out m-0 focus:text-gray-700 focus:bg-white focus:border-blue-600 focus:outline-none mt-2 mb-8"
            type="text"
            name="Description"
            placeholder="Description"
            value={description}
            onChange={(e) => setDescription(e.target.value)}
            required
          />

          <input
            className="form-control block w-full px-2 py-2 text-l font-normal text-gray-700 bg-white bg-clip-padding border border-solid border-gray-300 rounded transition ease-in-out m-0 focus:text-gray-700 focus:bg-white focus:border-blue-600 focus:outline-none mt-2 mb-8"
            type="date"
            name="Date"
            placeholder="Date"
            value={timeline}
            onChange={(e) => setTimeline(e.target.value)}
            required
          />

          <div className="mb-4">
            <input
              className="form-control block w-full px-2 py-2 text-l font-normal text-gray-700 bg-white bg-clip-padding border border-solid border-gray-300 rounded transition ease-in-out m-0 focus:text-gray-700 focus:bg-white focus:border-blue-600 focus:outline-none mt-2 mb-8"
              type="file"
              name="file"
              onChange={handleOnChange}
              required
            />
          </div>
          <button
            className="bg-blue-500 hover:bg-blue-700 text-white font-bold py-2 px-4 rounded focus:outline-none focus:shadow-outline"
            type="submit"
            disabled={loading}
          >
            {loading ? "Loading..." : "Submit"}
          </button>
          {error && <p className="text-red-500 text-xs italic">{error}</p>}
        </form>
      </div>
    </div>
  );
};

export default Upload;
Code language: JavaScript (javascript)
Testing our application, we should have something similar to this.
This blog post teaches us how to build a timeline tracker using Cloudinary, Xata, and Next.js. Try Cloudinary for yourself and sign up for a free account today.