
When you watch a YouTube video, at the end, some cards appear on the screen suggesting other videos to watch. This article is going to walk through managing video events to create a similar experience for videos in React.js.
We completed this project in a Codesandbox and it’s also available on GitHub. Fork it to run the project or get started quickly.
GitHub URL: https://github.com/folucode/YouTube-post-video-overlay/tree/main/

## Prerequisite

To follow through with this article, we need to have an understanding of JavaScript and React.js.


## Project Setup

[Node](https://nodejs.org/en/) and its package manager [npm](https://www.npmjs.com/) are required to initialize a new project.

Using `npm` would require that we download the package to our computer before using it, but `npm` comes with an executor called `npx`.  You can [find more information on using npx here](https://docs.npmjs.com/cli/v7/commands/npx).

`npx` stands for Node Package Execute. It allows us to execute any package that we want from the `npm` registry without installing it.

To install Node, we go to the [Node](https://nodejs.org/en/)[js](https://nodejs.org/en/) [website](https://nodejs.org/en/), download the Node version for our Operating system and follow the installation instructions. After we successfully installed the software, we should be able to verify Node.js by checking the installed version from the command line using the command below:

```bash
    node -v
    v14.7.1
The result shows the version of Node.js we installed on our computer. In the above example, we have node at version 14.7.1.
create-react-app is the package we would use to generate a new react application. It is the official node package for creating react applications.
We use the command below to create a new application:
npx create-react-app youtube-overlay-app
The above command will create a new React.js application called youtube-overlay-app.
Cloudinary provides a rich media management experience enabling users to upload, store, manage, manipulate, and deliver images and video for websites and applications.
Due to the performance benefits of serving images from an optimized Content Delivery Network, we’ll use images stored on Cloudinary.
We’ll utilize the Cloudinary-react package to render Cloudinary videos on a page. We Install the cloudinary-react package in the project using npm by running the following command in the project’s root directory:
npm i cloudinary-react
With installations completed, we’ll start the react application using the command below:
npm start
Once run, the command spins up a local development server which we can access on http://localhost:3000.
In the “App.js” file in the “src” folder, we clear all the boilerplate code and then replace it with the code below that renders a Cloudinary video.
    import { Video, CloudinaryContext } from "cloudinary-react";

    export default function App() {
      return (
        <div className="App">
          <div className="video-area">
            <CloudinaryContext cloudName="chukwutosin">
              <Video
                publicId="samples/elephants"
                controls
                muted
                width="500px"
              />
            </CloudinaryContext>
          </div>
        </div>
      );
    }
Code language: JavaScript (javascript)
First, we imported the Video component that renders the video onto the page and CloudinaryContext. This component takes props of any data we want to make available to its child Cloudinary components.
The cloudName prop is your Cloudinary cloud name which you can get from your Cloudinary dashboard once you create a Cloudinary Account.
Cloudinary offers a great free tier which is enough for all our development needs.
We use the Video component to render a 500px wide video player , having controls, and is muted on playback. We then pass a prop called publicId, which is the public ID of the video you want to render. A public ID is a unique identifier for a media asset stored on Cloudinary.
The rendered video should look like this:

We can seamlessly access the methods and properties of the video element using the innerRef prop provided by the cloudinary-react package.
By creating a reference using React’s useRef() hook and assigning it to the innerRef property, we can utilize the properties and methods of the underlying video element. Subsequently, all the video element’s available properties and methods will be on the .current property of the ref.
We create a ref and assign it with:
    import { Video, CloudinaryContext } from "cloudinary-react";
    import { useRef } from "react"; // change 1

    export default function App() {
      const videoRef = useRef(); // change 2

      return (
        <div className="App">
          <div className="video-area">
            <CloudinaryContext cloudName="chukwutosin">
              <Video
                publicId="samples/elephants"
                controls
                muted
                width="500px"
                innerRef={videoRef} // change 3
              />
            </CloudinaryContext>
          </div>
        </div>
      );
    }
Code language: JavaScript (javascript)When the video playback starts and ends, we listen to both events and trigger specific actions.
Using React’s useEffect hook, we’ll update the state of the video player stored in the component’s state.
We create the state variable and the effects with:
    import { Video, CloudinaryContext } from "cloudinary-react";
    import { useRef, useEffect, useState } from "react";

    export default function App() {
      const [videoEnded, setVideoEnded] = useState(false);
      const videoRef = useRef();

      useEffect(() => {
        const video = videoRef.current;
        video.onplay = () => {
          setVideoEnded(false);
        };

        video.onended = () => {
          setVideoEnded(true);
        };
      }, []);
      return (
        // render component here
      );
    }
Code language: JavaScript (javascript)
First, we created a state variable to hold a value for when the video playback finishes.
We listen for the onended and onplay events of the video In the useEffect hook. Next, we update the videoEnded variable to true if the video completes playing and false if it resumes playing.
The videoEnded state variable will be used in a condition to render the video overlay.
We start by creating a component to house the overlay that we would show. Next, we create a new file called ‘Card.js’ in src and paste it into the code below.
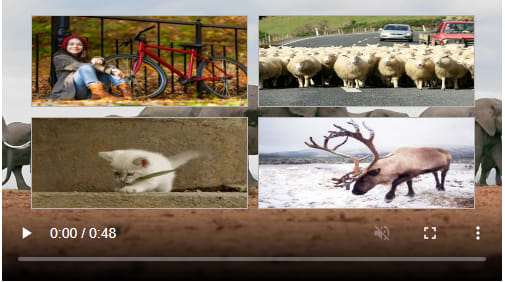
    const data = [
      {
        alt: "bike",
        link: "https://www.youtube.com/watch?v=6uq3P7zeYyU",
        thumbnail:
          "https://res.cloudinary.com/chukwutosin/image/upload/v1590019494/samples/bike.jpg"
      },
      {
        alt: "sheep",
        link: "https://www.youtube.com/watch?v=7w8K8GHs5Aw",
        thumbnail:
          "https://res.cloudinary.com/chukwutosin/image/upload/v1590019492/samples/sheep.jpg"
      },
      {
        alt: "kitten-playing",
        link: "https://www.youtube.com/watch?v=4SnUsJOpw74",
        thumbnail:
          "https://res.cloudinary.com/chukwutosin/image/upload/v1590019500/samples/animals/kitten-playing.gif"
      },
      {
        alt: "reindeer",
        link: "https://www.youtube.com/watch?v=ujxRTqqQODY",
        thumbnail:
          "https://res.cloudinary.com/chukwutosin/image/upload/v1590019491/samples/animals/reindeer.jpg"
      }
    ];

    const Card = () => (
      <div className="card">
        {data.map((element, index) => (
          <span className="column">
            <a key={index} href={element.link}>
              <img alt={element.alt} src={element.thumbnail} />
            </a>
          </span>
        ))}
      </div>
    );
    export default Card;
Code language: JavaScript (javascript)
data is an array of Objects with information for each card we want to overlay on the video element. Then, we made a functional component where we looped through each object in the data array and rendered a thumbnail image wrapped in a link.
We would need to add a stylesheet to customize the overlay on the video element. We do this by deleting the boilerplate styles in the index.css file and adding the following styles:
    .App {
      font-family: Cambria, Cochin, Georgia, Times, "Times New Roman", serif;
      text-align: center;
      margin: 0;
      padding: 0;
      width: auto;
      height: 100vh;
    }
    h3 {
      color: rgb(46, 44, 44);
    }
    .video-area {
      position: relative;
      width: 500px;
      margin: auto;
      left: calc(50% — 200px);
    }
    .card {
      left: 50%;
      margin-left: -250px;
      width: 500px;
      position: absolute;
      z-index: 1;
      background: rgba(0, 0, 0, 0.6);
    }
    .column {
      float: left;
      text-align: center;
      border: solid 1px rgb(180, 179, 179);
      width: 45%;
      margin: 2.3%;
      height: 85px;
      opacity: 1;
    }
    img {
      height: 100%;
      width: 100%;
    }
Code language: CSS (css)
After that, we import both files, ‘Card.js’ and ‘index.css’ into the ‘App.js’ file using:
    import "./index.css";
    import Card from "./Card";

    // the rest of the content goes here...
Code language: JavaScript (javascript)
With the overlay cards completed, we will show the overlay or hide it depending on the state of the videoEnded variable, either true or false.
In App.js, we include a conditional render block to show or hide the <Card/> component.
    // code before return statement...
      return (
        <div className="App">
          <h1>Building YouTube-style post-video overlay CTA</h1>
          <h3>
            This is a demo of how to build a simple clone of the YouTube post video
            overlay
          </h3>
          {videoEnded && <Card />}
          <div className="video-area">
            <CloudinaryContext cloudName="chukwutosin">
              <Video
                publicId="samples/elephants"
                controls
                muted
                width="500px"
                innerRef={videoRef}
              />
            </CloudinaryContext>
          </div>
        </div>
      );
    }
Code language: JavaScript (javascript)
With this, once the video playback completes, the videoEnded variable is set to true, and the cards overlays on the video. Each card can link to a CTA of our choice. Here’s what it looks like below.
This article addressed utilizing video events to create youtube-styled call-to-action cards on a video once playback ends. This technique is employed to increase conversion on a video’s call to actions.
You may find these resources helpful.