
I recall registering for one of the previous editions of the Next.js conference and seeing animation on the landing page with participants’ avatars joyously floating around.
In this article, we will recreate that animation using anime.js and React. A registration form will be displayed when the website loads. This form will contain four elements: an input field for the user’s name, a button for uploading an avatar, a checkbox that the user selects to indicate whether or not the avatar should be displayed on the page, and a submit button.
Cloudinary will handle image uploads and display. You will need a Cloudinary account so create one here if you do not already have one. We will use antd for UI components in our application.
Here is a link to the demo CodeSandbox.
Create a new React app using the following command:
npx create-react-app floating_avatars
Next, add the project dependencies using the following command:
    npm install animejs antd @ant-design/icons cloudinary-react axios
Code language: CSS (css)
Next, we need to import the CSS for antd. To do this, add the following to the App.css file in your src directory:
    @import "~antd/dist/antd.css";
Code language: CSS (css)
Next, we need to create some environment variables to hold our Cloudinary details. We will be sending images to Cloudinary via unsigned POST requests for this tutorial. To do this, we need our account cloud name and an unsinged upload preset. Create a new file called .env at the root of your project and add the following to it:
    REACT_APP_CLOUD_NAME = YOUR CLOUD NAME HERE
    REACT_APP_UPLOAD_PRESET = YOUR UNSIGNED UPLOAD PRESET KEY HERE
This will be used as a default when the project is set up on another system. To update your local environment, create a copy of the .env file using the following command:
    cp .env .env.local
Code language: CSS (css)
By default, this local file is added to .gitignore and mitigates the security risk of inadvertently exposing secret credentials to the public. You can update .env.local with your Cloudinary cloud name and generated upload preset.
Next, create a file named cloudinaryConfig.js in your src folder. This file will access the environment variables and prevent repeated process.env. calls throughout the project. Add the following to your cloudinaryConfig.js file:
    export const cloudName = process.env.REACT_APP_CLOUD_NAME;
    export const uploadPreset = process.env.REACT_APP_UPLOAD_PRESET;
    export const uploadTag = "floating_avatar_registration";
Code language: JavaScript (javascript)
In addition, we declared a constant named uploadTag. This will be attached to the uploaded images with the user’s permission to display in the floating avatars.
To help with requests to the Cloudinary API, create a new file called api.js and add the following to it:
    import axios from "axios";
    import { cloudName, uploadPreset, uploadTag } from "./cloudinaryConfig";
    export const getAvatarResources = ({ successCallback }) => {
      axios
        .get(`https://res.cloudinary.com/${cloudName}/image/list/${uploadTag}.json`)
        .then((response) => successCallback(response.data.resources));
    };
    export const uploadFile = ({ file, successCallback, addTag }) => {
      const url = `https://api.cloudinary.com/v1_1/${cloudName}/image/upload`;
      const data = new FormData();
      data.append("file", file);
      data.append("upload_preset", uploadPreset);
      if (addTag) {
        data.append("tags", uploadTag);
      }
      axios
        .post(url, data, {
          headers: {
            "Content-Type": "multipart/form-data",
          },
        })
        .then((response) => successCallback(response.data));
    };
Code language: JavaScript (javascript)
In the getAvatarResources function, we use the Client-side asset lists feature to retrieve the list of images with our set tag. To ensure that this feature is available on your Cloudinary account, you must ensure that the Resource list option is enabled. By default, the list delivery type is restricted.
The uploadFile function uploads the selected avatar to Cloudinary. With the selected file, a boolean flag named addTag and a callback function in the event of a successful upload, the uploadFile function makes a POST request to Cloudinary, providing the file and the upload preset we defined earlier. If the value of addTag is set to true, a tag is attached to the request to include the avatar in the animation(s) on the index page.
Create a new folder called components in your src directory. In the src/components directory, create a new file called AvatarSelector.js and add the following to it:
    import { Button, Upload } from "antd";
    import { UploadOutlined } from "@ant-design/icons";
    const AvatarSelector = ({ setUploadedFile, isUploading }) => {
      const props = {
        name: "file",
        onRemove: () => {
          setUploadedFile(null);
        },
        beforeUpload: (file) => {
          setUploadedFile(file);
          return false;
        },
        showUploadList: false,
        maxCount: 1,
      };
      return (
        <Upload {...props}>
          <Button icon={<UploadOutlined />} loading={isUploading}>
            Click to Upload
          </Button>
        </Upload>
      );
    };
    export default AvatarSelector;
Code language: JavaScript (javascript)
The AvatarSelector component takes two props:
-
setUploadedFile– this callback function is used to update the application state with the latest image uploaded by the user. -
isUploading– This flag is used to set the status of the upload button. If this value istrue, it indicates that the currently selected image is being uploaded to Cloudinary.
By returning false in the beforeUpload method, we disable the Upload component’s default behavior, which uploads the selected file to a provided URL. We also restrict the maximum number of files to 1.
In your src/component folder, create a new file called FloatingAvatars.js and add the following to it:
    import { useEffect, useRef } from "react";
    import anime from "animejs";
    import { cloudName, uploadPreset } from "../util/cloudinaryConfig";
    import { Image, Transformation } from "cloudinary-react";
    const FloatingAvatars = ({ avatars }) => {
      const refs = useRef([]);
      const windowHeight = window.innerHeight;
      const windowWidth = window.innerWidth;
      const animation = () => {
        anime({
          targets: refs.current,
          translateY: () => anime.random(0, windowHeight / 2),
          translateX: () => anime.random(0, windowWidth / 2),
          easing: "easeInOutSine",
          duration: 5000,
          loop: true,
          direction: "alternate",
          complete: animation,
        });
      };
      useEffect(() => {
        animation();
      });
      const getRandomNumber = (min, max) => Math.random() * (max - min) + min;
      const randomTop = () => getRandomNumber(0, windowHeight / 2);
      const randomLeft = () => getRandomNumber(0, windowWidth / 2);
      return avatars.map((avatar, index) => (
        <div
          key={index}
          ref={(el) => (refs.current[index] = el)}
          style={{
            position: "absolute",
            top: `${randomTop()}px`,
            left: `${randomLeft()}px`,
          }}
        >
          <Image
            publicId={`${avatar.public_id}.png`}
            cloudName={cloudName}
            upload_preset={uploadPreset}
            secure={true}
          >
            <Transformation width={50} height={50} gravity="face" crop="thumb" />
            <Transformation radius="max" />
            <Transformation effect="trim" />
          </Image>
        </div>
      ));
    };
    export default FloatingAvatars;
Code language: JavaScript (javascript)
This component takes a list of Cloudinary image resources, renders them in random positions, and applies the specified animation. The Image and Transformation components from the Cloudinary-react package are used to dynamically generate a 50px by 50px rounded image focusing on the face. The image is also automatically converted to png format as specified, allowing the trimmed section’s background to be transparent (instead of white).
The animation function targets the rendered images and animates them along a random course. This is done by generating random values for the translateX and translateY properties of the anime function.
Update your src/App.js with the following:
    import "./App.css";
    import { Button, Card, Checkbox, Col, Form, Input, message } from "antd";
    import AvatarSelector from "./components/AvatarSelector";
    import { useEffect, useState } from "react";
    import FloatingAvatars from "./components/FloatingAvatar";
    import { getAvatarResources, uploadFile } from "./utils/api";
    function App() {
      const [avatars, setAvatars] = useState([]);
      const [uploadedFile, setUploadedFile] = useState(null);
      const [isUploading, setIsUploading] = useState(false);
      useEffect(() => {
        getAvatarResources({ successCallback: setAvatars });
      }, []);
      const onFinish = (values) => {
        setIsUploading(true);
        const showUploadedAvatar = values.showAvatar || false;
        uploadFile({
          file: uploadedFile,
          successCallback: (data) => {
            setIsUploading(false);
            if (showUploadedAvatar) {
              setAvatars((oldAvatars) => [...oldAvatars, data]);
            }
            message.success(`Welcome ${values.username}!!!`);
          },
          addTag: showUploadedAvatar,
        });
      };
      const onFailedSubmission = (errorInfo) => {
        console.log("Failed:", errorInfo);
      };
      return (
        <div className="App" style={{ margin: "5%" }}>
          <Card style={{ margin: "auto", width: "50%" }}>
            <Form
              onFinish={onFinish}
              onFinishFailed={onFailedSubmission}
              autoComplete="off"
            >
              <Form.Item
                label="Username"
                name="username"
                rules={[
                  {
                    required: true,
                    message: "Please input your username",
                  },
                ]}
              >
                <Input />
              </Form.Item>
              <Col span={16} offset={9}>
                <AvatarSelector setUploadedFile={setUploadedFile} />
              </Col>
              <Form.Item
                name="showAvatar"
                valuePropName="checked"
                wrapperCol={{ offset: 9, span: 16 }}
              >
                <Checkbox>Show my avatar</Checkbox>
              </Form.Item>
              <Form.Item wrapperCol={{ offset: 10, span: 16 }}>
                <Button type="primary" htmlType="submit" loading={isUploading}>
                  Submit
                </Button>
              </Form.Item>
            </Form>
          </Card>
          <FloatingAvatars avatars={avatars} />
        </div>
      );
    }
    export default App;
Code language: JavaScript (javascript)
In this component, we create three state variables:
-
avatarsholds the list of Cloudinary resources to be rendered by theFloatingAvatarscomponent. -
uploadedFileholds the file uploaded using theAvatarSelectorcomponent. -
isUploadingis used to show a loading animation on theAvatarSelectorand submit button when the user completes the form.
We are calling the getAvatarResources function we declared in api.js in a useEffect hook and providing the setAvatars function as a callback if the API call is successful. This way, the avatars array is populated with the list of Cloudinary resources.
We also render a form with a single field for the username, a checkbox with which the user can indicate whether or not they would like their avatar to be displayed. The AvatarComponent is also rendered to allow the user to select an avatar. Finally, we rendered the FloatingAvatars component, passing in the necessary props.
The onFinish function is called when the Submit button is clicked. This function handles the upload of the selected file using the uploadFile function we declared in the api.js file. On a successful upload, if the user selected the Show my avatar checkbox, the returned resource is added to the array of Cloudinary resources, and the newly uploaded image is displayed on the screen.
Using the following command, start your application on http://localhost:3000/.
npm run dev
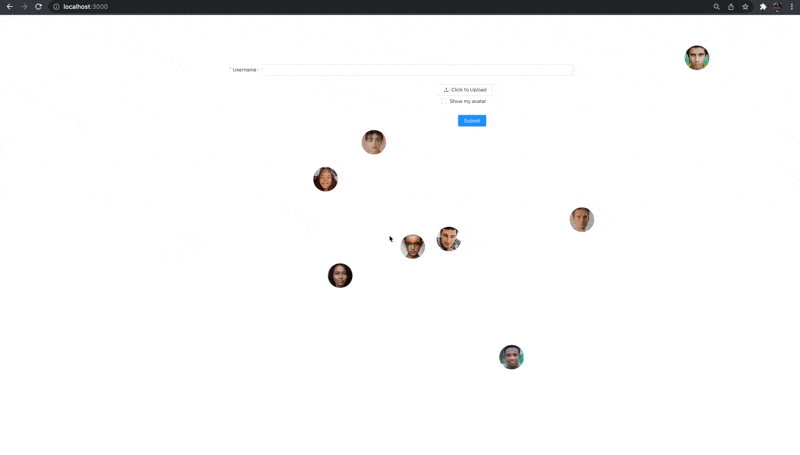
The final result will look like the gif shown below.
Find the complete project here on GitHub.
In this article, we looked at how to animate floating avatars using the anime.js library. Additionally, we looked at how to use Cloudinary to handle the upload and storage of media, the dynamic transformation, and the rendering of images in a developer-friendly manner. Finally, using antd, we generated a clean and intuitive user interface with minimal code and styling.
Resources you may find helpful: