
There are many JavaScript frameworks on the market today, and Svelte is one of the most exciting. Unlike other frameworks like React or Vue that do most of their work at runtime, Svelte compiles your component code for maximum efficiency and performance. It often scores highly in industry surveys — developers who use it enjoy using it, and developers who don’t are interested in learning it.
In this article, we’ll explain what you need to know to get started with Svelte and how you can optimize your images with Cloudinary for even more performant Svelte apps.
Let’s understand the key features that set Svelte apart.
- Compiled components. Svelte’s main innovation is shifting the work of a framework to compile-time instead of runtime. Instead of writing component code that directly runs in the user’s browser, your components are compiled ahead of time so the browser can do as little work as possible. This means that Svelte apps on average have smaller bundle sizes, since they don’t need to ship a heavy framework runtime to the browser.
- Simple state management. Managing state with Svelte is about as simple as you can get. To declare a piece of state, you create a variable with
letand reference it in your component’s template.
```svelte
<script>
    let name = 'world';
</script>

<h1>Hello {name}!</h1>
```
Code language: HTML, XML (xml)
Then, to update the state, assign to it and the component will update automatically.
```svelte
<h1>Hello {name}!</h1>
<button on:click={() => {
    name = 'folks'
}}>Update name</button>
```
Code language: HTML, XML (xml)
Behind the scenes, the Svelte compiler will wire things up so that assigning to the name variable updates the correct place in the DOM. Updating state like this is only possible because Svelte is a compiler. There isn’t a way in regular JavaScript to make assigning to a variable like this trigger an update to the DOM. But because Svelte is a compiler, it can design a more enjoyable component authoring experience instead of being constrained by what’s possible in regular JavaScript.
The upcoming release of Svelte 5 will introduce a new reactivity model with runes, allowing you to extend Svelte’s reactivity outside of components.
- Minimal boilerplate. Svelte values a component authoring experience that lets you write less code. As we saw above, updating state is as simple as assigning to a variable. Svelte also includes features like two-way binding to simplify controlling form inputs and reactive declarations that make it easy to derive state.
- Batteries included. Building web apps is more than just reactive components. Svelte aims to handle common web app concerns beyond reactivity, so it also includes solutions for:
- Scoped styling.
- Animations with
transition:andanimate:directives. - Global state management with stores.
- Form bindings with
bind:value.
In addition, the Svelte team maintains SvelteKit, the official Svelte application framework. SvelteKit includes routing, form handling, API endpoints, server rendering, packaging your app for various deployment platforms, and more features that make it easy to build a complete app with Svelte.
One of the frameworks most unlike Svelte is React. While Svelte components are HTML-first (you write JavaScript inside a HTML-like template language), React components are JavaScript first (you write JSX inside a JavaScript function). In addition, Svelte has a simpler mental model, especially in regards to state management. Svelte’s compile-time approach makes it more efficient at updating the DOM and allows it to ship less code to the browser, but because React doesn’t have a compiler, it gives the most flexibility in how you write your components. Svelte also includes more features out of the box, like scoped styles, stores, and transitions.
Vue is a lot more similar to Svelte. Both frameworks are template first, use a compiler, and include features like scoped styles. However, Svelte uses its compiler much more extensively than Vue does. It also has a much smaller runtime than Vue, though Vue’s runtime is much smaller than that of React. Svelte is also more opinionated — Vue gives you a lot of options for how you write your components (e.g. options vs composition API), while Svelte generally has one way to do things.
Svelte isn’t on the same level usage-wise as more established frameworks like React or Vue, but it has a passionate community and has more than proved itself to be a major contender in the front-end framework space. If you’re interested to learn more about Svelte, take a look at the official Svelte tutorial.
Just like Svelte makes it easy to write a performant web app, Cloudinary complements Svelte by making it easy to include performant images. By hosting your images with Cloudinary, Cloudinary will optimize and serve them to your web app’s users. Some of the optimizations Cloudinary applies include:
- Resizing and compressing the image from its original size, so that it looks good at the specified dimensions while minimizing the file size
- Converting the image to a modern format (like AVIF or WebP) that can reduce the file size further. Cloudinary will serve different formats depending on the browser, since image format support can vary.
In addition, Cloudinary can apply various transformations to your images, such as dynamic cropping, background removal, and overlaying text or images. We’ll see a few examples of these transformations later in the post.
The easiest way to use Cloudinary in your Svelte app is with the svelte-cloudinary package. This package lets you use a Svelte component to display images from Cloudinary instead of writing the Cloudinary URL yourself. For example, instead of constructing the src for this img manually, you can use the <CldImage> component:
```svelte
<h2>With CldImage</h2>
<CldImage
    height={840}
    width={700}
    src="orange-cat"
    alt="An orange cat with its head leaning to one side, looking quizzically at the camera"
/>

<h2>Without CldImage</h2>
<img
    src="https://res.cloudinary.com/dimxnfwwf/image/upload/c_limit,w_700/f_auto/q_auto/orange-cat"
    alt="An orange cat with its head leaning to one side, looking quizzically at the camera"
/>
```
Code language: HTML, XML (xml)
You can also use Cloudinary’s Node.js SDK in your SvelteKit server routes to upload and transform images and manage your media stored in Cloudinary.
Using the <CldImage> component can be as simple as passing a src and the dimensions of the image, but there are all sorts of different customizations you can apply. Let’s see some different ways to use the component in a Svelte app.
You can set a sizes prop to tell the browser what size image to request at different breakpoints. This can help performance by instructing the browser to only download an image that is appropriate for the current screen width.
```svelte
<CldImage
    height={840}
    width={700}
    src="orange-cat"
    alt="An orange cat with its head leaning to one side, looking quizzically at the camera"
    sizes="(min-width: 600px) 33vw,
   		 ((min-width: 300px) and (max-width: 600px)) 50vw,
   		 (max-width: 300px) 100vw"
/>
```
Code language: HTML, XML (xml)
This prop is the same as the sizes attribute on a regular <img>, so see MDN for more details on how it works.
The `CldImage` component will automatically generate the image’s srcset property for you. If you inspect the image in your browser DevTools, you can see the generated srcset with the different images available for the browser to request. Note that the screenshot below truncates the actual attribute value.

Cloudinary can remove the background from your images on the fly if you set the removeBackground prop on the component. You can also set background to apply a solid color background instead.
```svelte
<CldImage
    height={840}
    width={700}
    src="orange-cat"
    alt="An orange cat with its head leaning to one side, looking quizzically at the camera"
    removeBackground
    background="rgb:033F63"
/>
```
Code language: HTML, XML (xml)
To use the removeBackground prop, you need to enable the Cloudinary AI Background Removal add-on.
Cloudinary can also intelligently crop your images. In this example we apply crop="thumb" to crop the image for a thumbnail. By default, the component applies Cloudinary’s “automatic” gravity mode that keeps the most interesting area of the image in frame. In our example, that’s the puppy’s face, even though it’s at the bottom of the picture.
```svelte
<h2>Uncropped image</h2>
<CldImage
    height={600}
    width={400}
    src="white-and-brown-puppy"
    alt="A white and brown puppy looking into the camera."
/>

<h2>Cropped image</h2>
<CldImage
    height={300}
    width={300}
    crop="thumb"
    src="white-and-brown-puppy"
    alt="A white and brown puppy looking into the camera."
/>
```
Code language: HTML, XML (xml)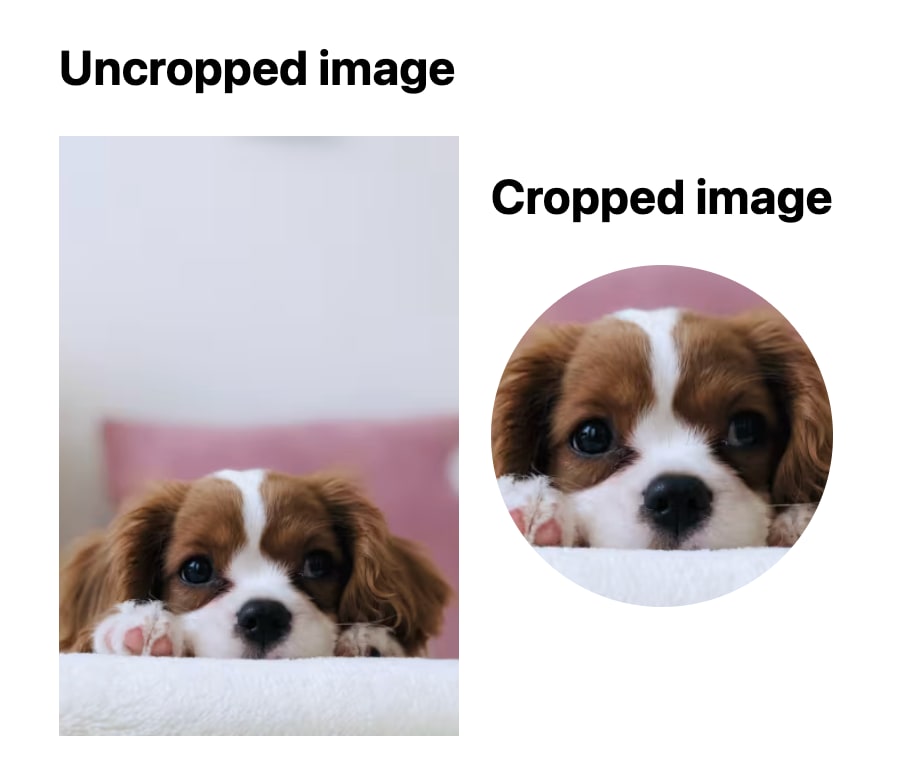
Hopefully this gives you a good idea of the possibilities with Svelte and Cloudinary. For more on Svelte and Cloudinary, check out the following resources:
- The official Svelte tutorial
- Svelte-Cloudinary documentation
- Integrating Cloudinary with Svelte and SvelteKit
- How to Create a Carousel in 3 Ways in Svelte
- Configure the Javascript SDK in Svelte (video tutorial)
- Transform and optimize images in Svelte (video tutorial)
- Upload assets in a SvelteKit app (video tutorial)