
Videos enable us to establish authority and a more personal feel to your message. It enables us to connect with the emotional levels of our audience. React is a great JavaScript library for describing User Interfaces that change over time. To create video content programmatically with React.js
We are going to use an amazing tool called Remotion.
Let’s explore how we can achieve this.
Check out this GitHub Repository for the complete source code.
The final project can be viewed on Codesandbox.
You can find the complete source code on my Github repository.
Below are some requirements you are to meet to follow along with this article:
- Basic knowledge of JavaScript
- Basic knowledge of React.js
In your preferred directory, create a new remotion project using yarn create video
You might want to choose the recommended template but for the purposes of this choose a blank template. Run yarn start This will start the local dev server running. You will see a window like this.
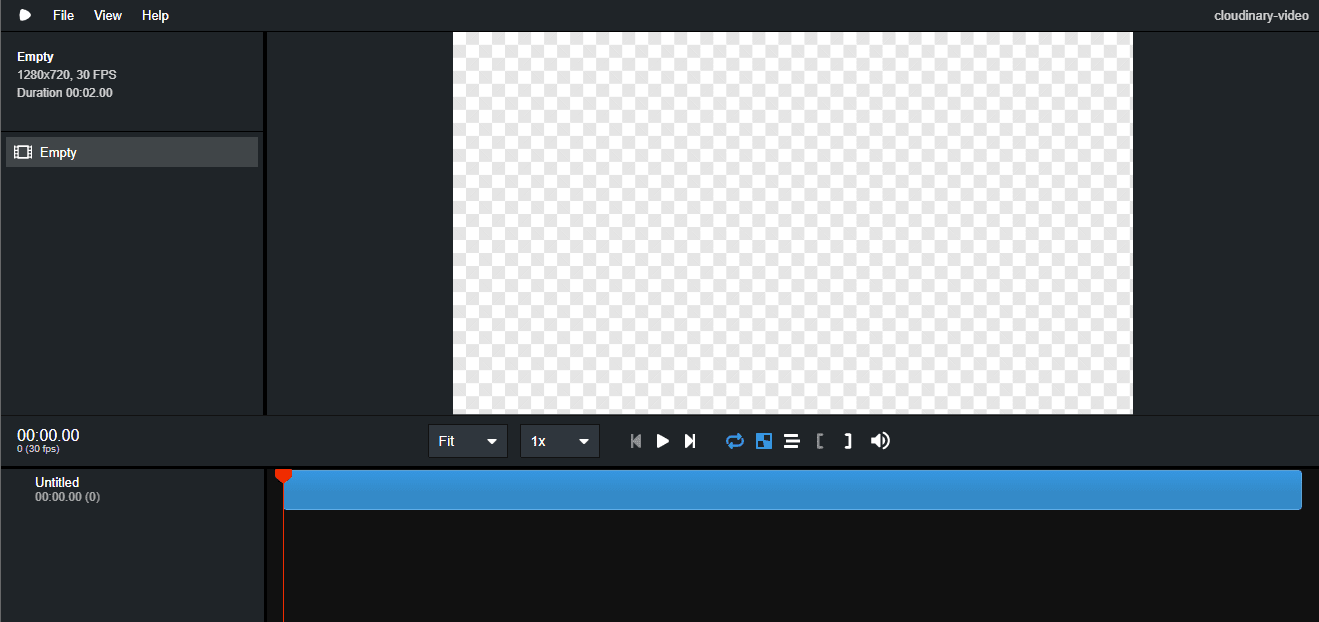 On the left we have a sidebar showing all the compositions for our project which allows you to isolate and inspect each scene in the video. Each composition is a renderable component. Composition is made up of sequences which tell the video which frames to display the content in. The entry point of a remotion project is the
 index.tsx here we call the function registerRoot(RemotionVideo); which is in the Video.tsx
Open the Video.tsx file. This file contains the RemotionVideo component. You can think of this component as your entire video.
export const RemotionVideo: React.FC = () => {
    return (
        <>
            <Composition
                id="Empty"
                component={MyComposition}
                durationInFrames={450}
                fps={30}
                width={1280}
                height={720}
            />
        </>
    );
};
Code language: JavaScript (javascript)
A video is basically made up of one or more compositions. within the composition, we define video properties as the durationInFrames which is the number of frames which the video will take, fps which is the number of frames per second, width and height of the video in pixels.
When we talk of frames you can think of it as a still image at a given point in the video.
The id identifies the composition in the video player and references the component that contains the UI that you want to show. The width and height properties are used to change the resolution of the video e.g., to change the resolution to a portrait
    width={1080}
    height={1920}
The actual length of the video in seconds is based on the fps. durationInFrames / fps = length(s) This implies that for this demo our video is 15 seconds long 450 / 30 = 15.
We are going to create new Main component just below the RemotionVideo component.
const Main = () => {
    return <h1>Welcome to Cloudinary!</h1>
}
Code language: JavaScript (javascript)
To view this on your browser you will have to change the value of the id from id="Empty" to id=" Main" also the component value to component={Main} When you change the id value you will also have to change the package.json file
"build": "remotion render src/index.tsx Empty out/video.mp4"
to have the value of the id
"build": "remotion render src/index.tsx Main out/video.mp4"
Once you open the video player you will see the video with the text Welcome to Cloudinary.
To modify the css styling of your video programmatically use inline CSS.
const Main = () => {
    return (
        <div style={{backgroundColor: 'white', flexGrow: 1}}>
            <h1
                style={{
                    position: 'absolute',
                    top: '50%',
                    width: '100%',
                    textAlign: 'center',
                    fontSize: '5rem',
                }}
            >Welcome to Cloudinary!</h1>
        </div>
    );
};
Code language: JavaScript (javascript)
We can have three components for this particular video the Title, SubTitle and the Image then call them inside the Main component.
const Title = () => {
	return(
        <h1
            style={{
                position: 'absolute',
                top: '50%',
                width: '100%',
                textAlign: 'center',
                fontSize: '5rem',
            }}
        >Welcome to Cloudinary!</h1>
    );
}
const SubTitle = () => {
	return(
        <h3
            style={{
                position: 'absolute',
                top: '60%',
                width: '100%',
                textAlign: 'center',
                fontSize: '3rem',
	    }}
        >Transform images and videos to load faster with no visual degradation, automatically generate image and video variants, and deliver high quality responsive experiences to increase conversions.</h3>
    );
}
Code language: PHP (php)
To add images and render them we have to use Img tag which shoud be imported from Remotion.
import {Composition, Img} from 'remotion';
import cloudinary from './cloudinary.png';
Code language: JavaScript (javascript)
We can then create the Image Component
const Image = () => {
	return(
        <Img
            src={cloudinary} alt='cloudinary'
            style={{
                display: 'block',
                marginLeft: 'auto',
                marginRight: 'auto',
                width: '30%',
                height: '50%',
            }}
        />
    );
}
const Main = () => {
    return (
        <div style={{backgroundColor: 'white', flexGrow: 1}}>
            <Title />
            <Image />
            <SubTitle />
        </div>
    );
};
Code language: JavaScript (javascript)
For now, everything we need for this video is set, but we need to do some animation to make create our video cool and interesting.
To make up our entire video clip we are going to use Sequences, these are small individual sections in finite time that make up our entire video. We then specify the time we from which we want a component to show using from={0} This means it will start to show at the start(0 seconds). You can also specify the time you want the component to disappear using the durationInFrames={60} attribute.
<div style={{backgroundColor: 'white', flexGrow: 1}}>
    <Sequence from={0}>
        <Image />
    </Sequence>
    <Sequence from={60}>
        <Title />
    </Sequence>
    <Sequence from={120}>
    <SubTitle />
    </Sequence>
</div>
Code language: HTML, XML (xml)We can simply add videos using the <Audio /> tag in Remotion. Let’s add a Voice component to render the voice.
import {Composition, Img, Audio} from 'remotion';
import voice from './voice.mp3';
// rest of the code
const AudVoice = () => {
    return (
        <Audio src={voice} startFrom={0} endAt={30*15}/>
    );
};
// other code
Code language: JavaScript (javascript)
Remotion provides a variety of different hooks which enable us to provide data about the video.
useVideoConfig() hook enables us grab data about the
fps,duration in frames,width, andheight. We can use this to calculate values for animating our frames.useCurrentFrame() hook gives us the current frame and the timeline. These frames will be re-rendered for each time in the video.
For now your video player is playing well but we now need to use the data about the video in place of the natural numbers 0, 60 and 90. Import useVideo from remotion.
const Main = () => {
    const {fps, durationInFrames} = useVideoConfig();
    return (
        <div style={{backgroundColor: 'white', flexGrow: 1}}>
            <Sequence from={fps*0.3} durationInFrames={durationInFrames}>
                <Image />
            </Sequence>
            <Sequence from={fps} durationInFrames={durationInFrames}>
                <AudVoice />
            </Sequence>
            <Sequence from={fps} durationInFrames={durationInFrames}>
                <Title />
            </Sequence>
            <Sequence from={fps*2} durationInFrames={durationInFrames}>
                <Subtitle />
            </Sequence>
        </div>
    );
}
Code language: JavaScript (javascript)Let’s make our animation more captivating with a fade in effect. Here we’ll use the useCurrentFrame() hook as shown.
const SubTitle = () => {
	const frame = useCurrentFrame();
	const opacity = frame > 30 ? 1 : frame / 30;
	return(
        <h3
 	style={{
		position: 'absolute',
		top: '60%',
		width: '100%',
		textAlign: 'center',
		fontSize: '3rem',
		opacity
	}}
 >Transform images and videos to load faster with no visual degradation, automatically generate image and video variants, and deliver high quality responsive experiences to increase conversions.</h3>
	);
}
Code language: PHP (php)
useCurrentFrame brings back the current frame which is SubTitle in the context of the sequence.
const frame = useCurrentFrame();
Code language: JavaScript (javascript)
We want the opacity to be zero at the start then as time goes it becomes one. If the frame is greater than 30 then return the opacity as 1. Otherwise, have the opacity as frame/30
const opacity = frame > 30 ? 1 : frame / 30;
Code language: JavaScript (javascript)const Image = () => {
const frame = useCurrentFrame();
const {fps} = useVideoConfig();
const translate = spring({frame, fps, to: 100})
return(
<Img
src={cloudinary} alt='cloudinary'
style={{
display: 'block',
marginLeft: 'auto',
marginRight: 'auto',
width: '30%',
height: '50%',
transform: `translateY(${translate}px)`
}}
/>
);
}
Code language: PHP (php)The spring function makes our component bounce from a point to a point. We’ll get the fps from the hook as shown. The function takes the frame and fps so that it knows how fast to go, from and to tell you how much range you want the outputs to be, and from has a default value of zero.
To build our project run yarn build or npm run build on your terminal. This has a dependency on ffmpeg, the terminal will give you instructions on how to configure it on your machine.
Once done you will find the video inside the out folder of your project.
Click this link to see the end video.
Great! In this article, we managed to create a 15-second video without using any video editing tools just React. It’s amazing how we can create videos using react, right?