
What’s more popular than landing your next tech job? Nothing. And even then, how are you sure you’re doing the right thing? Crafting excellent resumes for your different job interests can be a daunting task without some extra help or automation. In this post, we’ll walk through the process of generating a stellar resume on-demand (PDF) with Cloudinary by supplying only the necessary details via a Next.js form.
Cloudinary offers an end-to-end solution for all our image and video needs, including the upload, storage, administration, transformation, and optimized delivery.
Next.js is a React-based frontend development framework that supports server-side rendering and static site generation.
This post requires the following:
- Experience with JavaScript and react.js
- Installation of Node.js
- A Cloudinary account. Signup is free!
We start by downloading this Canva resume template, and uploading the PDF file to Cloudinary.
Log in to Cloudinary and follow the steps below to upload the file.
-
Click on “Media Library” from the dashboard.
-
Click on the Upload button.
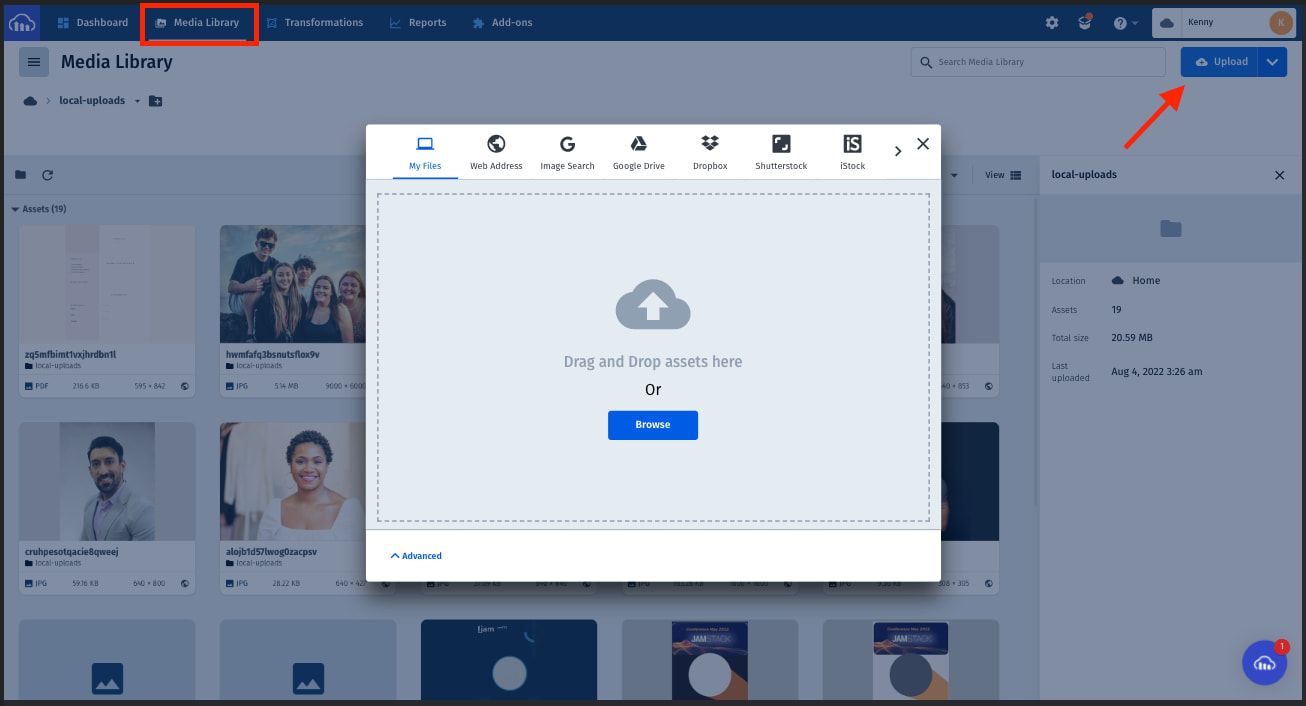
- In the dialog box, navigate to “My Files,” drag and drop the PDF file or browse to its directory to upload them.
After successful upload we should note the file “Public-Id.”; we’ll be using it later.
Run the following command in the terminal to create a new Next.js application:
npx create-next-app resume-generator
The above command creates a starter next.js application in the resume-generator folder.
Next, we’ll navigate into the project directory and start the application with the following commands:
cd resume-generator # to navigate into the project directory
npm run dev # to run the dev server
Next.js will start a live development server at http://localhost:3000.
We’ll start by installing the @cloudinary/url-gen package with the following command:
npm install @cloudinary/url-gen #to access cloudinary SDK in react environment
Next, in the root directory of our project, let’s create a components folder and Form.js file with the following snippets:
    //components/Form.js
    function Form({ userDetails, setUserDetails, handleSubmit }) {
      const {
        firstname,
        lastname,
        email,
        mobile,
        website,
        course,
        role,
        company,
        position,
        school,
        country,
        state,
        interest_1,
        interest_2,
        interest_3,
      } = userDetails;

      const handleChange = (e) => {
        setUserDetails({ ...userDetails, [e.target.name]: e.target.value });
      };

      return (
        //form inputs & Submit button here
      );
    }
    export default Form;
Code language: JavaScript (javascript)
Here:
- We destructured
userDetails,setUserDetails, andhandleSubmitprops that we’ll pass to this component later in the index.js file. - Destructured user information from the
userDetailsand created thehandleChange()function using thesetUserDetailsprop; this function will update the user information with the form input values.
In the return() function of the Form.js component, we:
- Created the form to collect the user information and created a Submit button to submit the information.
- Passed the
handleChange()function and thehandleSubmit()function to the form input and the Submit button, respectively
The complete snippets of the Form.js component are in this GitHub Gist.
Next, let’s clean up the index.js file and update it with the following snippets:
    //pages/index.js
    import Head from "next/head";
    import { useState } from "react";
    import styles from "../styles/Home.module.css";
    import Form from "../components/Form";

    const initialState = {
      email: "",
      phone: "",
      role: "",
      school: "",
      // init more user details (website, course, etc)
    };
    export default function Home() {
      const [userDetails, setUserDetails] = useState(initialState);
      const [showPDF, setShowPDF] = useState(false);

      const handleSubmit = async (e) => {
        e.preventDefault();
        setShowPDF(true);
      };

      return (
        // return statement here
      );
    }
Code language: JavaScript (javascript)
In the above snippets, we:
- Imported
useStatefrom “react” andFormfrom the components folder. - Created
initialStateobject that houses the information expected from a user. - Created
userDetailsandshowPDFconstants and used theuseStatehook to set their values toinitialStateandfalse, respectively. - Created
handleSubmit()function that will update the value of theshowPDFto true.
Next, let’s set up the return() statement in our index.js file to render the form on the browser:
    import Head from "next/head";
    import { useState } from "react";
    import styles from "../styles/Home.module.css";
    import Form from "../components/Form";

    const initialState = {
      // Init user details here
    };
    export default function Home() {
      const [userDetails, setUserDetails] = useState(initialState);
      const [showPDF, setShowPDF] = useState(false);

     // handleSubmit() function here
      return (
        <div className={styles.container}>
          <Head>
            <title>Resume Generator</title>
            <meta name="description" content="Generated by create next app" />
            <link rel="icon" href="/favicon.ico" />
          </Head>
          <main className={styles.main}>
            <Form
              userDetails={userDetails}
              setUserDetails={setUserDetails}
              handleSubmit={handleSubmit}
            />
          </main>
        </div>
      );
    }
Code language: JavaScript (javascript)
Here, we gave the application a title, rendered the Form we imported from the components folder, and passed userDetails, setUserDetails, and handleSubmit as props to it.
In the browser, we should have the application working like below:
Now let’s fetch the resume template we saved earlier and use Cloudinary transformations to overlay the user information on the template.
To achieve that, create a Template.js file inside the components folder with the following snippets.
    // components/template.js
    import { Cloudinary } from "@cloudinary/url-gen";
    import { source } from "@cloudinary/url-gen/actions/overlay";
    import { text } from "@cloudinary/url-gen/qualifiers/source";
    import { TextStyle } from "@cloudinary/url-gen/qualifiers/textStyle";
    import { Position } from "@cloudinary/url-gen/qualifiers";
    import { compass } from "@cloudinary/url-gen/qualifiers/gravity";
    function Home({ userDetails, setUserDetails, setShowPDF, initialState }) {
      const {
        firstname,
        lastname,
        email,
        mobile,
        website,
      // init more user details (school, course, etc)
      } = userDetails;

      const cld = new Cloudinary({
        cloud: {
          cloudName: "CLOUD_NAME",
        },
      });

      const template = cld
        .image("YOUR_IMAGE_URL")
        .addFlag("rasterize");

      return ();
    }
    export default Home;
Code language: JavaScript (javascript)
In the above snippets, we:
- Imported
Cloudinaryand some action qualifiers from “@cloudinary/url-gen.” - Destructured user information from the
userDetailsprop we’ll pass when rendering theTemplate.jscomponent in theindex.jsfile. - Instantiated a new
Cloudinaryinstance with ourcloudName, saved theCloudinaryinstance astemplateconstant, and passed the file public_id we held earlier.
Next, let’s overlay the user information on the PDF file using Cloudinary transformation.
    // components/template.js
    template.overlay(
        source(
          text(`${firstname} ${lastname}`, new TextStyle("Nunito", 60)).textColor(
            "black"
          )
        ).position(
          new Position().gravity(compass("north")).offsetY(200).offsetX(-400)
        )
      );
      //Education Overlay
      template
        .overlay(
          source(text(`${school}`, new TextStyle("Times", 30))).position(
            new Position().gravity(compass("west")).offsetY(50).offsetX(100)
          )
        )
        .overlay(
          source(
            text(`${course}`, new TextStyle("Times", 30)).textColor("gray")
          ).position(
            new Position().gravity(compass("west")).offsetY(120).offsetX(100)
          )
        );
Code language: JavaScript (javascript)
Here, we overlaid the user’s firstname, lastname, and education information onto the template directly from Cloudinary. Next, lets overlay the user’s contact and profile informations:
     // Contacts Overlay
      template
        .overlay(
          source(
            text(`${mobile}`, new TextStyle("Times", 30)).textColor("gray")
          ).position(
            new Position().gravity(compass("west")).offsetY(410).offsetX(100)
          )
        )
        .overlay(
          source(
            text(`${email}`, new TextStyle("Times", 30)).textColor("gray")
          ).position(
            new Position().gravity(compass("west")).offsetY(510).offsetX(100)
          )
        )
        .overlay(
          source(
            text(`${website}`, new TextStyle("Times", 30)).textColor("gray")
          ).position(
            new Position().gravity(compass("west")).offsetY(610).offsetX(100)
          )
        );
      // Profile Overlays
      template
        .overlay(
          source(
            text(
              `I'm ${firstname}  ${lastname},`,
              new TextStyle("Times", 40)
            ).textColor("gray")
          ).position(
            new Position().gravity(compass("north")).offsetY(300).offsetX(200)
          )
        )
        .overlay(
          source(
            text(
              `a ${role} from ${state}, ${country}.`,
              new TextStyle("Times", 30)
            ).textColor("gray")
          ).position(
            new Position().gravity(compass("north")).offsetY(350).offsetX(200)
          )
        );
Code language: JavaScript (javascript)
Repeat this process and overlay the user’s work experience information and any other interests onto the resume template. With all the necessary information overlaid onto the template, our resume is complete. Next, let’s transform it into a downloadable Image that users can access via a URL:
    const pdfTemplate = template.toURL();
      return (
        <div>
          <iframe src={pdfTemplate} width="500" height="778"></iframe>
          <div className="mt-3">
            <button
              onClick={() => {
                setUserDetails(initialState);
                setShowPDF(false);
              }}
              className="btn btn-primary"
            >
              Generate New Resume
            </button>
          </div>
        </div>
      );
Code language: JavaScript (javascript)
Here, we:
- Transformed the
templateto a URL with thetoURL()Cloudinary function and displayed thetemplateinreturn()function. - Created a Generate New Resume button that clears the form so a user can generate a new resume.
We can find the complete snippets of the Template.js in this Github Gist.
Next, let’s import and render the Template.js component inside the index.js page and pass the userDetails to it. Update the index.js like in the below:
    // Other imports here
    import Template from "../components/Template";
    // Init state here

    export default function Home() {
      const [userDetails, setUserDetails] = useState(initialState);
      const [showPDF, setShowPDF] = useState(false);

    // handleSubmit function here

      return (
        <div className={styles.container}>
            // Head tag here
          <main className={styles.main}>
           // Form component here
           {showPDF && (
                <Template
                  userDetails={userDetails}
                  setShowPDF={setShowPDF}
                  setUserDetails={setUserDetails}
                  initialState={initialState}
                />
              )}
          </main>
        </div>
      );
    }
Code language: JavaScript (javascript)
In the above snippet, we import the Template.js file from the components folder, used the showPDF boolean to render it conditionally, and then passed-in the required properties.
In the browser, when a user fills the form and clicks on the Generate Resume button, the resume gets generated with the information the user provided.
This post explored rich Cloudinary transformation APIs and discussed building a resume generator app that collects user information and generates a PDF resume with Next.js.
Cloudinary text overlays might be a helpful resource.