Transformations on 3D models
Last updated: Oct-27-2025
You can apply image transformations on 3D models as described on this page.
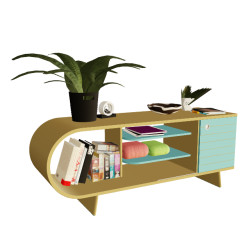
The examples on this page use the following models:
-
CldLogo3D.glb: a GLB file, uploaded as an
imageasset type. -
DamagedHelmet3D.gltz: a zip file, uploaded as an
imageasset type, containing a glTF file and other associated files. -
foyer-table.fbxz: a zip file, uploaded as an
imageasset type, containing an FBX file and other associated files. [© HippoStance] -
cute-kitty.glb: a GLB file, uploaded as an
imageasset type. ["Cute Little Kitty" https://skfb.ly/ospAT by Diskette96 is licensed under Creative Commons Attribution.]
- Upload 3D models with the
imageasset type (see Uploading 3D models for details). - To transform and deliver 3D models, ensure that the Allow delivery of PDF and ZIP files option is enabled in the Security page of your Console Settings.
- Special transformation counts apply to 3D models.
Generating an image from a 3D model
You can generate a single image from a 3D model by setting the format to an image format such as PNG or JPG and using the camera effect (e_camera in URLs).
For example, the DamagedHelmet3D.gltz file can be requested as a PNG file (f_png) as follows:
Or, by specifying the .png extension:

You can then apply further transformations to the image, for example, add a shadow using the light effect (e_light in URLs), and apply a purple background (b in URLs):

By default, the image is rendered at a resolution of 640 x 640 pixels, but you can change that by scaling the model before applying other transformations, for example:

The image rendering size is particularly relevant if you want to use a resize/cropping action other than scale that will result in an image greater than 640 x 640 pixels, for example, c_fill,w_1500,h_1000. If you don't specify the size to render the image from the model first, using, for example, c_scale,w_1500, then the c_fill action will upscale the default 640 x 640 pixel image, resulting in a lower quality image.
Therefore, the best practice in this case would be:
You can also customize the 2D image you create from the 3D model by specifying the position of the camera, the exposure, zoom and lighting to capture your perfect shot.
The camera always points towards the center of the 3D model and can be rotated around it.
For full syntax details see the camera effect in the transformation reference.
For example, capture a JPG image of the foyer-table 3D model (f_jpg) with the camera positioned at an angle of 20 degrees above the table (up_20), rotated 30 degrees to the left (right_-30), zoomed in to 110% (zoom_1.1), with "pillars" lighting (env_pillars) and 1.4 amount of exposure (exposure_1.4):

Camera effect interactive demo
Try out the different camera effect settings on the cute kitty 3D model.
Use the controls to set up the camera, then capture your shot!
May take a few seconds to generate*
*It can take a few seconds to generate a new image on the fly if you've tried a combination of settings that hasn't been tried before. Once an image has been generated though, it's cached on the CDN, so future requests to the same transformation are much faster. You can learn more about that in our Service introduction.
["Cute Little Kitty" https://skfb.ly/ospAT by Diskette96 is licensed under Creative Commons Attribution.]
Generating a 360 animated image from a 3D model
To generate a 360 animated image from a 3D model, use the animated flag and specify a file format that supports animation, such as WebP (f_webp,fl_animated). The following example generates a 360 animated WebP from a GLB model of the Cloudinary logo, with the camera positioned 30 degrees below the model, and starting at 15 degrees to the right, capturing 20 frames (e_camera:up_-30;right_15;frames_20):

Generating a 360 video from a 3D model
To generate a 360 video from a 3D model, use the animated flag and specify a video file format, such as MP4 (f_mp4,fl_animated). The following example generates a 360 video from an FBX model of a foyer table (in addition to applying other image transformations):
3D model ZIP files are uploaded as image types, so make sure you set the resource_type parameter to image when implementing the video tag:
Applying Draco compression to glTF files
You can optimize the mesh buffer in glTF files using Draco compression. To apply Draco compression, use the draco flag (fl_draco in URLs):
- If you use the .gltz extension, the whole zip file is delivered containing the modified glTF file, referencing the Draco mesh.
- If you use the .gltf extension, only the modified glTF file is delivered.
Delivering 3D models in different 3D formats
You can deliver a 3D model (uploaded as an image type) in any of the formats that are supported for encoding. So, for example, you can deliver an OBJ model as GLB, or a glTF model as USDZ. However, you cannot deliver a glTF model as FBX, or a PLY model as OBJ.
| 3D format | Supported for upload as an image type |
Supported for encoding |
|---|---|---|
3ds |
Yes | Yes |
bw |
Yes | No |
fbx |
Yes1 | No |
glb |
Yes | Yes |
gltf |
Yes1 | Yes |
obj |
Yes | No |
ply |
Yes | Yes |
u3ma |
Yes1 | No |
usdz |
Yes2 | Yes |
- This file format is supported for upload within a zip file containing other required files for the model, such as textures etc.
- USDZ supported for upload as an image type is currently a Beta feature.
To deliver a model in a different format, either:
- Specify the 3D format as the extension on the public ID (see Example 1), or
- Set the
fetch_format/formattransformation parameter to the required format (see Example 2).
Example 1: Deliver a glTF model as GLB
GLB is the binary file format representation of 3D models saved in the GL Transmission Format (glTF).
Deliver the DamagedHelmet3D glTF model as a GLB model by setting the extension to .glb, as follows:
Example 2: Deliver an FBX model as USDZ
USDZ (Universal Scene Description) is a file format for 3D models, introduced by Apple for its ARKit, to display 3D models on iPad, iPhone or Mac.
Deliver the foyer-table FBX model as a USDZ model by setting the fetch_format/format parameter to usdz, as follows:
Changing the texture of a 3D model
You can replace the texture of a 3D model by using the swap_image effect. This effect takes two parameters, image and index. Set image to a file reference variable, initialized with the public ID of the new texture to use (any image). Set index to the index in the model to swap with.
In this example, the image at index 0 is replaced with the raindrops image:

You can also use a base64 encoded URL of a remote image as the texture by setting the file reference variable to !fetch:<encoded URL>!. For example:

 Ask AI
