
With websites being accessed from many devices worldwide, the attention paid to image delivery could be the difference between high customer retention and a high website bounce rate. Special attention has to be paid to the nature of the devices available and tailoring the delivered image to each device to ensure maximum satisfaction. However, it doesn’t stop there; we also need to consider the size of the image to be delivered and how this can be managed to provide a smooth user experience. This is what is referred to as image optimization.
Cloudinary has made a name for itself by not only providing a means of image storage but also providing fast CDN delivery, which helps to get resources to your users quickly. Additionally, Cloudinary automatically performs certain optimizations on transformed images and videos by default and it also provides features that enable you to optimize your media further to fit your needs.
In this article, we’ll look at how to optimize images for various screen sizes by building a simple photo album application with React. This application will allow us to upload multiple images to our Cloudinary account and then view them in a grid.
For UI components in our application, we will use antd while axios will be used for uploading our images to our Cloudinary account.
Here is a link to the demo CodeSandbox.
Create a React application using the following command:
npx create-react-app image_optimization_demo
Next, let’s add the project dependencies.
npm install antd @ant-design/icons axios
Code language: CSS (css)Let’s import the CSS for antd. Open your src/App.css file and edit its content to match the following:
@import '~antd/dist/antd.css';

.overlay {
    position: fixed;
    display: none;
    width: 100%;
    height: 100%;
    top: 0;
    left: 0;
    right: 0;
    bottom: 0;
    background-color: rgba(0, 0, 0, 0.5);
    z-index: 2;
    cursor: pointer;
}
Code language: CSS (css)
We also declare the styling for a class named overlay. This will be used to blur the screen when the user is uploading images.
For the image grid, we’ll also need some custom styling. Create a new file called Grid.css in the src folder and add the following to it:
.gallery {
    display: grid;
    grid-gap: 10px;
    grid-template-columns: repeat(auto-fit, minmax(150px, 1fr));
}

.gallery img {
    width: 100%;
}
Code language: CSS (css)
For this tutorial, we will be sending images to Cloudinary via unsigned POST requests. To do this, we need our account cloud name and an unsigned upload preset.
To help with requests to the Cloudinary API, in your src folder, create a folder called util, and inside it, create a file called api.js and add the following to it:
import axios from "axios";

export const getImages = ({ successCallback }) => {
  axios
    .get(`https://res.cloudinary.com/YOURCLOUDNAME/image/list/image_optimization_demo.json`)
    .then((response) => successCallback(response.data.resources));
};

export const uploadFiles = ({ selectedFiles, successCallback }) => {
  const uploadResults = [];
  selectedFiles.forEach((file) => {
    uploadFile({
      file,
      successCallback: (response) => {
        uploadResults.push(response);
        if (uploadResults.length === selectedFiles.length) {
          successCallback(uploadResults);
        }
      },
    });
  });
};

const uploadFile = ({ file, successCallback }) => {
  const url = `https://api.cloudinary.com/v1_1/YOURCLOUDNAME/image/upload`;
  const data = new FormData();
  data.append("file", file);
  data.append("upload_preset", "YOURUPLOADPRESET");
  data.append("tags", "image_optimization_demo");

  axios
    .post(url, data, {
      headers: {
        "Content-Type": "multipart/form-data",
      },
    })
    .then((response) => successCallback(response.data));
};
Code language: JavaScript (javascript)
In the getImages function, we use the Client-side asset lists feature to retrieve the list of images with the tag image_optimization_demo.
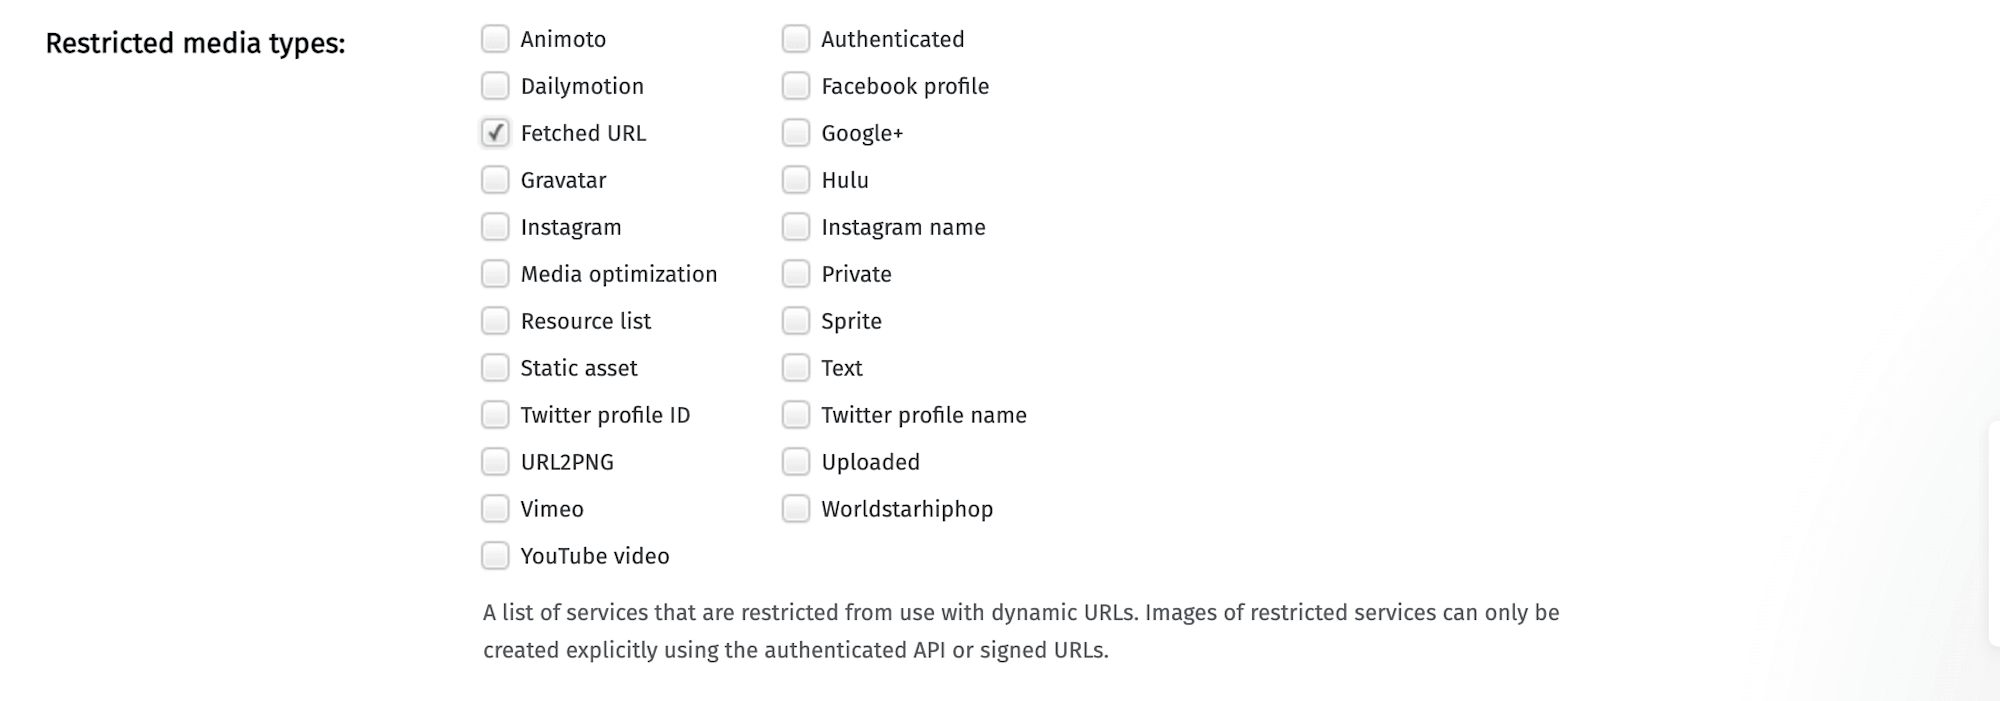
To ensure that this feature is available on your Cloudinary account, you need to enable the Resource list option. By default, the list delivery type is restricted. To enable it, open the Security settings in your Management console and clear the Resource list item under Restricted image types. You may want to clear this option only temporarily, as needed. Alternatively, you can bypass this (and any) delivery type restriction using a signed URL.
The uploadFiles function is used to upload the selected images to Cloudinary. It iterates through the list of selected images and, using the uploadImage function, uploads the image to Cloudinary, attaching the image_optimization_demo tag to the image. This will be used to filter the images in our store and only retrieve the album images when we want to populate the grid. A callback function is also provided, which will be executed once all the images have been uploaded. This callback function also receives the result of the upload process, which can be used elsewhere in the application.
Update YOURCLOUDNAME and YOURUPLOADPRESET as specified in your Cloudinary account.
Next, let’s create a component to upload images to Cloudinary. In the src directory, create a new folder named components.
In the src/components directory, create a new file called ImageUpload.js and add the following to it:
import { Upload, Button, Card, Col, Row } from "antd";
import { UploadOutlined } from "@ant-design/icons";
import { useEffect, useState } from "react";
import { uploadFiles } from "../util/api";

const ImageUpload = ({ onCompletion }) => {
  const [selectedFiles, setSelectedFiles] = useState([]);
  const [showSubmitButton, setShowSubmitButton] = useState(false);
  const [isUploading, setIsUploading] = useState(false);

  useEffect(() => {
    setShowSubmitButton(selectedFiles.length > 0);
  }, [selectedFiles]);

  const addFile = (file) => {
    setSelectedFiles((currentSelection) => [...currentSelection, file]);
  };

  const removeFile = (file) => {
    setSelectedFiles((currentSelection) => {
      const newSelection = currentSelection.slice();
      const fileIndex = currentSelection.indexOf(file);
      newSelection.splice(fileIndex, 1);
      return newSelection;
    });
  };

  const beforeUpload = (file) => {
    addFile(file);
    return false;
  };

  const successCallback = (response) => {
    setIsUploading(false);
    onCompletion(response);
  };

  const handleSubmit = () => {
    setIsUploading(true);
    uploadFiles({ selectedFiles, successCallback });
  };

  return (
    <Card
      style={{
        position: "fixed",
        top: "50%",
        left: "50%",
        transform: "translate(-50%, -50%)",
      }}
    >
      <Upload
        onRemove={removeFile}
        addFile={addFile}
        beforeUpload={beforeUpload}
        fileList={selectedFiles}
        multiple={true}
        accept="image/*"
      >
        {!showSubmitButton && <Button>Select files</Button>}
      </Upload>
      {showSubmitButton && (
        <Row>
          <Col offset={9} span={6}>
            <Button
              icon={<UploadOutlined />}
              type="primary"
              onClick={handleSubmit}
              loading={isUploading}
            >
              Upload
            </Button>
          </Col>
        </Row>
      )}
    </Card>
  );
};

export default ImageUpload;
Code language: JavaScript (javascript)
In this component, we declare three state variables – one to keep track of user file selection, another to determine whether or not the submit button should be rendered, and the last to determine whether or not files are being uploaded, and this will be used to show a loading animation on the submit button when the images are being uploaded.
We use the useEffect hook to keep track of the number of files selected by the user. Once the user has selected some files, we render the submit button to allow the user to upload the current selection. However, if the user has not selected any file, the submit button is not rendered.
The file selection in state is modified using the addFile and removeFile functions. These are used by the Upload component to update the list of files in state based on the user’s action.
The beforeUpload function is passed to the Upload component as a prop. It returns false to prevent the automatic upload of files by antd.
The handleSubmit function is used as a handler for when the Upload button is clicked. This function sets the isUploading state variable to true and calls the uploadFiles function we declared earlier to initiate the upload process.
Finally, we declare the JSX for the component, a button the user clicks to select the files they wish to upload, and a button (which is rendered conditionally depending on whether or not the user has selected any image). Using the accept prop for the Upload component, we restrict the possible selection of files to images.
In the src/components directory, create a new file called ImageGrid.js and add the following to it:
import "../Grid.css";

const baseUrl = "https://res.cloudinary.com/YOURCLOUDNAME/image/upload";

const generateSrcSet = (image) =>
  `
  ${baseUrl}/w_400,h_300,c_scale/v${image.version}/${image.public_id}.${image.format} 400w,
  ${baseUrl}/w_800,h_600,c_scale/v${image.version}/${image.public_id}.${image.format} 800w,
  ${baseUrl}/w_1200,h_900,c_scale/v${image.version}/${image.public_id}.${image.format} 1200w,
  `;

const ImageGrid = ({ images }) => {
  return (
    <div className="gallery">
      {images.map((image) => (
        <img
          key={image.public_id}
          src={`${baseUrl}/w_400,h_200,c_scale/v${image.version}/${image.public_id}.${image.format}`}
          srcSet={generateSrcSet(image)}
          sizes="(max-width: 768px) 300px,(max-width: 992px) 600px, 900px"
        />
      ))}
    </div>
  );
};

export default ImageGrid;
Code language: JavaScript (javascript)
The ImageGrid component takes an array of Cloudinary image resources as a prop, iterates through the array, and renders each image.
To ensure that the images are optimized for screen size, in addition to providing a default image source (in the src prop), we declare two additional props – srcSet and sizes. Using these, the image source and size are set based on the screen width of the user’s device.
The string value of the srcSet prop is generated using the generateSrcSet function. The generateSrcSet function takes advantage of Cloudinary’s URL transformation feature to generate three versions of the same image on the fly.
Update YOURCLOUDNAME in the baseUrl with your cloud name.
Finally, modify your src/App.js file to match the following:
import "./App.css";
import { UploadOutlined } from "@ant-design/icons";
import { message, Menu } from "antd";
import ImageGrid from "./components/ImageGrid";
import ImageUpload from "./components/ImageUpload";
import { useEffect, useState } from "react";
import { getImages } from "./util/api";

const items = [
  {
    label: "Upload Image",
    key: "upload",
    icon: <UploadOutlined />,
  },
];

const App = () => {
  const [images, setImages] = useState([]);
  const [showImageUpload, setShowImageUpload] = useState(true);

  useEffect(() => {
    getImages({
      successCallback: (response) => {
        setImages(response);
        setShowImageUpload(response.length === 0);
      },
    });
  }, []);

  const onCompletion = (response) => {
    setImages(response);
    message.success("Images uploaded successfully");
    setShowImageUpload(false);
  };

  return (
    <div style={{ margin: "1%" }}>
      <div
        className="overlay"
        style={{
          display: `${showImageUpload ? "block" : "none"}`,
        }}
      >
        <ImageUpload onCompletion={onCompletion} />
      </div>
      <Menu
        onClick={() => {
          setShowImageUpload(true);
        }}
        mode="horizontal"
        items={items}
        style={{ marginBottom: "10px" }}
      />
      <ImageGrid images={images} />
    </div>
  );
};

export default App;
Code language: JavaScript (javascript)
On page load, we retrieve the images from Cloudinary using the getImages function declared earlier. If the result is an empty array, then we render the ImageUpload component. If not, we pass the resources to the ImageGrid component to be rendered accordingly.
Find the complete project here on GitHub.
In this article, we created a basic photo album application and took advantage of the srcset and sizes HTML attribute to optimize the size of images rendered based on the user’s device screen size.
In the generation of the srcSet string, we saw one of the advantages of using Cloudinary. We were able to use the URL transformation feature to generate images of different sizes without duplicating and modifying the images for each screen size manually. However, it doesn’t stop there, as Cloudinary provides additional optimizations that make for a seamless experience.
By default, all metadata is stripped from the images being returned. This reduces the image size and the time taken to download the image. Also, by providing the images via CDN, the waiting time to retrieve the images is reduced, thus making for a quick retrieval and download process.
** Resources you may find helpful: **