This Mediajam will show you how to use Next.js to retrieve Cloudinary images from a PostgreSQL database (Supabase) and provide optimized, blurred images with next/image.
We can use create-next-app to clone a Next.js and Tailwind CSS starter application ;
npx create-next-app --example cloudinary-supabase
The command above will start a Nextjs application using the most recent Next.js version. Follow the steps in the Tailwind Documentation to use Tailwind CSS.
After setting up Tailwind, Create a Components folder inside the pages directory and create a BlurImage.js component in it. This component will be used to render individual images and their metadata.
In the component, we will use Next’s image component to achieve good Core web vitals and optimize the images.
For a better user experience, we’d like to show a blurred version of images while they load. Even though this is part of the Image component for local image files, we will soon be getting images from Supabase. Instead, we can get a similar effect by using onLoadingComplete, CSS animation, and blur as illustrated below :
import  Image  from  'next/image';
import  {  useState  }  from  'react';

function  cn(...classes)  {
return  classes.filter(Boolean).join('  ');
}

const  BlurImage  =  ({  img  })  =>  {
const  [isLoading,  setLoading]  =  useState(true);

return  (
<a  href={img.href}  className='group'>
<div  className='aspect-w-1 aspect-h-1 w-full overflow-hidden rounded-lg bg-gray-200 xl:aspect-w-7 xl:aspect-h-8'>

<Image
alt=''
src={img.imageSrc}
layout='fill'
objectFit='cover'
className={cn(
'group-hover:opacity-75 duration-700 ease-in-out',
isLoading? 'grayscale blur-2xl scale-110':'grayscale-0 blur-0 scale-100'
)}
onLoadingComplete={()  =>  setLoading(false)}
/>

</div>
<h3  className='mt-4 text-sm text-gray-700'>{img.name}</h3>
<p  className='mt-1 text-lg font-medium text-gray-900'>{img.username}</p>
</a>
);};

export  default  BlurImage;
Code language: JavaScript (javascript)
The Next step is to Create a Gallery.js component that will be used to style and display all the images we shall fetch from supabase. Remember the BlurImage component is used to style a single image while the gallery component will be used to display and format all the images from supabase ;
import  BlurImage  from  './BlurImage';

const  Gallery  =  ({  img  })  =>  {

return  (
<div  className='mx-auto max-w-2xl py-16 px-4 sm:py-24 sm:px-6 lg:max-w-7xl lg:px-8'>
<div  className='grid grid-cols-1 gap-y-10 gap-x-6 sm:grid-cols-2 lg:grid-cols-3 xl:grid-cols-4 xl:gap-x-8'>
<BlurImage  key={img.id}  img={img}  />
</div>
</div>

)};
export  default  Gallery;
Code language: JavaScript (javascript)
In the above code, we first import the BlurImage.js component then we style it using Tailwind and CSS grid to display the images in a grid layout.
The Next.js Image component needs an allowlist to tell it which domains’ images we can optimize. While we’re using res.cloudinary.com as a placeholder, we can add any domain we want to the allowlist in next.config.js:
/** @type  {import('next').NextConfig} */

module.exports  =  {
images:  {
reactStrictMode:  true,
domains:  ['res.cloudinary.com'],
},
target:  'serverless',
};
Code language: JavaScript (javascript)Supabase makes it incredibly simple to build your backend, providing you with a PostgreSQL database in just a few clicks. Let’s configure our new project in our Supabase dashboard:
Sign up to Supabase – https://app.supabase.com and create a new project. Wait for your database to start then ;
- Click “New project”
- Choose your organization
- Pick a name, database password, and click “Create new project”
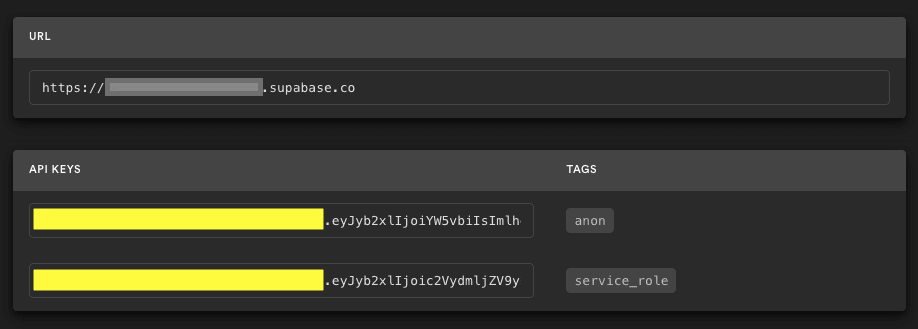
After creating your project, you will need to copy and save these two values:
-
Project API keys →
service_role: This is how we’ll securely connect to Supabase on the server. - Configuration → URL: This is the API endpoint the Supabase client will use to fetch and edit data ;

Save these values as Environment Variables. Inside your Next.js application, use env.local as follows:
NEXT_PUBLIC_SUPABASE_URL=your-value-here
SUPABASE_SERVICE_ROLE_KEY=your-value-here
First, we will need to create a new table inside Supabase for our images.
- We’ll name our table
images - We’ll keep the
idandcreated_atcolumns as is - Let’s add
name,href,userName, andimageSrccolumns, which are alltext - Click “Save” and we’re done!
Using the Supabase client insert data in the created table using the following command :
await supabaseAdmin.from('images').insert([{
    name: 'Eugene Musebe',
    href: 'https://twitter.com/_musebe',
    userName: '_musebe',
    imageSrc: 'https://res.cloudinary.com/hackit-africa/image/upload/v1580219806/me.jpg'
Code language: JavaScript (javascript)We’ve already configured our Supabase client in the file to allow us to select all photos from our images table:
The action of fetching data from supabase will be performed on the index.js file then we shall pass the data to our BlurImages.js and Gallery.js components as props
Firts we need to configure supabase into our application with the following command :
npm i @supabase/supabase-js
Code language: CSS (css)
The next step is to create a new supabase client that will enable the application communicate with the Supabase infrastructure :
import { createClient } from '@supabase/supabase-js';
Code language: JavaScript (javascript)
We’ll retrieve this information using getStaticProps. This function allows you to fetch data from the server and return it as props for the Page: default React component.
export  async  function  getStaticProps()  {
const  supabaseAdmin  =  createClient(
process.env.NEXT_PUBLIC_SUPABASE_URL  ||  '',
process.env.SUPABASE_SERVICE_ROLE_KEY  ||  ''
);
const  {  data  }  =  await  supabaseAdmin.from('images').select('*').order('id');
console.log(data);

return  {
	props:  {
	images:  data,
},};
}
Code language: JavaScript (javascript)
Once the data is fetched we need to pass it to the main component as follows :
export  default  function  Home({  images  })  {

return  (

<Layout>
{images.map((img)  =>  (
<Gallery  key={img.id}  img={img}  />
))}
</Layout>

);

}
And we are done !!! Once all the above has been done your supabase-cloudinary gallery should be able to look like this :

We were able to develop a Next.js application that displayed a list of photographs dynamically downloaded from Supabase and Cloudinary.
The final project can be viewed on Codesandbox.
You can find the complete source code on my Github repository.
