
In the first part of this post, we discussed how to upload a video with an audio clip to make a skit (short video clip). In this tutorial, we will learn how to add further transformations to the video. The transformations will add text, a progress bar, blur, and crop to the video as desired.
You don’t need to read the first part of this tutorial to follow through with this one.
We completed the project on CodeSandbox; you can fork it to get started quickly.
GitHub repository: https://github.com/Olanetsoft/audio-video-transformation

## Prerequisites & Installation

The knowledge of JavaScript and React.js is required to follow through with this article. Also, you require [Node.js](https://nodejs.org/en/) and its package manager NPM installed to proceed.

Verify you have Node installed using the following terminal command:

```bash
    node -v && npm -v
The above command should output their respective version number if installed.
In the first part of this post, we built a Next.js app that allowed us to upload videos and add an audio transformation using Cloudinary. In that part, we used the Cloudinary upload widget to upload media assets to Cloudinary. The component’s state stores the returned asset’s Cloudinary public ID.
We will continue development on the first part’s Next.js app. You can fork it to proceed. https://codesandbox.io/s/video-and-audio-upload-with-nextjs-zvuo9
Alternatively, we can create a new Next.js project using the npx create-next-app command.
Once the app is initialized and the dependencies automatically installed, we will see a message with instructions for navigating to our site and running it locally. We do this with the command.
    cd <project name> && npm start
Code language: HTML, XML (xml)
Next.js will start a hot-reloading development environment accessible by default at http://localhost:3000.
We will use the Cloudinary React package, a React.js library that helps us optimally render Cloudinary videos and handles video transformations.
We can use Cloudinary’s robust transformation features to modify the video distributed through an integrated content delivery network (CDN).
We install the cloudinary-react package in the project’s directory using npm with:
npm i cloudinary-react
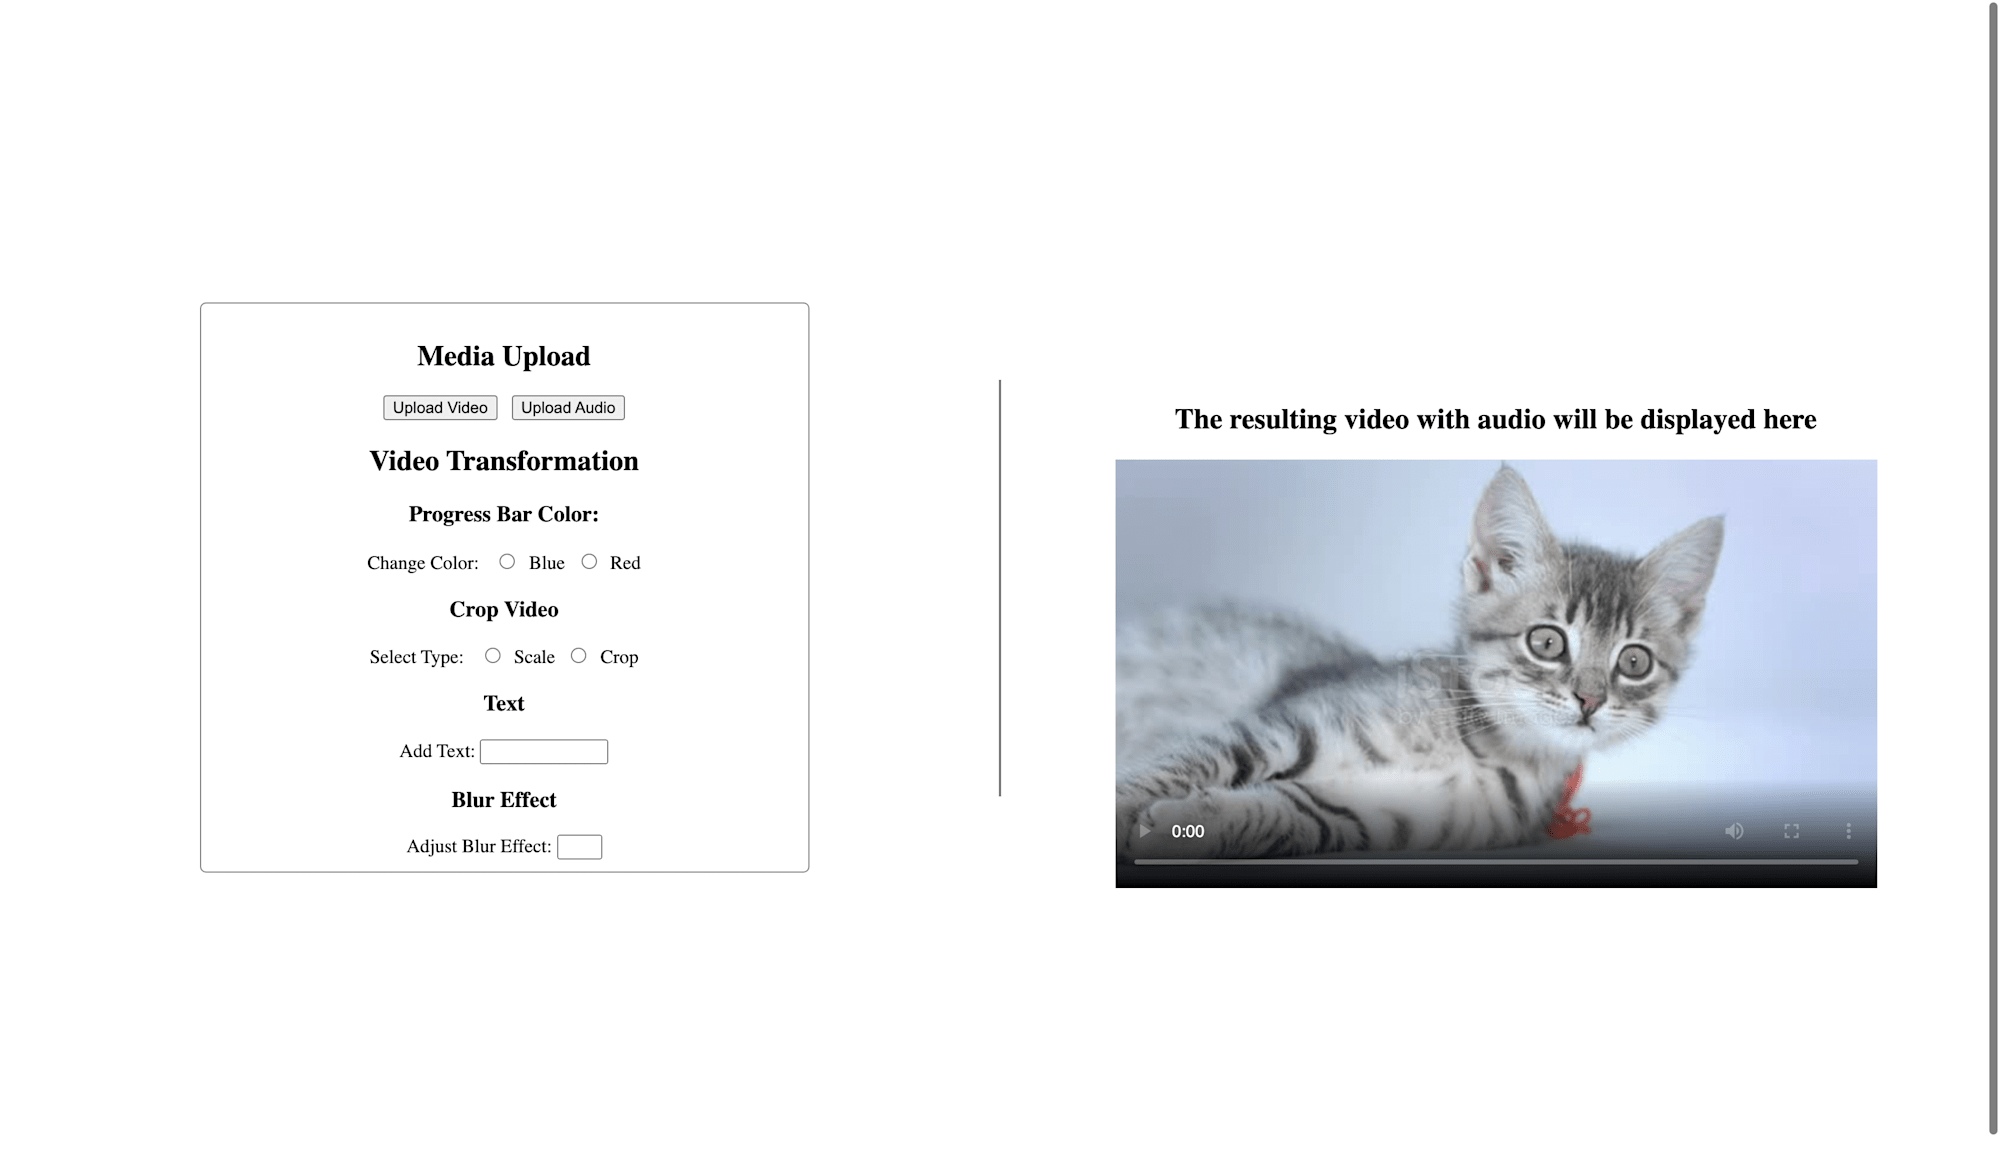
We will display the controls for the video transformations on the home page by updating the functional component, pages/index.js created in part one, to include the following code snippet in this GitHub Gist.
https://gist.github.com/Chuloo/420595bb7e083a6d9d9ec84f85e0aa85
https://gist.github.com/Chuloo/420595bb7e083a6d9d9ec84f85e0aa85
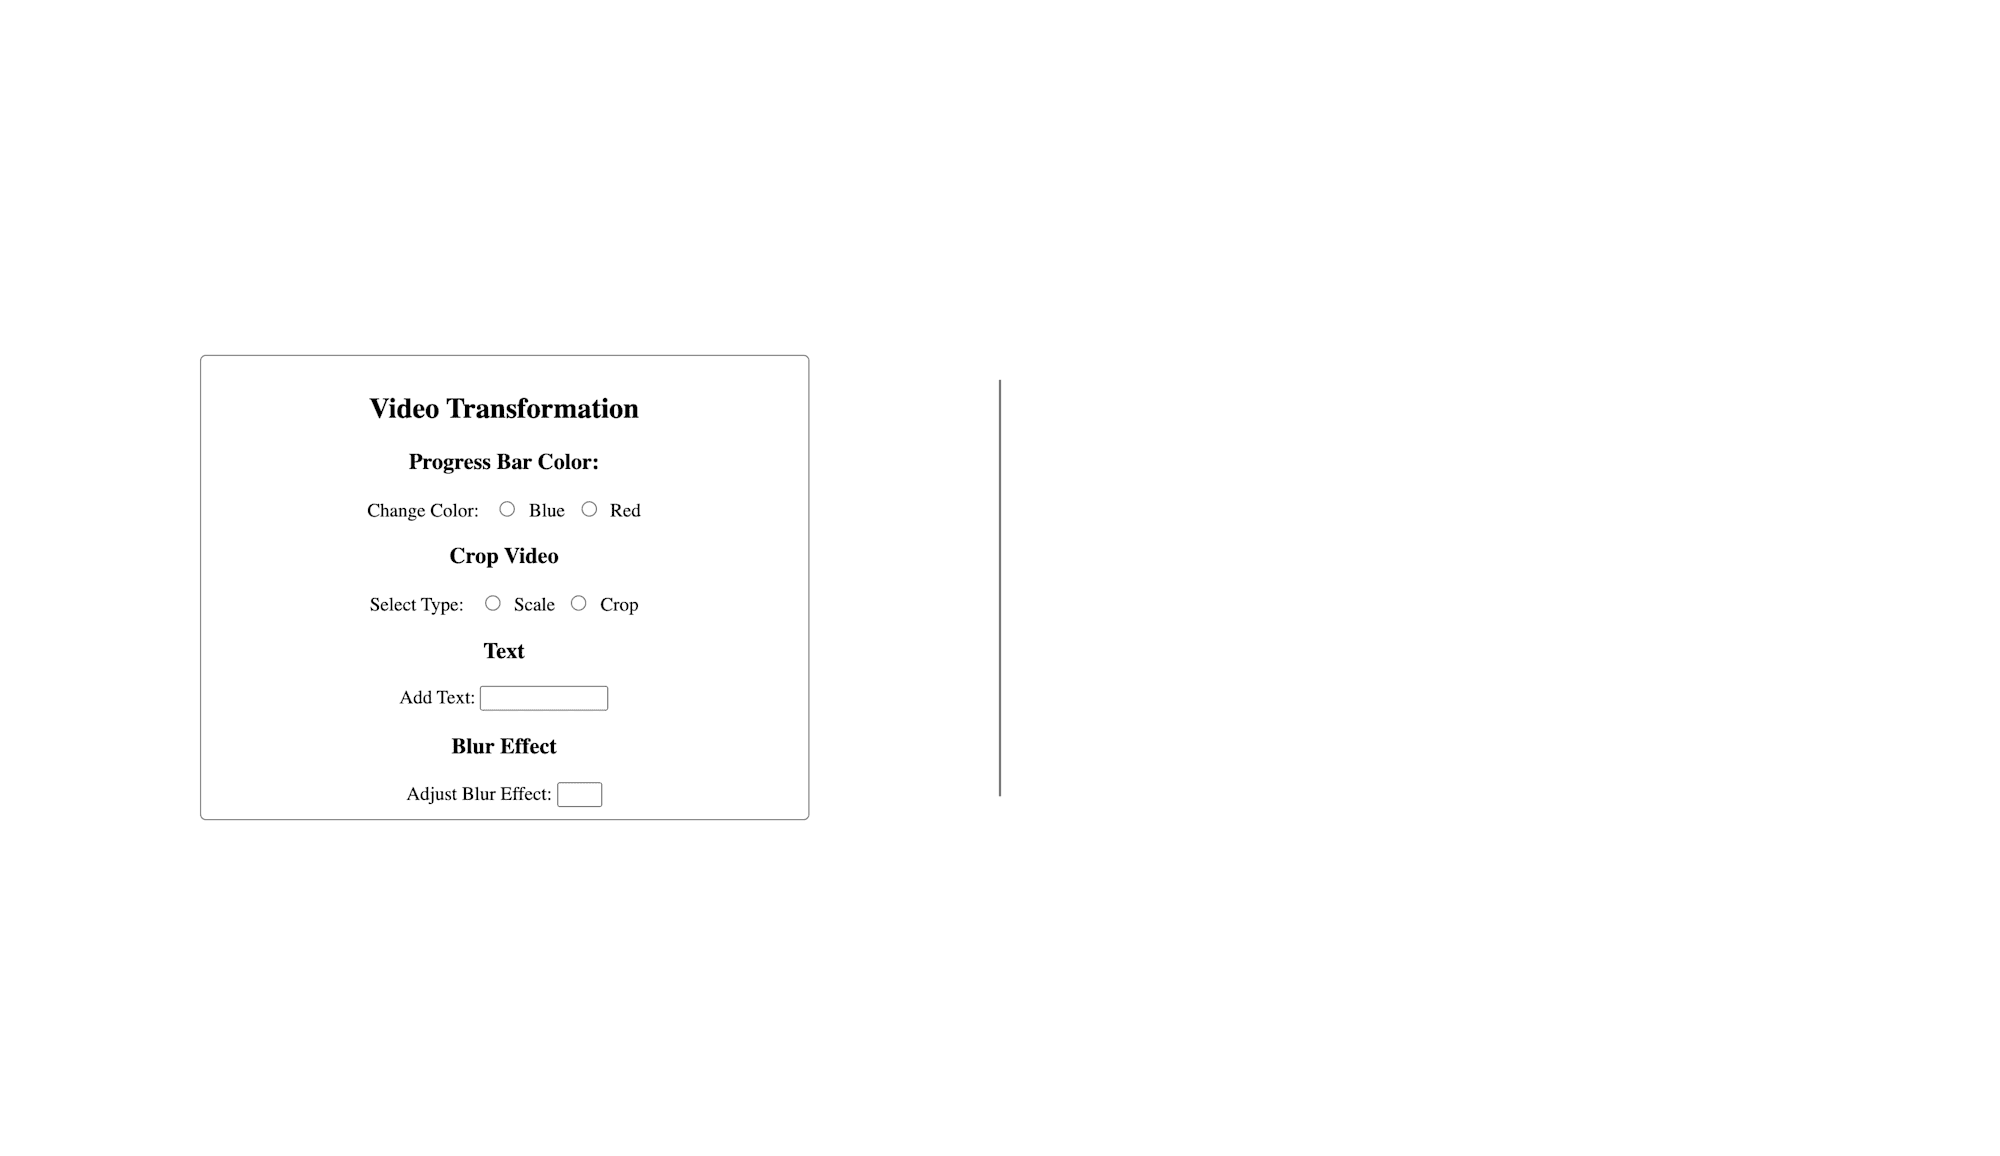
Here, we added form fields for:
- A progress bar with a color of either red or blue
- Video crop with two options of scale and crop
- Custom text input
- A blur effect on the video
The current user interface doesn’t look aesthetically pleasing; thus, we add some style with CSS. We update the CSS styles in /css/style.css to the following content in this GitHub Gist:
https://gist.github.com/Chuloo/33434d6ed74109bb032313c33652efff
https://gist.github.com/Chuloo/33434d6ed74109bb032313c33652efff
We imported this CSS file in the _app.js file in the pages directory of the project. If it isn’t imported or non-existent, we need to create an _app.js file inside the pages directory. This file is native to Next.js and wraps the whole application. We’ll import the CSS file we created into this _app.js file with:
    import "../css/style.css";
    export default function MyApp({ Component, pageProps }) {
      return <Component {...pageProps} />;
    }
Code language: JavaScript (javascript)
Our application should look like this on http://localhost:3000/.
To handle video transformations, we need to create a component that handles the transformation depending on the props passed to the component. We create a components/ folder in the root directly and create a file video.js in the folder with the following content.
    import { CloudinaryContext, Transformation, Video } from "cloudinary-react";
    const TransformVideo = ({video, audio}) => {
      return (
        <CloudinaryContext cloudName="olanetsoft">
          <Video publicId={video} controls autoplay="true">
            <Transformation overlay={`video:${audio}`} />
          </Video>
        </CloudinaryContext>
      );
    };
    export default TransformVideo;
Code language: JavaScript (javascript)
Here, we imported CloudinaryContext, a wrapper Cloudinary component used to manage shared information across all its children’s Cloudinary components. The rendered TransformVideo component takes data of video and audio as props. This video information (public ID) passed is sent to the video component. We set the audio data as a transformation on the video.
The above code block will render the uploaded video with the background audio when we import it into pages/index.js:
    import React, { useState } from "react";
    import { Helmet } from "react-helmet";
    import TransformVideo from "../components/video";
    const App = () => {
      const [videoPublicId, setVideoPublicId] = useState("");
      const [alt, setAlt] = useState("");
      const [audioPublicId, setAudioPublicId] = useState("");
      const openWidget = () => {
        // widget creation logic
        const widget = window.cloudinary.createUploadWidget(
              {
                cloudName: "olanetsoft",
                uploadPreset: "w42epls6"
              },
              (error, result) => {
                if (result.event === "success") {
                  console.log(result.info);
                  if (result.info.is_audio === true) {
                    setAudioPublicId(result.info.public_id);
                    setAlt(`A file of ${result.info.original_filename}`);
                  } else {
                    setVideoPublicId(result.info.public_id);
                    setAlt(`A file of ${result.info.original_filename}`);
                  }
                 }
              }
            );
            widget.open();
      };
      return (
        <div>
          <main className="App">
            <section className="right-side">
              <h1>The resulting video with audio will be displayed here</h1>
              {videoPublicId && (
                <TransformVideo
                  audio={audioPublicId}
                  video={videoPublicId}
                />
              )}
            </section>
            {/*JSX code in there including form fields and buttons*/}
          </main>
        </div>
      );
    };
    export default App;
Code language: JavaScript (javascript)
After importing the TransformVideo component and uploading a video, we should have had a video playing, which should look like this:
We’ll update our TransformVideo component to accept props for various video transformation operations. Let’s start with changing the color of the progress bar. We update the TransformVideo component to include the color props.
    const TransformVideo = ({color, video, audio}) => {
      return (
        <CloudinaryContext cloudName="olanetsoft">
          <Video publicId={video} controls autoplay="true">
          <Transformation overlay={`video:${audio}`} />
            <Transformation effect={`progressbar:bar:${color}:30`} />

            {/*Add the color here*/}
            <Transformation effect={`progressbar:bar:${color}:30`} />

          </Video>
        </CloudinaryContext>
      );
    };
Code language: JavaScript (javascript)
In pages/index.js, we create a state variable to contain the selected color using the useState hook, with a default color of green.
    import React, { useState } from "react";

    const App = () => {
      const [color, setColor] = useState("green");
      //...
    }
Code language: JavaScript (javascript)
We add an onChange event handler on the radio inputs rendered to update the color state variable once an option is selected.
    // ...
        <input
          type="radio"
          value="blue"
          name="color"
          // Add the onChange attribute here
          onChange={(event) => setColor(event.target.value)}
        />
        <label>Blue</label>
        <input
          type="radio"
          value="red"
          name="color"

          // Add the onChange attribute here
          onChange={(event) => setColor(event.target.value)}
        />
        <label>Red</label>
    // ...
Code language: JavaScript (javascript)
Next, we update the TransformVideo component rendered in pages/index.js to include the progress bar color information.
    import React, { useState } from "react";
    import { Helmet } from "react-helmet";
    import TransformVideo from "../components/video";
    const App = () => {
      // state variables and methond definitions go in here
      return (
        <div>
          <main className="App">
            {/*JSX rendered in here...*/}

            <section className="right-side">
              <h1>The resulting video with audio will be displayed here</h1>
              {videoPublicId && (
                <TransformVideo
                  color={color}
                  audio={audioPublicId}
                  video={videoPublicId}
                />
              )}
            </section>
          </main>
        </div>
      );
    };
    export default App;
Code language: JavaScript (javascript)
Similarly, to add Cloudinary transformations including crop, text, and blur effect, we modify the TransformVideo component’s definition to accept the values as props and create the state variables in the pages/index.js.
We modify TransformVideo to:
    import { CloudinaryContext, Transformation, Video } from "cloudinary-react";

    const TransformVideo = ({ crop, color, text, blur, audio, video }) => {
      return (
        <CloudinaryContext cloudName="olanetsoft">
          <Video publicId={video} controls autoplay="true">
           <Transformation overlay={`video:${audio}`} />
            <Transformation effect={`progressbar:bar:${color}:30`} />

            {/*Added more transformation effect below*/}
            <Transformation
              overlay={{
                fontFamily: "arial",
                fontSize: 60,
                text
              }}
              endOffset="9.0"
              gravity="south"
              startOffset="2.0"
              y="80"
            />
            <Transformation effect={`blur:${blur}`} crop={crop} />
            <Transformation width="500" height="350" crop={crop} />

          </Video>
        </CloudinaryContext>
      );
    };
    export default TransformVideo;
Code language: JavaScript (javascript)
In pages/index.js, we add state variables to manage the blur, crop, and text transformations.
    import React, { useState } from "react";
    import { Helmet } from "react-helmet";
    import TransformVideo from "../components/video";
    const App = () => {
      const [videoPublicId, setVideoPublicId] = useState("");
      const [alt, setAlt] = useState("");
      const [audioPublicId, setAudioPublicId] = useState("");
      const [textValue, setTextValue] = useState(" ");
      const [color, setColor] = useState("green");
      const [crop, setCrop] = useState("scale");
      const [blur, setBlur] = useState("");
      };
      return (
        {/*Returned JSX goes in here*/}
      );
    };
    export default App;
Code language: JavaScript (javascript)
We also set default state values for each variable.
For each transformation’s input element, we add an onChange event handler to update its state value.
    //...

        <h3>Crop Video</h3>
        <label className="label">Select Type</label>
        <input
          type="radio"
          value="scale"
          name="crop"

          // Add the onChange attribute for crop transformation here
          onChange={(event) => setCrop(event.target.value)}

        />
        <label>Scale</label>
          <input
            type="radio"
            value="crop"
            name="crop"

            // Add the onChange attribut for crop transformation here
            onChange={(event) => setCrop(event.target.value)}

          />
        <label>Crop</label>
          <h3>Text</h3>
          <label className="label">Add Text</label>
          <input
            id="text"
            type="text"

            // Add the onChange attribute for textValue effect here
            onChange={(event) => setTextValue(event.target.value)}
          />
        <h3>Blur Effect</h3>
        <label className="label">Adjust Blur Effect</label>
        <input
          type="number"

          // Add the onChange attribute for blur transformation here
          onChange={(event) => setBlur(event.target.value)}
        />
      </form>

    // ...
Code language: HTML, XML (xml)
Lastly, we pass props of the state data to the rendered TransformVideo with:
    // ...

    <section className="right-side">
        <TransformVideo
          crop={crop}
          color={color}
          text={textValue}
          blur={blur}
          //...
        />
    </section>

    // ...
Code language: HTML, XML (xml)
You can see what the the final App.js file looks like in this GitHub Gist. This includes audio/video upload and video transformation.
https://gist.github.com/Chuloo/36d3ddcb643452f01530197b8a49c8d1
With this, we complete our application development, and it looks like this:
This article discussed how to add multiple transformations to a video file, completing an app that lets you upload a video, having an audio file playing in the background while displaying multiple transformations. Furthermore, you can add multiple video transformations and controls for each of them.
You may find these resources useful.