Laravel is a PHP framework developed with developer productivity in mind. The framework also aims to evolve with the web and has already incorporated several new features and ideas in the web development world—such as job queues, API authentication out of the box, real-time communication, and much more.
In this article, we’ll explore the ways you can build a simple Cloudinary Watermark API using Laravel. The API will allow you to add a watermark to an image using Cloudinary’s powerful transformational API. We’ll be using Laravel 8, and all of the code is available for reference on GitHub.
You can find the full source code on my Github repository.
The final project can be viewed on PHPSandbox
Using Cloudinary in your Laravel projects is pretty straightforward. However, for you to be able to easily follow along, you need to have a good command of your terminal, Git, and entry knowledge of PHP specifically with the Laravel framework.
You also need to understand what a RESTful API is. REST stands for REpresentational State Transfer and is an architectural style for network communication between applications, which relies on a stateless protocol (usually HTTP) for interaction.
Lastly, you will need an API Client/Platform such as Postman or Insomnia installed on your system to test the API endpoints.
Being that Laravel is a PHP Framework, we will need Composer. Like any modern PHP framework, Laravel uses Composer to manage its dependencies. So, before we can start ensure you have Composer installed on your machine. Follow step 1 below to install Composer and PHP.
-
Install Composer and PHP on your development or production machine.
-
Install Laravel
-
Via Composer:
composer create-project --prefer-dist laravel/laravel cloudinary-watermark-api -
Via Laravel Installer
composer global require laravel/installerlaravel new cloudinary-watermark-api
-
-
In step 2 above we have installed the Laravel Installer and used it to scaffold a new application in the folder
cloudinary-watermark-api. With Laravel installed, we should be able to start and test the server ensuring everything is okay. Change the directory to the project folder and run the local development server by typing the following commands:cd cloudinary-watermark-apiphp artisan serve
The Laravel project is now up and running. When you open http://localhost:8000 on your computer, you should see the image below:

In the routes/ folder you will notice that Laravel has a couple of files. We will work with the routes/api.php file to create the routes we need for our API.
For a start, we will need two endpoints, one to upload the watermark to Cloudinary and the other to create the watermark branded images, but you can add more routes you need as you continue exploring the Cloudinary APIs.
We have a route now we need to create a controller. Run the following commands to create one.
php artisan make:controller WatermarkController
This will create the controller app/Http/Controllers/WatermarkController.php

At the moment it is empty, but we will populate it shortly. First things first, let us set up Cloudinary 🙌🏾😊.
Cloudinary has a tonne of features from media upload, storage, administration, and manipulation to optimization and delivery. In this case, we will use Cloudinary’s transformation features to create an API endpoint that will automatically overlay a brand/watermark image over our media.
That way our media content will be authentic and super professional which is a requirement for excellent brand management
To get started:
-
Sign up for a free Cloudinary account then navigate to the Console page and take note of your Cloud name, API Key and API Secret.

-
Install Cloudinary’s Laravel SDK:
composer require cloudinary-labs/cloudinary-laravel
Note: Please ensure you follow all the steps in the #Installation section. Publish the configuration file and add
the Cloudinary credentials you noted in Step 1 to the .env file.
We will make use of the WatermarkController we had created earlier. It will take two required inputs from the POST request:
-
watermark– This is a required image input of type PNG since we need our watermark to be transparent in order to overlay it over other images. -
public_id– We need to implicitly provide the public id for our watermark since we will need to specify this when performing the overlay transformation later on.
Open the file app/Http/WatermarkController.php and add the following code:
- First we create the function upload which will correspond to our
watermark/uploadendpoint.
public function upload(Request $request) {

}
Code language: PHP (php)- Add the functionality to validate the required inputs, upload the watermark to Cloudinary and send a response to the user. Here is how it works:
public function upload(Request $request): JsonResource {
    // Validates the request from the user
    // If the validation failed, throw a ValidationException and inform the user.
    $data = $this->validate($request, [
        'watermark' => [
            'required',
            'image',
            'mimes:png',
        ],
        'public_id' => [
            'required',
            'string'
        ]
    ]);

	// If there are no validation errors, proceed and upload the watermark to Cloudinary and return a Json response to the user.
    $watermark = $data['watermark'];
    $public_id = $data['public_id'];
    cloudinary()->upload($watermark->getRealPath(), [
        'folder'    => 'watermark-api',
        'public_id' => $public_id
    ])->getSecurePath();

    return JsonResource::make([
        'message'   => "Watermark created successfully",
        'watermark' => ['public_id' => $public_id]
    ]);
}
Code language: PHP (php)- Now we can link this in the routes file. Open your
routes/api.phpand add the following code:
Route::post('watermark/upload', [WatermarkController::class, 'upload']);
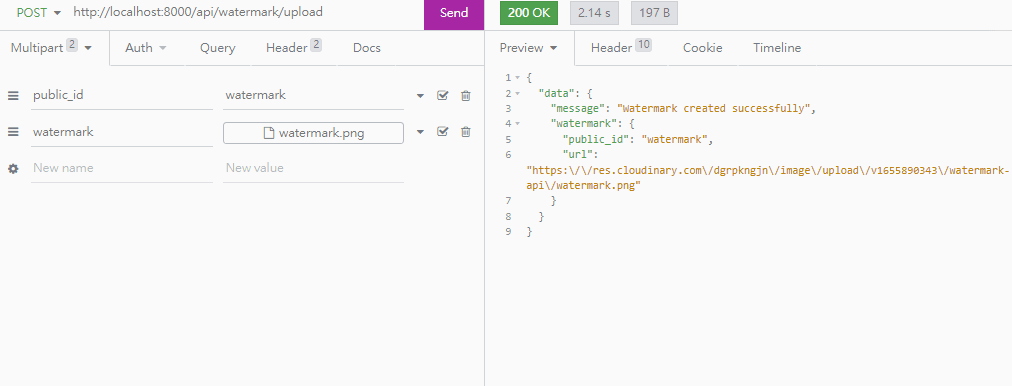
Testing: You can test the route using Postman or Insomnia. Below is an example of a successful and failed response:
 |
|---|
| Successful API Response |
 |
|---|
| Failed API Response |
Awesome, moving on nicely.
By now you know how to create an endpoint, this should be a breeze. We will use the same WatermarkController but create a new method for this endpoint.
Similar to the previous endpoint this one will also take two inputs:
-
media– This is a required image/video input. It is the media file that we want to be branded with our cool watermark, which we created earlier. -
public_id– This is the public id of the watermark we passed to the previous endpoint. This needs to be exactly the same as the one we provided previously.
In our WatermarkController add the following method:
public function create(Request $request): JsonResource {

}
Code language: PHP (php)
We will populate the create method above with the following code:
public function create(Request $request): JsonResource {
  // Validation
    $data = $this->validate($request, [
        'media'     => ['required', 'image', 'max:1024'],
        'public_id' => [
            'required',
            'string'
        ]
    ]);

    // Uploading image to Cloudinary with transformation parameters that will overlay our watermark on our image
    $media = $data['media'];
    $public_id = $data['public_id'];
    $branded = cloudinary()->upload($media->getRealPath(), [
        'folder'         => 'watermark-api',
        'transformation' => [
            'overlay' => $public_id,
            'gravity' => 'south_east', // watermark location bottom right
            'x'       => 0.02, // 2 percent offset horizontally
            'y'       => 0.02, // 2 percent offset vertically
            'crop'    => 'scale',
        ],
    ])->getSecurePath();

    // We return a response to the user with the URL of the branded or watermarked image
    return JsonResource::make([
        'message' => "Watermark created successfully",
        'url'     => $branded
    ]);
}
Code language: PHP (php)
Important: Take note of the following transformation that makes the magic happen. Please refer to this Cloudinary Layers documentation to learn more about these transformation options and experiment with several other awesome features:
-
overlay– This is the public id of the watermark we uploaded earlier. Please note that since we provided afolder_namewhen uploading the watermark. We will need to include the folder name in thepublic_idinput we send to the server, otherwise, Cloudinary will look for the watermark in the root folder and not find it. -
gravity– This is where the overlay will be placed. it can be center, north, south, east, and so on and so forth. -
xandyoffsets – These parameters accept either integer values representing the number of pixels to adjust the overlay position in the horizontal or vertical directions or decimal values representing a percentage-based offset relative to the containing image (e.g., 0.2 for an offset of 20%). -
Install Livewire Package by running the following command in your Laravel project:
composer require livewire/livewire
If you followed along with this article keenly, you should be able to use an API client such as Postman or Insomnia to hit the endpoints to upload a watermark or create a watermarked/branded image similar to the one below:
 |
|---|
| Photo by Justin Brian: https://www.pexels.com/photo/city-landscape-beach-water-9833512/ |
Note: Cloudinary is super powerful for the management of your media assets in your project that will not only optimize your assets for visual quality but also cost savings in terms of performance, storage, and AI-powered transformations as well.
Building an API is a whole technical process that requires you to think about the goals, architecture, testing, scaling, security, and more, but in this implementation, with Cloudinary we had fun building a very simple API.
Cloudinary is your A to Z media management solution – upload, storage, administration, manipulation, optimization, and delivery.
Get started with Cloudinary in your Laravel projects for FREE!
