
Product recommendations on your e-commerce site can be a great way to increase customer satisfaction and boost sales.
But identifying large volumes of unseen product images so that they can be easily matched with user preferences is an unwieldy, time-consuming task. The good news is that AI can make this manageable by doing all of the organizing, sorting, and labeling for you.
Imagine a platform that can automatically recognize the content of your product images and tag them accordingly. Your images would be classified and described in no time. Using the auto-tags, you’d be able to easily track which product images a customer has been selecting, and you’d be able to pick out and display product images that match the customer’s activities.
Sound too good to be true? It’s real. Cloudinary makes it possible.
Using add-ons driven by deep neural network models that analyze images at scale with a very high precision rate, Cloudinary helps you easily keep track of customer behavior to make intelligent product recommendations.
Let’s dive into a demo of how Cloudinary can help you offer e-commerce product recommendations using python by automatically identifying, tagging, labeling, and categorizing all your images.
When you’re done, you can see Cloudinary’s Python SDK documentation for more information.
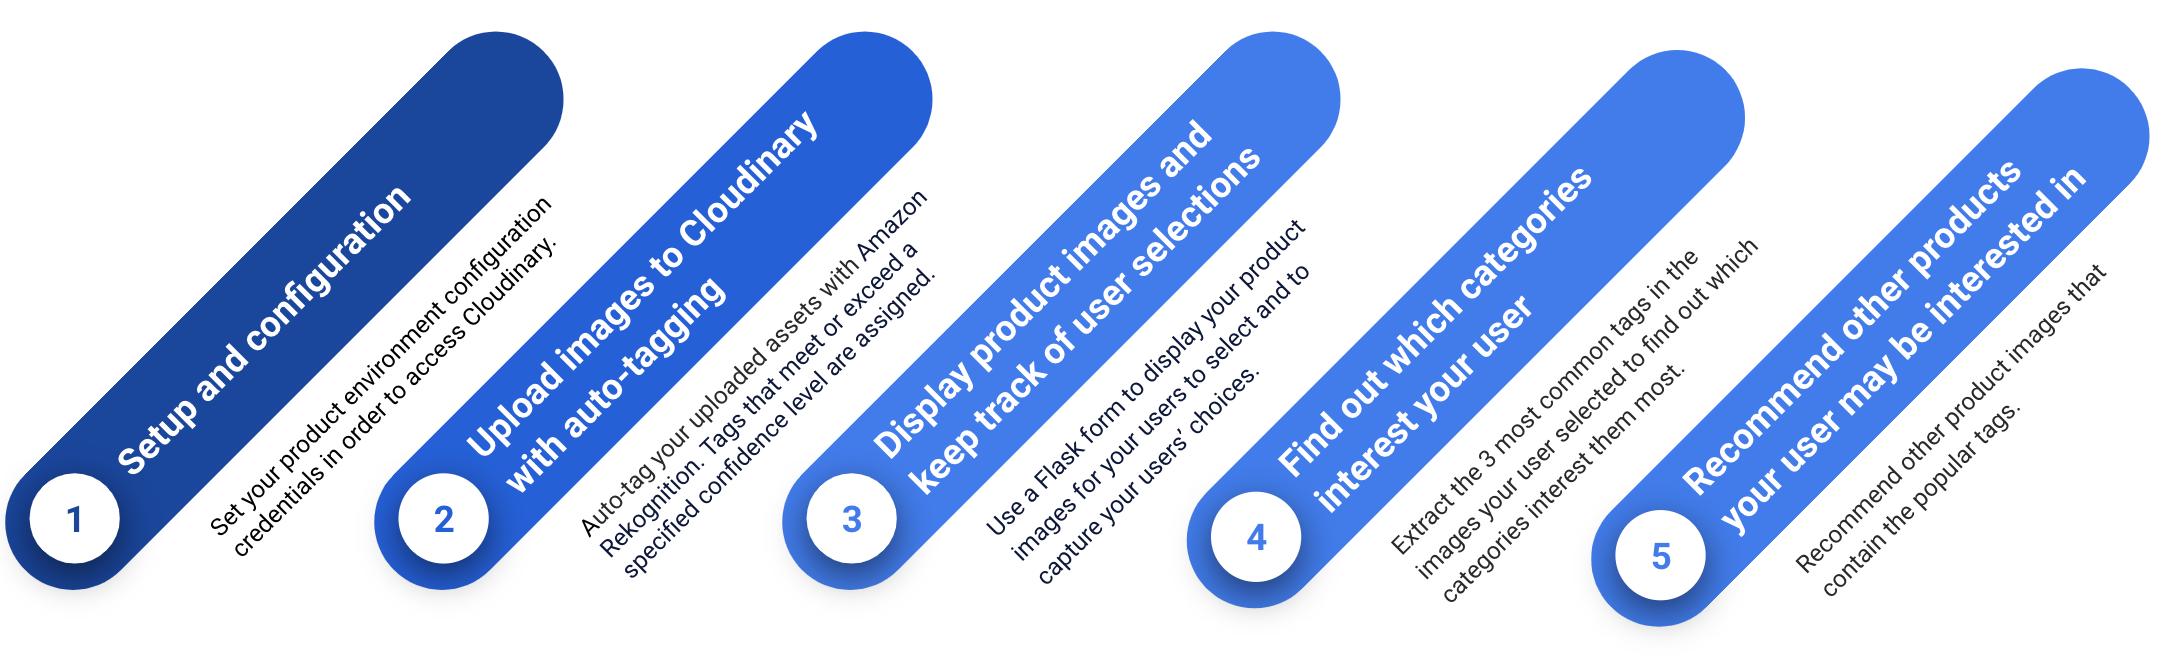
This is the logic your code will follow:
View the completed code.
To perform the steps in this demo, you’ll need:
- A Cloudinary account. If you don’t have one yet, you can quickly register for free.
- One of the automatic tagging add-ons. You can register for one here. (This blog uses Amazon Rekognition for the purposes of demonstration).
- Your product environment credentials. You can find your credentials in the Dashboard page of your Cloudinary Console.
- A working Python development environment with a supported version of Python.
In a terminal in your Python3 environment, run the following code:
pip3 install cloudinaryIn your project, create a new file called my_products.py. Next, copy and paste the following into this file, and replace the <cloud_name>, <api_key>, and <api_secret> with your product environment credentials:
When writing your own applications, follow your organization’s policy on storing secrets and don’t expose your API secret.
my_products.py:
# Set your Cloudinary credentials
# ==============================
cloudinary.config(
  cloud_name = "<cloud_name>",
  api_key = "<api_key>",
  api_secret = "<api_secret>",
  api_proxy = ""
)

# import Cloudinary libraries
import cloudinary
from cloudinary import uploader
import cloudinary.api
from cloudinary.utils import cloudinary_url

# import other libraries
import os
import threading
from collections import Counter
from urllib.request import urlopen
import ssl
import json
from flask import Flask, render_template, request

app = Flask(__name__)Code language: PHP (php)First, create a folder called Images in the same directory as my_products.py. Then, fill that folder with the images you want to use for this project.
The Images folder is all set up with sample images when you download the project from GitHub.
Copy the following code to my_products.py to upload all the images from the Images folder and automatically tag those images using Amazon Rekognition’s automatic image tagging capabilities. Only tags that meet or exceed the specified confidence level of 0.7 are assigned to the image.
my_products.py (con’t):
def img_upload():
  # Get your images stored in a local directory.
  listOfImgs = os.listdir(os.path.join(os.getcwd()+'/Images'))

  # Upload all those images to Cloudinary with auto-tagging.
  for key,row in enumerate(listOfImgs):
    resp=cloudinary.uploader.upload('Images/'+row,
      categorization = "aws_rek_tagging",
      auto_tagging = 0.8,
      use_filename = True,
      unique_filename = False,
      overwrite = True,
      folder = "tagged_images",
      transformation = "/c_fill,g_auto,w_250,h_250/f_auto/q_auto",
      # You’ll use the my_products tag to retrieve all the images.
      tag="my_products"
)Code language: PHP (php)Call this function only the first time you run the program so that the images are uploaded just once.
For the purposes of this demo, we’re auto-tagging freshly uploaded images. However, you can just as easily auto-tag any images that are already stored in Cloudinary using the update method of the Admin API.
Use a Flask form to display your product images for your users to select.
Then, use the same form to capture which product images the user chose.
Copy the following code to my_products.py.
my_products.py (con’t):
@app.route("/", methods=['GET'])
def index():
  # Only call the img_upload function to upload your images
  # the first time you run this program:

  # thread = threading.Thread(target=img_upload)
  # thread.start()
  # wait here for the result to be available before continuing
  # thread.join()

  # Get all the images you uploaded and display the first ten of them in ‘index.html’.
  result = all_images()
  imgs=[]
  count=1
  for asset in result['resources']:
    # Build the delivery URL for the asset.
    url="https://res.cloudinary.com/demo/image/upload/f_auto/q_auto/c_fill_pad,g_auto,w_100,h_100/v"+str(asset["version"])+"/" +asset["public_id"]
    # Add image information, including image url and public ID, to an array for
    # displaying all the images in index.html.
    img_entry={'url':url, 'id':"myCheckbox"+str(count), 'public_id':asset['public_id']}
    imgs.append(img_entry)
    if count==10:
      break
    count+=1
  return render_template('index.html', imgs=imgs)

def all_images():
  # Return a JSON with  all the images you uploaded using the cloudinary_url method from the
  # cloudinary.utils library.
  # You can also use the resources method from the admin API (rate-limited).
  cloudinary_url("my_products.json", type="list")
  context = ssl._create_unverified_context()
  response = urlopen("https://res.cloudinary.com/demo/image/list/my_products.json", context=context)
  result = json.loads(response.read())
  return resultCode language: PHP (php)
Copy the following code to template/index.html. This is the HTML file your users interact with to view and select product images.
template/index.html:
<!DOCTYPE html>
<html lang="en">

<head>
  <meta charset="UTF-8" />
  <title>Product Recommendations</title>
  <link rel="stylesheet" type="text/css" href="/static/main.css">
</head>

<body>

  <div class="container">
    <h1>Please select some products</h1>
  </div>

 <!--This form displays the product images and returns user selections to the backend.-->
  <form method="POST" action="{{ url_for('output')}}">

    <ul>
      {% for i in imgs %}

      <li>
        <input type="checkbox" name="selected_imgs" id="{{i['id']}}" value="{{i['public_id']}}" />
        <label for="{{i['id']}}"><img src="{{i['url']}}" /></label>
      </li>

      {% endfor %}
    </ul>

    <button type="submit">Submit</button>
  </form>

</body>

</html>Code language: HTML, XML (xml)
Copy the following CSS code to static/main.css to style your webpage.
static/main.css:
h1 {
    margin-left: 62px;
    font-family: 'Arial';
    font-style: normal;
    font-weight: 500;
    font-size: 18px;
    line-height: 22px;
    color: #0A0C0F;
 }

container {
    display: flex;
 }

ul {
    list-style-type: none;
 }

li {
    display: inline-block;
 }

input[type="checkbox"][id^="myCheckbox"] {
    display: none;
 }

label {
    border: 1px solid #fff;
    padding: 10px;
    display: block;
    position: relative;
    margin: 10px;
    cursor: pointer;
 }

label:before {
    background-color: white;
    color: white;
    content: " ";
    display: block;
    border-radius: 50%;
    border: 1px solid grey;
    position: absolute;
    top: -5px;
    left: -5px;
    width: 25px;
    height: 25px;
    text-align: center;
    line-height: 28px;
    transition-duration: 0.4s;
    transform: scale(0);
 }

label img {
    height: 100px;
    width: 100px;
    transition-duration: 0.2s;
    transform-origin: 50% 50%;
 }

:checked+label {
    border-color: #ddd;
 }

:checked+label:before {
    content: "✓";
    background-color: grey;
    transform: scale(1);
 }

:checked+label img {
    transform: scale(0.9);
    /* box-shadow: 0 0 5px #333; */
    z-index: -1;
 }

button {
    background: #3448C5;
    border-radius: 4px;
    display: flex;
    flex-direction: row;
    justify-content: center;
    align-items: center;
    padding: 12px 16px;
    gap: 8px;
    width: 298px;
    height: 40px;
    margin-left: 62px;
    font-family: 'Arial';
    font-style: normal;
    font-weight: 500;
    font-size: 14px;
    line-height: 14px;
    color: #FFFFFF;
 }

button:active {
    background: gray;
 }

button:focus {
    background: gray;
}Code language: CSS (css)Copy the following code to my_products.py to extract the three most popular tags from the image(s) your user selected.
my_products.py (con’t):
def most_frequent(List):
    c = Counter(List)
    return c.most_common(3)

@app.route("/output", methods=['POST'])
def output():
  # Capture the public IDs of the selected images.
  selected_imgs = request.form.getlist("selected_imgs")

  # Display an error message if no images were selected.
  if not selected_imgs:
    message="Select at least one product image."
    recommendations=[]
  else:
    # If one or more images were selected, find the 3 most frequent tags for those images.
    result = all_images()
    tags=[]
    tag_list=[]
    # Look up the details for each selected image.
    for img in selected_imgs:
      for asset in result['resources']:
        if asset['public_id']==img:
          img_details = cloudinary.api.resource(img)
          # Keep a list of all the tags from all selected images.
          for tag in img_details['tags']:
            # Remove irrelevant tags
            if tag != "adult" and tag != "my_products":
              tag_list.append(tag)
    # Get the 3 most popular tags.
most_frequent_tags=most_frequent(tag_list)Code language: PHP (php)Copy the following code to my_products.py to recommend other images that contain the 3 most popular tags.
my_products.py (con’t):
    recommendations=[]
    # Find the images that contain each of the 3 most popular tags.
    for frequent_tag in most_frequent_tags:
      # Go through each of the uploaded images.
      for asset in result['resources']:
        show="yes"
        # Get the details of each image.
        img_details = cloudinary.api.resource(asset['public_id'])
        for i in selected_imgs:
          # Don’t recommend an image that the user's already selected.
          if i == asset['public_id']:
            show="no"
          # If the image contains a popular tag, add its URL to recommendations.
          if frequent_tag[0] in img_details['tags'] and show=="yes":
            # Add transformations to the URL to fit the image in the thumbnail.
         url="https://res.cloudinary.com/demo/image/upload/f_auto/q_auto/c_fill_pad,g_auto,w_100,h_100/v"+str(asset["version"])+"/" +asset["public_id"]
            # Exclude doubles.
            if url not in recommendations:
              recommendations.append(url)
    message="We thought you might like to try these:"
  # Display the product recommendations in ‘output.html’
  return render_template('output.html', recommendations=recommendations, msg=message)

if __name__ == "__main__":
  app.run()Code language: PHP (php)
Copy the following code to template/output.html to display the recommended images.
template/output.html:
<!DOCTYPE html>
<html lang="en">
  <head>
    <meta charset="UTF-8" />
    <title>Product Recommendations</title>
    <link rel="stylesheet" type="text/css" href="/static/main.css">

    <style>
      h1{
         margin-left:40px;
     }
     button{
        margin-left:40px;
     }
    </style>

    </head>
    <body>
       <div>
           <div><h1>{{msg}}</h1></div>
           <ul>
                {% for p in recommendations %}
                <li>
                     <img src="{{p}}">
                </li>
                {% endfor %}
          </ul>
       </div>
       <form method="GET"  action="{{ url_for('index')}}">
            <button type="submit">Choose Products</button>
       </form>
    </body>
</html>Code language: HTML, XML (xml)See the code above in action using this code playground:
This code is also available on GitHub.
This is just one example of the many Cloudinary capabilities you can implement to offer e-commerce product recommendations using Python. Other actions you could consider include:
- Experimenting with other automatic tagging add-ons, or using them in combination.
- Creating a matrix to tailor the automatic tagging according to particular terms and concepts your business uses. For example, all images tagged with “female” and “dress” can be customized as “women’s apparel.”
- Building an algorithm to determine what’s considered a matching tag. For example, instead of displaying product images with identical tags, you can display images with associated tags to what the user has selected (e.g., displaying “toothpaste” when the user has selected “toothbrush”).
- Saving user selections in a database so that you can learn more about the user over time.
This demo shows a simple Python code solution for providing e-commerce product recommendations to users based on their previous selections. There’s so much more you can do to develop this solution to suit your organization’s particular needs.
With Cloudinary, identifying user selections and recommending product images to match, based on a huge volume of unseen images, is now feasible. Cloudinary’s AI capabilities provide the foundation, and from there, the sky’s the limit. I invite you to customize your own solution.
