
Imagine being able to create a beautiful collage of digital images automatically, on a mass production scale, with unknown inputs, in any layout. For example, you could create:
- A product page gallery collage that you can share with a click
- An album or gallery of real estate or travel properties to showcase your agency’s offerings
- A banner collage from images coming from a web page crawler, or technical flow instructions
You can do it easily using Cloudinary’s Image Collage generation feature.

I’m proud to have developed this exciting Cloudinary feature. In this post, I’ll introduce you to this feature and explain how my team and I:
- Built a simple, developer-friendly interface for creating customizable collages
- Resolved the templating challenge by creating a flexible array representation to fit all needs
- Considered several tradeoffs to resolve the gap challenge while satisfying desired collage properties, without compromising the resolution
Our goal in developing the ImageCollage generation feature was to empower Cloudinary users to choose collage dimensions, assets, spacing, and layout. Most of these parameters are represented easily by a json. But how could we determine the collage layout? This was our first challenge.
A grid layout was our first choice. We started with the following json representation:The first thing to tackle was how to represent collage generation easily. We would like to allow the user to choose the collage dimensions, assets, spacing and layout. Most of these parameters are represented easily by a json, but how to determine the collage layout?
It was clear that `grid` should be the first one to develop. So we started with the following json representation:
manifest_json={
  "template": "grid",
  "width": 500,
  "height": 500,
  "columns": 3,
  "rows": 3,
  "spacing": 2,
  "color": "white",
  "assetDefaults": { "kind": "upload", "crop": "fill", "gravity": "center" },
  "assets": [
    { "media": "docs/collage/blog/australian-animals/tasmaniandevil" },
    { "media": "docs/collage/blog/australian-animals/kangaroo" },
    { "media": "docs/collage/blog/australian-animals/cassawary" },
    { "media": "docs/collage/blog/australian-animals/echidna" },
    { "media": "docs/collage/blog/australian-animals/koala" },
    { "media": "docs/collage/blog/australian-animals/emu" },
    { "media": "docs/collage/blog/australian-animals/platypus" },
    { "media": "docs/collage/blog/australian-animals/wombat" },
    { "media": "docs/collage/blog/australian-animals/kokatoo", "gravity": "north" }
  ]
}Code language: JavaScript (javascript)
Let’s dive into the parameters.
The template parameter defines the collage layout. A grid requires the following dimensions to be defined:
- Width
- Height
- Spacing between images
In addition, row and column counts should be defined to determine the number of images in the collage. This is achieved by setting the following parameters:
- Width
- Height
- Spacing
- Rows
- Columns
The images that compose the collage are specified by the assets parameter, which is an array that should match the template size (rows x columns).
Next, we explored collage customization.
Setting the “color” parameter determines the color of the spacing between images. Options for personalizing assets include:
- Setting defaults for all assets to control the resource delivery type (upload/fetch/restricted), crop, and gravity, defined by the “assetDefaults” parameter
- Setting specific asset properties by specifying the desired ‘kind’, ‘crop’, and ‘gravity’ and thus allowing maximum flexibility in asset personalization
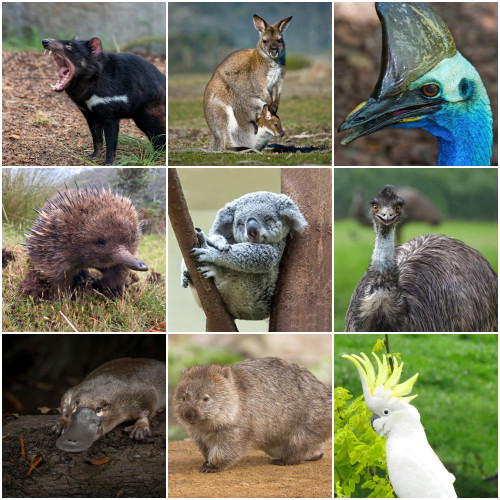
The manifest json above produces the following collage:
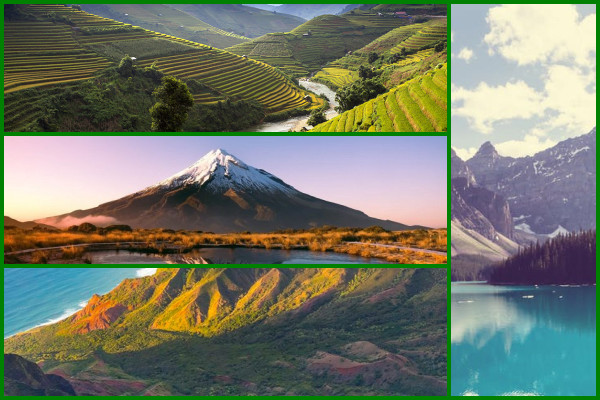
The challenge that remained was representing custom collage templates. Let’s have a look at some template options:

We could use predefined templates using a string representation as we did for the grid layout, but we wanted to provide users with more template options.
Assuming the whole collage is a 3×3 matrix, we merged cells to get the desired template. Each image is mapped to a single cell or multiple cells and represented by a color and a number.
Let’s see how this looks:

Numbers are determined left to right, top to bottom.
Removing the colors, we could now represent the collage template in a simple numeric array:
Want a different template configuration? No problem! Simply add more rows and columns to create your desired template.
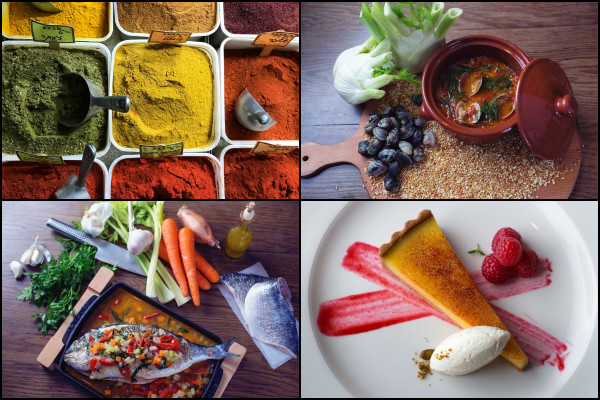
Here’s the finalized manifest json for a custom template:
manifest_json={
"template": [[1, 2, 2],
[1, 3, 3],
[1, 3, 3]],
"width": 600,
"height": 400,
"columns": 3,
"rows": 3,
"spacing": 2,
"color": "black",
"assetDefaults": { "kind": "upload", "crop": "fill", "gravity": "auto"},
"assets": [{ "media": "docs/collage/blog/dogs/dog1" },
{ "media": "docs/collage/blog/dogs/dog2" },
{ "media": "docs/collage/blog/dogs/dog3"}
]
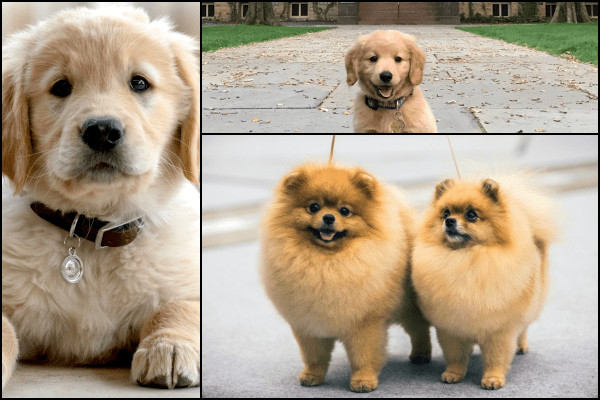
}Code language: JavaScript (javascript)And here’s the collage it produces:
The next challenge we tackled was validating input.
Looking at the examples above, it is clear that the only valid template options are a square or a rectangle. In addition, the image numbers should be consecutive, should not repeat themselves in different images, and should be ordered as I previously explained.
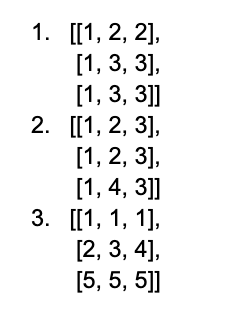
Here are two examples of invalid inputs:

The first example is invalid because image 2 is not a rectangle or a square.
The second example is invalid because there is a repeated number (2) and a jump in images numbering (5 instead of 4).
Looking closely at the first example, the problem is that cells (0,1), (1,0), (1,1) don’t create a square; they form an L-shaped structure. Any possible L structure is invalid even if it is rotated by 90, 180, or 270 degrees.
Looking at the (2,1) cell in the second example, there is no adjacent horizontal or vertical cell with the same number (lonely cell), and the number already appears in a previous image in the template . Let’s ignore the numbering consistency for now as this is easy to resolve.
After analyzing the input, validating the user input is easy: just search for “L” structures or lonely cells.
Last but not least, we tackled the challenge of collage layout dimensions.
Let’s look at another example. Let’s assume we’re creating a 1×3 grid collage of size 1000×1000. Dividing the total width in the images count, to get each image width, results in 1000/3=333.333
We’re working in pixels, which must be integers. We had several options here:
- Leave a gap at the end, the start, or divide the missing pixels per image. How should we handle it in custom templates?
- Stretch the last image to fill the gap (consider the edge cases, e.g., 1×1000 grid)
- Produce a collage with adjusted dimensions after ceiling/flooring each image dimensions
Let’s look at what Option 1 above might look like, where each blue section is a different image:

Not looking very nice, is it?
Fortunately, we used existing Cloudinary capabilities to enhance the collage layout.
We started by rounding up any floating point value per image, such that every image had integer dimensions. After creating the whole grid using Cloudinary’s resize, the collage is then downscaled to the desired dimensions. We thus filled the gap without losing resolution. (Note: Some resolution is, in fact, lost while ceiling each collage image, but this has a limited effect as 0 < diff < 1, while the alternative, upscaling the whole collage, may create a diff > 1.)
On a personal note, this was the first feature I developed in Cloudinary and I had a great time doing it while learning the system. Ready to start creating beautiful collages of images for your website with maximum flexibility using Cloudinary ImageCollage generation? Learn how to create your own collages here.


