
Using alternative text (alt text) in HTML has long been a common SEO best practice, which also works well for accessibility. This post shows you how to programmatically generate, save, and use alt text for your images on Cloudinary.
According to Moz, alt text is “used within HTML code to describe the appearance and function of an image on a page.” Alt text serves three purposes:
- It enables accessibility, that is, helps visually impaired users understand the content.
- It serves as a placeholder in case the related images are not accessible.
- It helps search-engine crawlers index content by providing context.
Ideally, you should tag all your images with alt text. Even if you don’t do that, the rule of thumb is that if an image is relevant to the content, add alt text to the image.
For example, you could skip alt text for decorative images. However, if they fail to load, your viewers will have no clues of what they are missing. Hence, for better user experience, make alt text for images a universal practice.
When you upload an image to Cloudinary, we assign it a metadata field called Context Metadata. Within this field is a placeholder for the alt text, which is displayed on a mouse-over or a click of the image for a preview.

Alternatively, if you have structured metadata enabled, you can access the alt text by following these steps:
- Choose an image and then click the spanner icon for the settings.
- Click the Transform button on the top-right corner.
- Click the Edit metadata link. The context details for the image are then displayed, as in the example below:

Later in this post, you’ll learn how to tag images with alt text by making use of the alt field shown above.
To set alt context metadata, set up the context method. For example, on Python, type:
result = cloudinary.uploader.add_context(context, public_ids, **options)
Next, retrieve the tag with Cloudinary’s “Get details of single resource” API. In Python, the code looks like this:
cloudinary.api.resource(public_id, **options)
Look for the field context->custom->alt in the JSON response. This partial response is an example:
{
  "public_id": "wvpbmcdyuxdcktgaqwgz",
  "format": "jpg",
  "version": 1575658469,
  "resource_type": "image",
  ...
  "tags": [
    "bird",
    "brown pelican",
    "pelican"
  ],
  "context": {
    "custom": {
      "alt": "pelican perched on wooden dock during daytime"
    }
  }..
}
Now comes the million-dollar question: how do you generate the alt text at scale? An earlier blog post titled Making Media Accessible: How to Automatically Generate alt Text for Images has the answer. To interpret images, use a third-party API offered by CloudSight.
While uploading images to Cloudinary, you can specify a webhook notification URL. Take advantage of that capability for tagging. The diagram below illustrates the process.

Note that https://api.cloudsight.ai/v1/images is the endpoint for tagging images here.
Once an alt tag has been generated, you can fetch it with Cloudinary’s single- resource API. However, that API is rate limited and the usage limits vary according to your Cloudinary plan.
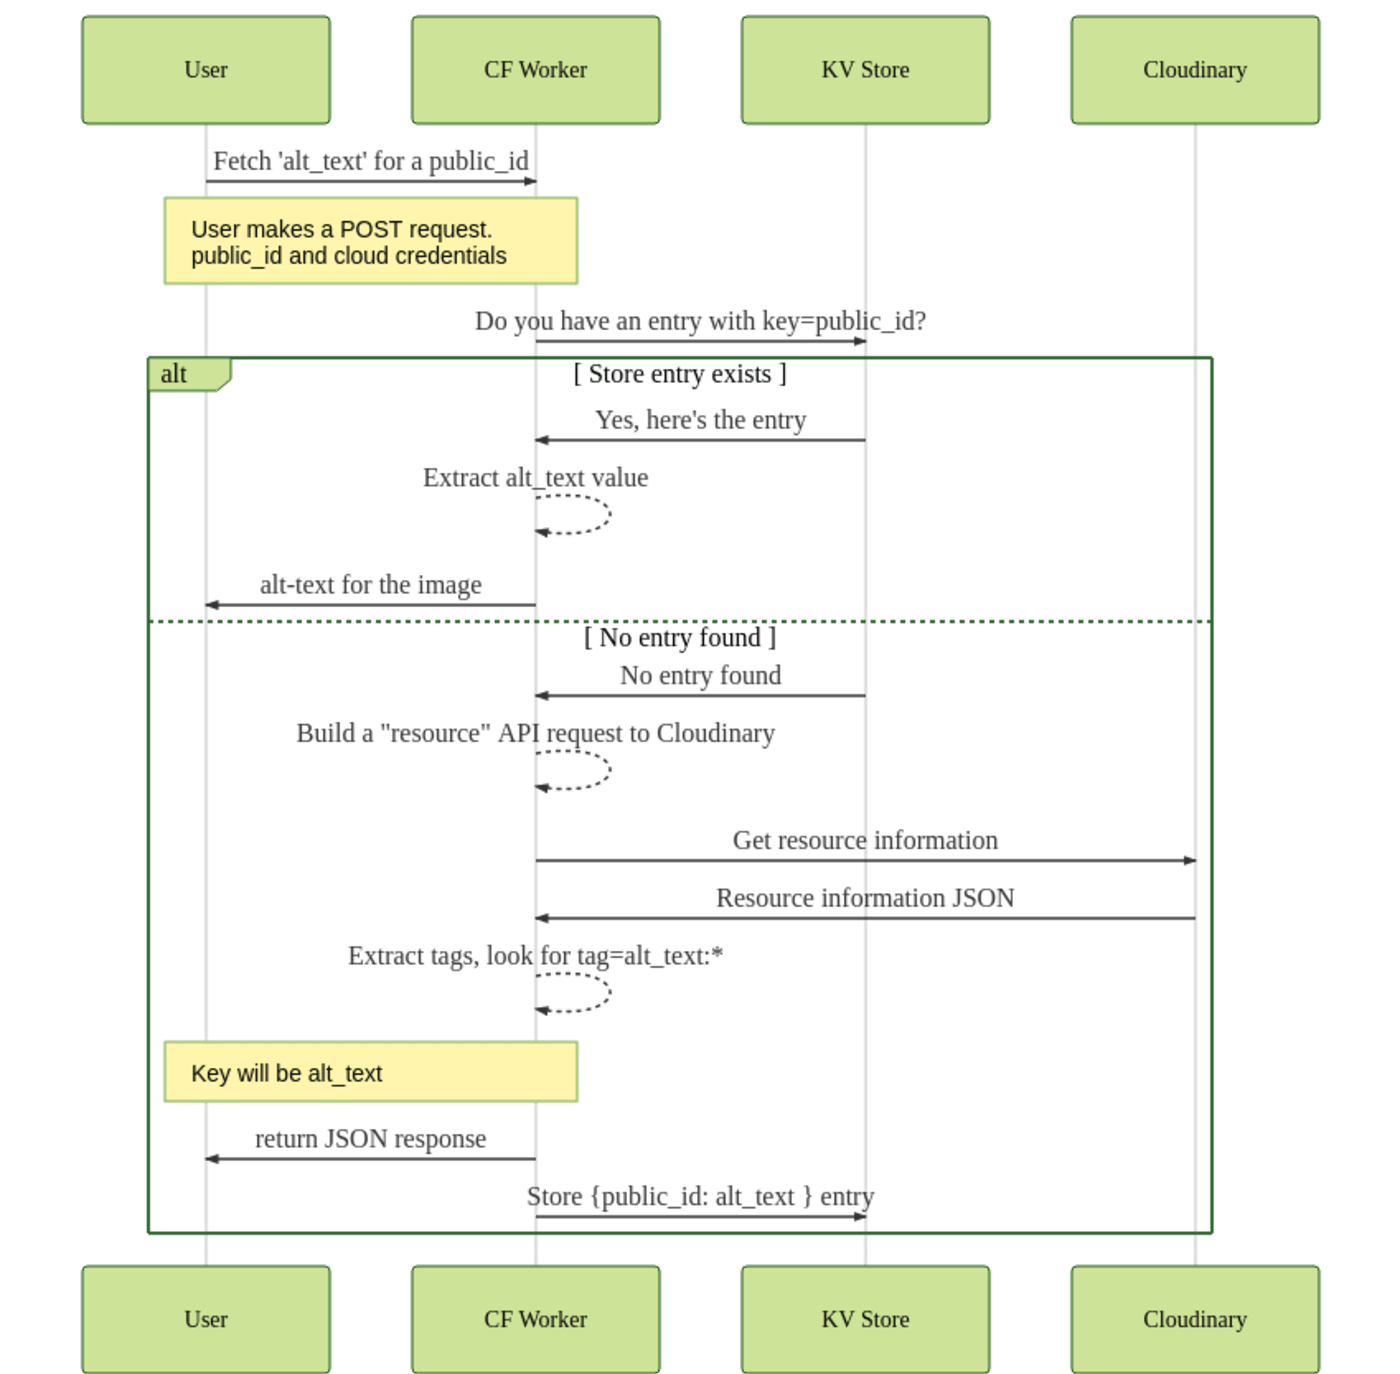
As an alternative, set up a Cloudflare Worker as your proxy. By proxying the call through that Worker, you can cache the response in a Cloudflare Workers KV, which you can then leverage at scale without incurring API rate-limits.
In this workflow, when you request the tag information for an image, the Cloudflare Worker checks the KV database. If it finds no entry there, the Worker fetches the details from Cloudinary and returns and caches them in the KV store, serving all subsequent requests from there. Caching is necessary to avoid hitting the rate limits in the underlying Cloudinary API call.
See the diagram below for the process.
Below are two sample requests.
When you request the alt text for an image for the first time, it’s not in the KV store, as indicated in the example response below:
curl -s "https://testfetch.cloudinary.workers.dev" -d '{"cloudName": "<cloud-name>","publicId": "some-image", "apiKey": "NNNNNN", "apiSecret": "XXXX"}' -H "Content-Type: application/json" | jq

{
  "alt_text": "pelican perched on wooden dock during daytime",
  "source": "API call"
}
If an image’s alt text is present in the KV store, the Cloudfare Worker returns the response, incurring no API cost. The request format is the same as the preceding example. The response looks like this:
{
  "alt_text": "pelican perched on wooden dock during daytime",
  "source": "KV Store"
}
Currently, Cloudflare Workers cannot delete entries. However, you can do that by resetting the cache-expiration time to zero (0) with this syntax:
YOUR_KEY_NAMESPACE.put(publicId, tagWord, { expirationTtl: 0 })
The key is then deleted from the store.
Are you ready to make your images accessible? Do give Cloudinary a try for free. Here is the sample code for building the solution described in this post. Looking forward to see what you build!