
Sending API requests to Cloudinary is the bare minimum required to unleash all your media potential. It happens all the time. You’ve sent multiple API requests to Cloudinary just by loading this blog post (or at least your browser has). Loading media in your browser is as simple as a get request to an image or video URL and our URL API returns you exactly what you’re after.
Uploading and managing your media is a little more complex though, and understandably, has additional barriers such as authentication. You can handle all of this using one of our many SDKs, or you can make use of our Command Line Interface, but what about if you just want to try out a few requests without having to write code or install the CLI? This is where Postman comes in. Postman is the number one tool for helping developers build out and test REST APIs, be it your own or, in this case, Cloudinary’s.
Postman comes with a comprehensive set of features, designed to help you easily send API requests to a number of different services with only minimal setup. Start simple by sending a few requests to get an idea about the API and the responses you might get back, before progressing to using it for scheduling tasks, running complex workflows, or including it in a CI pipeline.
This blog post will introduce you to the Cloudinary Postman collections and show you how to make use of a variety of features Postman has to offer.
To help you follow along with the examples in this blog post, we’ve created a Cloudinary Examples collection that includes a set of folders and requests which you can view and optionally fork.
Before digging into some examples and use cases, get familiar with the Cloudinary Postman collections. They are designed to provide example requests for all of our API endpoints and with just a few setup steps are ready for you to update with your own credentials and parameter values. The Programmable Media collections are located in a dedicated public Postman Workspace and are split up by API.
Before you can start sending your first requests, you’ll need to get yourself set up with the collections. We have an in-depth guide for this in our documentation, but we will run through the steps below.
If you don’t already have a Postman account, you’ll need to sign up for a new account in order to fork the collections.
Your Postman environment allows you to define a set of variables that can be used across multiple requests. For the Cloudinary Collections, use the environment to set your account credentials. You can find the Cloudinary environment included with the Cloudinary Collections, you can fork this to your workspace and then set your credentials.
Head to the Programmable Media public Postman Workspace and find the collection/collections you want to start using. You’ll need to fork each one to your own workspace before you can start updating parameters and sending requests.
The Cloudinary collections can be run with minimal adjustments to the parameters and values. Most collections will include placeholder values. In some cases, these values will need to be updated to use valid values for your account and media assets.
After making sure that all required parameter variables have valid values, click the Run button to send your request and view the response.
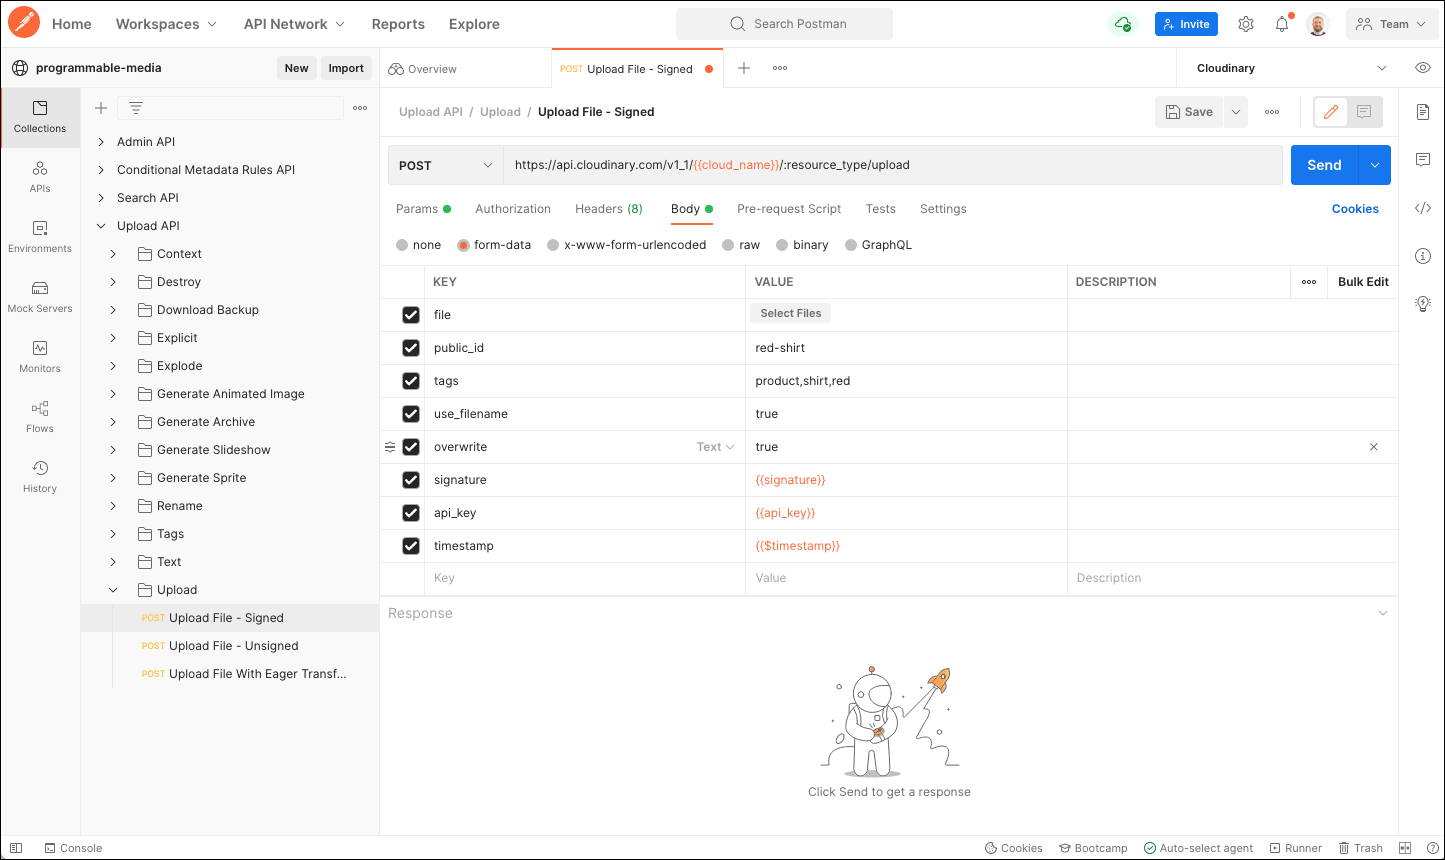
For requests made to the Upload API, the Cloudinary Postman collections have a pre-request script that runs before the request is made. This script handles the signature generation, which is required to be able to send a direct request to the API, making it super simple and intuitive.
You can find an example of a signed upload request in the “Uploading” folder of the Cloudinary Examples collection. The pre-request script is included with the request so you can see how this works and experiment easily with uploading to your Cloudinary account using Postman.
Running single requests is a great way to learn and understand how the Cloudinary APIs work, but what if you wanted to accomplish a simple workflow involving your media using Postman. Thankfully, Postman has some great features that allow you to achieve this with some basic scripts. The Postman Runner is one such feature, allowing you to run a set of requests from a collection as a sequence.
An example of this would be to search for a set of assets based on their size and the date they were uploaded and then generate a zip archive of these old images.
Take a look at the “search and generate archive” folder in the Cloudinary Examples collection, here you will find two requests. One uses the search API to retrieve a list of all image assets smaller than 5MB that were uploaded over two years ago. The results are also restricted to a maximum of 5 and sorted in order of when they were created, starting with the oldest.
The code for this is:
{
   "expression": "uploaded_at<720d AND resource_type:image AND bytes<5000000",
   "sort_by": [{"created_at": "asc"}],
   "max_results": 5
}
Code language: JSON / JSON with Comments (json)
You’ll notice there’s also a “test” configured for that request which takes the response and stores the public_ids in a collection variable as an array:
const jsonData = JSON.parse(responseBody);
const publicIds = []

jsonData.resources.forEach(resource => publicIds.push(resource.public_id));
pm.collectionVariables.set("public_ids", publicIds)
Code language: JavaScript (javascript)
This data is then pulled in by a “Pre-request Script” for the second request which uses the generate_archive method of the upload API to create a zip archive of all the images that were identified using the search. In the example, we’re also adding a transformation that applies an old-fashioned-looking filter.
const publicIds = pm.collectionVariables.get("public_ids");

publicIds.forEach(pids => {
   pm.request.body.formdata.add({
   key: 'public_ids[]',
   value: pids
});
})
Code language: JavaScript (javascript)As this request is a signed request using the upload API, the code to generate the signature is also included in the pre-request script. This is the same script that is set for all the example requests provided in the Upload API collection.
Now that we have a collection that can be run using the runner, this can be configured to run on a schedule. The Postman feature for this is called Monitors.
You might want to tweak the above example to instead delete the large assets that were uploaded over two years ago. The “Search and delete” folder of the Cloudinary Examples collection demonstrates this. Using the requests in this folder, you could create a new Monitor and set the frequency to run once a week. Now, each week you’ll receive an email notification with a summary of the requests that were run and you’ll be able to keep a track of the media assets that were cleaned up.
- Currently, Monitors can only be configured to run on a whole collection, rather than just a single folder. When setting up a monitor, ensure that you have a dedicated collection containing only requests you want to include in the scheduled job.
- Be careful when running any of the requests that delete assets to ensure you’re not deleting anything important.
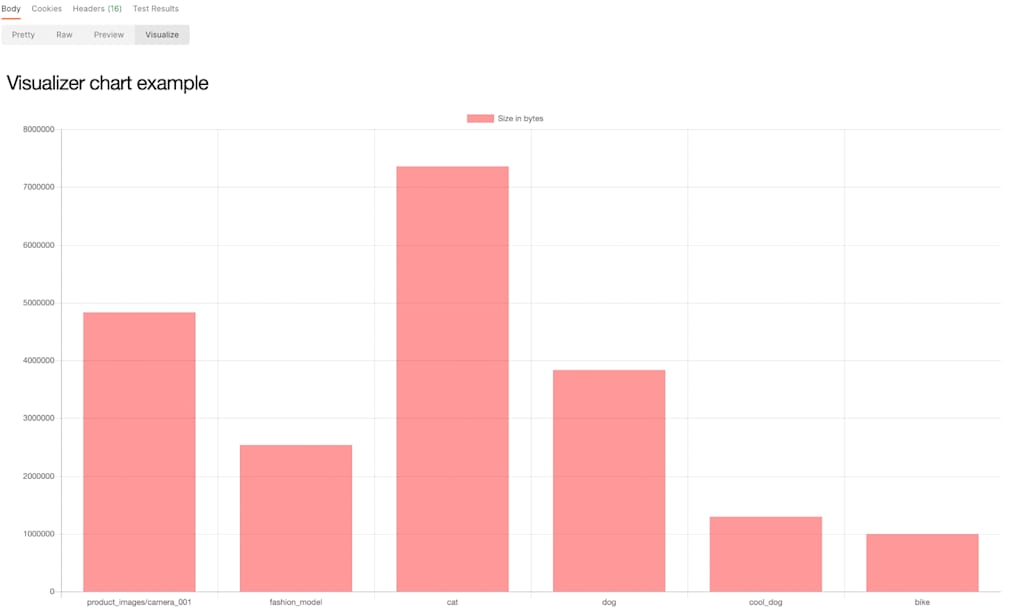
Visualizations provide a neat way to see the results of your requests, and given media is very visual, they work nicely with the Cloudinary Postman collections. Once you’ve run a request, you can open the “Visualize” tab from the results pane. By default, nothing will be displayed but with a few lines of code, you can transform the response into a visual representation, be that a chart, a graph, or even a basic HTML page.
To see an example of this, open the “visualizations” folder in the Cloudinary Examples collection. This demonstrates two visualizations, one plots the size in bytes of a set of files with a given tag and the other takes those images and renders them as HTML. A nice visual way to see your assets directly through Postman.

Postman is a powerful tool to have in your toolkit when testing out the Cloudinary APIs. With our pre-configured collections, you can easily try out the various requests and get an understanding of how the APIs work before integrating them into your ecosystem. Not only that, you can take Postman’s various features and functionality to run media workflows or to easily visualize the state of your Cloudinary account. Why not go ahead and fork the collections now to start taking advantage.


