
In this article, we will take advantage of a new feature provided by Cloudinary, which is video slideshow generation. We will build an application that uses a webcam to capture images and generate a slideshow video with them.
Here is a link to the demo on CodeSandbox.
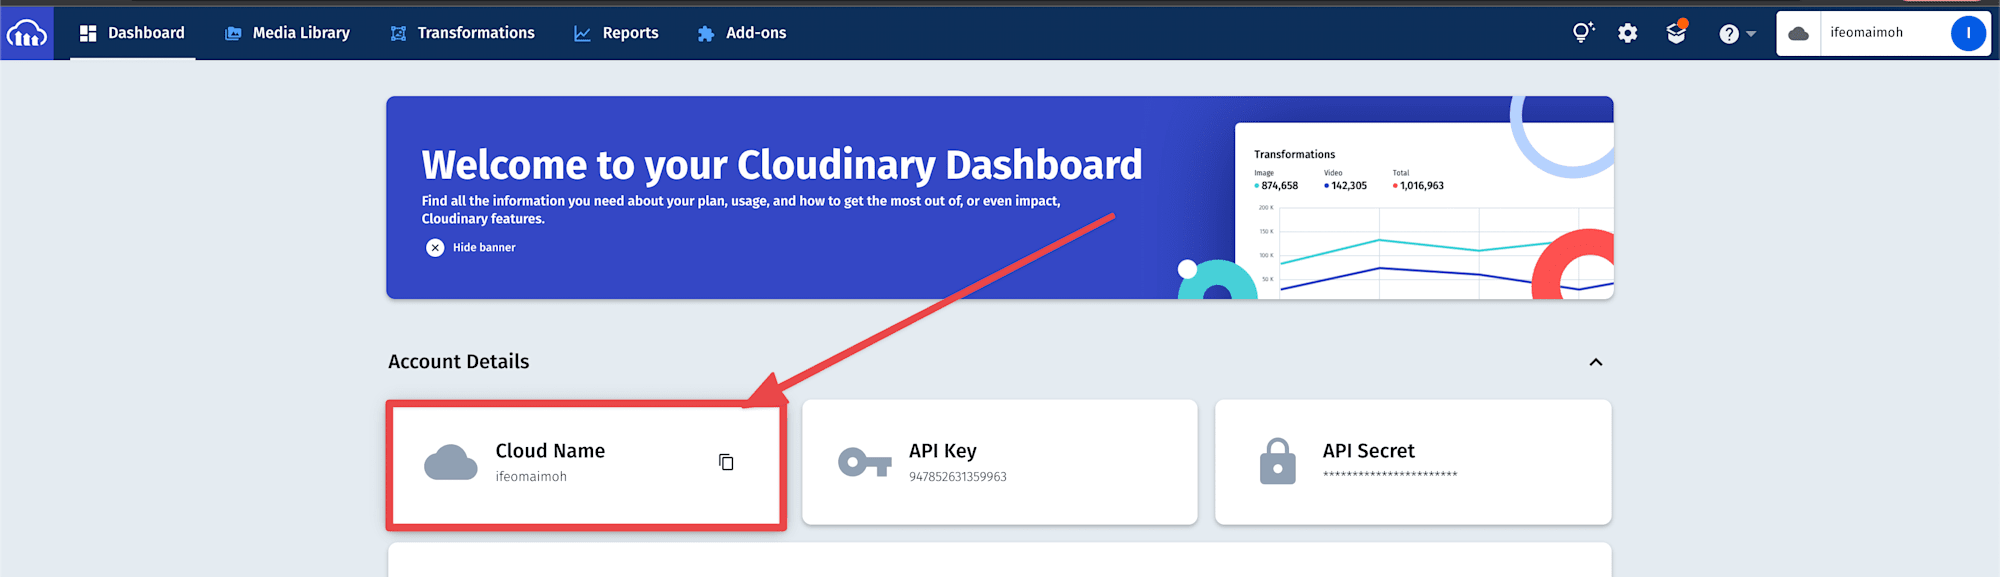
To store and manage media using the Cloudinary platform, we need to create an account. In the account details section on your dashboard, you should see your Credentials, as shown below. In our case, we only need the Cloud name.
Since all our uploads will be done on our client application, we need to create an unsigned upload preset. See here for how to create an unsigned upload preset.
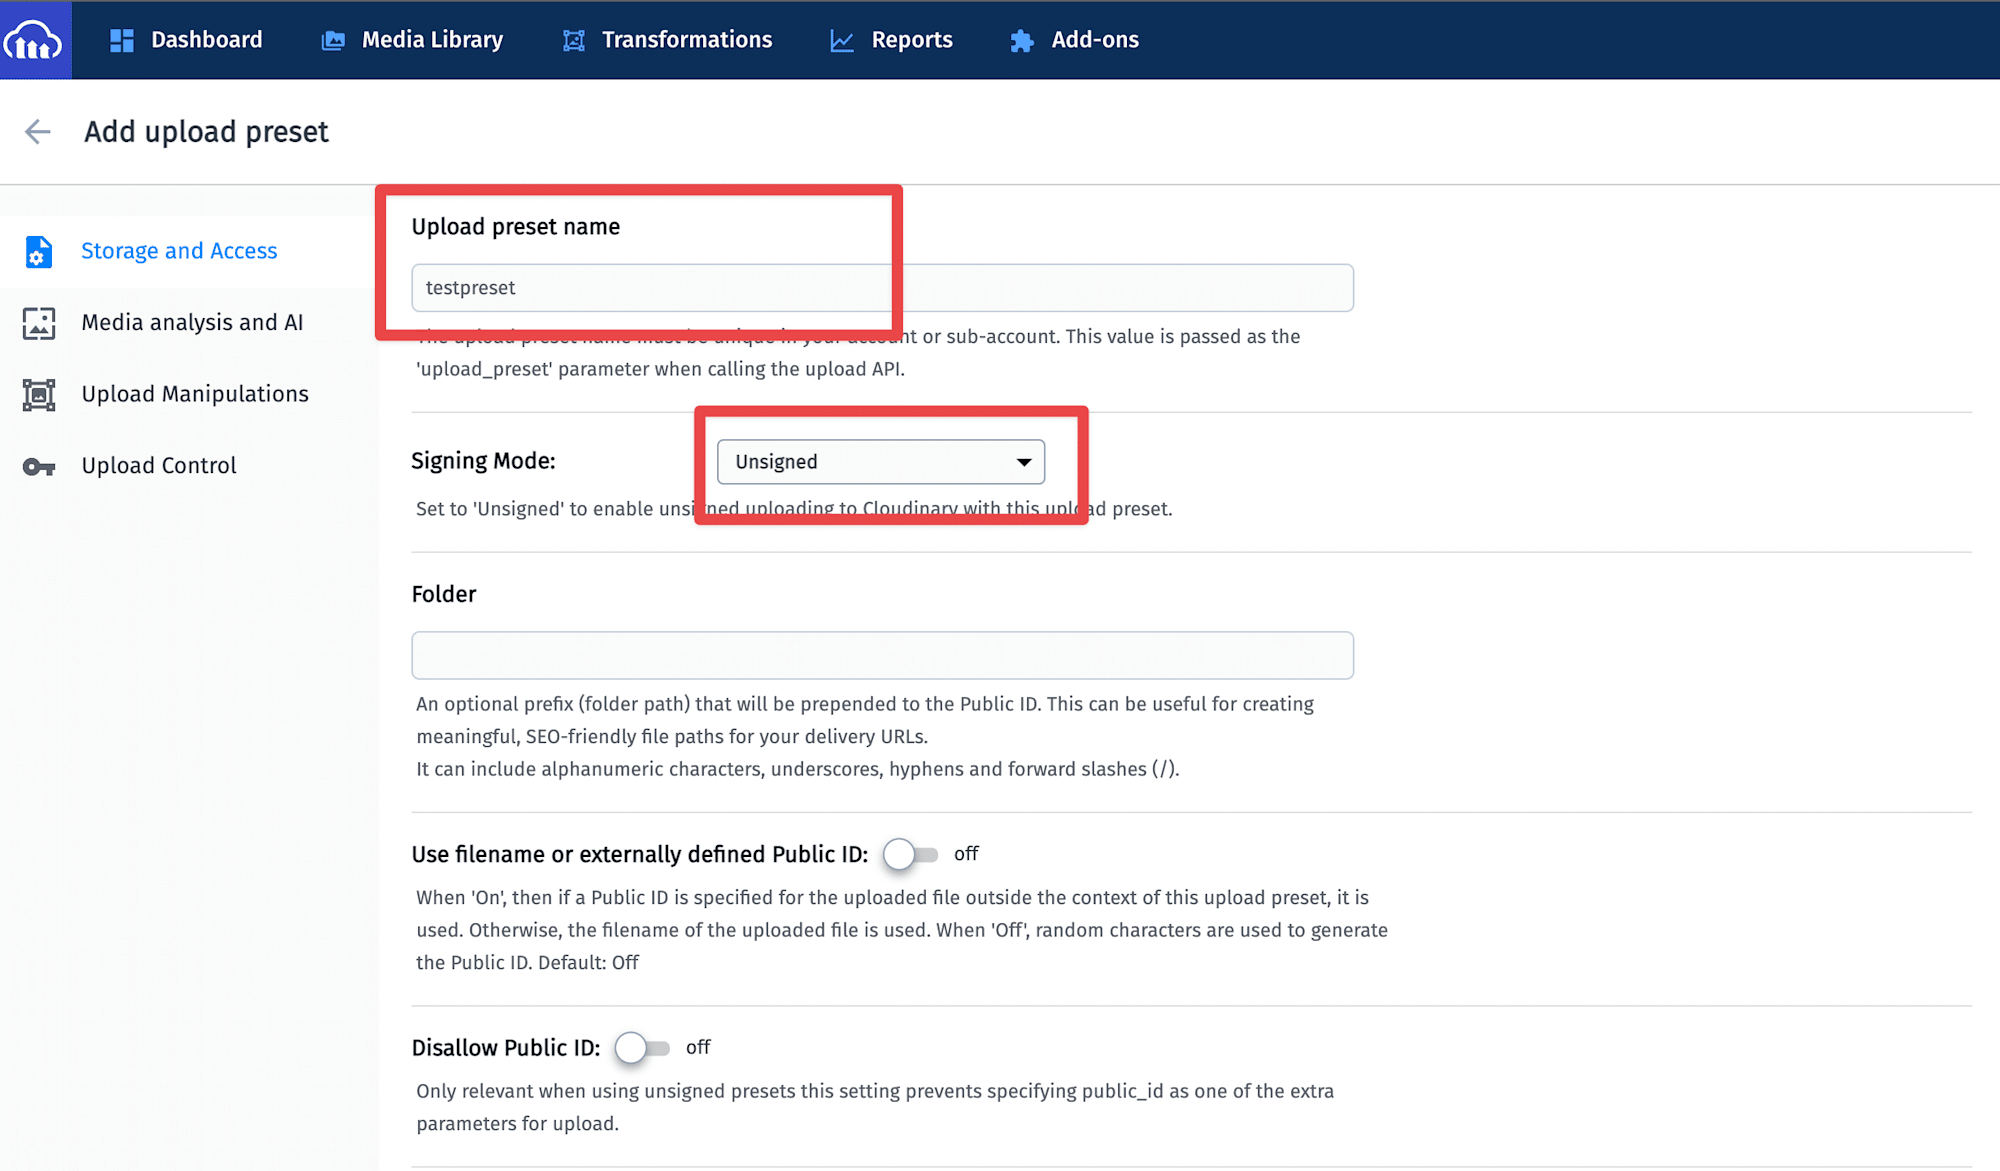
Take note of your preset name because we will need it later. As seen in the image above, I created an unsigned upload preset called testpreset, but you can use any name you like.
Cloudinary provides us with two ways to generate slideshows. In our case, we will be using the delivery URL method, and this requires a CLT template file provided by Cloudinary. This template file will be used to generate our slideshows. We need to download the template file and upload it to our Cloudinary account. See here for how to upload an asset to Cloudinary using the media library.
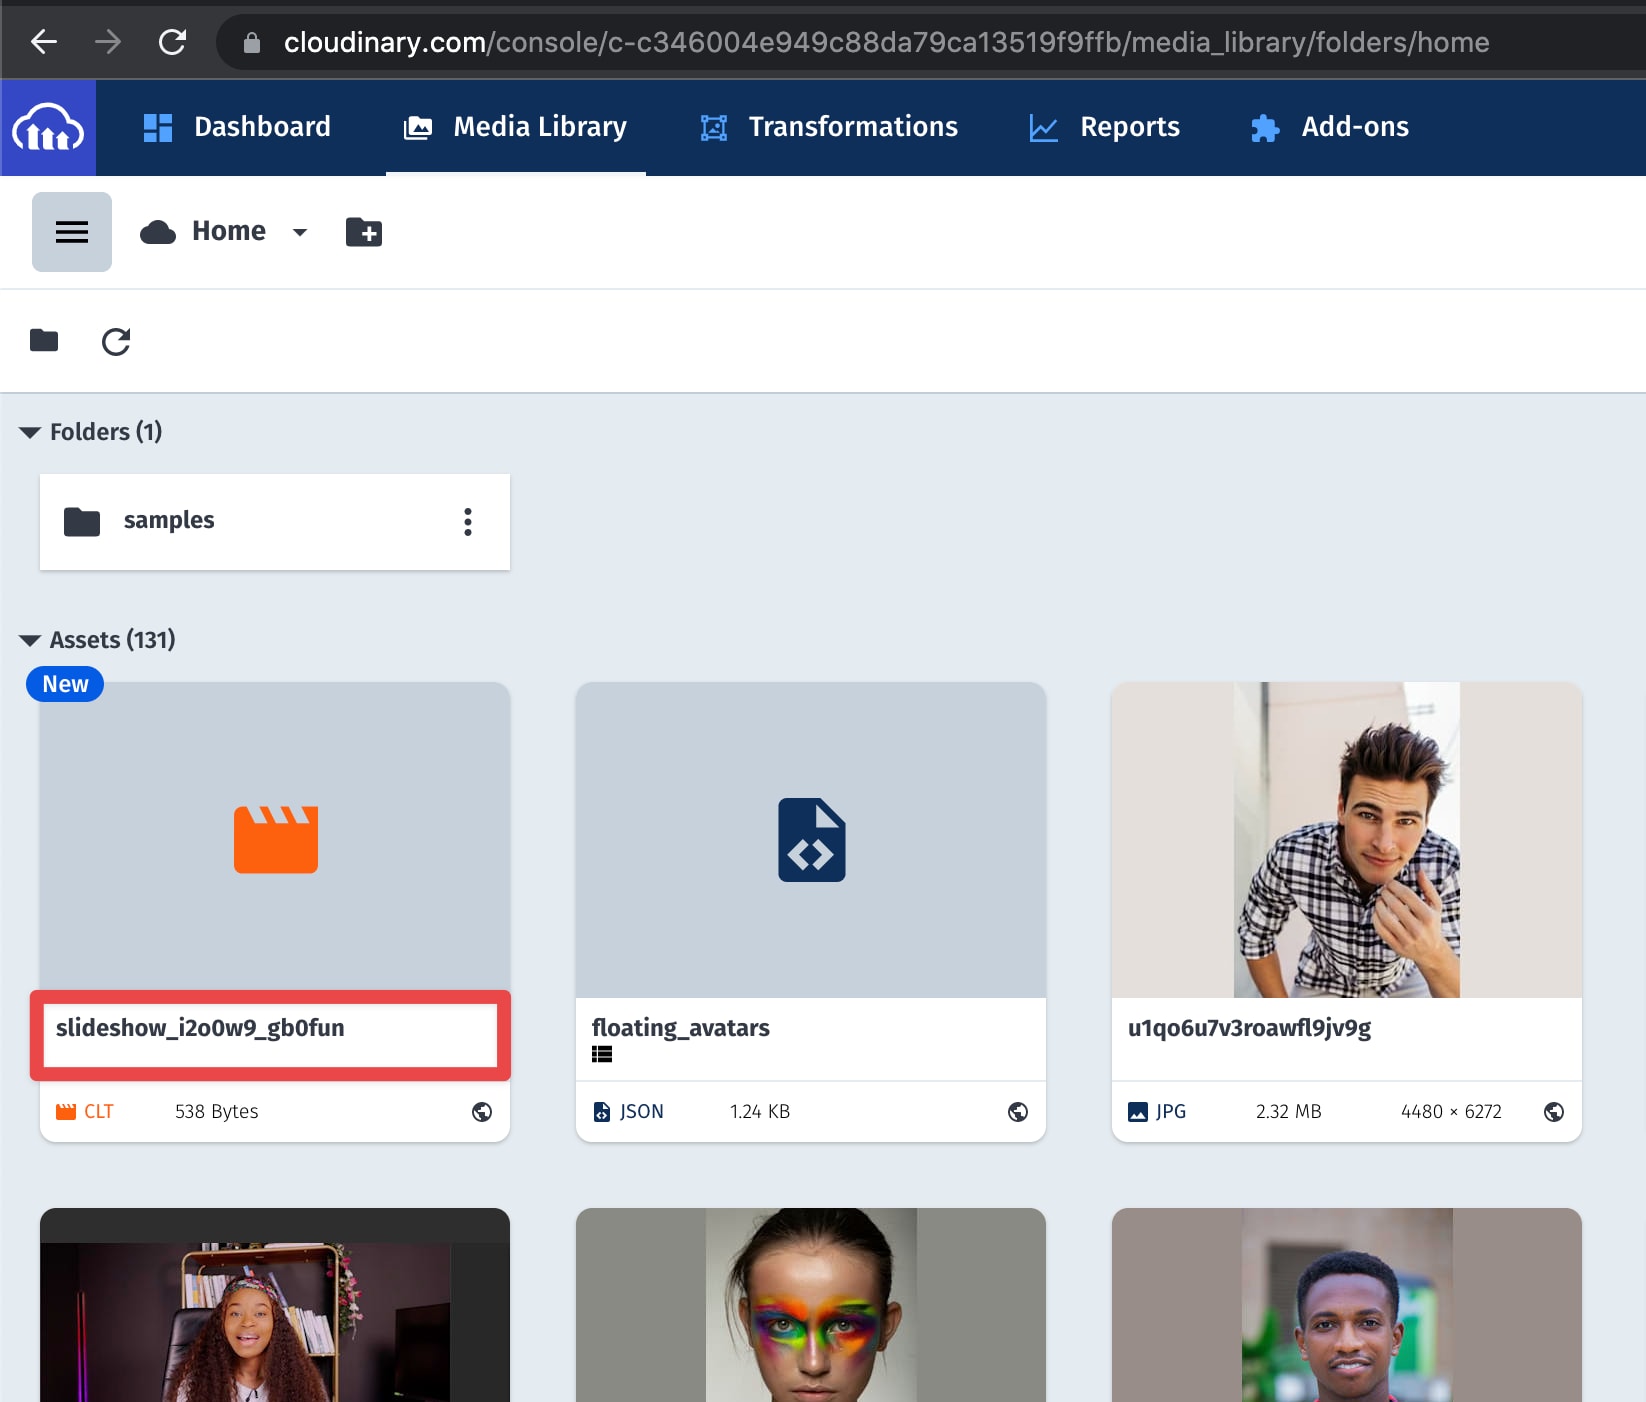
After a successful upload, you should see the template file appear in the list of your media files. Take note of the template file’s publicID as seen above. We’ll need it later when generating URLs for our slideshows.
Run this command in your terminal to create a simple React application:
npx create-react-app my-slideshow-app
Next, run the following command in your terminal to install the dependencies we’ll need for this project:
npm i axios react-webcam
The axios module will be the HTTP client, while react-webcam will be used to access the user’s camera to capture images.
The essence of our application is to display a slideshow containing some images. These are the pieces that make up our app, along with their fundamental roles:
- Camera: This represents our image source.
- Image Previewer: Used to display and delete images.
- SlideShow Previewer: Used to display the slideshow, which is just a regular video.
Create a folder called components in your src directory. Create a file called WebCamera.js inside the components folder and add the following to it:
    import Webcam from "react-webcam";
    import { useRef } from "react";

    const WebCamera = ({ onCapture, loading }) => {
      const capture = async () => {
        // get screenshot
        const image = webCamRef.current.getScreenshot();
        onCapture(image);
      };
      const webCamRef = useRef();
      const videoConstraints = {
        width: 500,
        height: 400,
        facingMode: "user",
      };
      return (
        <article className="media_box">
          {/* web cam */}
          <Webcam
            audio={false}
            height={400}
            ref={webCamRef}
            screenshotFormat="image/jpeg"
            width={600}
            videoConstraints={videoConstraints}
          />
          <button
            disabled={loading}
            onClick={capture}
            className={"capture_btn"}
          ></button>
        </article>
      );
    };
    export default WebCamera
Code language: JavaScript (javascript)
In the code above, the Webcamera component expects two props. The onCapure prop will be used to return a captured image to the parent component that renders it, and the loading prop will be used to toggle the loading states of some sort internally. The component starts by creating a function called capture accompanied by a reference variable and an object that defines the specifications we want on the video track. Here, we specified that the video should have a resolution of 600 by 400 and that it should be streamed from the front camera.
Its return statement renders the Webcam component, which accepts the reference variable, the video constraints, and the format for the captured image as props.
A notification will be displayed requesting permission to access the front camera. If the user accepts, it binds some methods to the reference variable passed, one of which is the getScreenshot() function used to take a picture and then feed the resulting base64 encoded string representing the image to the onCapture prop. The capture function is triggered by a button that is disabled when loading to prevent the user from taking more pictures.
Next, we need to create a component that will be used to display captured images. In your components folder, create a file named ImagePreviewer.js and add the following to it:
    const ImagePreviewer = ({ url, del }) => {
      return (
        <figure className="single_img">
          <img src={url} alt={`captures`} />
          <button className="btn_red" onClick={del}>
            Delete
          </button>
        </figure>
      );
    };
    export default ImagePreviewer;
Code language: JavaScript (javascript)
This component renders an image using the URL it accepts as props and a button that deletes the image when clicked. Now that we have our WebCamera and ImagePreviewer components set up, we can use them in our App.js file. Replace the code in your App.js file with the following:
    import { useState } from "react";
    import WebCamera from "./components/WebCamera";
    import ImagePreviewer from "./components/ImagePreviewer";
    import "./App.css";
    export default function App() {
      const [loading, setLoading] = useState(false);
      const [images, setImages] = useState([]);
      const onCapture = (newImage) =>
        setImages((prevImages) => [...prevImages, newImage]);
      const deleteImage = (ind) =>
        setImages((prevImages) => images.filter((_, index) => index !== ind));
      return (
        <main>
          <section className="main con">
            <WebCamera onCapture={onCapture} loading={loading} />
          </section>
          <div></div>
          <section className="captured_imags_con con">
            {images.map((imgURL, index) => (
              <ImagePreviewer
                url={imgURL}
                key={index}
                del={() => deleteImage(index)}
              />
            ))}
          </section>
        </main>
      );
    }
Code language: JavaScript (javascript)
This Component starts by creating two state variables, one to manage the loading state, and the other is an array to store the captured images. We also have two functions that update and delete images from the array.
It then returns the WebCam component, which receives the required props. We also iterate over the array of images and display them on the screen.
Start your development server and head over to your browser to see how our application currently looks.
npm start

Our app currently allows us to capture, view, and delete images. Next, we need to combine these images and generate a slideshow. Irrespective of the method chosen to generate slideShows, every Slideshow created using Cloudinary consists of the following components:
- Template: this is the template file provided by Cloudinary that we uploaded earlier.
- Manifest transformation: refers to the global Slideshow settings, global slide Settings, and ****individual slide settings(the images or videos you want to include in the slideshow and their settings).
- Global transformations: the visual enhancements, filters, and effects you wish to apply to the resulting slideshow.
In this post, we will create our slideshows using the Delivery URL syntax, which combines the components mentioned above to give the following syntax.
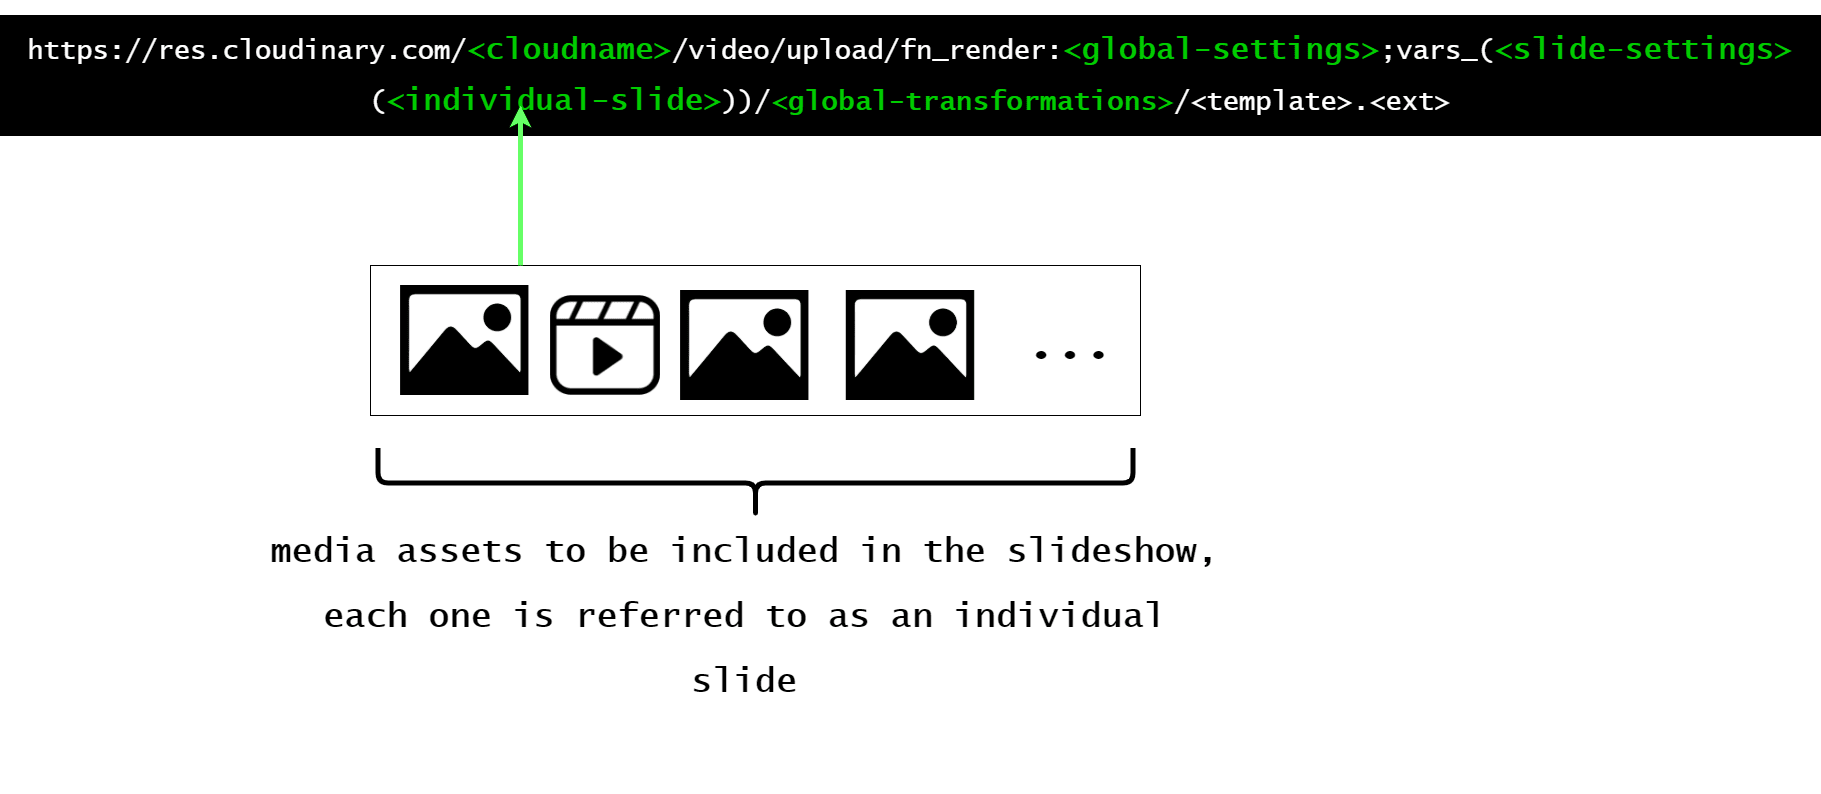
From the diagram above, we can see the part of the URL where the settings would live, but most importantly, we see where our captured images will live. We cannot directly embed the base64 encoded version of our captured images in this URL. We need to upload them first, get their publicIDs, and embed them in the URL.
Let’s create a file that will hold some utility functions. Create a file named helpers.js inside your src folder and add the following to it:
    import axios from "axios";

    const cloudName = "ifeomaimoh";
    const upload = async (imgFileB64) => {
      const imageData = new FormData();
      imageData.append("file", imgFileB64);
      imageData.append("upload_preset", "testpreset");
      const res = await axios.post(
        ` https://api.cloudinary.com/v1_1/${cloudName}/image/upload`,
        imageData
      );
      const imageDetails = res.data;
      return imageDetails.public_id;
    };

    const genDeliveryURL = (arrOfAsetIds) => {
      const templateID = "slideshow_i2o0w9_a1hyoq";
      const globalSettings = `w_500;h_500;du_10`;
      const slideSettings = `tdur_1500;transition_s:InvertedPageCurl`;
      const individualSlides = arrOfAsetIds
        .map((id) => "(media_i:" + id + ")")
        .join(";");
      return `https://res.cloudinary.com/${cloudName}/video/upload/fn_render:${globalSettings};vars_(${slideSettings};slides_(${individualSlides}))/${templateID}.mp4`;
    };
    export { upload, genDeliveryURL };
Code language: JavaScript (javascript)
In the code above, we start by importing the axios module, and then we define a variable that holds our Cloud name. The upload function accepts a base64 encoded string representing an image as an input. It uses the input file and the upload preset we created earlier to create the request body. It then makes a request to the API to upload the image. If the request is successful, it returns the public ID of the uploaded image.
The genDeliveryURL function returns a URL for the slideshow. It accepts an array containing the public IDs of images. It creates several variables that match the components of the slideshow. Most of the settings specified are based on preferences.
First, we stored the publicID of our CLT template. For global settings, we specified the dimensions of the video to be 500 by 500, and it should last for a duration that is twice the number of images provided (i.e., two images would take 4s). We specified 1500ms as the duration for each slide transition for the global slide settings.
Finally, we created a string that contains the media assets that would be included in the slideshow. Click here to see a list of the available settings that can be applied to a slideshow.
Create a file called SlideShowPreviewer.js inside your components directory and add the following to it.
    import { useRef, useState, useEffect } from "react";
    import axios from "axios";
    const SlideShowPreviewer = ({ url }) => {
      const ref = useRef();
      const [retry, SetRetry] = useState(1);
      const [canView, setCanView] = useState(false);
      const [URL, setURL] = useState("");
      let loadingText = (
        <p>
          Requesting slideshow please wait...{retry}{" "}
          {retry > 1 ? "retries" : "retry"} so far
        </p>
      );
      async function tryToGetSlideShow(URL) {
        return new Promise(async (res, rej) => {
          try {
            const response = await axios(URL);
            console.log({ response });
            setURL(URL);
            setCanView(true);
          } catch (error) {
            SetRetry(retry + 1);
          }
        });
      }
      useEffect(() => setCanView(false), [url]);
      useEffect(() => {
        if (!canView) ref.current = setTimeout(() => tryToGetSlideShow(url), 7000);
        return () => clearTimeout(ref.current);
      }, [retry, canView, url]);
      return (
        <article className="slide_box">
          {canView || URL ? (
            <>
              <video src={URL} autoPlay muted loop controls />
              {!canView && loadingText}
            </>
          ) : (
            loadingText
          )}
        </article>
      );
    };
    export default SlideShowPreviewer;
Code language: PHP (php)
As you can see, the slideshows are generated asynchronously. This means that even if we generate the delivery URL for the slideshows and make a request for it, it won’t be available immediately. The generation of the slideshow may take some time depending on the number of media assets, the transformations used, etc.
In the code above, the component expects the delivery URL as props. We defined some state variables to track if the slideshow can be viewed or not and the number of unsuccessful attempts to get the slideshow. In the effect hook, the component repeatedly requests the slideshow every 7 seconds. If the request is successful, it toggles the state to indicate that the slideshow is ready and feeds the delivery URL to an HTML video element, but if it fails, it retries.
Let’s import and use the helper functions and SlideShowPreviewer component in our App component. Update your App.js file with the following:
    import { useState } from "react";
    import WebCamera from "./components/WebCamera";
    import ImagePreviewer from "./components/ImagePreviewer";
    import SlideShowPreviewer from "./components/SlideShowPreviewer";
    import { upload, genDeliveryURL } from "./helpers";
    import "./App.css";
    export default function App() {
      const [loading, setLoading] = useState(false);
      const [deliveryURL, setDeliveryURL] = useState("");
      const [images, setImages] = useState([]);
      const onCapture = (newImage) =>
        setImages((prevImages) => [...prevImages, newImage]);
      const deleteImage = (ind) =>
        setImages((prevImages) => images.filter((_, index) => index !== ind));
      const uploadMultipleImages = async (images) => {
        let arrOfImageIds = [];
        for (const image of images) {
          arrOfImageIds.push(await upload(image));
        }
        return arrOfImageIds;
      };
      const buildSlideShow = async () => {
        try {
          setLoading(true);
          const uploadedImgsPublicIds = await uploadMultipleImages(images);
          const deliveryURL = genDeliveryURL(uploadedImgsPublicIds);
          setDeliveryURL(deliveryURL);
          setImages([]);
        } catch (error) {
          console.log(error);
        } finally {
          setLoading(false);
        }
      };
      return (
        <main>
          <section className="main con">
            <WebCamera onCapture={onCapture} loading={loading} />
            {deliveryURL && <SlideShowPreviewer url={deliveryURL} />}
          </section>
          {images.length >= 2 && (
            <div>
              <button onClick={buildSlideShow} className="create_slide_btn">
                {loading ? "processing" : "generate slideshow"}
              </button>
            </div>
          )}
          <section className="captured_imags_con con">
            {images.map((imgURL, index) => (
              <ImagePreviewer
                url={imgURL}
                key={index}
                del={() => deleteImage(index)}
              />
            ))}
          </section>
        </main>
      );
    }
Code language: JavaScript (javascript)
In the return statement for this component, we added a button that will only be displayed when we have captured at least three images. This button triggers a function called buildSlideShow. This function first attempts to upload the captured images. Then it generates the URL for the slideshow using the publicIDs returned from the uploadMultipleImages function and stores it in the state. We also passed the URL to the SlideShowPreviewer as props. If we run our app now, we should see the resulting slideshow as expected.
You can find the complete project here on Github.
Today, there are several use-cases for slideshows, and with solutions like Cloudinary, we can easily combine assets to create auto-generated slideshows that match the needs of our projects.
Resources you may find useful: