
YouTube has been and continues to be an essential piece in popular culture. With the addition of post-video completion call-to-action(CTA), users can dive in and find amazing video recommendations similar to what they have been watching.
This post will discuss implementing YouTube-style post-video completion call-to-action(CTA) using Cloudinary and Nuxt.js. At the end of this tutorial, we will learn to use callback functions to handle HTML5 video events.
Similar to YouTube on devices, when a video is done playing, the video player display portion is replaced by a grid of 4 cards, with each of these cards linking to a different video.
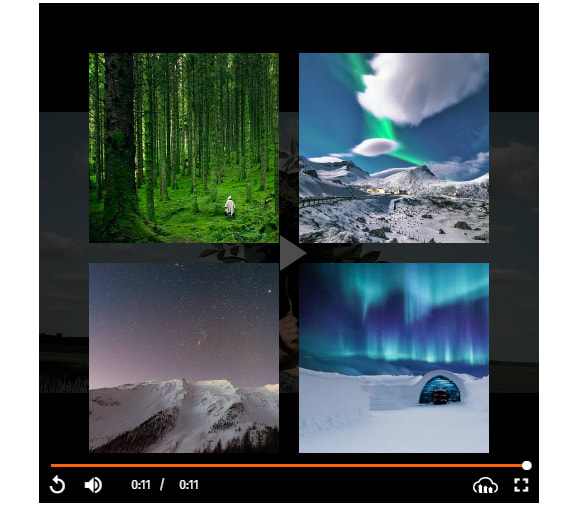
Although the grid of cards covers the video display portion, the video player controls are still in view so that once the original video is played back, the card’s grid is hidden.
This project was completed in a Codesandbox. To get started quickly, fork the codesandbox or run the project.
GitHub Repository
https://github.com/Iheanacho-ai/YouTube-Style-Post-video-Completion
To get the most out of this article it is important that we have the following:
- A basic understanding of CSS, JavaScript and Vue.js
- Node and its package manager,
npm. Run the commandnode -v&&npm -vto verify we have them installed, or install them from here. It is recommended that we have the latest version. Alternatively, we can use another package manager, Yarn. - Understanding Nuxtjs would help us follow through with this tutorial quicker, but it is not entirely required.
- A Cloudinary account, if you don’t have one, you can create one here.
Nuxtjs is an open-source vue.js frontend development framework that allows us to create universal web applications without stress, render statically Vue.js applications without having a server, and enables functionalities like server-side rendering, etc. in our project.
To create a nuxtjs app, we go to our terminal and run the command below.
NOTE: If you are on windows and using Git Bash you might have issues with the arrows, so it is advisable that you use the Powershell terminal instead.
    npm init nuxt-app <project-name>

    #or

    npx create-nuxt-app <project-name>

    #or

    yarn create nuxt-app <project-name>
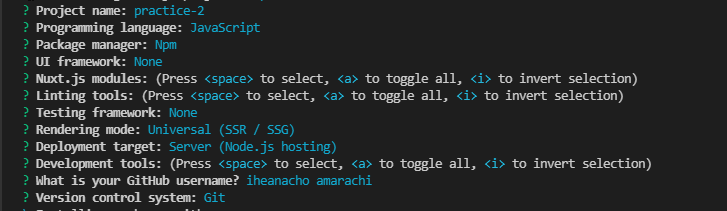
Running this command will trigger a set of question prompts. In the picture below this is the setup I used.
Next we run these commands
    cd <project name>

    npm run dev

    #or

    yarn dev
This would change the directory to the project we just created and run it on our browser, to see our app go to http://localhost:3000/
Cloudinary
Cloudinary is a cloud-based service that provides an end-to-end image and video management solution, including uploads, storage, and optimized delivery.
It also allows developers to embed video players in their app that handles video events effectively.
To enable our Nuxt.js app to use these Cloudinary features, we will add the video player assets in the head section of our nuxt.config.js file.
    // nuxt.config.js

    export  default  {
        head:  {
        ...
          link: [
            ...
            { rel:  'stylesheet', href:  'https://unpkg.com/cloudinary-video-player@1.5.9/dist/cld-video-player.min.css'  }
          ],
          script:  [
            { src:  'https://unpkg.com/cloudinary-core@latest/cloudinary-core-shrinkwrap.min.js'  },
            { src:  'https://unpkg.com/cloudinary-video-player@1.5.9/dist/cld-video-player.min.js'  },
          ],
        },

    };
Next up, we create a .env at the root of our project.
touch .env
After creating our .env file, we go to our Dashboard on Cloudinary, in the Account Details section we can see our cloud name, copy it and paste it in our .env file.
CLOUD_NAME = <Cloudinary-cloud-name>
In our index.vue file, we embed the Cloudinary video player in our project, to do that, we use the HTML5 native video element.
    <template>
      <div>
        <video
        id= "video-player"
        class="cld-video-player"
        >
        </video>
      </div>
    </template>
Now that we are done with that, in the mounted lifecycle hook of our index.vue file, we create a Cloudinary instance. Doing this in our mounted lifecycle hook allows the instance to be created once the app mounts.
    // pages/index.vue

    <script>

    export default {
      data(){
        return{
          cld: null,
          player: null,
          video: "videoplayback_1_pr2hzi",
        }
      },
      mounted(){
        this.cld= cloudinary.Cloudinary.new({
          cloud_name:  process.env.CLOUD_NAME,
          secure:  true
        })
        this.player = this.cld.videoPlayer(
          'video-player', {
              controls: true
          }
        );
        this.player.source(this.video);
    }

    }


    </script>
In the data object, we define four variables to start with:
- The
cldvariable holds the Cloudinary instance we will create. - The
playervariable has the new Cloudinary video player we will instantiate on mount. - The
videovariable holds the video’s id we are looking to play. This video is stored on Cloudinary. - The
controlsvariable controls the native player controls.
In our mounted lifecycle hook, we create a Cloudinary instance from the Cloudinary object by passing into it as an argument the cloud name we stored in our .env file and secure: true.
We then instantiate the Cloudinary video player by using the videoPlayer method and passing in two arguments:
- The video player’s id or the video player element itself.
- An object which sets the controls on the video to true.
Next, we add the video stored in our video variable as the source for the player.
In the style section of our index.vue file, we add a bit of styling to our video player, we centre the div containing our video player with the native CSS flex property, we then give our video player a width of 500px and a height of 500px.
    <style scoped>
     div{
      display: flex;
      align-items: center;
      justify-content: center;
    }
    .cld-video-player{
      width: 500px;
      height: 500px;
    }
    </style>
With that we have embedded a Cloudinary video player in our project.
Our overlay would contain four thumbnails that direct us to four different videos, to create this, we go into the template section of our index.vue file, using the HTML div element, we add a class of overlay.
We then create a card container that would hold four a tags each of which contains a div with a background image.
    <div class="overlay" >
        <div class="cards">
          <a href="https://www.youtube.com/watch?v=1wkPMUZ9vX4">
            <div :style="{ 'backgroundImage': 'url(https://images.pexels.com/photos/15286/pexels-photo.jpg?auto=compress&cs=tinysrgb&dpr=1&w=500)' }"></div>
          </a>
          <a href="https://www.youtube.com/watch?v=IUN664s7N-c">
            <div :style="{ 'backgroundImage': 'url(https://images.pexels.com/photos/3408744/pexels-photo-3408744.jpeg?auto=compress&cs=tinysrgb&dpr=1&w=500)' }"></div>
          </a>
          <a href="https://www.youtube.com/watch?v=Faow3SKIzq0">
            <div :style="{ 'backgroundImage': 'url(https://images.pexels.com/photos/572897/pexels-photo-572897.jpeg?auto=compress&cs=tinysrgb&dpr=1&w=500)' }"></div>
          </a>
          <a href="https://www.youtube.com/watch?v=7bOptq-NPJQ">
            <div :style="{ 'backgroundImage': 'url(https://images.pexels.com/photos/624015/pexels-photo-624015.jpeg?auto=compress&cs=tinysrgb&dpr=1&w=500)' }"></div>
          </a>
        </div>
      </div>
But our overlay is incomplete without the styling. We add these styles in the style section of our index.vue file.
    .overlay{
      width: 500px;
      height: 500px;
      position: absolute;
      background-color: rgba(0,0,0, 0.70);

    }
    .cards{
      width: 80%;
      height: 80%;
      display: grid;
      grid-template-columns: 1fr 1fr;
      grid-template-rows: 1fr 1fr;
      gap: 20px;
    }
    .cards a{
      width: 100%;
      height: 100%;
    }
    .cards div{
      width: 100%;
      height: 100%;
      background-size: cover;
      background-repeat: no-repeat;
    }
We give our overlay a width and height of 500px. It also has an absolute position to sit on our video player.
The card’s div has a width and height of 80 per cent of its parent element. Using the native CSS grid for our layout, we specify that we want our card’s div to be divided into four equal parts (two per row and column).
Finally, for each div in the cards container, we want our background image to cover our entire div and not repeat itself.
Selectively rendering the overlay.
For our overlay to show up after the video has ended, we create an overlay variable on the data object in our index.vue file.
    data(){
      return{
        ...
        overlay: false
      }
    }
We then use this overlay variable to selectively render our overlay.
     <div class="overlay"  v-if = 'overlay'>
      <div class="cards">
        <a href="https://www.youtube.com/watch?v=1wkPMUZ9vX4">
          <div :style="{ 'backgroundImage': 'url(https://images.pexels.com/photos/15286/pexels-photo.jpg?auto=compress&cs=tinysrgb&dpr=1&w=500)' }"></div>
        </a>
        <a href="https://www.youtube.com/watch?v=IUN664s7N-c">
          <div :style="{ 'backgroundImage': 'url(https://images.pexels.com/photos/3408744/pexels-photo-3408744.jpeg?auto=compress&cs=tinysrgb&dpr=1&w=500)' }"></div>
        </a>
        <a href="https://www.youtube.com/watch?v=Faow3SKIzq0">
          <div :style="{ 'backgroundImage': 'url(https://images.pexels.com/photos/572897/pexels-photo-572897.jpeg?auto=compress&cs=tinysrgb&dpr=1&w=500)' }"></div>
        </a>
        <a href="https://www.youtube.com/watch?v=7bOptq-NPJQ">
          <div :style="{ 'backgroundImage': 'url(https://images.pexels.com/photos/624015/pexels-photo-624015.jpeg?auto=compress&cs=tinysrgb&dpr=1&w=500)' }"></div>
        </a>
      </div>
    </div>
Next, using Cloudinary’s ended and play callback functions, we control the overlay variable.
    // Controls the overlay

     this.player.on('ended', ()=> {
      this.overlay= true;
    })
    this.player.on('play', ()=> {
      this.overlay = false;
    })
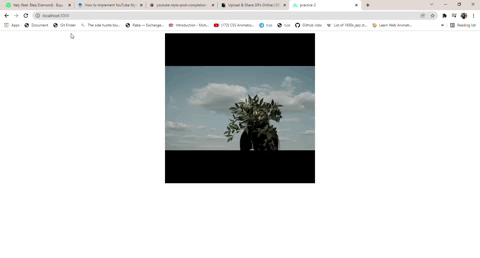
With that we have completed our project, we should have something like this.
This article discussed what Cloudinary is and how we can use it to handle player events to create a YouTube-style post-video completion CTA.
You may find the following resources useful.