
They say a picture speaks a thousand words. What if you needed the picture to speak more words than that? More words are certainly required to convince consumers to part with their hard-earned money, right? Adding interactivity to the images provides a more profound experience for the customer, making the product image almost tangible. In this tutorial, I will show you how to implement an in-house interactive media gallery with minimal fuss using Cloudinary.
In this tutorial, we will build the gallery management feature for an e-commerce web application. Using the application, you can upload images and videos of a product. Upon successful upload, you can view the items rendered using the Cloudinary product gallery widget.
Here is a link to the demo CodeSandbox.
Create a new React app using the following command:
npx create-react-app cloudinary_product_gallery
Next, add the project dependencies using the following command:
npm install antd @ant-design/icons axios react-router-dom
Code language: CSS (css)
For UI components in our application, we will use antd while Axios will be used for uploading media files to our Cloudinary store. React router will be used to transition between pages.
Next, we need to import the antd CSS. To do this, open the src/App.css file and edit its content to match the following:
@import "~antd/dist/antd.css";
Code language: CSS (css)To use Cloudinary’s provisioned services, you need to first sign up for a free Cloudinary account if you don’t have one already. Important details are displayed on your account’s Management Console (aka Dashboard): your cloud name, API key, etc.
For this tutorial, we will be sending images to Cloudinary via unsigned POST requests. To do this, we need our account cloud name and an unsigned upload preset. To create one, select Settings > Upload in the Management Console and then scroll to the Upload presets section. Create a new upload preset by clicking Add upload preset at the bottom of the upload preset list. In the displayed form, ensure the Signing Mode is set to Unsigned, as shown below.
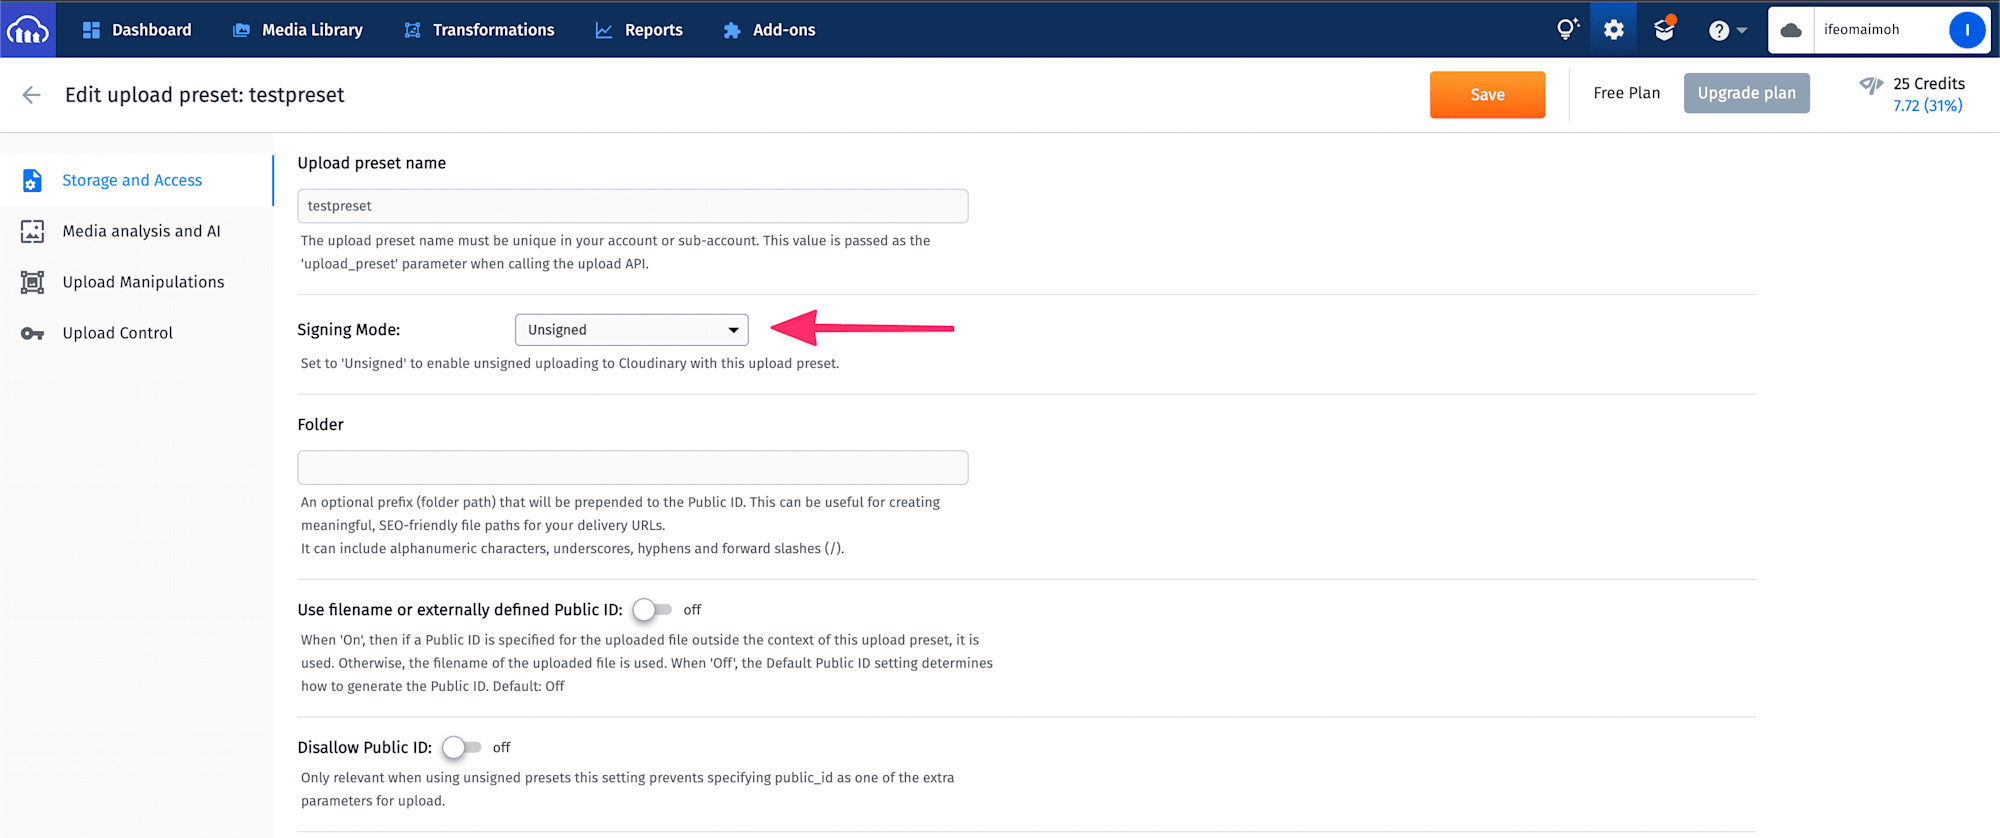
Click Save to complete the upload preset definition, then copy the preset name displayed on the Upload Settings page.
Next, let’s create environment variables to hold the details of our Cloudinary account. Create a new file called .env at the root of your project and add the following to it:
REACT_APP_CLOUD_NAME = "INSERT YOUR CLOUD NAME HERE";
REACT_APP_UPLOAD_PRESET = "INSERT YOUR UNSIGNED UPLOAD PRESET KEY HERE";
Code language: JavaScript (javascript)
This will be used as a default when the project is set up on another system. To update your local environment, create a copy of the .env file using the following command:
cp .env .env.local
Code language: CSS (css)
By default, this local file resides in the .gitignore folder, mitigating the security risk of inadvertently exposing secret credentials to the public. You can update the .env.local file with your Cloudinary credentials.
In the src directory of the project, create a new folder named cloudinary. This folder will hold the Cloudinary-related helper classes we will need in our components. In the cloudinary folder, create a new file called cloudinaryConfig.js. This file will give access to the environment variables and prevent repeated process.env. calls throughout the project. Add the following to the cloudinaryConfig.js file:
export const cloudName = process.env.REACT_APP_CLOUD_NAME;
export const uploadPreset = process.env.REACT_APP_UPLOAD_PRESET;
export const defaultUploadTag = "cloudinary_interactive_gallery";
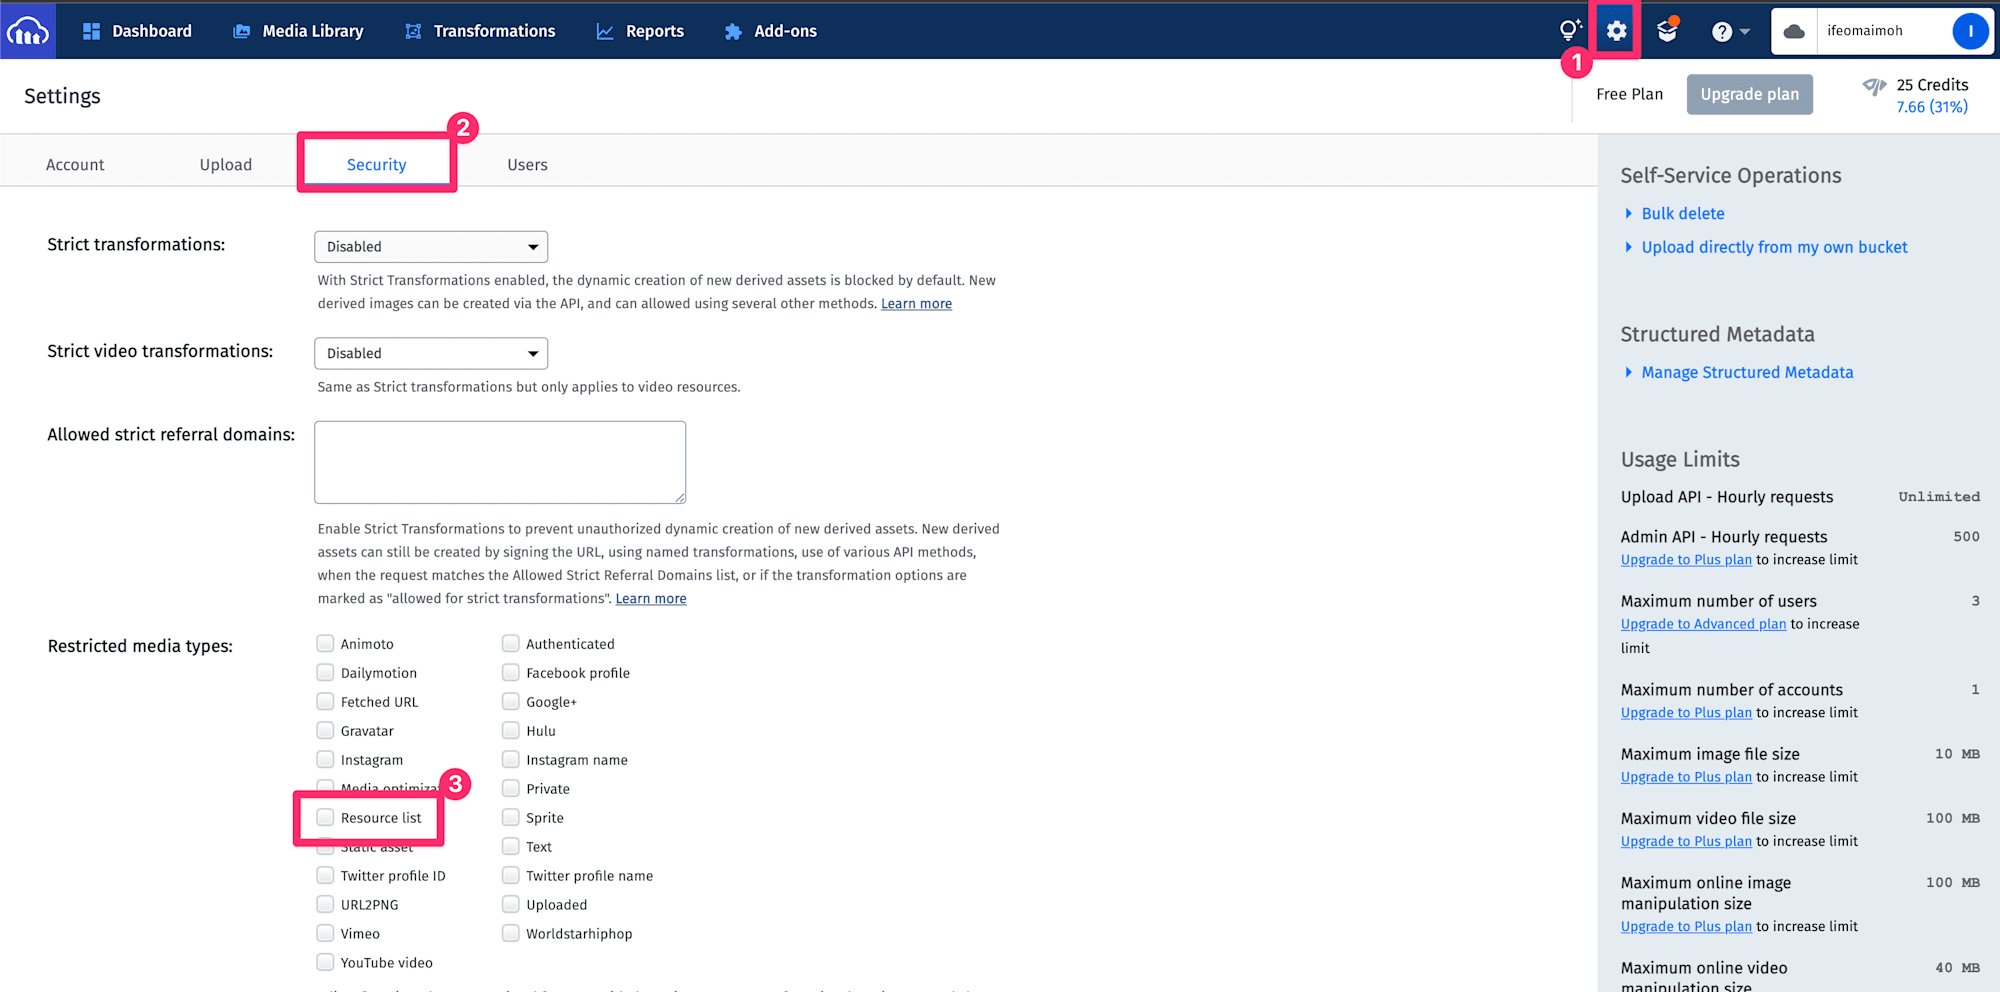
Code language: JavaScript (javascript)The Cloudinary gallery widget relies on the Client-side asset lists feature to retrieve the list of images (or videos) with the specified tag. To ensure that this feature is available on your Cloudinary account, you must ensure that the Resource list option is enabled. By default, the list delivery type is restricted. To enable it, open the Security settings in your Management console and clear the Resource list item under Restricted media types.
With these in place, we can write the helper function to upload media files to Cloudinary. In the cloudinary folder, create a new file named cloudinaryHelper.js and add the following to it:
import axios from "axios";
import { cloudName, defaultUploadTag, uploadPreset } from "./cloudinaryConfig";

export const upload = ({ file, fileType, successCallback }) => {
  const url = `https://api.cloudinary.com/v1_1/${cloudName}/${fileType}/upload`;
  const data = new FormData();
  data.append("file", file);
  data.append("upload_preset", uploadPreset);
  data.append("tags", defaultUploadTag);
  axios
    .post(url, data, {
      headers: {
        "Content-Type": "multipart/form-data",
      },
    })
    .then((response) => successCallback(response.data));
};
Code language: JavaScript (javascript)
The upload function is used to upload files to Cloudinary using the previously defined upload preset and upload tag. The function has one argument, which is an object containing the file to be uploaded, the file type (for this tutorial, it could be either image or video), and a function to be called upon receipt of a successful response from the Cloudinary API.
The functionality for the gallery widget is delivered via CDN and instantiated in the index.js file. However, we need access to the instantiated object elsewhere in our application to update the widget on successful upload. To avoid prop drilling, we’ll use React Context to pass this object to any component where it may be required. In the src folder, create a new folder named context. In the src/context folder, create a new file named GalleryContext.js and add the following to it:
import { createContext } from "react";

const GalleryContext = createContext(null);
export default GalleryContext;
Code language: JavaScript (javascript)
With our context in place, we can instantiate the widget and update the context value.
Open the public/index.html file and add the following <script> tag in the head of the HTML file:
<script
  src="https://product-gallery.cloudinary.com/all.js"
  type="text/javascript"
>
  {" "}
</script>
Code language: HTML, XML (xml)
Next, update the src/index.js file to match the following:
import React from "react";
import ReactDOM from "react-dom/client";
import "./index.css";
import App from "./App";
import { defaultUploadTag, cloudName } from "./cloudinary/cloudinaryConfig";
import GalleryContext from "./context/GalleryContext";
import { BrowserRouter } from "react-router-dom";

/* eslint-disable */
const myGallery = cloudinary.galleryWidget({
  container: "#gallery",
  cloudName: cloudName,
  mediaAssets: [
    { tag: defaultUploadTag }, // by default mediaType: "image"
    { tag: defaultUploadTag, mediaType: "video" },
  ],
});

const root = ReactDOM.createRoot(document.getElementById("root"));
root.render(
  <React.StrictMode>
    <BrowserRouter>
      <GalleryContext.Provider value={myGallery}>
        <App />
      </GalleryContext.Provider>
    </BrowserRouter>
  </React.StrictMode>
);
Code language: JavaScript (javascript)
Here we initialize the product gallery widget with the cloudinary.galleryWidget method call. We pass the initialization options, including the cloud name and the tags of the media assets we wish to retrieve. We also specify a key named container. This is the id of the div element in which the galley will be rendered. The instantiated object is then passed to the GalleryContext provider via the value prop.
We used the eslint-disable annotation to avoid eslint throwing an undefined variable exception.
With the gallery widget instantiated and the object made available via Context, let’s create two components – one for uploading files and the other for rendering the gallery.
In the src folder, create a new folder named components. Next, in the src/components folder, create a new file called MediaUpload.js and add the following to it:
import { useState } from "react";
import { Button, Card, message, Upload } from "antd";
import { UploadOutlined } from "@ant-design/icons";
import { useNavigate } from "react-router-dom";
import { upload } from "../cloudinary/cloudinaryHelper";
import { defaultUploadTag } from "../cloudinary/cloudinaryConfig";
import { useContext } from "react";
import GalleryContext from "../context/GalleryContext";
const MediaUpload = () => {
const [isUploading, setIsUploading] = useState(false);
const [selectedFiles, setSelectedFiles] = useState([]);
const navigate = useNavigate();
const myGallery = useContext(GalleryContext);
const uploadSelection = () => {
if (selectedFiles.length === 0) {
message.error("You need to upload a media file first");
} else {
setIsUploading(true);
selectedFiles.forEach((file, index) => {
const fileType = file["type"].split("/")[0];
upload({
file,
fileType,
successCallback: () => {
if (index === selectedFiles.length - 1) {
message.success("Images uploaded successfully");
myGallery.update({
mediaAssets: [
{ tag: defaultUploadTag },
{ tag: defaultUploadTag, mediaType: "video" },
],
});
setIsUploading(false);
navigate("/gallery");
}
},
});
});
}
};
const props = {
multiple: true,
onRemove: (file) => {
setSelectedFiles((currentSelection) => {
const newSelection = currentSelection.slice();
const fileIndex = currentSelection.indexOf(file);
newSelection.splice(fileIndex, 1);
return newSelection;
});
},
beforeUpload: (file) => {
setSelectedFiles((currentSelection) => [...currentSelection, file]);
return false;
},
showUploadList: true,
};
return (
<Card
style={{ margin: "auto", width: "50%" }}
actions={[
<Button type="primary" loading={isUploading} onClick={uploadSelection}>
Submit
</Button>,
]}
>
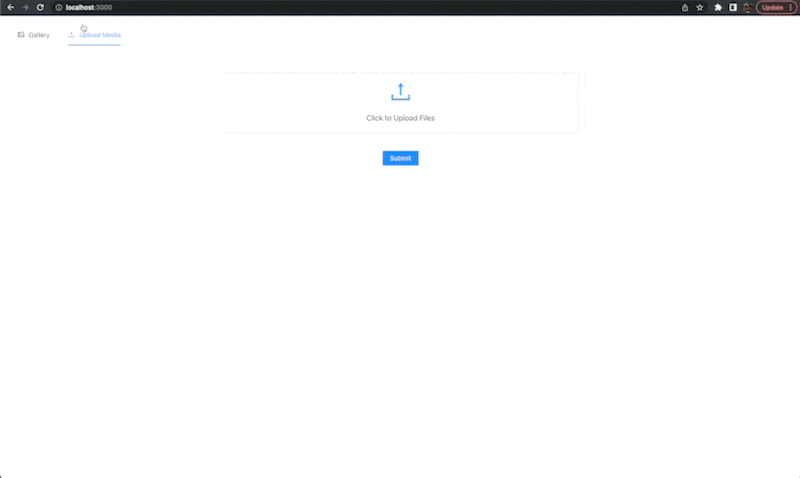
<Upload.Dragger {...props}>
<p className="ant-upload-drag-icon">
<UploadOutlined />
</p>
<p className="ant-upload-text">Click to Upload Files</p>
</Upload.Dragger>
</Card>
);
};
export default MediaUpload;
Code language: JavaScript (javascript)This component renders a simple drag and drop form using the antd Upload component. A submit button is also rendered, which calls the uploadSelection function when clicked.
If at least one file is selected, the function iterates through the selectedFiles state variable (updated when files are selected or removed via the Upload component). For each file, it calls the upload function we declared earlier.
Once the files have been uploaded, a success message is displayed, and the gallery widget (retrieved via the useContext call) is used to update the widget. Finally, the application redirects to the Gallery component, which we will build next.
In the src/components folder, create a new file named Gallery.js and add the following to it:
import { useEffect, useContext } from "react";
import GalleryContext from "../context/GalleryContext";

const Gallery = () => {
  const gallery = useContext(GalleryContext);
  useEffect(() => {
    gallery.render();
  }, []);
  return (
    <>
      <h1>Gallery</h1>
      <div id="gallery"></div>
    </>
  );
};

export default Gallery;
Code language: JavaScript (javascript)
This component retrieves the gallery widget from GalleryContext and declares the target container – an empty div with id gallery. An useEffect call is used to render the gallery on page load.
We have our components, but we need to implement the routing between them. We also need a component to help the user trigger the navigation process where necessary.
We’ll start by adding a menu. In the src/components folder, create a new file named Menu.js and add the following to it:
import { Menu as AntDMenu } from "antd";
import { useState } from "react";
import { Link } from "react-router-dom";
import { PictureOutlined, UploadOutlined } from "@ant-design/icons";

const Menu = () => {
  const [currentlySelected, setCurrentlySelected] = useState("upload");

  const handleMenuSelection = (e) => {
    setCurrentlySelected(e.key);
  };

  const items = [
    {
      label: <Link to="/gallery">Gallery</Link>,
      key: "gallery",
      icon: <PictureOutlined />,
    },
    {
      label: <Link to="/">Upload Media</Link>,
      key: "upload",
      icon: <UploadOutlined />,
    },
  ];

  return (
    <AntDMenu
      mode="horizontal"
      onClick={handleMenuSelection}
      selectedKeys={[currentlySelected]}
      items={items}
    />
  );
};

export default Menu;
Code language: JavaScript (javascript)
This menu provides two items – one for the gallery and the other for the upload form. Using the Link component provided by react-router-dom, we specify the path to which the application should redirect when an item is clicked.
Next, in the src folder, create a new file named routes.js and add the following to it:
import Gallery from "./components/Gallery";
import MediaUpload from "./components/MediaUpload";

const routes = [
  {
    path: "/",
    element: <MediaUpload />,
  },
  {
    path: "/gallery",
    element: <Gallery />,
  },
];

export default routes;
Code language: JavaScript (javascript)
Here we specify the component to be rendered for a given path.
Finally, update src/App.js to match the following:
import "./App.css";
import { useRoutes } from "react-router-dom";
import routes from "./routes";
import Menu from "./components/Menu";
import { Col, Row } from "antd";

const App = () => {
  const router = useRoutes(routes);
  return (
    <div style={{ margin: "1%" }}>
      <Menu />
      <div style={{ textAlign: "center" }}>
        <Row justify="center" align="middle" style={{ textAlign: "center" }}>
          <Col style={{ width: "100%", margin: "2%" }}>{router}</Col>
        </Row>
      </div>
    </div>
  );
};

export default App;
Code language: JavaScript (javascript)
Here we render the menu along with the content rendered by the router (as determined by the current path).
With everything in place, run your application using the following command:
npm start
By default, the application will be available at http://localhost:3000/. The final result will look like the GIF shown below.
Find the complete project here on GitHub.
In this article, we looked at how to build an interactive product gallery using Cloudinary. Using Cloudinary, not only can we deliver a seamless storage and retrieval process for images, we are also able to render an interactive, aesthetically pleasing gallery without worrying about styling, functionality, and the likes (the Gallery component is less than 30 lines long).
For this tutorial, we rendered only images and videos. However, the widget can also render 360 spin sets and 3D models, which you can read more about in the Cloudinary guide. With all these, your application guarantees a seamless experience that speaks much more than a static image.
Resources you may find helpful: