
This blog post introduces a developer-friendly approach to client-side media handling challenges, leveraging Next.js App Router for video uploads to Cloudinary.
The complete source code of this project is on GitHub.
In the context of video uploads, using Next.js App Router with server components offers the following advantages:
- Enhanced security. By managing essential functionality on the server, we minimize the exposure of sensitive data on the client side.
- Improved performance. Data fetching and video upload processing are done on the server, minimizing the strain on client-side resources, particularly for larger video files.
- Streamlined data flow.Server components handle form submissions and data manipulation directly, making the codebase cleaner and more maintainable.
You must have the following:
- A Cloudinary platform account.
- A basic understanding of Next.js and Typescript.
With our Cloudinary account and credentials ready, let’s bootstrap a Next.js app.
npx create-next-app@latest
We’ll receive prompts to set up our new app. Select Typescript, Tailwind CSS, and App Router, as they’ll be needed to build this project. Then, install the necessary dependencies using the command below.
npm install cloudinary next-cloudinary multer
Running npm run dev should render our project at https://localhost:3000/ in our browser.
After creating an account on Cloudinary, we’ll have access to the dashboard, where we’ll find all the required credentials.
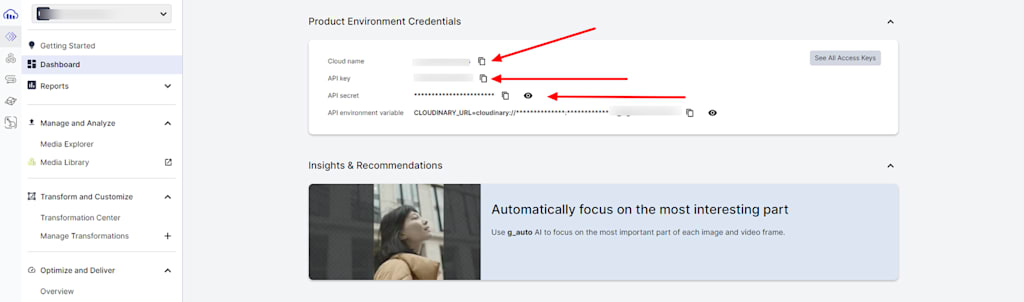
Next, create a .env.local file in the root folder of our project to store our Cloudinary credentials.
// .env.local
NEXT_PUBLIC_CLOUDINARY_CLOUD_NAME=<cloudinary_api_key>
NEXT_PUBLIC_CLOUDINARY_API_KEY=<cloudinary_api_secret>
CLOUDINARY_API_SECRET=<cloudinary_cloud_name>Code language: HTML, XML (xml)Never share your credentials publicly.
We’ll build a form that allows users to select a video file to upload and include a button to initiate the upload process. Add the code snippet below to the src/app/pages.tsx file.
//src/app/pages.tsx
export default function Home() {
  return (
  <div>
    <h1 className='text-xl font-bold text-center pb-10'>
      How to upload a video to Cloudinary in Next.js App Router
    </h1>
      <div className="flex justify-center mt-10 items-center">
        <form>
      <input type="file" accept="video/*"  />
      <button type='submit' className='bg-blue-800 text-white p-2 rounded-md'>Upload</button>
        </form>
      </div>
  );
}Code language: JavaScript (javascript)
The next step involves integrating the useFormState hook to manage the form submission state in our project. Update the file with the code snippet below:
// src/app/pages.tsx
+ import { useFormState } from 'react-dom';
export default function Home() {
+  const [url, formAction] = useFormState(upload, null);
return(
 ...
 <form action={formAction}>
  ...
</form
  )
}Code language: PHP (php)
The hook takes two arguments: an initial state and an action function — upload — to handle form submissions and upload requests. Then, it returns an array with two elements:
- The current state (the uploaded video URL in our case).
- A new action function, formAction, that triggers the upload process.
The useFormState hook is currently marked as deprecated, which means it will be replaced with a new hook called useActionState in a future update. To try out useActionState features early, use the Next.js Canary version 14.3.0-canary.45, which already includes support for useActionState. However, remember that Canary versions are unstable and not recommended for production use.
Let’s create the action function: upload. Go to the src folder and create actions/upload.ts with the following content.
// src/actions/upload.ts
"use server"
import { v2 as cloudinary } from 'cloudinary';
cloudinary.config({
  cloud_name: process.env.NEXT_PUBLIC_CLOUDINARY_CLOUD_NAME,
  api_key: process.env.NEXT_PUBLIC_CLOUDINARY_API_KEY,
  api_secret: process.env.CLOUDINARY_API_SECRET,
});
export async function upload(previousState: string | undefined | null, formData: FormData) {
  const file = formData.get('video') as File;
  const buffer: Buffer = Buffer.from(await file.arrayBuffer());
  try {
    const base64Image: string = `data:${file.type};base64,${buffer.toString(
      'base64'
    )}`;
    console.log(`The file: ${previousState} is uploading...`);
    const response = await cloudinary.uploader.upload(base64Image, {
      resource_type: 'video',
      public_id: 'my_video',
    });
    previousState = response.secure_url;
    return previousState
  } catch (error: any) {
    console.error(error);
  }
}Code language: JavaScript (javascript)
Let’s break down what the code snippet above does:
- Lines 3-8. This part of the code imports the Cloudinary Node.js SDK (version 2) and configures it using our environment variables.
- Line 9. This section accepts two arguments from
src/app/pages.tsx:previousStateandformData. The previousState argument represents the previous state of the form that will be updated, and theformDataargument contains the video file from the form. - Lines 10-15. This section retrieves the video file from the form data using the key “video,” converts the video file into a buffer object, and creates a Base64-encoded string representation of the video file.
- Lines 17-20. This snippet uploads the Base64 encoded video data to Cloudinary.
- Lines 21 and 22. These lines retrieve and return the secure URL of the uploaded video from the Cloudinary response.
- Lines 23-25. This part of the code catches any errors that might occur during the upload process.
Then, return to the src/app/pages.tsx file and import the upload.ts function.
// src/app/pages.tsx
import { upload } from '../actions/upload';
import { useFormState } from 'react-dom';
export default function Home() {
  ...
}Code language: JavaScript (javascript)
With all the pieces set up, let’s upload the video. First, we’ll select the video we want to upload, then click the Upload button to upload the video to Cloudinary. Upon successful upload, we’ll also need to render the video on our UI using the URL from Cloudinary’s response.
To make the uploaded video playable, we’ll use a special component from Cloudinary called CldVideoPlayer inside the src/app/pages.tsx file as shown below.
"use client"
import { CldVideoPlayer } from 'next-cloudinary';
import 'next-cloudinary/dist/cld-video-player.css';
import { upload } from './actions/upload';
import { useFormState } from 'react-dom';
export default function Home() {
  const [url, formAction] = useFormState(upload, null);
return(
    <div className='min-h-screen flex-col items-center justify-between p-10 mt-20'>
      <h1 className='text-xl font-bold text-center pb-10'>How to upload a video to Cloudinary in Next.js App Router</h1>
      <div className="flex justify-center my-10 items-center">
        <form action={formAction}>
          <input type="file" name='video' accept="video/*" />
          <button className='bg-blue-800 text-white p-2 rounded-md'>Upload</button>
        </form>
      </div>
    {url && <CldVideoPlayer width="860" height="470" src={url} />}
  )
}Code language: JavaScript (javascript)
The useFormState hook updates the url state variable in the component with the returned video URL. Then, it displays the CldVideoPlayer component using the uploaded video URL. After applying the necessary configurations our application will look like this.
to show the video’s upload progress.
As a developer, choosing a suitable routing method depends on your needs and features. Server components and pages are great on search engines with a good initial page load speed. If a dynamic, app-like experience is the priority, we can explore the client components. With both strengths, you can combine server and client components for a hybrid approach. Ultimately, the key to making the right decision lies in understanding the strengths and limitations of both methods.
This blog post discussed uploading videos using Next.js App Router, a server component, and Cloudinary’s powerful video management features. Combining these, we achieved a secure solution for video uploads in our Next.js application with a great developer experience.
You can implement other beneficial features like progress indication, improved error handling, and resumable uploads.
To learn more about Cloudinary’s video management features, contact us today.
If you found this post helpful and would like to learn more, feel free to join the Cloudinary Community forum and its associated Discord.