
Image optimization is important in delivering an efficient user experience in web development. The integration of WordPress as a headless CMS with front-end technologies has empowered developers to build responsive and dynamic web applications. However, managing and optimizing images within this headless architecture has its challenges.
The Cloudinary WordPress plugin and WPGraphQL are two tools that combine to offer a streamlined solution for image optimization. WPGraphQL provides a flexible query language, enabling developers to request only the data they need in your WordPress backend, while Cloudinary’s plugin offers a suite of features to handle image transformations, compression, and delivery in WordPress.
In this article, we’ll explore the techniques for image optimization within a headless WordPress environment. We’ll delve into the setup and configuration of WPGraphQL, integrating it with the Cloudinary WordPress plugin, and demonstrate how to use these tools to achieve optimal image performance.
To benefit from this article, you should be familiar with the basics of WordPress development, WPGraphQL, Node.js, Next.js, and the Apollo Client.
WordPress setup:
- Set up a WordPress site on any host of your choice. I’m using Local by WP Engine, which is a free local development server for WordPress.
- Install and activate the Cloudinary plugin.
- Install and activate the WPGraphQL plugin.
For this article, I’ll use Faust.js, a frontend framework built on top of Next.js, specifically designed to work with headless WordPress. Out of the box, it has the Apollo Client, WPGraphQL and basic queries as well as routing built in.
If you’re using Local and follow the setup wizard, it has an option to spin up a Faust.js project from Local. This will automate the connection with your WordPress environment variables and Faust.js.
If you want to use a Faust.js project off npm, you can follow the getting started documentation here.
If you choose to use Next.js on its own, you can follow along in the custom Next.js section of this article using my good friend Colby Fayock’s starter project here.
The Cloudinary WordPress plugin integrates Cloudinary’s image and video management services with WordPress. Here’s a detailed breakdown of its functions:
- Image optimization. The plugin can automatically optimize images, transforming their format and quality to improve loading times without compromising visual appearance.
- Responsive images. Cloudinary can automatically create various resized versions of each image, ensuring that the optimal size is delivered for every device and screen resolution.
- Media management. Through the plugin, Cloudinary’s media library can be accessed directly within WordPress, enabling efficient management, organization, and transformation of media files.
- Content delivery network (CDN) integration. Images and videos are served via Cloudinary’s globally distributed CDN. This ensures faster delivery to users around the world.
- Video manipulation. Not just limited to images, Cloudinary also allows transformation and optimization of video content. Videos can be resized, cropped, filtered, and much more.
- Accessibility enhancements. The plugin can automatically add attributes like alt text, assisting in meeting various accessibility standards.
- Easy integration with visual editors. It’s generally compatible with popular WordPress visual editors and page builders, allowing seamless insertion and transformation of images and videos.
- Developer-friendly options. For developers, the Cloudinary API can be used to create custom transformations and integrations.
- Analytics and insights. Cloudinary offers insights into media asset performance and usage, which can help in understanding how media is being accessed and utilized.
In a headless WordPress context, the Cloudinary plugin can be utilized to ensure that media is managed efficiently, optimized, and delivered in the most responsive manner.
Now that we have it installed in our WP Admin, after you follow the setup wizard, you should have a main dashboard that looks like this:

Once downloaded, the default settings and media sync is automatic. Your media items are now offloaded to an optimized media CDN!
It’s that easy. If you go to your media option on the side menu in your WP Admin and start loading in images, the Cloudinary plugin will automatically sync your images to the Cloudinary CDN as well as your dashboard:

The green cloud icon indicates that the sync is successful between your WordPress backend and your Cloudinary account.
A feature I want to highlight is the Cloudinary DAM, which is an extension. Once you select Add Extension in the dashboard here:
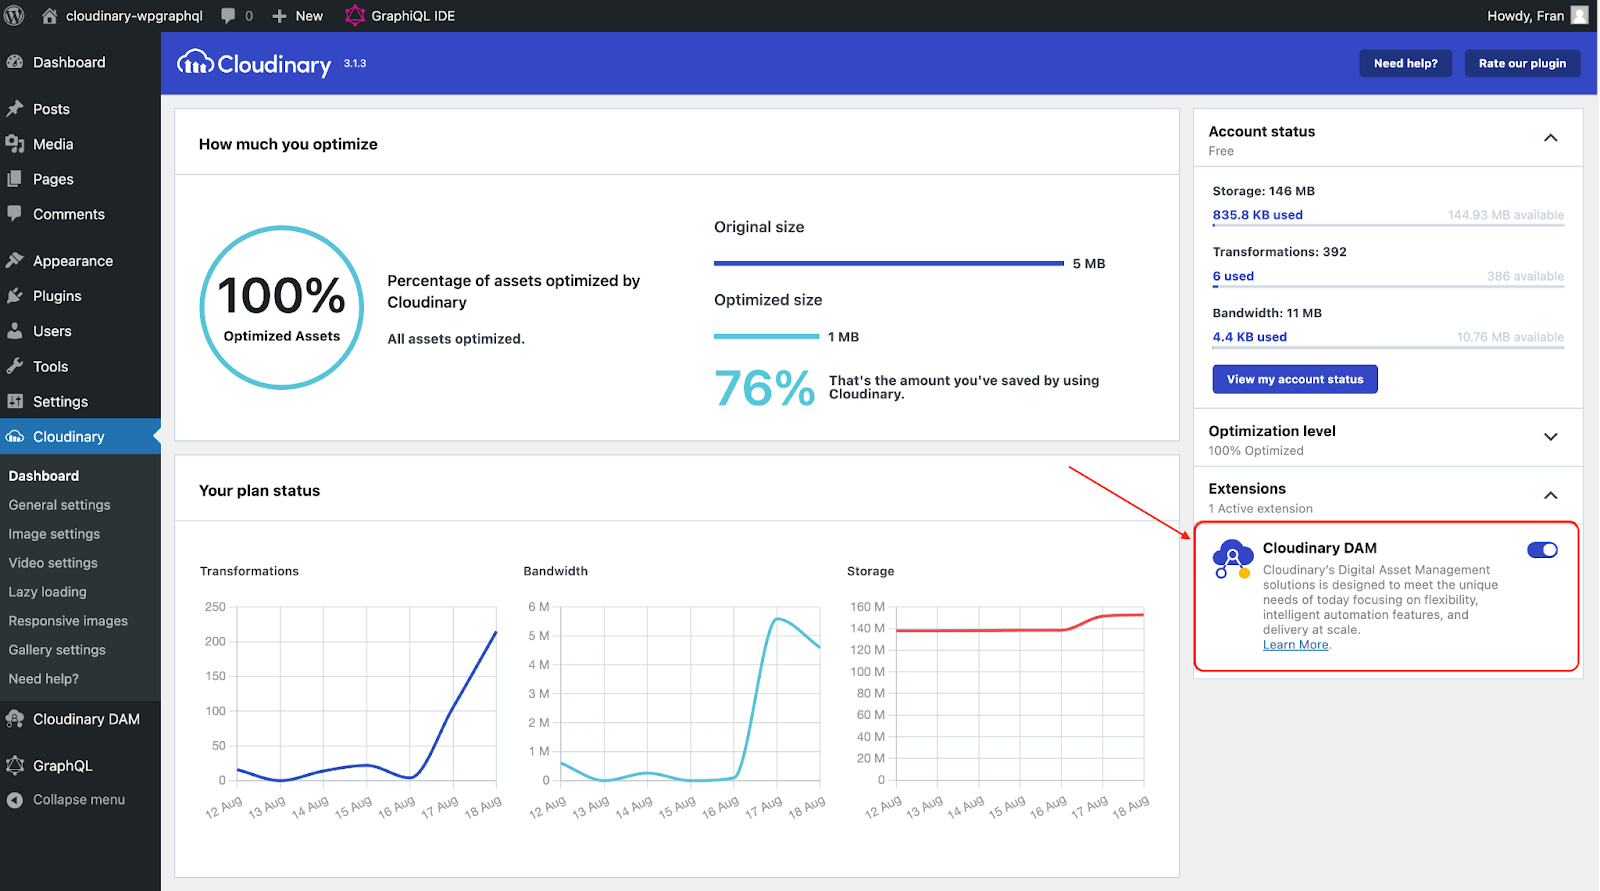
It will give you access to your media library and the features you have that you similarly have in your Cloudinary console. This is awesome as it eliminates having to switch back and forth from WP admin to your Cloudinary console.
WPGrahQL is an open source WordPress plugin that turns your WordPress backend into a GraphQL server. Once you download this plugin, you’ll have a menu on the right side of your WP Admin relating to your WPGraphQL settings as well as a GraphiQL IDE.

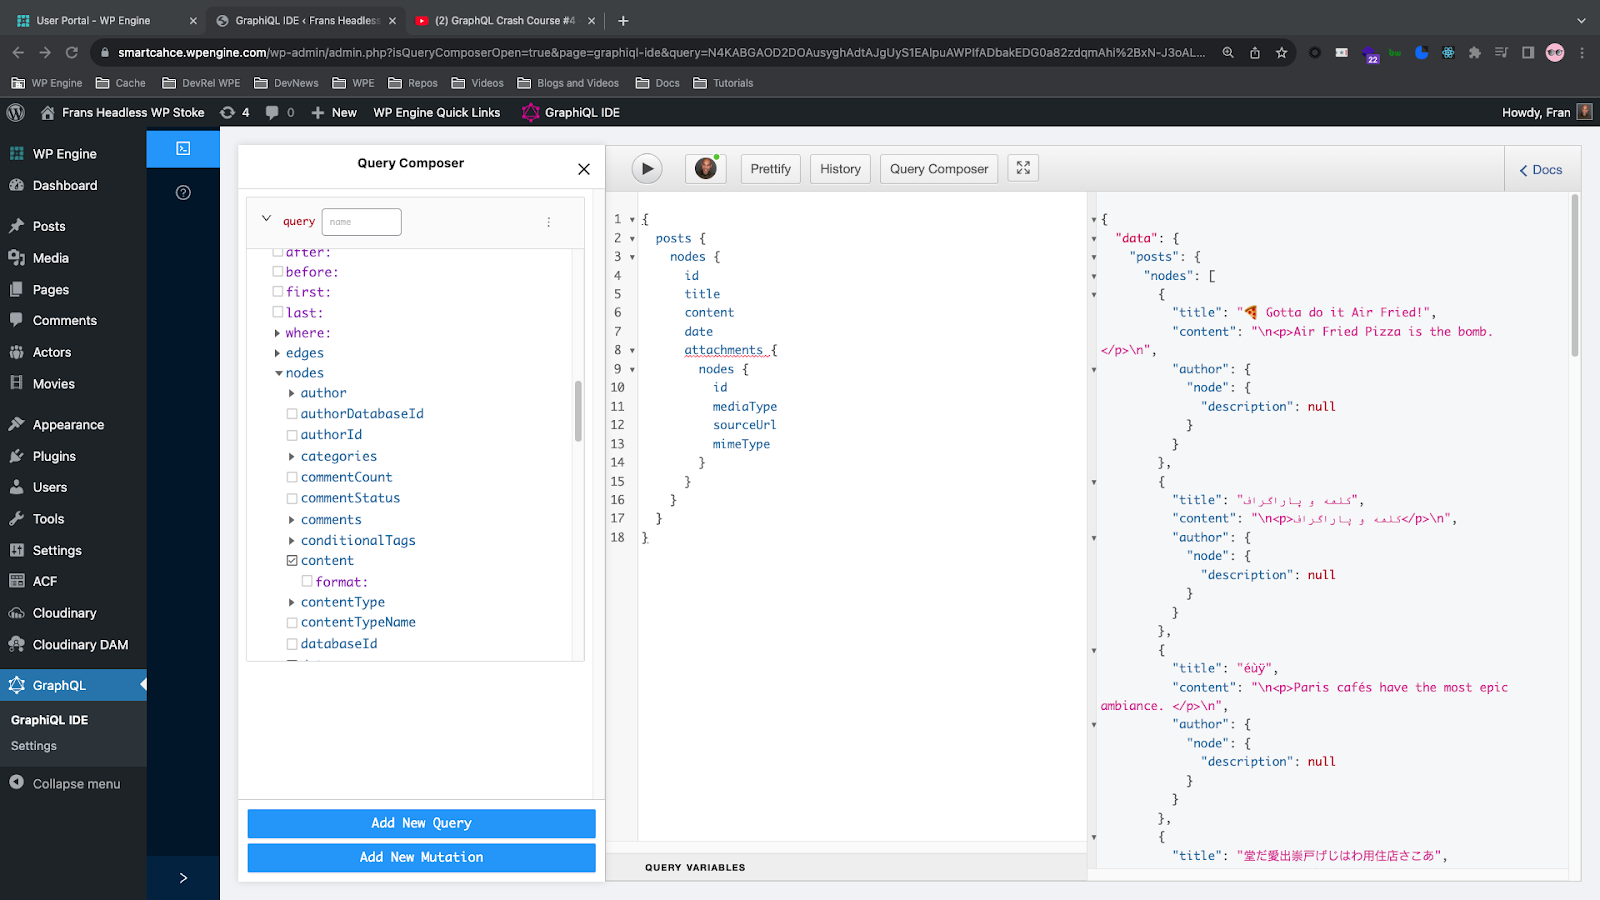
Now that WPGraphQL is set up, let’s make a query for the featured images of all our posts:
{
  posts {
    nodes{
      featuredImage {
        node {
          sourceUrl
        }
      }
    }
  }
}
This is the data we get back from that request:

The source URL of that image is being served from the Cloudinary CDN instead of WordPress.
Now let’s query for images within the block editor in WordPress that aren’t the featured image. You can do this by downloading the extension for WPGraphQL to query content blocks called WPGraphQL Content Blocks.
Here’s our query:
{
  posts {
    nodes {
      editorBlocks {
        ... on CoreImage {
          apiVersion
          attributes {
            url
          }
        }
      }
    }
  }
}

The image shows we get back the data from the blocks with images, and it’s also coming from Cloudinary. Just a note, I also added some content to these posts along with images.
Now that we’ve offloaded and optimized our images to Cloudinary in our WordPress backend, let’s render that data on the front end with Faust.js.
We have our queries coming back from WPGraphQL with the images in our WordPress backend being offset to the Cloudinary CDN. Because we’re using Faust.js for our frontend, it automatically has the components and the queries built in to render the post’s data you input in its boilerplate.
Let’s take a look at our browser now running on localhost:3000
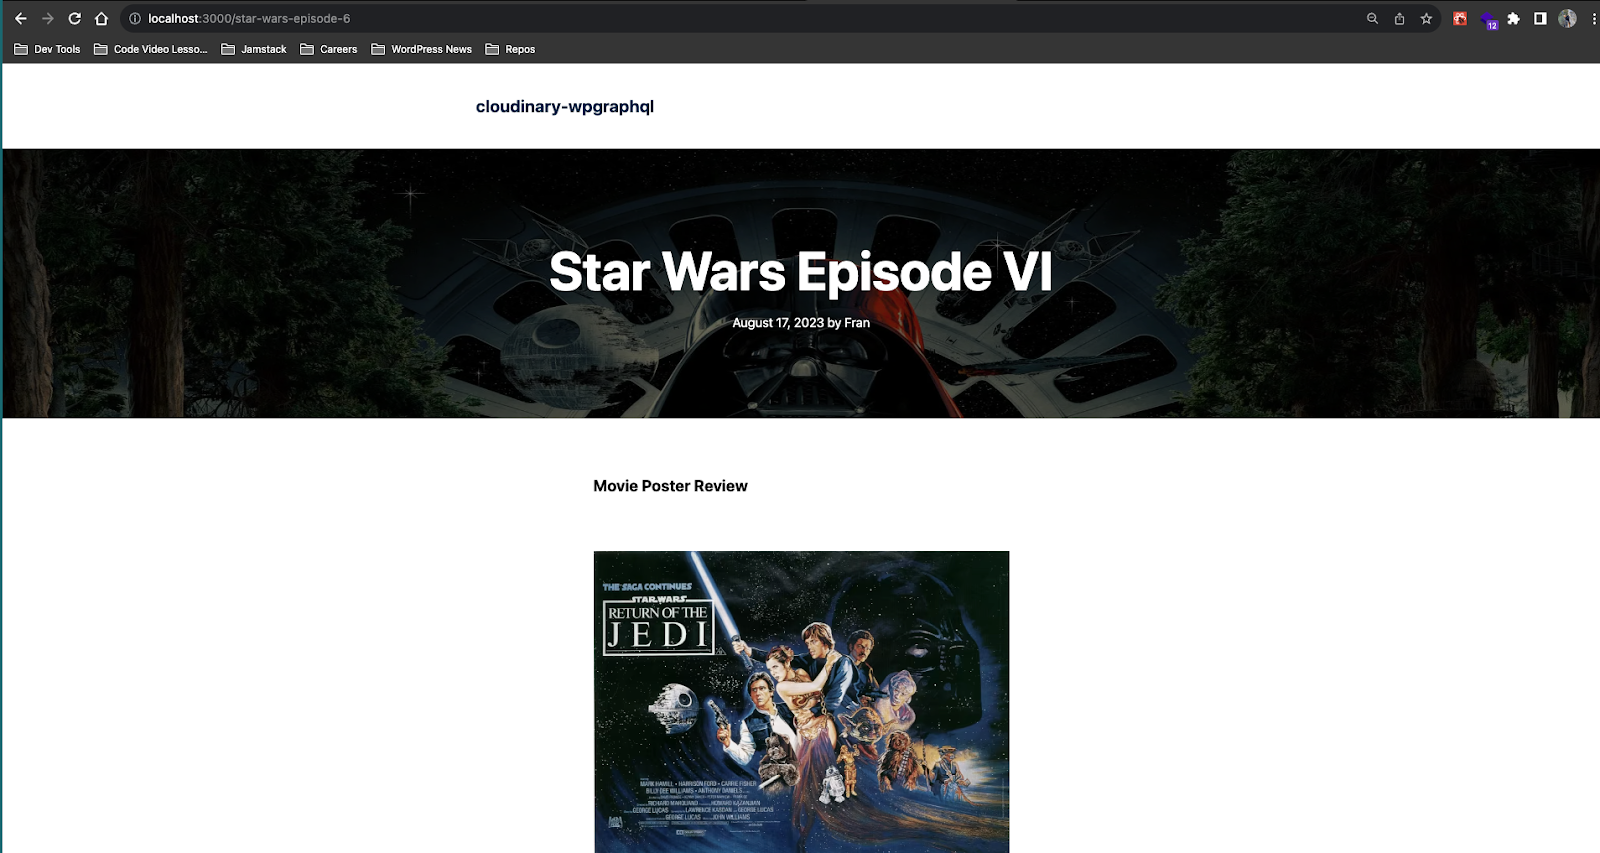
We have our images from our posts in our WordPress backend on the page. Now, let’s open up the dev tools and look at the elements tab:

You can see that on the browser, the images are coming from the Cloudinary CDN as well as the Cloudinary lazy loading script to optimize those images when necessary.
If you’re using only Next.js, let’s create a custom page that pulls out only images.
You can also do this in Faust.js as it’s built on top of Next.js.
First, create a components directory in your Next.js project at the root. In the components directory, add a ImageComponent.js file then paste this code in:
import { useQuery, gql } from "@apollo/client";

const GET_ALL_IMAGES_FROM_BLOCKS = gql`
  {
    posts {
      nodes {
        featuredImage {
          node {
            sourceUrl
            altText
          }
        }
        editorBlocks {
          ... on CoreImage {
            apiVersion
            attributes {
              url
            }
          }
        }
      }
    }
  }
`;

const ImagesFromPosts = () => {
  const { loading, error, data } = useQuery(GET_ALL_IMAGES_FROM_BLOCKS);

  if (loading) return <p>Loading...</p>;
  if (error) return <p>Error: {error.message}</p>;

  return (
    <div style={{ display: "flex", flexWrap: "wrap", gap: "10px" }}>
      {data.posts.nodes.map((post, index) => (
        <div key={index} style={{ width: "30%" }}>
          {post.featuredImage?.node && (
            <img
              src={post.featuredImage.node.sourceUrl}
              alt={post.featuredImage.node.altText || ""}
              style={{ width: "100%", marginBottom: "10px" }}
            />
          )}
          {post.editorBlocks.map((block, blockIndex) => {
            if (block.__typename === "CoreImage" && block.attributes.url) {
              return (
                <img
                  key={blockIndex}
                  src={block.attributes.url}
                  alt=""
                  style={{ width: "100%", marginBottom: "10px" }}
                />
              );
            }
            return null;
          })}
        </div>
      ))}
    </div>
  );
};

export default ImagesFromPosts;
Code language: JavaScript (javascript)
Let’s break down what’s happening in this component:
- The
GET_ALL_IMAGES_FROM_BLOCKSGraphQL query matches the one provided, targeting images from content blocks. Within the query, I’m asking for the featured images of all posts as well as core images of blocks. - The
useQueryhook from Apollo Client is used to execute the query. - Loading and error states are handled appropriately.
- The images are mapped over and rendered as
<img>elements.
You can import and use this component within your pages or other components in your Next.js project.
Since the provided query doesn’t include an alt attribute for the images, I’ve left the alt attribute of the <img> tags empty. If possible, including an appropriate alt attribute would improve accessibility. I just didn’t do it for this article.
Then, in the pages directory of your Next.js project, create a file called images.js and paste this code in:
export default function images() {
  return (
    <>
      <div>
        <ImagesComponent />
      </div>
    </>
  );
}
Code language: JavaScript (javascript)
This component is rendering the ImagesComponent inside a div. Let’s see what we get on the browser:

We get back all our images from our WordPress backend being served by Cloudinary!
I hope this article provided a better understanding for you in using the Cloudinary WordPress plugin with WPGraphQL in headless.
As always, I look forward to seeing what you build out there on the web and if you have any feedback, please share in the Cloudinary Community forums or the associated Discord.