WordPress Plugin
Last updated: Feb-02-2026
Overview
The Cloudinary WordPress plugin is designed to optimize your site performance and improve user experience with faster page load times, advanced auto-responsive delivery, lazy loading and better visual experience. Automate image quality and video encoding settings, scale and crop images using AI to focus on the most important region, apply comprehensive video and image transformations and effects, display assets via an interactive media gallery, and deliver optimized media experiences to any device in any resolution or pixel density.
Cloudinary is fully compatible with WPML, the leading WordPress multilingual plugin, and is officially recommended for seamless media management across multiple languages. Cloudinary ensures that your media assets are efficiently handled on your multilingual site. For more details, visit WPML's official page on Cloudinary compatibility.
We invite you to try the free Introduction to Cloudinary for WordPress Administrators online course, where you can learn how to configure the plugin and use asset management, image and video optimization, product gallery creation and more.
Quick start
- Sign up for a Cloudinary account or log in to your existing account.
- Install the Cloudinary WordPress plugin from the WordPress plugin directory.
- Complete the setup wizard, following the instructions to add your connection string and select your sync and optimization settings.
- Your existing media will begin syncing with Cloudinary and your media URLs will be updated to enable optimized media and fast delivery via CDN.
- That's it! Sit back and enjoy your improved site performance and greater user experience. You can keep an eye on your bandwidth savings and usage via the plugin dashboard.
Video tutorial: Optimize images and videos in WordPress
This video is brought to you by Cloudinary's video player - embed your own!
Use the controls to set the playback speed, navigate to chapters of interest and select subtitles in your preferred language.
Tutorial contents
Installation and configuration
Before you install the Cloudinary plugin, make sure you have a Cloudinary account. Sign up for a Free plan, starting with generous usage limits and when your requirements grow, you can easily upgrade to a plan that best fits your needs. More pricing information is available here.
Install or upgrade the plugin from the WordPress Plugins directory. You can open this from the Plugins dashboard by clicking Add New. Search for "Cloudinary" to bring up the Cloudinary Plugin.
Alternatively, you can install the plugin manually:
- Download the plugin.
- Click Add New to go to the Plugins Directory.
- Click Upload Plugin and then Choose file to select the Cloudinary plugin zip file.
- Click Install Now to begin the installation.
- Once installed, click Activate Plugin to begin the Cloudinary setup.
Uninstall
To stop using the plugin, you can deactivate and/or uninstall from the Plugins dashboard. When you deactivate the Cloudinary plugin, all assets will be delivered from WordPress storage and transformations will no longer be applied, you will also have the option to delete all data relating to Cloudinary. If your storage is configured as Cloudinary only, you'll need to sync your assets back to WordPress before deactivating the plugin to prevent any issues.
Setup
Once you’ve activated the plugin, a new Cloudinary menu item will be added and you’ll begin the setup wizard to connect your Cloudinary account's product environment to WordPress and pre-configure the essential settings.
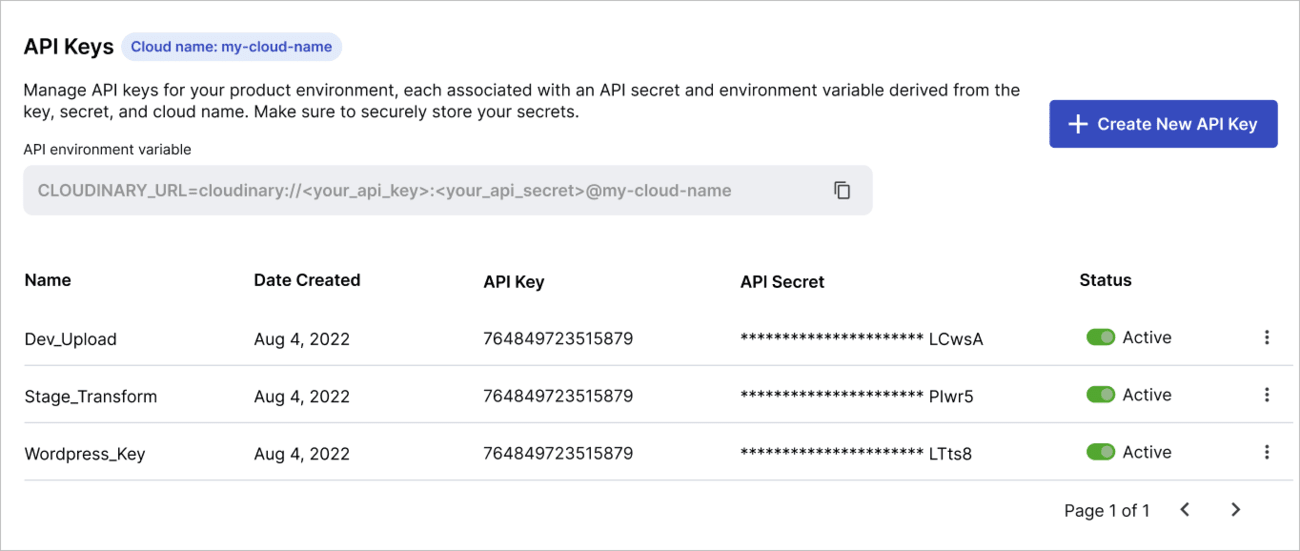
When connecting your Cloudinary product environment, you need to add your connection string, which is your environment variable. To do this, go to the API Keys page in the Cloudinary Console Settings and copy the format for the API environment variable. Replace the <your_api_key> and <your_api_secret> placeholders with the actual values provided on that page. Your cloud name will already be correctly included in the format.
As part of the setup wizard, you'll have the option to adjust the recommended plugin settings. The recommended settings provide comprehensive optimization and are comprised of:
- Optimizing Media Library items - Your media assets will be delivered using Cloudinary's automatic format and quality algorithms for the best tradeoff between visual quality and file size.
- Optimizing themes, plugins, WP core and uploads folder items - Additional assets relating to themes, plugins, WordPress core and your uploads folder will be optimized and delivered by Cloudinary, giving you an additional performance boost.
- Activating advanced features (lazy loading and responsive breakpoints) - Cloudinary's lazy loading and responsive image functionality will be applied to your media assets as part of delivery to further optimize your assets.
The recommended settings are designed to provide the highest level of optimization for your site. You may want to tweak these for your use case but we advise leaving them enabled initially and adjusting them once you've been able to assess the impact on your media.
Once the setup wizard is complete, all of your existing media will begin syncing with Cloudinary and your media URLs will be updated to enable optimized media and fast delivery via CDN.
Adjusting storage settings
By default all your assets are stored in both WordPress and Cloudinary, which allows us to keep all assets in sync. If you're looking to reduce the size of your WordPress storage, you can adjust your storage settings accordingly. You'll find this setting under General Settings > Media Library Sync Settings from the plugin menu. As a minimum, assets must be stored with Cloudinary to be delivered with all the benefits Cloudinary offers.
The three options you can select are:
- Cloudinary and WordPress - This setting stores all assets in both Cloudinary and WordPress local storage. With this setting, if there are any issues with your Cloudinary account, or you choose to deactivate the Cloudinary plugin, your assets will be delivered directly from WordPress storage with no issues, ensuring a more robust fallback mechanism.
- Cloudinary and WordPress (low resolution) - This setting stores the original full resolution assets with Cloudinary and a lower resolution compressed version in WordPress, saving space in your local storage. With this setting, if you deactivate the Cloudinary plugin, your assets will be delivered at a much lower resolution directly from WordPress storage. This setting provides a limited fallback mechanism.
- Cloudinary only - This setting stores all assets in Cloudinary only, any existing assets stored in WordPress will be removed to save space in your local storage. With this setting enabled, you need to manually sync your media back to WordPress before deactivating the plugin. Before setting to Cloudinary only, we recommend creating a full backup of your WordPress site.
The table below demonstrates where an image would be stored for the given options, how it would look and the size of each version:
| Storage Setting / Location | Cloudinary | WordPress |
|---|---|---|
| Cloudinary and WordPress |
 465.67 KB |
 465.67 KB |
| Cloudinary and WordPress (low resolution) |
 465.67 KB |
 182.48 KB |
| Cloudinary only |
 465.67 KB |
Dashboard
The Cloudinary plugin dashboard page displays a whole host of information about the state of your media, optimization and your Cloudinary account, this includes:
- Your percentage of assets optimized by Cloudinary.
- The file size savings you've made by optimizing with the plugin.
- Graphs showing your Cloudinary usage for bandwidth, storage and transformations.
- Details about your current Cloudinary plan.
- The plugin sidebar also shows your remaining usage and your optimization level.
Syncing media
Syncing media is how we ensure that your existing and any future WordPress assets are uploaded to Cloudinary and kept in sync. By being uploaded to Cloudinary, you'll be delivering your assets with all your optimizations and via CDN for improved site performance.
Your WordPress assets will sync to the root folder of your Cloudinary product environment, unless a folder path is specified in your Media Library Sync Settings. As an example, to store your assets in the cld-images sub-folder of the wordpress-assets folder, you would set the Cloudinary folder path to wordpress-assets/cld-images.
Syncing media library assets
By default, auto-sync is enabled. Auto-sync ensures that all of your WordPress media assets are automatically synced with Cloudinary when they're added to the WordPress Media Library. This allows you to continue to manage your media assets as normal but still experience all the many benefits the Cloudinary plugin provides.
If you'd rather manage the syncing of your assets manually, you can change this option under General Settings > Media Library Sync Settings from the plugin menu. With manual syncing enabled, all your WordPress Media Library assets will remain in WordPress only until they're' manually synced with Cloudinary. To sync assets manually, navigate to the WordPress Media Library and hover over the relevant asset, from here you can click Sync and deliver from Cloudinary.
Asset sync status
The WordPress Media Library includes information about the sync status of your assets with Cloudinary. Switch to list view to see the sync status column; this column contains an icon indicating one of four statuses:
- Indicates the asset is fully synced with Cloudinary and will be delivered using a Cloudinary delivery URL.
- Indicates syncing with Cloudinary is in progress. You may see this if you change a setting that affects a synced asset, such as the quality.
- Indicates the asset isn't synced with Cloudinary. Any un-synced assets can be pushed manually. Hover over the relevant asset and select the Sync and deliver from Cloudinary option.
- Indicates the asset has been manually selected to be delivered from WordPress. To re-sync to Cloudinary, hover over the relevant asset and select the Sync and deliver from Cloudinary option.
-
Indicates there was a problem syncing to Cloudinary. Hovering over the icon will show a message explaining the error. This will most likely be due to a file size limitation or an incompatible file type.
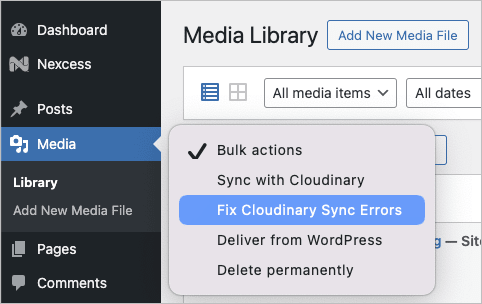
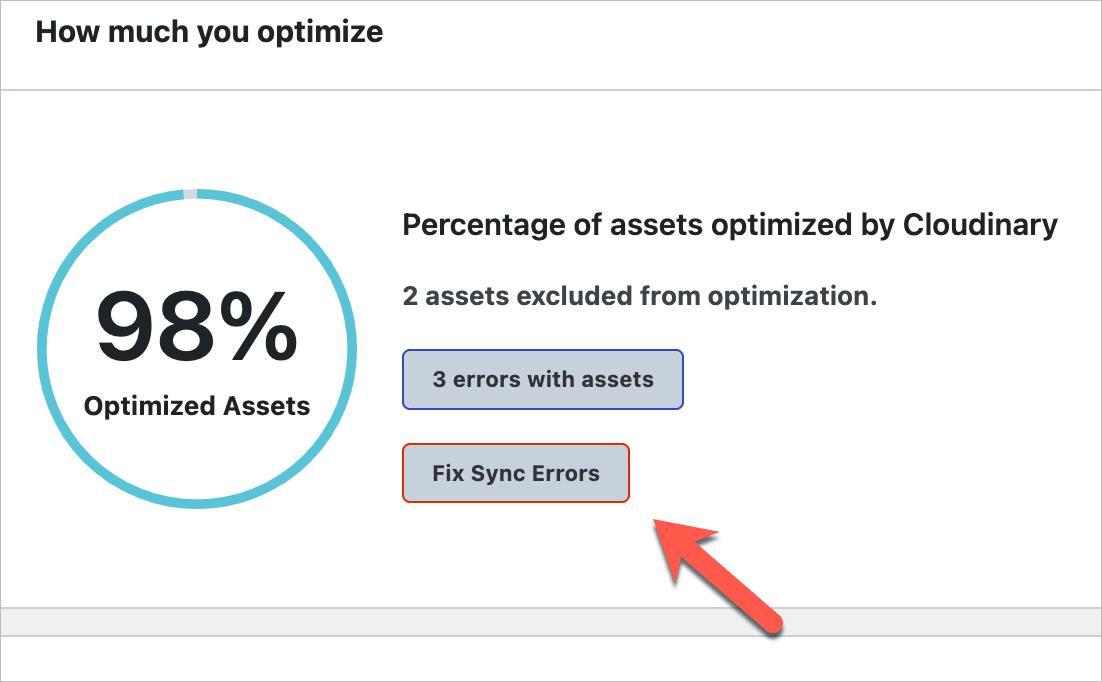
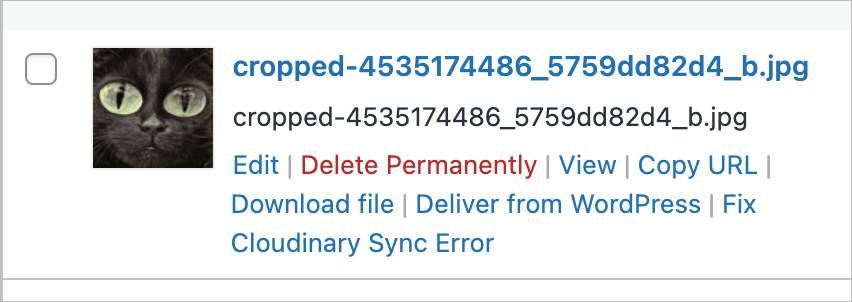
To resolve sync errors, fix the errors as detailed in the message (consult your Cloudinary package limitations for additional information if needed) and then select Fix Cloudinary Sync Errors from the Bulk actions menu, the single asset menu, or the dashboard.
Syncing specific media types
By default, both images and videos are set to be delivered via Cloudinary. However, you can choose to deliver either your images or videos, or both, via WordPress instead. This can save you Cloudinary usage.
In order to deliver either images or videos via WordPress instead of Cloudinary, turn off the Image/Video delivery setting on the Image/Video Settings page for the media type of your choice.
Syncing additional assets
Syncing additional assets uploads all relevant assets to Cloudinary and enables advanced optimization and CDN delivery, resulting in improved site performance. Additional asset syncing is enabled by default as part of the setup wizard. You can update the settings for this in General Settings > Additional Asset Sync Settings.
The additional assets are grouped into four categories:
- Plugins
- Themes
- WordPress core
- Site content
For each of the categories, you can choose to sync all assets, or you can select individual components from the categories to sync.
Syncing external assets
If you have a number of media assets hosted externally to WordPress or you're managing your media across multiple environments, you can also sync these with Cloudinary and benefit from all the advanced optimization and delivery capabilities. To use this functionality, enable the setting from General Settings > External Asset Sync Settings and add any relevant domains in the box below.
Managing media
The Cloudinary WordPress plugin allows you to continue managing your media in the same way as you did before, however you can also make use of a number of advanced media management features provided as part of the plugin. By using Cloudinary as your principle media source, you'll get all benefits that come with a dedicated media platform.
Cloudinary Media Library
The Cloudinary Media Library can be added as an extension from the Extensions menu of the right sidebar when adjusting plugin settings or viewing the dashboard. Once enabled, you can access a compact version of the Cloudinary Media Library which provides almost all of the same functionality that's available in the full Media Library in your Cloudinary Console. You can also access the Media Library when you select the Cloudinary tab from the media selection modal when editing content.
With the Cloudinary Media Library you can take advantage of all the features listed below.
- Safari: The Safari browser may require additional steps when logging in to the Media Library. If you encounter an issue, follow the prompts to log in separately and attempt to open the Media Library again. Alternatively, use one of the other recommended browsers when working with Cloudinary.
-
Third-party cookies: Some browsers (such as Firefox) may block third-party cookies by default, which can prevent the Media Library Widget from functioning properly. Users may need to explicitly allow third-party cookies for the Cloudinary domain (
https://cloudinary.com) in their browser settings.
Advanced Search
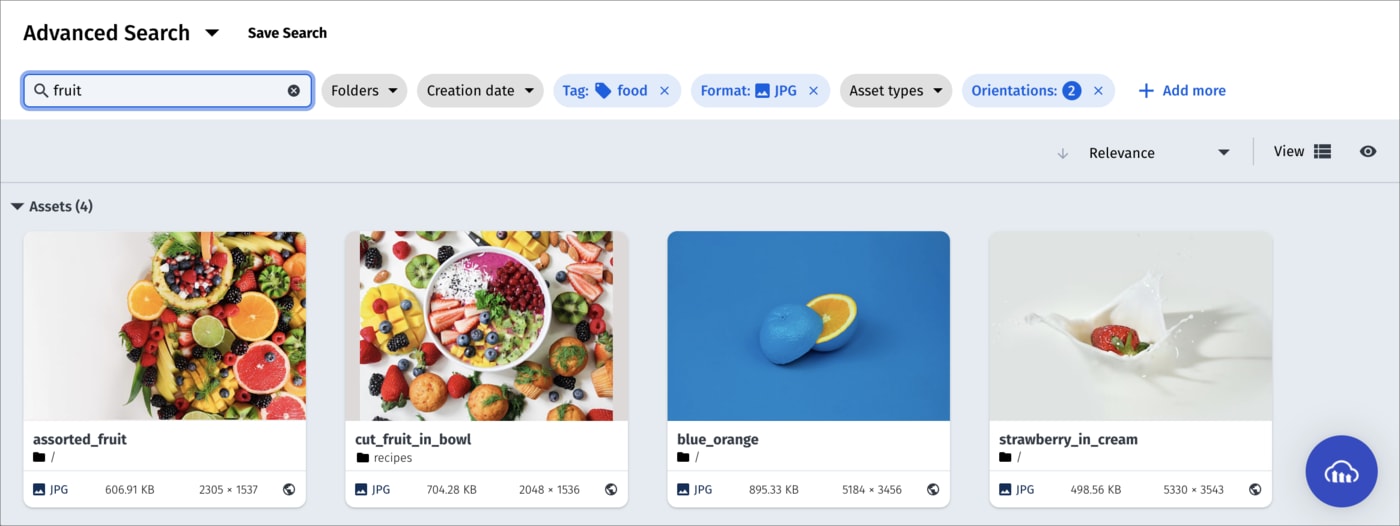
The Advanced Search feature lets you search by filters such as tags, metadata, format, orientation, resolution, or (if supported for your account), even by image analysis characteristics, such as prominent colors, presence of faces, or image location.
For more details, see Advanced Search in the Assets user guide.
Collections
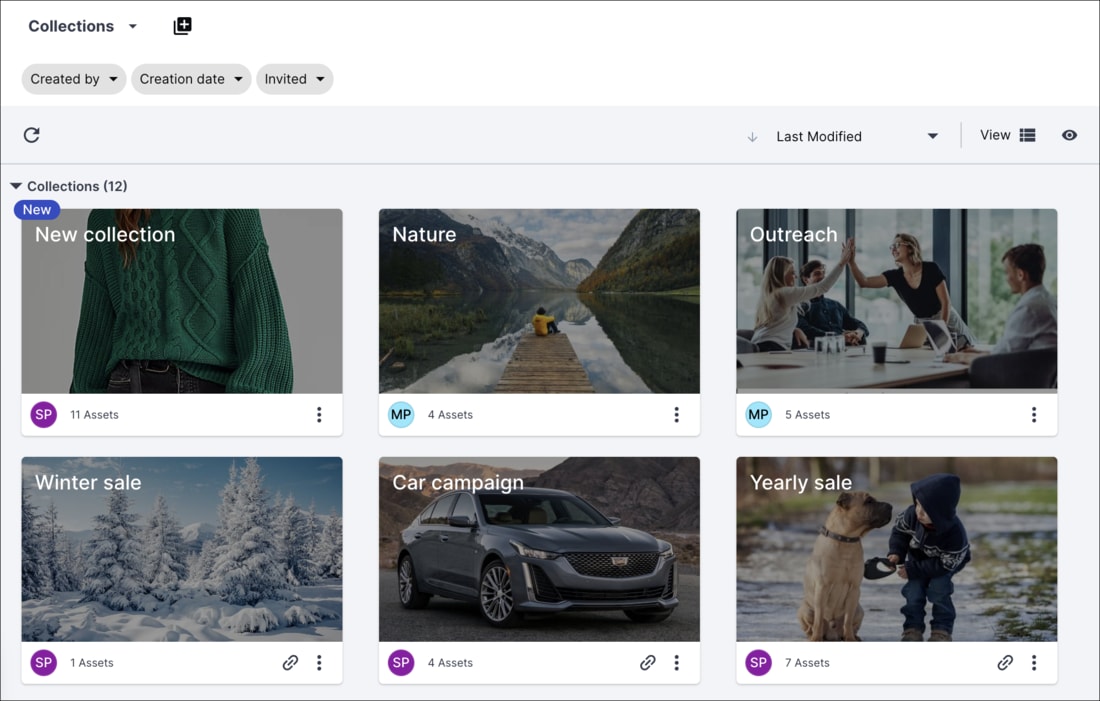
Collections are ad-hoc groupings of assets. Assets can be added to and from collections without affecting or moving the asset itself, and assets can be included in multiple collections. You can create your own collections (assuming you have the required permissions) or other Cloudinary users can share collections with you. You can also share collections with external stakeholders by sending a URL to a dedicated collection webpage, which is available to those with a link during an optionally specified date range.
Collections can often be a convenient way to group all assets that you might want to use on a particular project or campaign.
For more details, see Collection management in the Assets user guide.
Tagging and metadata
Assets that have tags and other metadata enable all Media Library users to better organize and search for assets in the Media Library.
In addition to the option to specify tags when you upload an image or video, you can also add or edit tags and other metadata after images and videos are uploaded via the embedded Media Library, and even set the same tags or metadata on multiple images and videos at once.
You can view and set this data using the Asset toolbar or in the Asset management page.
Asset toolbar
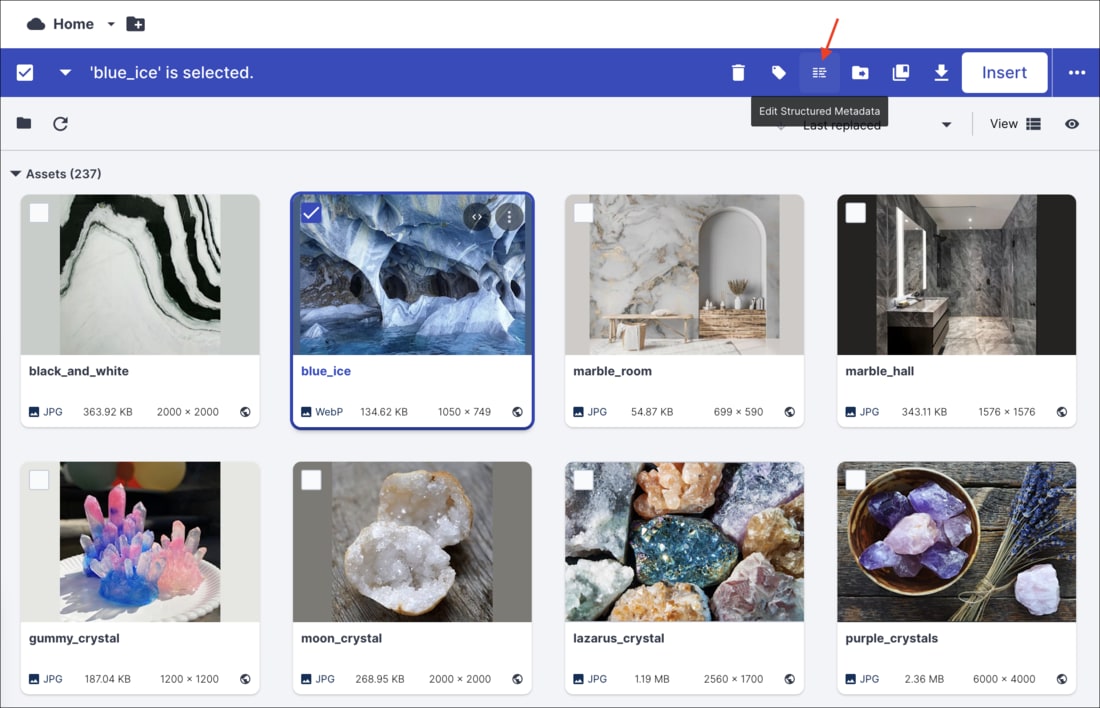
You can set tags and metadata for several selected assets at once from the Media Library using the Tag or Edit Structured Metadata options in the asset toolbar. You can Edit Contextual Metadata via the (3-dot) options menu. The type of metadata available for editing (contextual or structured) depends on the setup for your organization's account.
Asset management page
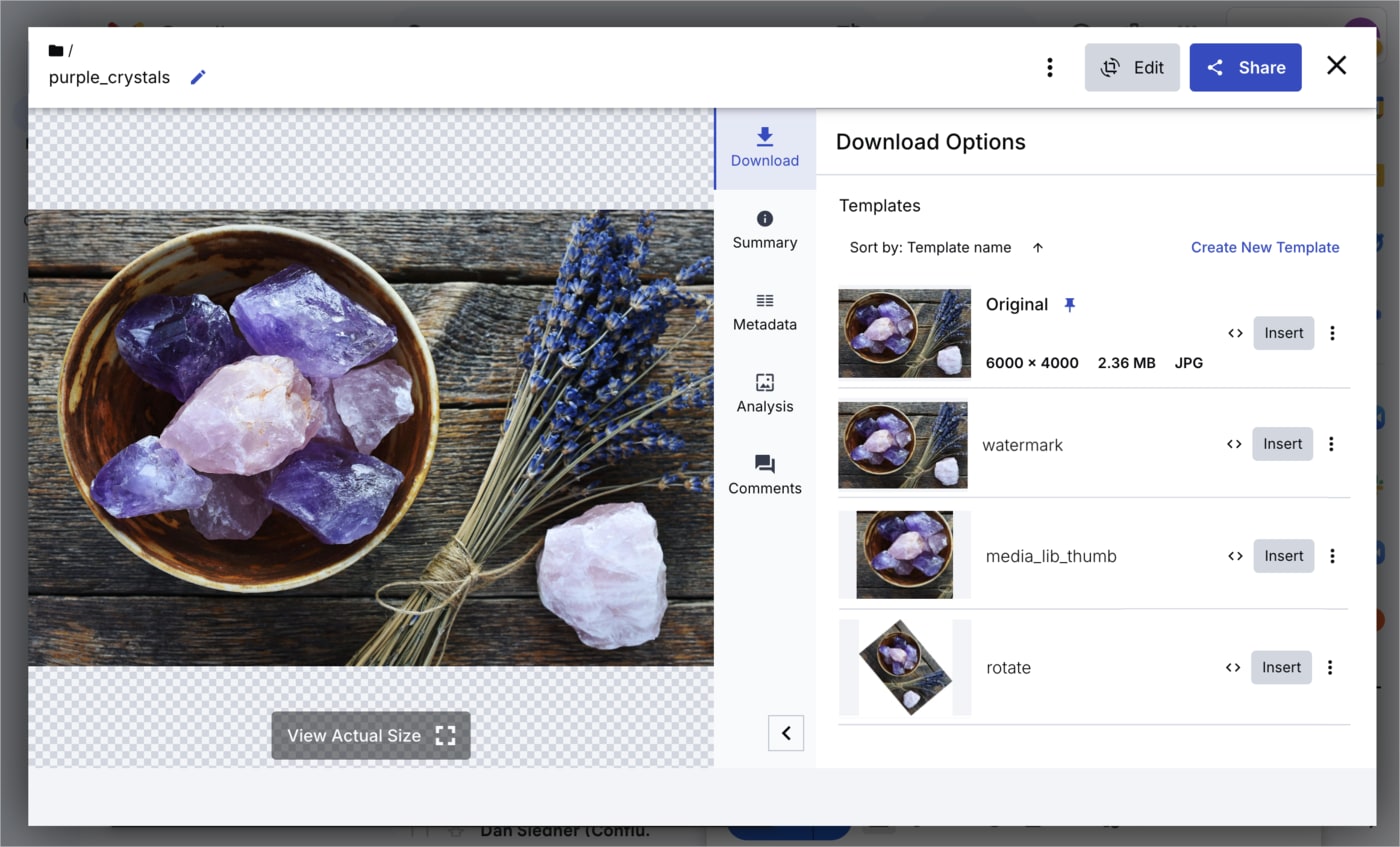
You can view or edit tags and metadata as well as view embedded image metadata for a specific asset from the Summary and Metadata tabs of the Asset management page.
To open the Asset management page either double-click the asset or select Open from the asset's context (right-click) menu.
Media editor
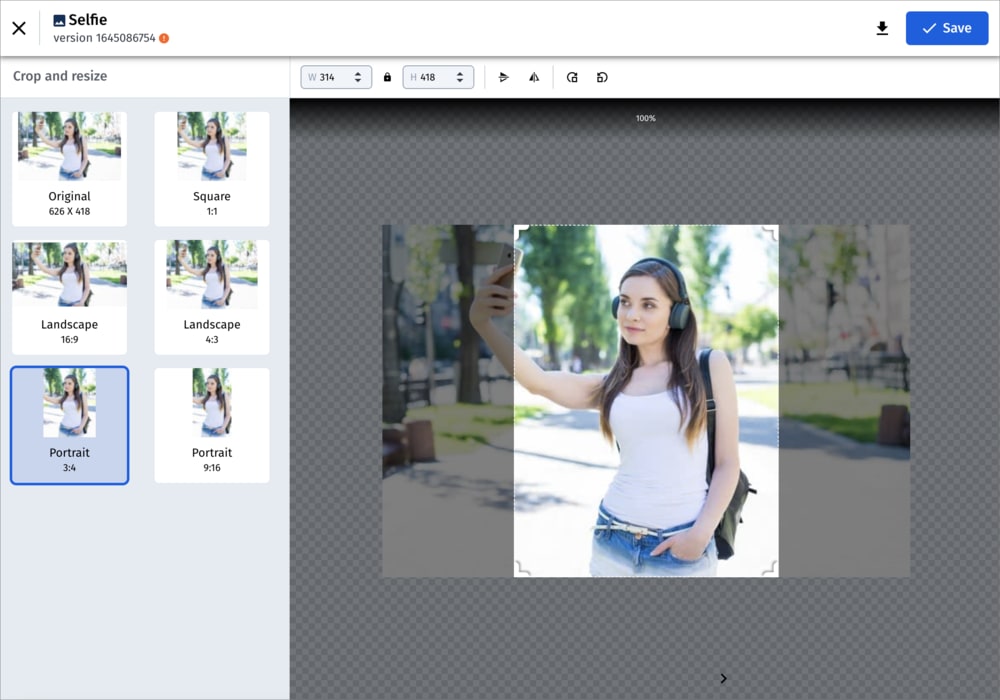
The Media Editor is only applicable to images and is accessible from the Asset management page, by clicking the Edit Image button.
In the Media Editor, you can crop and resize your image to suit your design. If you save the modified image, your current asset will be overwritten. You can retrieve the original if you have backups enabled. Otherwise, you may prefer to download the modified image and upload it as a new asset.
Transformation editor
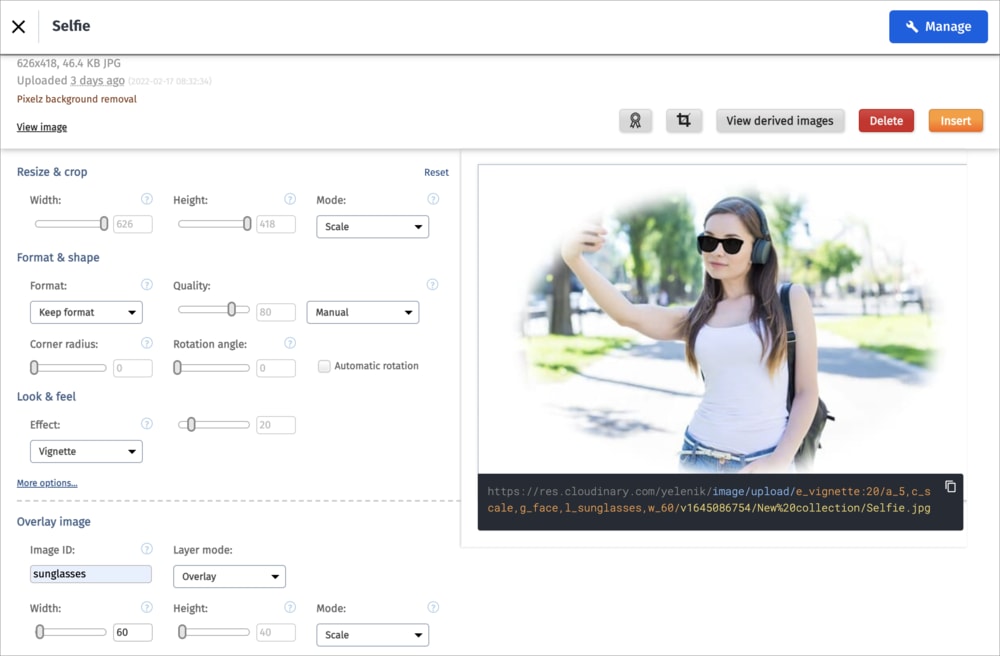
The transformation editor is accessible from the Asset management page. To open it, select Edit Transformation from the kebab menu next to the original asset or the transformation you want to edit further.
In the transformation editor you can apply and preview various transformations. Once you are satisfied with the adjustments, click Insert to use this transformed asset as your media item. Unlike the Media Editor, your original asset remains unmodified.
For more details, see Asset and transformation editing in the Assets user guide.
Delivering media
For all your synced media, the media URLs that are used on your website will be updated to Cloudinary URLs and will therefore be delivered to your end users by our advanced CDN network. The Cloudinary URLs will also include any additional transformations that will help optimize the asset to ensure you're serving your users the optimal version. You can also apply transformations that will effect the visual appearance of your assets.
You can configure a variety of settings to alter how your media is delivered by Cloudinary:
- Image and video optimization
- Enhanced video playback options
- Lazy loading
- Responsive images
- Transformations
If you have assets that you want to deliver directly from WordPress, you can select these on an individual basis. To deliver an individual asset from WordPress, navigate to the WordPress Media Library and hover over the relevant asset, from here click the Deliver from WordPress link.
Image and video optimization
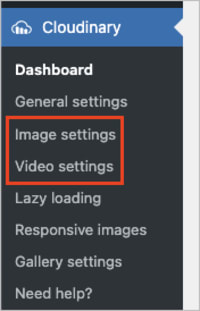
The default settings for image and video optimization will make use of Cloudinary's automatic format and quality algorithms for the best tradeoff between visual quality and file size. If you want to update these settings to manually adjust the format and quality, for example if you have a requirement to deliver high-quality images as part of a portfolio, you can tweak this using the options in the Image Settings or Video Settings pages.
Navigate to the Settings pages using the options in the left panel:
You can learn more about optimization and its impact on performance or metrics such as Core Web Vitals from our media optimization guide.
Enhanced video playback options
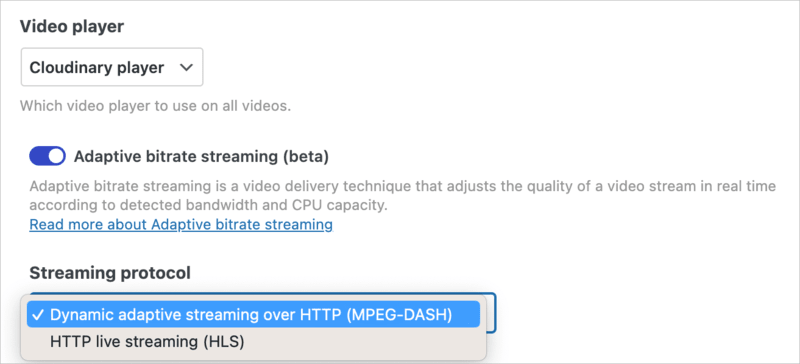
When you select the Cloudinary Video Player to stream all your videos, you can utilize Adaptive Bitrate Streaming (ABR), adjusting video quality in real time based on bandwidth and CPU capacity. Choose between Dynamic adaptive streaming over HTTP (MPEG-DASH) and HTTP live streaming (HLS) as the streaming protocol. For more information about these protocols, see Automatic streaming profile selection.
Lazy loading
Lazy loading is a technique used on websites that delays the initialization of your web assets until they're actually required, to improve page load times, which is a key component of improving your Core Web Vitals metrics.
With the Cloudinary WordPress plugin, you can enable lazy loading and configure how your media appears before it's fully loaded. You have the option to select a color for the pre-loader as well as define the type of placeholder to show.
Lazy loading is enabled by default as part of the setup process but we recommend opening the Lazy loading settings to customize it for your website.
- The lazy loading techniques make use of Cloudinary transformations and, as such, will count against your usage.
- The WordPress Plugin doesn't support lazy loading for videos.
Responsive images
Enabling responsive images will automatically generate multiple image sizes based on your configured breakpoints. This will enable your images to responsively adjust to different screen sizes. You can use the Responsive images settings to adjust the logic and determine how many images should be generated. Generating large numbers of images will deliver a more optimal version for a wider range of screen sizes but will result in an increase in your transformations usage.
By default, responsive images are enabled and will generate a maximum of five image sizes, this will provide optimal images for a wide range of screen sizes whilst ensuring your usage remains at a reasonable level.
Crop and gravity control (Beta)
The Cloudinary plugin allows you to choose how your images are cropped, positioned and resized to fit the requested dimensions and new aspect ratio, including:
- Crop: Whether parts of the image will be cropped out, or the image will be resized (upscaled or downscaled) to fit the new width and height.
- Gravity: Which part of the original image is kept.
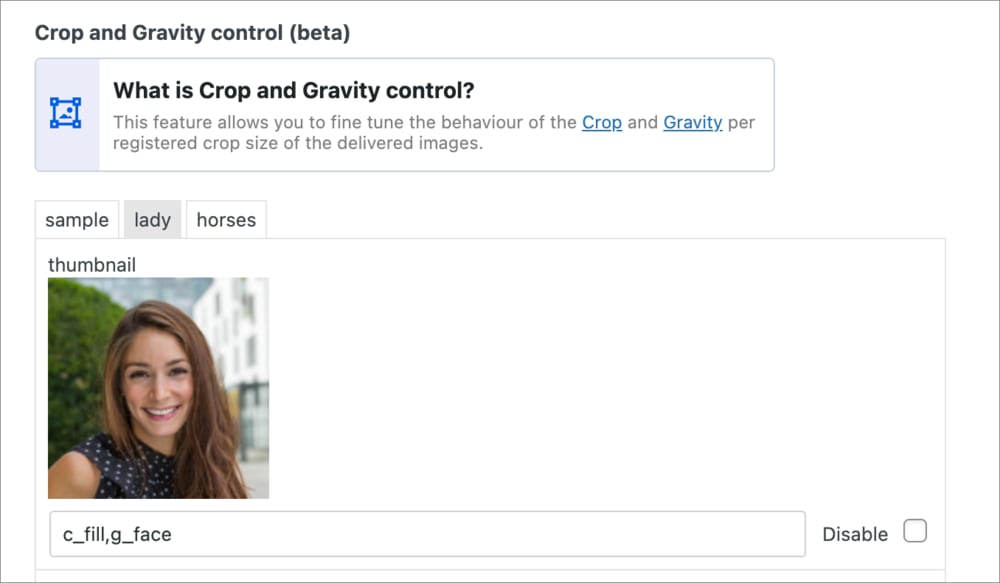
You can specify the crop and gravity transformation that will applied for each crop size on the Image Settings page. A sample asset is displayed for each crop size to help you visualize how your images will look when that crop size is applied. If you don't want a crop size to be available as a sizing option, you can Disable it.
In this example, the thumbnail crop size is set to apply the c_fill,g_face transformation:
Once you've configured your crop sizes, you'll be able to apply them to the images on any post that you add.
You can also apply crop sizes when selecting images in the WordPress media library.
The transformation selected via the crop size is applied in addition to the individual transformations set in the media library.
Transformations
Transformations are defined as a set of parameters included in a Cloudinary URL to programmatically transform the visual appearance of the assets on your website. With the Cloudinary plugin, you can add transformations and apply them to different assets in three different ways:
- Global transformations are applied to all images or all videos. These transformations are set in the plugin's Image Settings or Video Settings.
Navigate to Image and Video Settings
- Taxonomy transformations are applied based on certain categories or tags. These transformations are set when creating or editing a tag or category.
Navigate to the Categories and Tags
- Individual transformations are applied to individual assets. These transformations are set using the Add Effects option for an individual asset in the WordPress Media Library.
Navigate to the WordPress Media Library
All of these transformations can be configured to be applied as combined transformations or can override others as outlined in transformation hierarchy.
Transformation hierarchy
Transformation hierarchy is used to ensure the correct transformations are applied to the correct assets in the correct places. You can set transformations at global level, taxonomy level and individual asset level (when inserting from the Cloudinary Media Library), with the option to overwrite or append the transformations to achieve the desired effect.
Global level transformations
Global level transformations apply to all images or video throughout your site. Global level transformations can have taxonomy and individual transformations appended to the end or they can be overwritten. The best practice for global level transformations is to ensure they don't edit the content of the media too significantly and therefore would not need to be overwritten. An example would be to add a watermark to all your media assets.
Here's an example of how to configure a global transformation from Image Settings that adds a Cloudinary logo overlay to all images:
Taxonomy level transformations
Taxonomy level transformations are specific to a defined taxonomy, either a "category" or a "tag". You can set your transformations when creating or editing the taxonomy. You can then apply the taxonomy to a post or page to see the transformations take effect on the media assets. An example of a taxonomy level transformation would be to apply an overlay or effect relating to that taxonomy e.g. Adding the tag "sale" could overlay a sale banner onto all the media assets in that post or adding a "dog" category could overlay a paw print.
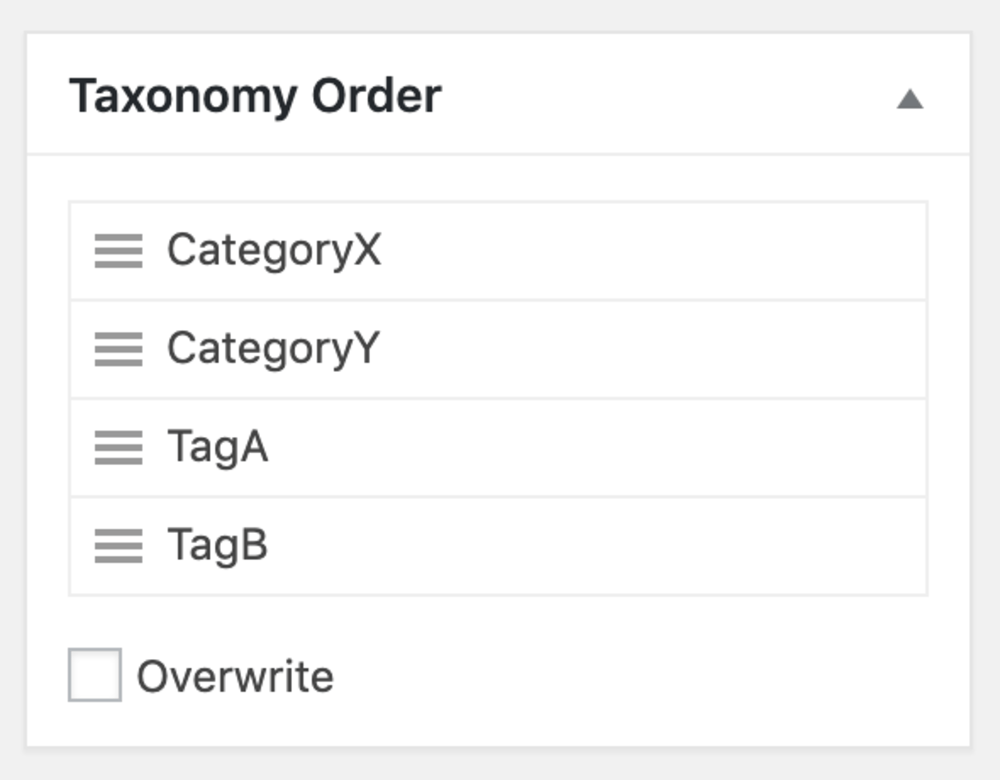
Taxonomy order
When editing your content there will be a setting for "Taxonomy order". This allows you to configure the order in which the taxonomy level transformations should be applied (if you have multiple). You can also set whether the taxonomy level transformations should overwrite the global transformation.
Individual level transformations
Individual level transformations are defined using the Add Effects option for an individual asset in the WordPress Media Library or by applying transformations using the Cloudinary Media Library. The transformations are then included in the delivery URL and can't be overwritten by any other transformation.
Here's an example of how to access settings for an individual image in the WordPress Media Library:
Select Add Effects to add a transformation string, as well as adding and formatting text and image overlays:
If you add a transformed asset to your content, you can specify whether you wish the individual level transformation to overwrite the taxonomy and global level transformations you have defined and therefore only display the individual transformation. To do this, navigate to the asset within the editor and click the asset to display the options in the "block" tab, or select edit (if you're using the classic editor). You'll see either a radio button or toggle for Overwrite Transformations.
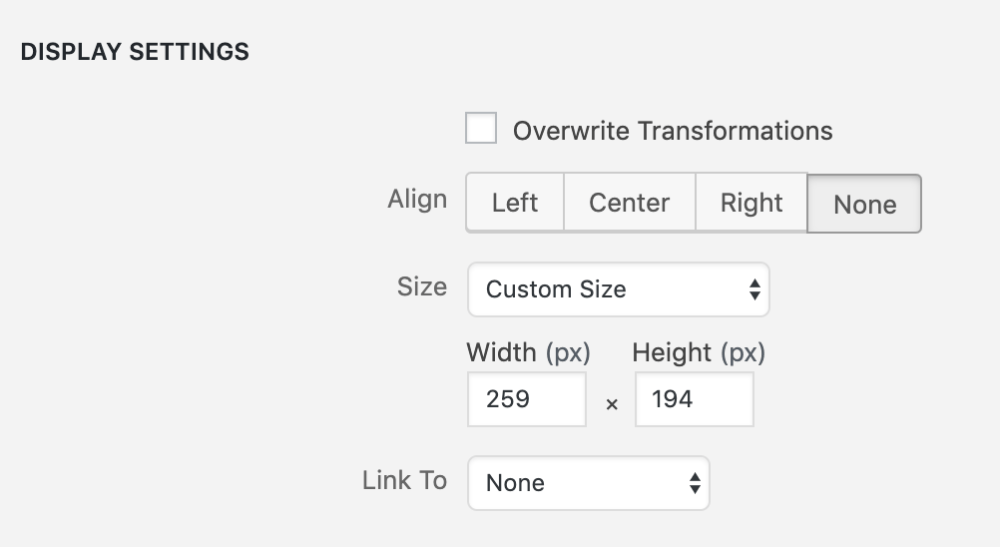 Classic
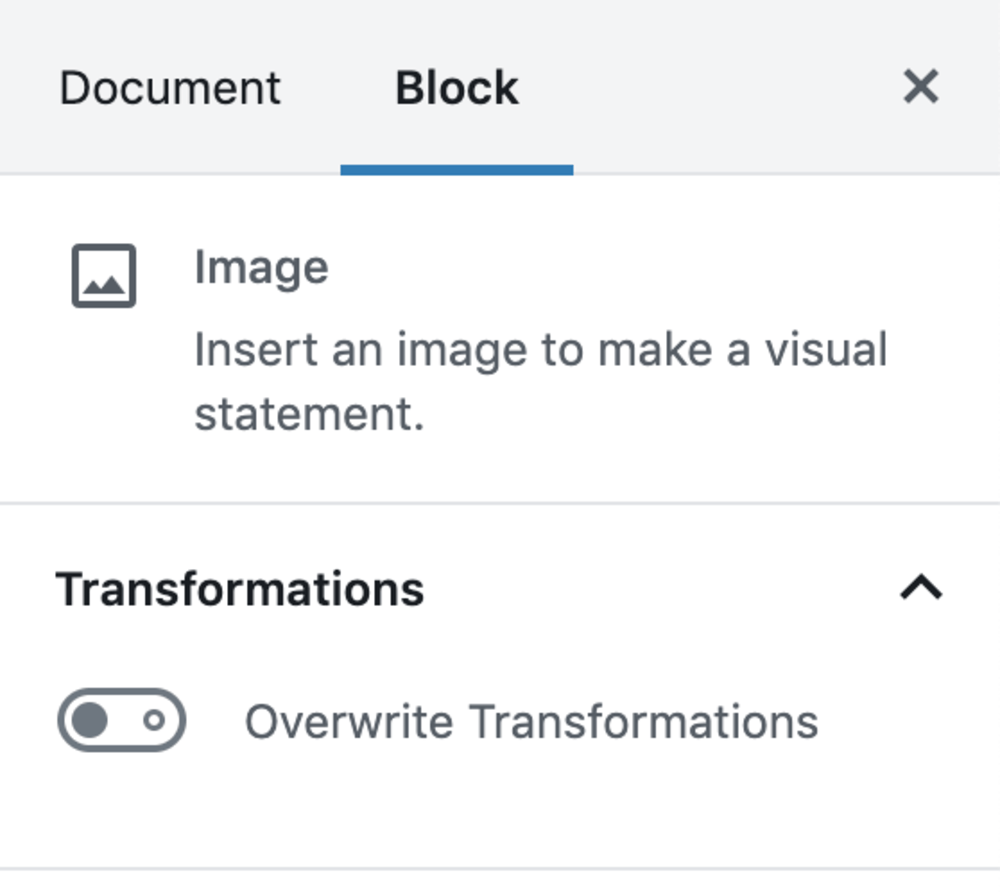 Gutenberg
Examples
The examples below demonstrate how transformations are applied for different combinations of overwrite settings. The result is the Cloudinary URL that's used to deliver the image.
Original image
Example of individual level overwrite
If you overwrite at the individual level only, both the taxonomy and global level transformations aren't included in the final delivery URL.
| Transformation level | Transformation string | Transformation | Overwrite? |
|---|---|---|---|
| Global | l_cloudinary_icon_white |
Cloudinary logo overlay | N/A |
| Taxonomy |
e_red:50/e_sharpen/e_improve/o_70
|
|
✖️ |
| Individual | e_outline:outer:20:200 |
Black outline effect | ✔ |
Result

Example of taxonomy level overwrite
If you overwrite at the taxonomy level, you will get both individual and taxonomy level transformations in the final delivery url. The global level transformations will be overwritten.
| Transformation level | Transformation string | Transformation | Overwrite? |
|---|---|---|---|
| Global | l_cloudinary_icon_white |
Cloudinary logo overlay | N/A |
| Taxonomy |
e_red:50/e_sharpen/e_improve/o_70
|
|
✔ |
| Individual | e_outline:outer:20:200 |
Black outline effect | ✖️ |
Result

Example of overwriting at taxonomy and individual level
If you overwrite at both taxonomy and individual level, you will get the same result as just overwriting at individual level, as this will always take precedence.
| Transformation level | Transformation string | Transformation | Overwrite? |
|---|---|---|---|
| Global | l_cloudinary_icon_white |
Cloudinary logo overlay | N/A |
| Taxonomy |
e_red:50/e_sharpen/e_improve/o_70
|
|
✔️ |
| Individual | e_outline:outer:20:200 |
Black outline effect | ✔ |
Result

Example with no overwriting
If you don't overwrite at any level then all transformations will be included in the final delivery URL.
| Transformation level | Transformation string | Transformation | Overwrite? |
|---|---|---|---|
| Global | l_cloudinary_icon_white |
Cloudinary logo overlay | N/A |
| Taxonomy |
e_red:50/e_sharpen/e_improve/o_70
|
|
✖️ |
| Individual | e_outline:outer:20:200 |
Black outline effect | ✖️ |
Result
Cloudinary status
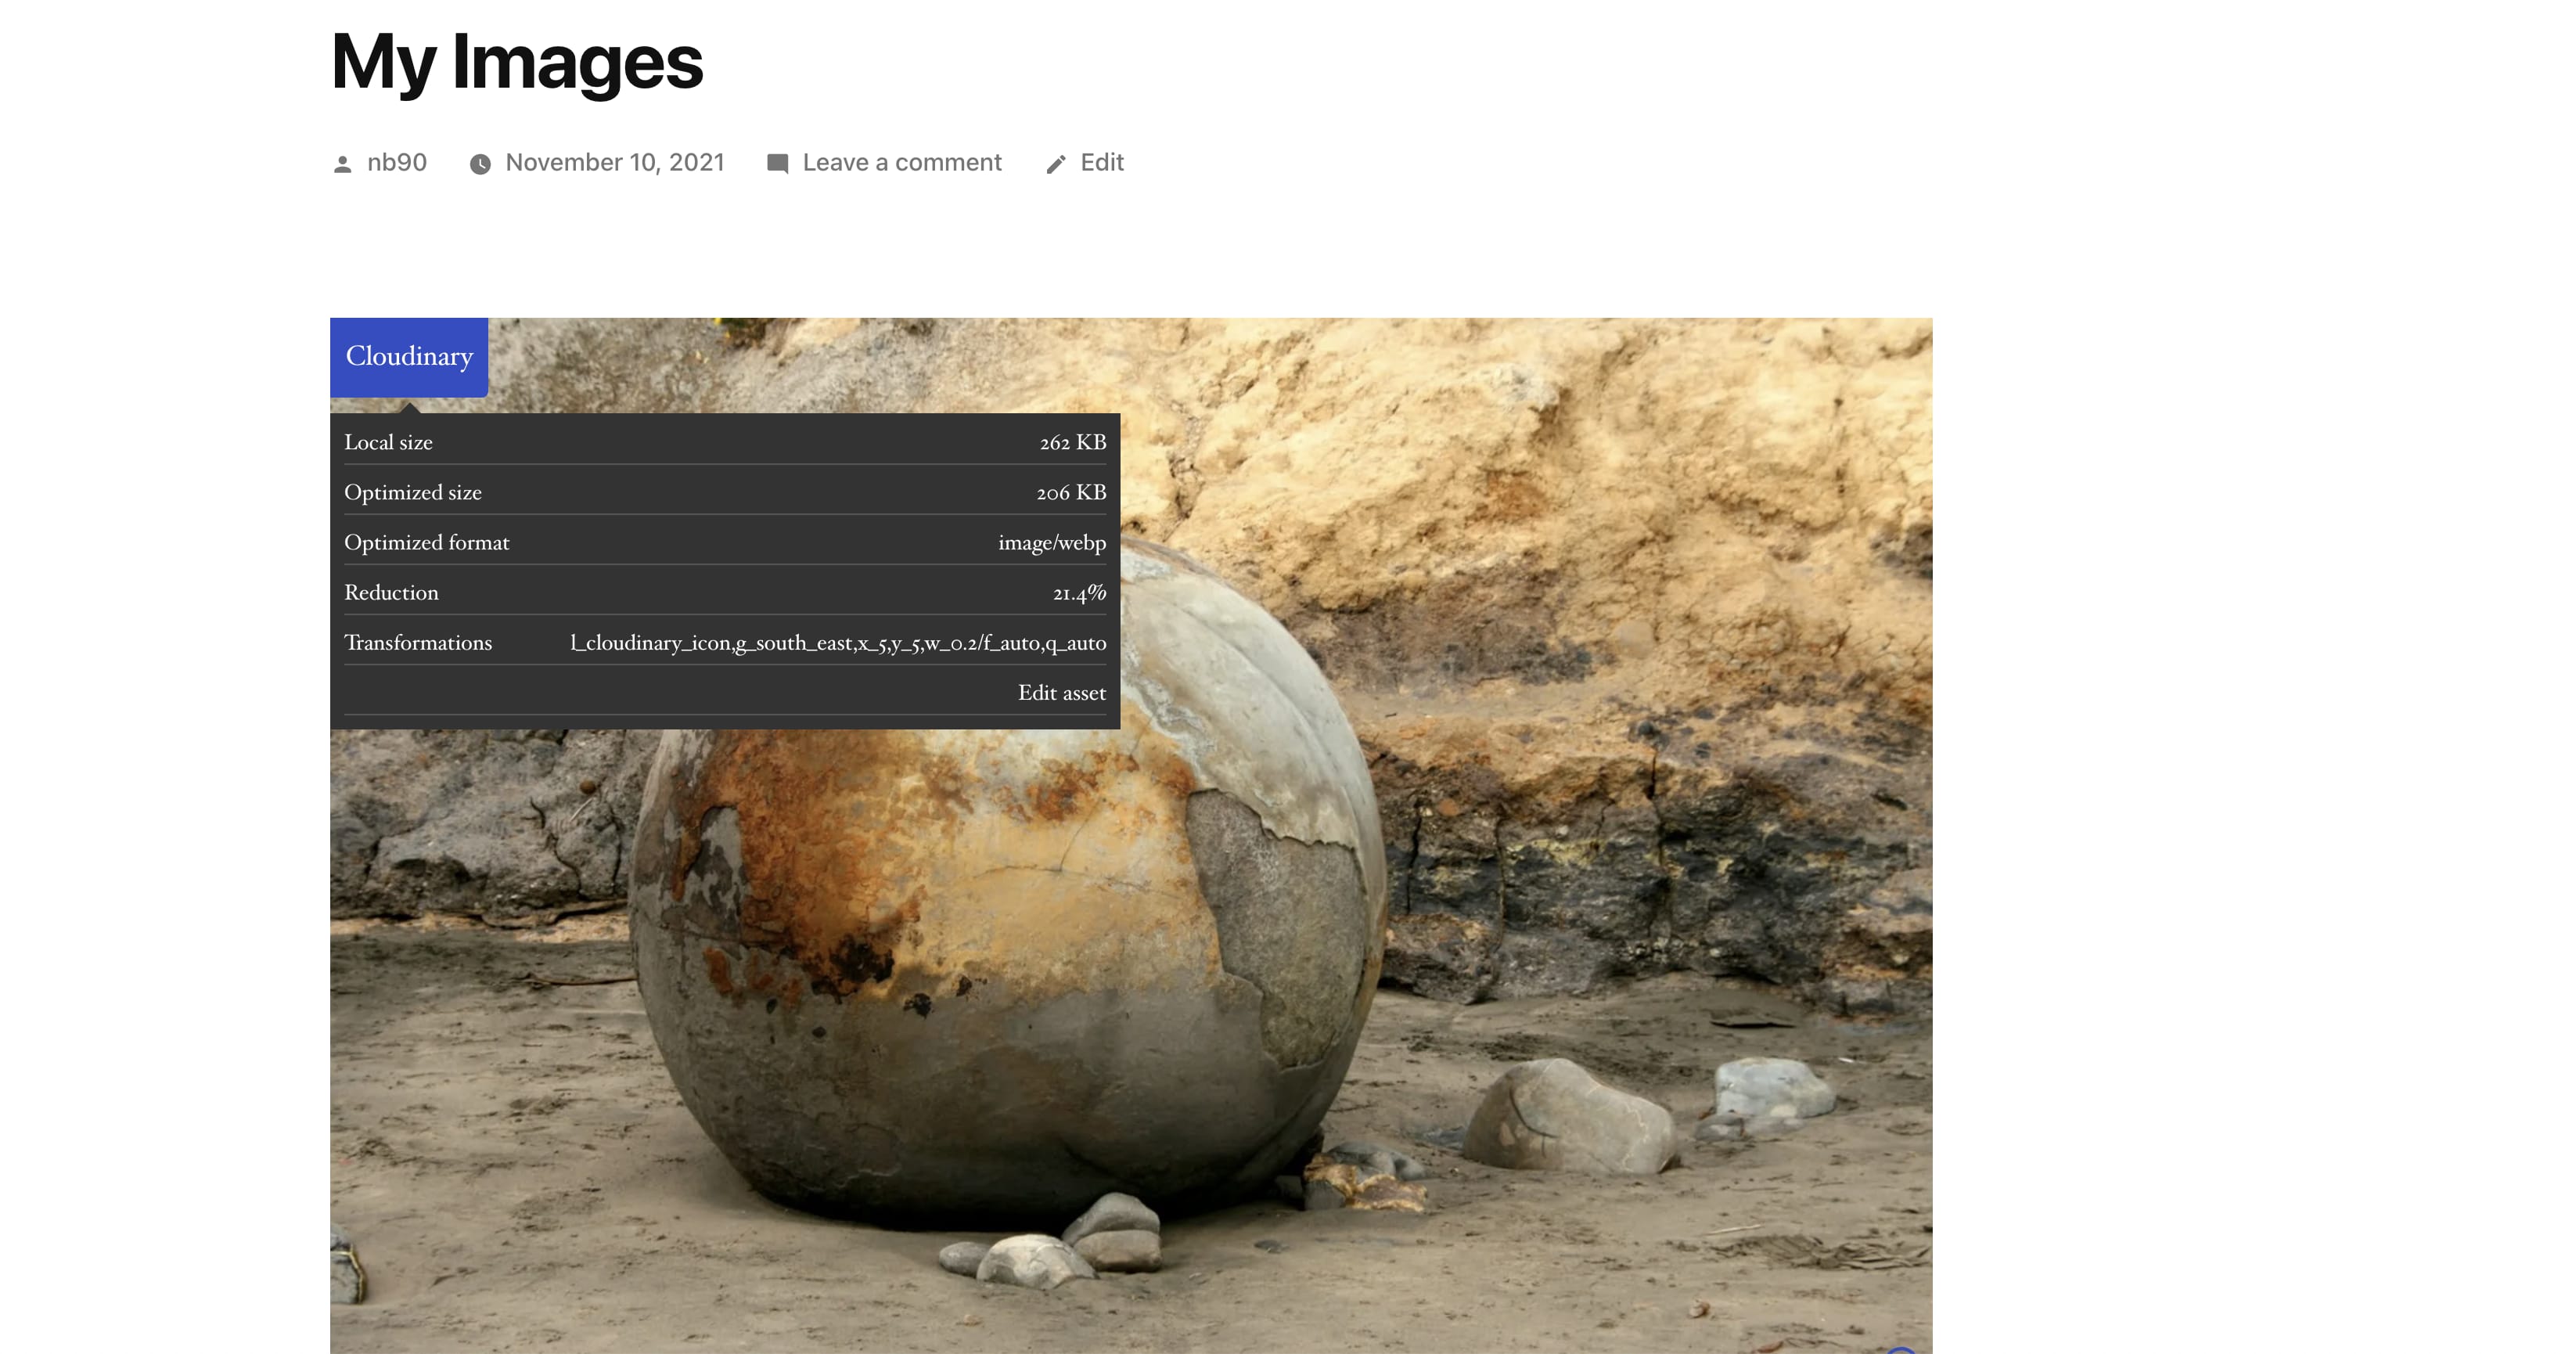
The Cloudinary plugin includes an additional option that allows you to see information about the status of your media assets on your website frontend. This is useful in understanding the impact of the Cloudinary plugin on individual assets as well as seeing which transformations are being applied.
The status shows you whether an asset is delivered from Cloudinary or from WordPress. For Cloudinary delivered assets, it shows the following information:
- Local size
- Optimized size
- Optimized format
- Reduction (%)
- Transformations
To view the status of your media, view any page or post from within WordPress and click the Enable Cloudinary status option from the Admin bar. Once enabled, an overlay is added to each of your media assets stating either "Cloudinary" or "WordPress". For all assets delivered from Cloudinary, you can hover over the overlay to view the status of that media asset.
Cloudinary Gallery
The Cloudinary Gallery provides a highly customizable and optimized gallery interface using the Cloudinary Product Gallery. The gallery is great for product detail pages but can also be used as a way of showcasing images for a variety of other use cases.
To use the gallery, first configure the look and feel using the Gallery settings. When you're happy with the design, add the Cloudinary Gallery block to any page or post and select the media you want to include.
For WooCommerce sites, the gallery can be enabled to replace the default product gallery on all product detail pages.
- The Cloudinary Gallery block isn't available when using the Classic editor.
- The Cloudinary Gallery doesn't support media selection based on tags. All media must be added individually using the Media Library.
Troubleshooting
If you run into any issues with the Cloudinary plugin and need some help, contact support who will be able to help resolve your issues. We recommend generating a system report to assist our support team in understanding your problems and finding a solution.
System report
The system information report is an option that allows you to generate and download a realtime snapshot report about your WordPress site and the Cloudinary plugin. The report can be used to debug any specific issues you're having with your Cloudinary media and will help assist our support team should you need to contact them with any queries. You can enable the system report from the plugin Help Center.
The report is in JSON format and it includes information about:
- Current WordPress and Cloudinary configuration
- Currently installed plugins
- Any themes that are being used
- Any specifically selected media
- Any specifically selected posts or pages
Once the report is enabled, you'll see a button to download your report. As the report is a realtime snapshot, it will include updated information each time you download it.
Adding media or posts/pages to the report
Adding specific media or posts to your report can help to solve any issues you might be seeing.
Before adding media or posts/pages to your report, ensure that system information reports are enabled. Once enabled, to add items to the report:
- Navigate to the WordPress Media Library or the Posts/Pages section.
- Find the media, post or page that you want to add to the report. For media, ensure you're viewing the library in list mode.
- Hover over the item and select Add to Cloudinary Report.
Cloudinary Professional Services configuration support
The WordPress Plugin is part of Cloudinary's Standard Professional Services integration configuration package.
If you need assistance setting up this integration and you're on an Enterprise plan with a professional services package in your contract, Cloudinary's professional services can help you set it up as part of your contracted package.
Learn more: Cloudinary Professional Services packages
 Ask AI


