Managing individual media assets
Last updated: Feb-23-2026
Overview
This page walks you through the basics of managing your individual media assets, providing descriptions of the different Media Library views, asset operations and asset identifiers, and listing the basic management capabilities you can apply to your assets.
The rest of the pages in this guide provide details, use cases and examples of the additional options for managing your individual assets:
| Option | Useful for... |
|---|---|
| Editing and transformations | Editing assets with an array of tools, such as transformation templates, basic image and video editors, and transformation editors. |
| Collaboration tools | Facilitating seamless collaboration within your team through asset sharing and commenting, and extending collaboration to external stakeholders by sharing public links to assets. |
| Custom metadata | Organizing and keeping track of assets by managing custom metadata individually and in bulk. |
| Analysis and insights | Maximizing efficiency and gaining insights by analyzing assets and linking related ones. |
| Asset protection | Controlling whether assets are viewable by applying moderation and setting access control. |
| Add-ons | Extending your Assets capabilities with tools that offer advanced features for managing, processing, and delivering your digital assets effectively. |
| DAM Apps | Use apps selected by your product environment administrator to enhance the Media Library core product. |
Media Library views
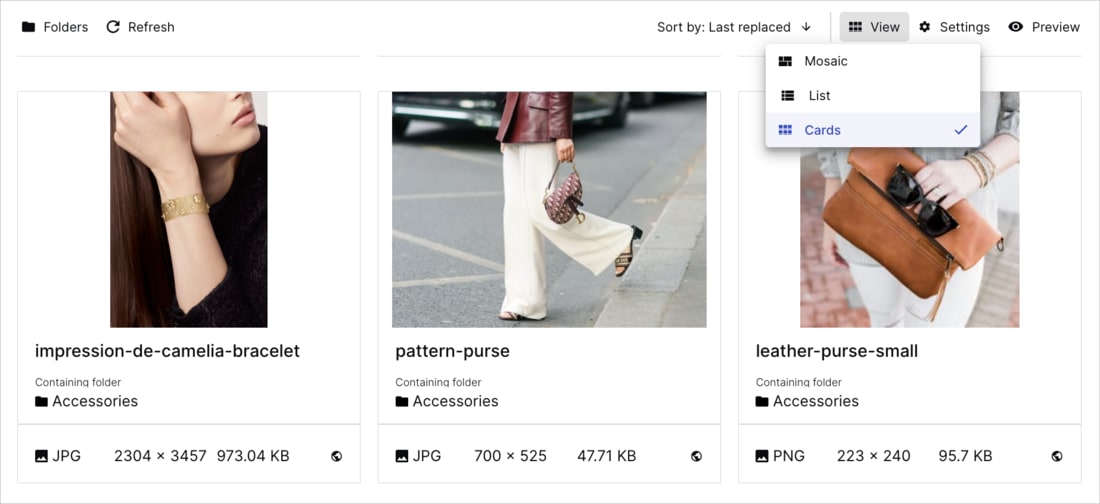
You can display your assets along with selected attributes from the Assets, Folders, Collections and Moderation pages as:
-
Card view: A grid of square thumbnail cards. This view allows you to browse your assets as previews with descriptive details displayed on them.

List view: An asset list. This view allows you to see and easily copy detailed information about all your assets in list format, providing a global view of your assets and enabling you to easily compare their data.

Mosaic view (available from the Assets and Folders pages only): A responsive masonry layout. This view offers an immersive visual experience by optimizing the use of space, positioning elements dynamically, minimizing gaps between assets and displaying them with their true aspect ratios.

You can switch between these views using the View drop-down menu at the top right of the main Asset Pane.
Attribute display settings
- To learn more about the features available in the Assets Free plan and how they can support development workflows, see Media Library for Developers.
- For upgrade options or more information, contact us.
The ![]() icon allows you to configure different display settings for these two views:
icon allows you to configure different display settings for these two views:
- Card View: Select the size of the cards, which descriptive details to display on the cards, and whether to always show details or to only show them on hover.
- List View: Select the information that's displayed within the table columns, including structured metadata, according to your needs. You can also sort your asset list in ascending or descending order by clicking on sortable columns.
Additionally, you can select the main action for an asset (Copy Delivery URL, Share Public Link, Copy Display Name or Open in New Tab), available in both Card and List views.
Primary attribute
- To learn more about the features available in the Assets Free plan and how they can support development workflows, see Media Library for Developers.
- For upgrade options or more information, contact us.
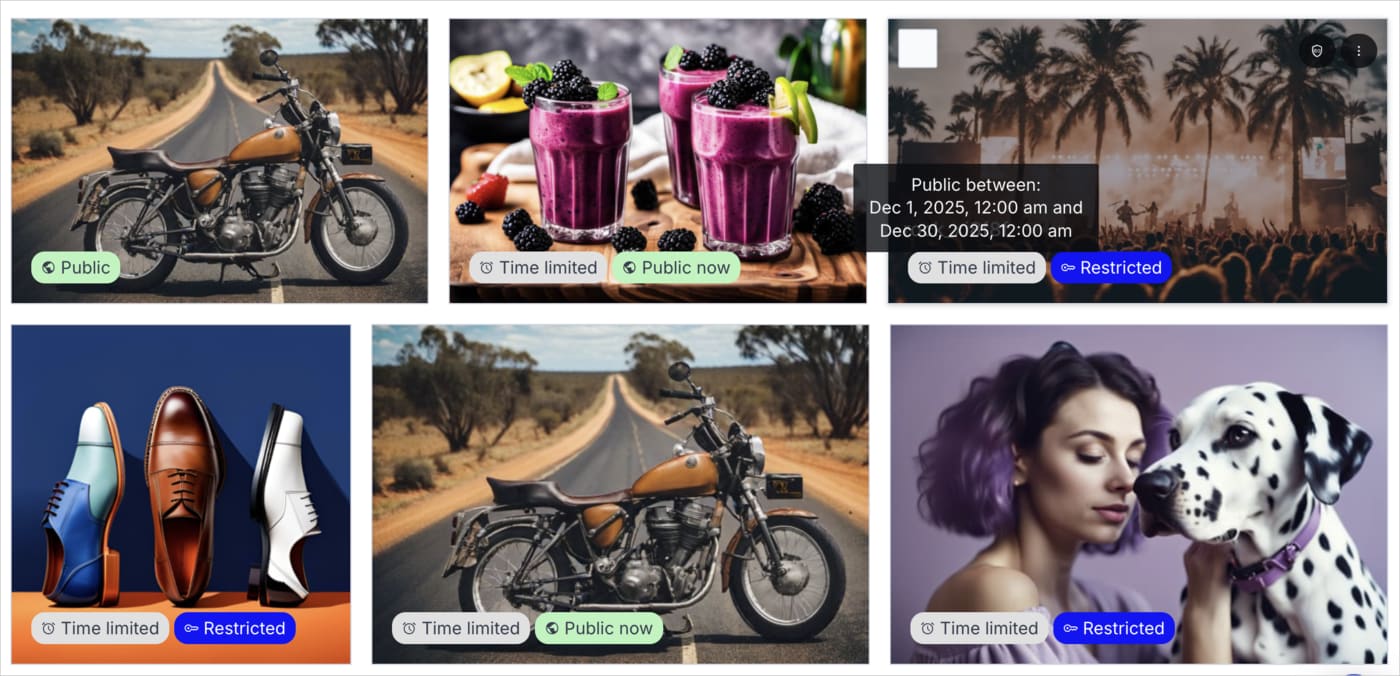
If your administrator set a structured metadata field or asset characteristic as the primary attribute, its value will be prominently displayed in any page of the Media Library (Home, Assets, Folders, Collections and Moderation). In Card and Mosaic Views, the value is highlighted and color-coded on each asset. In List View, this attribute is takes the first column of the table. This feature is particularly helpful for quickly spotting crucial statuses in the Media Library.
Access control as primary attribute
When access control is set as the primary attribute, you'll see enhanced visibility information for time-restricted assets:
- Public now: Assets that were time-restricted but are now public display "Public now" instead of "Restricted," helping you distinguish between permanently public assets and those that became public due to an expired time limitation.
- Time-based restriction indicators: Currently restricted assets with time limitations show a clear indicator that the restriction is time-based.
- Detailed time windows: Hover over the "Restricted" tag to view the specific time window during which the asset is accessible.
Asset operations
For any displayed asset in the Assets, Folders, Collections, and Moderation pages of the Media Library (with some actions also available on the Home page), you can perform the following actions:
| Action | How to | Details |
|---|---|---|
| View or edit summary details such as display name (not supported in product environments using the legacy fixed folder mode), public ID and metadata (tags, structured, contextual) in the Preview pane View version history and restore previous versions of the asset Select one asset to perform operations |
Single-click the asset | The Preview pane is available on the right side of the screen. If the Preview pane is closed, click the Open Preview button |
| Navigate between assets | Left/right arrows | Moves selection one asset to the left or right. |
| Manage asset (also available on the Home page) |
Double-click the asset or Click Open from the (3-dots) options menu |
Opens the Asset Management drill-down page where you can view or edit summary, metadata, and analysis data. |
| Select one or more assets to perform bulk operations | Click the checkmark icon or Shift+single-click a first and last asset in a range or Cmd+click (Mac) Ctrl+click (Windows) or Drag the mouse over consecutive assets |
Performs any of the operations available in the displayed assets toolbar on all selected assets at once. For example, you can delete selected assets, add/remove tags or custom metadata, move assets, download them, apply a moderation status, or generate a Product Gallery. |
| Select all assets on the page |
Cmd+A (Mac) Ctrl+A (Windows) |
The number of assets selected appears on the toolbar. If there are more assets in the folder that you want to select, keep scrolling down and pressing Cmd+A or Ctrl+A until all the assets you want are selected. |
| Deselect all previously selected assets |
Single-click an asset or Single-click the grid background |
Deselection can't be undone. |
| Share the asset with teammates and external stakeholders | Hover over Share from the (3-dots) options menu and select an option |
Invite: Share a link to the selected asset's manage page with users who have access. - Note: This feature is unavailable on the Assets Free plan. Embed: Access the asset's delivery URL for copying and pasting to other platforms and development environments, or open the asset in a new browser window. You can choose to include the version number or not. |
|
Open the asset's context menu (also available on the Home page) |
Right-click the asset or Click the (3-dots) options menu |
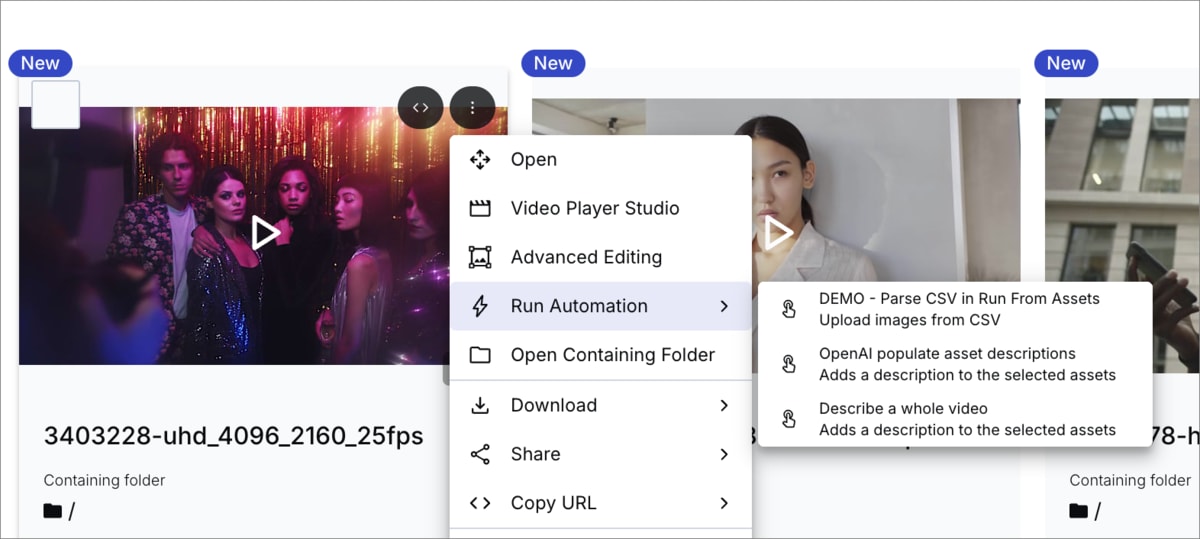
Provides another way to perform many of the above actions as well as additional operations. For example: - Run MediaFlow automations on assets. - Navigate to the asset's containing folder (when you are currently in a non-folder view). - Download the asset in one of several forms. - Copy the asset's original URL, or a URL transformed using a template. Open a dialog to copy the original URL with its version number, or open it in a new tab. - Rename the asset - Replace the asset by overwriting it with a newly uploaded version - Add the asset to a collection. - Open the Access control options. - Delete the asset. - Use Video Player Studio to generate code for creating and customizing a Video Player instance on a website. |
Download options
Assets Enterprise plans:
- These features are premium offerings for Assets Enterprise plans, and their availability depends on your account setup. If these features aren't yet enabled for your account and you'd like to enable them, please contact your Customer Success Manager.
Assets Free plan:
- This feature isn’t included in the Media Library available with the Assets Free plan, which offers basic management. It's part of the Media Library for Assets Enterprise plans.
- To learn more about the features available in the Assets Free plan and how they can support development workflows, see Media Library for Developers.
- For upgrade options or more information, contact us.
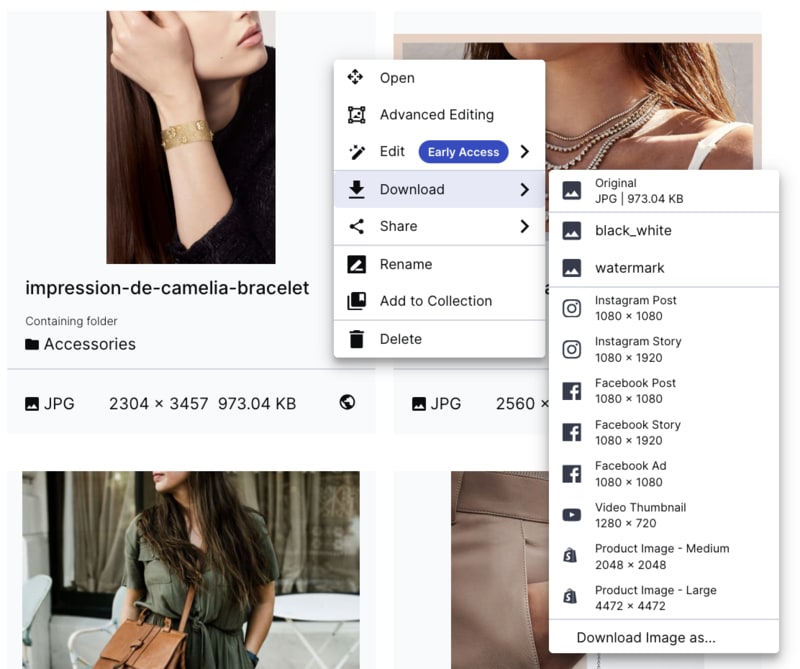
Several download options are available from the asset's (3-dots) options menu, as shown here:
Download the asset:
- In its original form.
- Modified by applying a transformation template. (The option to download multiple assets with a transformation template applied is available from the assets toolbar.)
- Sized to fit a selected social media format.
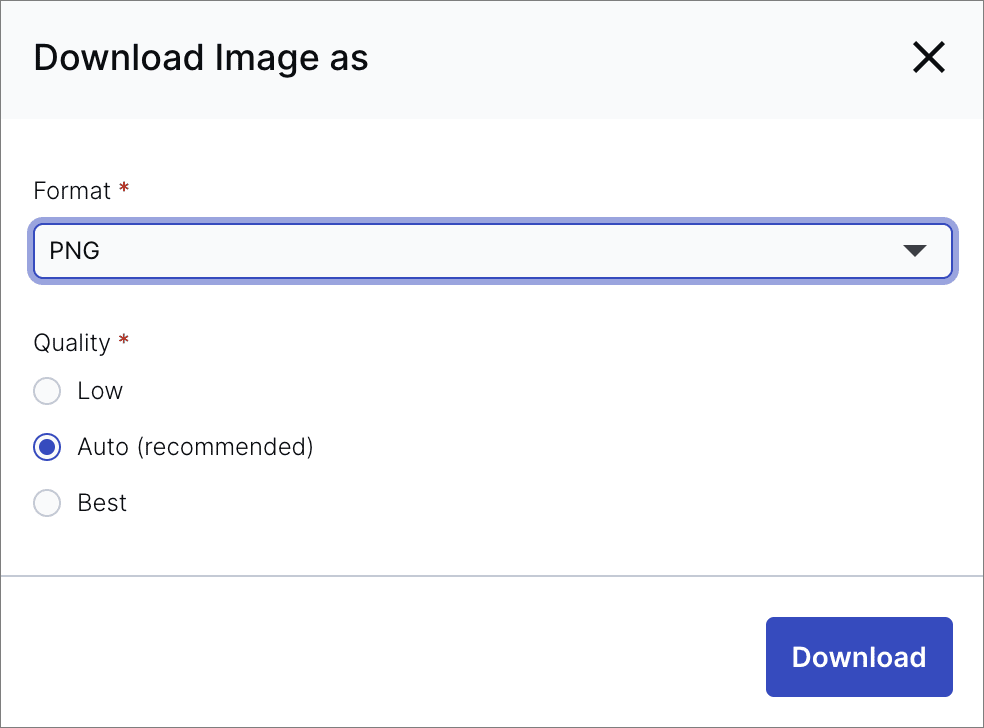
- In selected formats:
- Image: Download the image in the format and quality of your choice. (Click Download Image as to open the dialog box.)
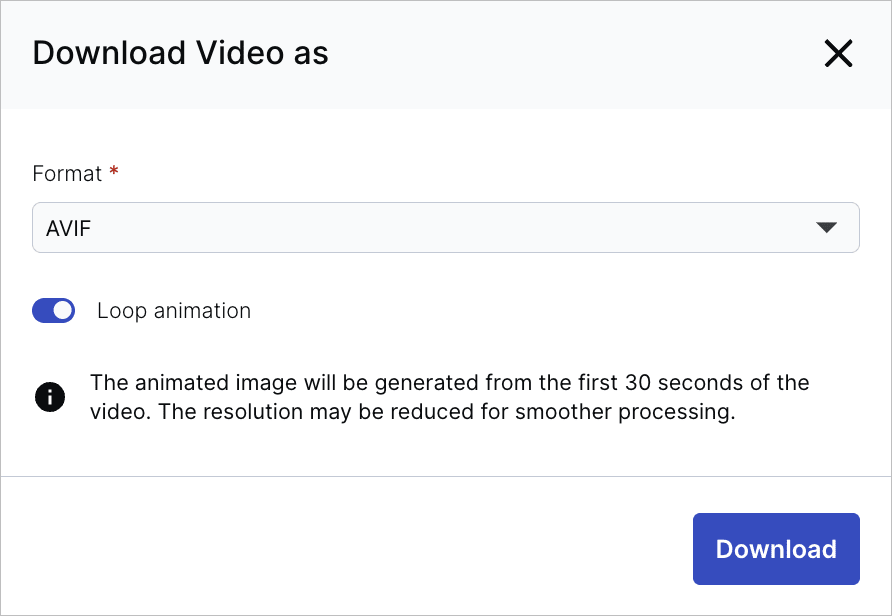
- Video: Convert the video to an animated image. (Click Download Video as to open the dialog box.)
Run automations
You can run MediaFlows automations directly from the Assets view in the Media Library. This lets you trigger custom flows on selected assets, either individually or in bulk, without leaving the Media Library.
MediaFlows enables you to streamline your content workflow by automating actions such as generating metadata, applying transformations, or enforcing asset expiration. Depending on how you designed the flow, you can perform a wide range of automated tasks directly on your assets. For example, you can:
Enrich metadata: Extract keywords, tags, or descriptions using AI models and write them to asset metadata fields.
Apply transformations: Automatically resize, crop, or optimize assets, or generate new derived versions for different channels or formats.
Enforce governance policies: Flag, archive, or expire assets that don’t meet specific compliance or branding criteria.
Distribute content: Push approved assets to external platforms, CMSs, or delivery networks.
Generate AI-driven insights: Ask natural-language questions about selected assets (for example, “Describe the scene in each image”) and store the responses in metadata.
Collaborate efficiently: Automatically send selected assets for review, approval, or processing through integrated tools.
Once your flow is configured, you can trigger it on one or more selected assets.
To run an automation:
- In the Media Library, select an asset.
- For a single asset, click the (3-dots) options menu and select Run Automation.
- For multiple assets, select several assets, then select Run Automation from the (3-dots) options menu of the assets toolbar.
- Choose the flow you want to run.
- (Optional) If the flow defines input parameters, enter values as prompted.
- Run the automation.
The flow then executes according to its configuration in MediaFlows.
Asset identifiers
An asset has a display name and a public ID, each serving different purposes:
Display name
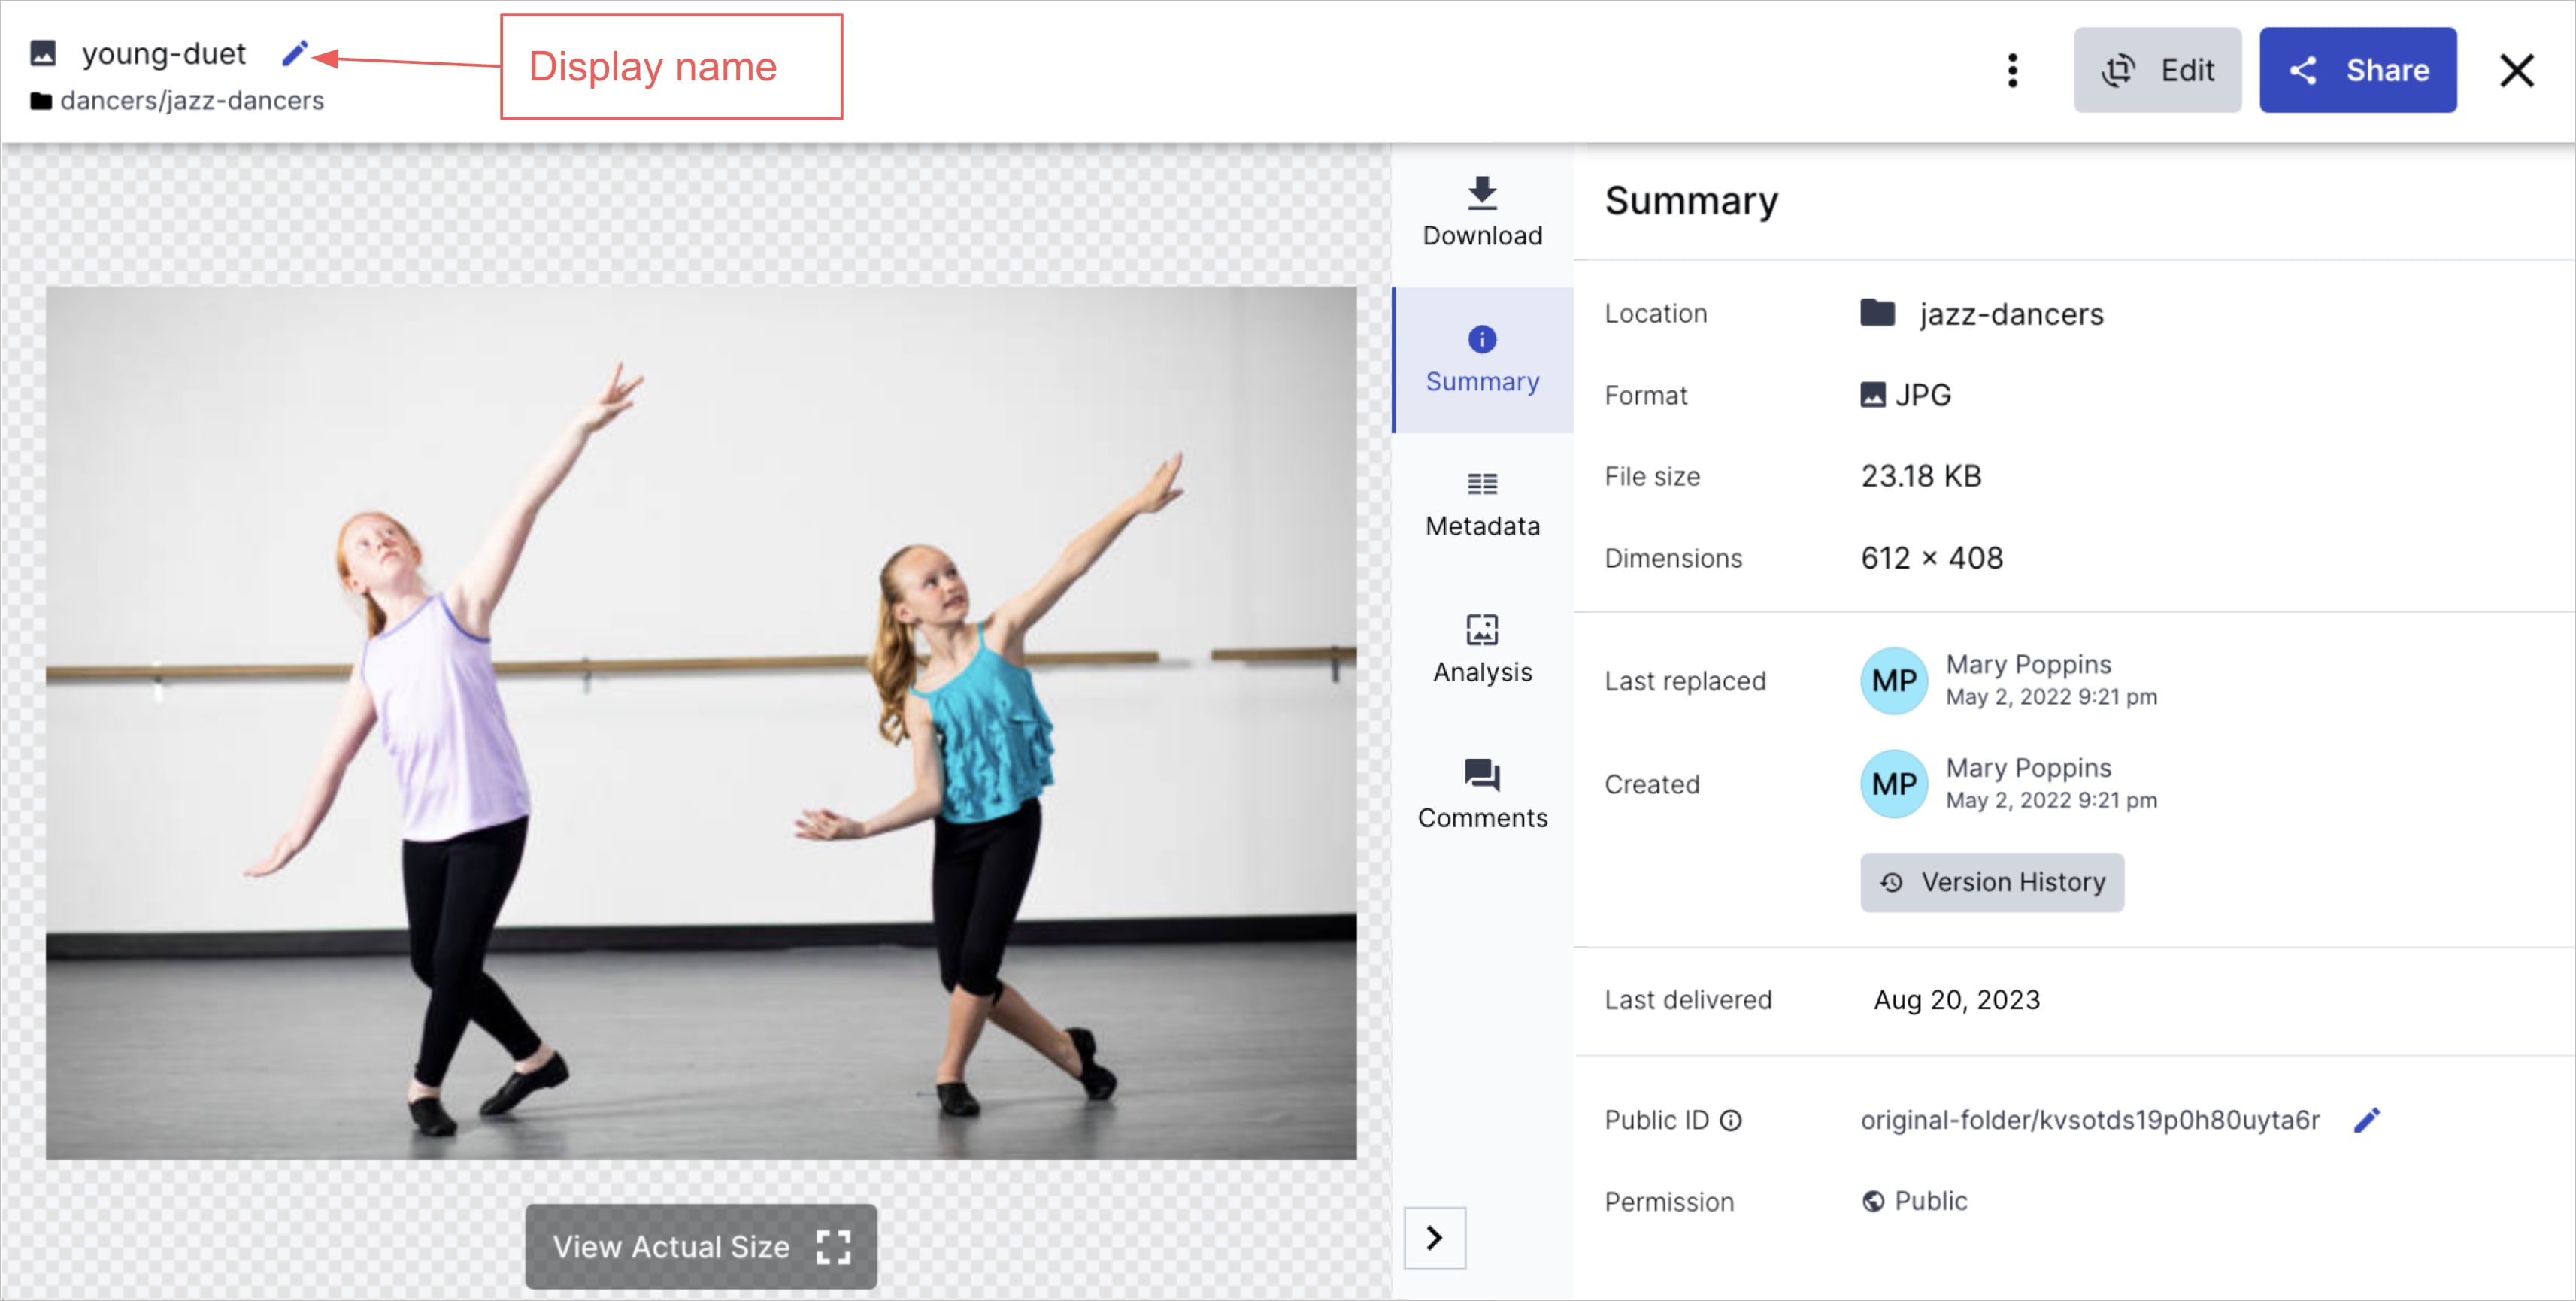
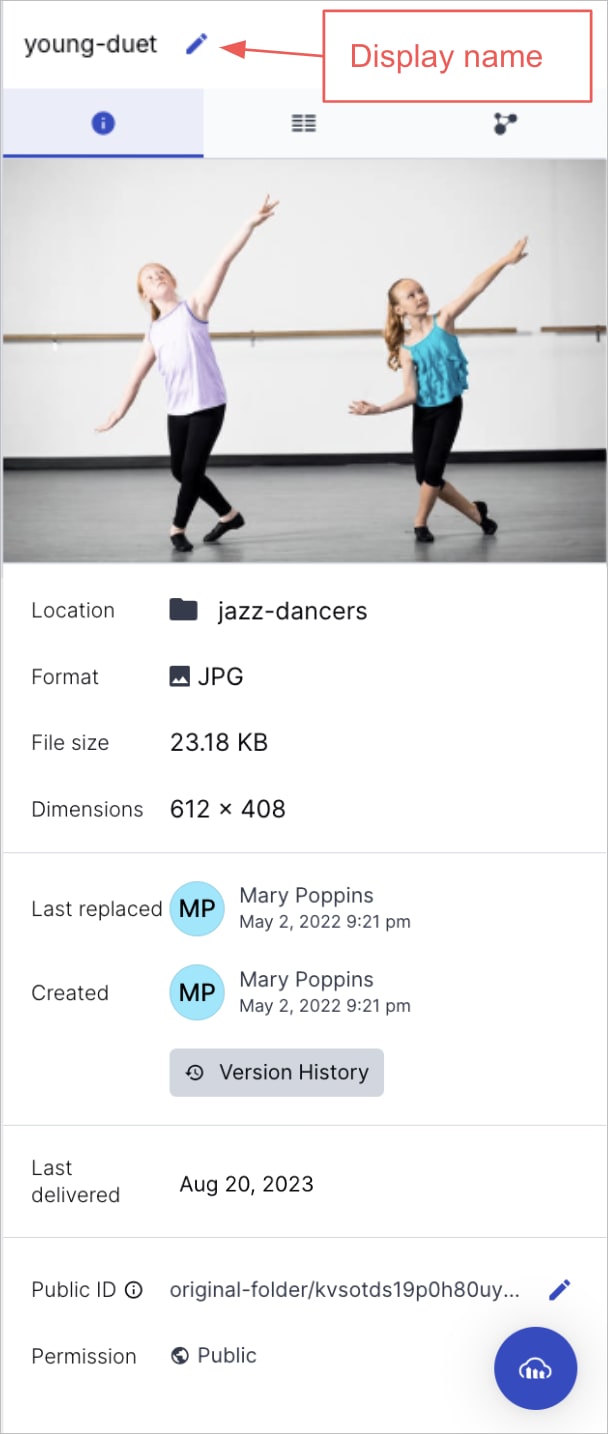
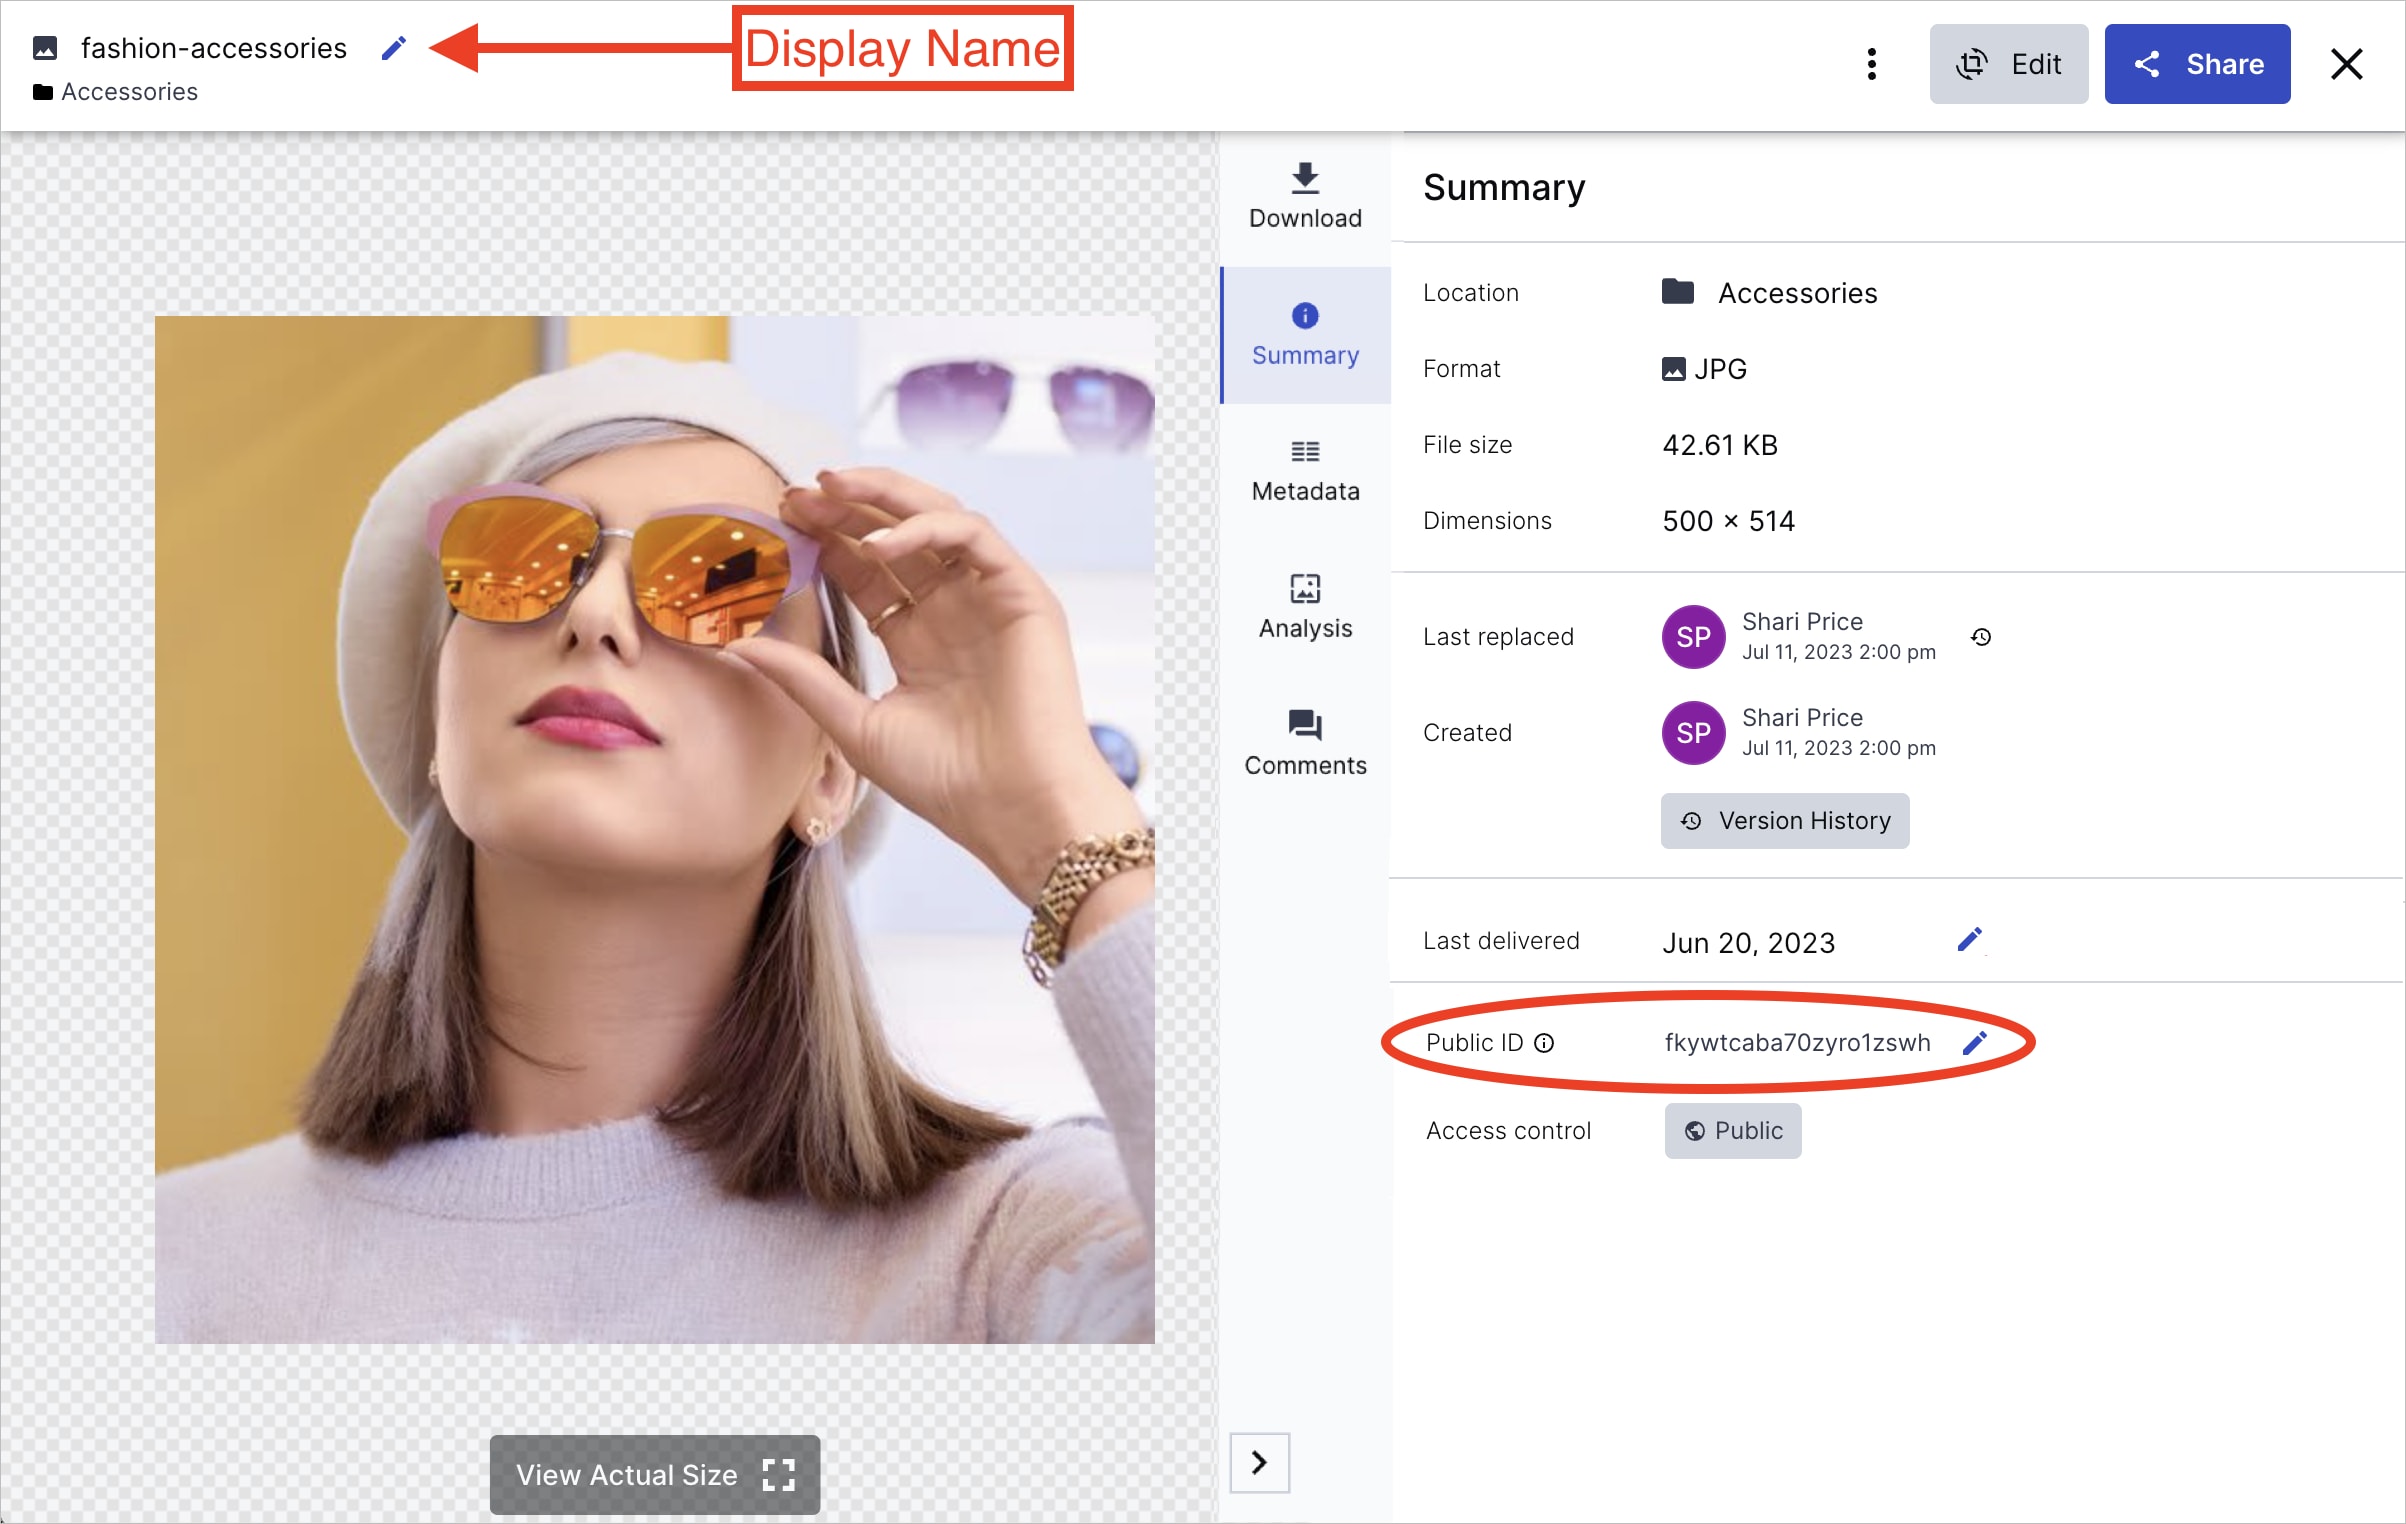
The display name is a descriptive or user-friendly name for the asset located at the top of the asset management drill-down page and Preview pane in the Media Library, as well as in basic portals and published collections.
- It can include spaces and special characters. The only limitation is that it can't include forward slashes
/. - It's possible, though not recommended, for the same display name to be used for different assets, even in the same asset folder.
- The display name isn't part of the delivery URL. Therefore, it can be edited freely, if you have permission to do so, without risking breaking links to assets in production.
To edit the display name:
Open the Summary tab or the Preview pane. If you have the necessary permissions, you can click on the display name and edit.
Public ID
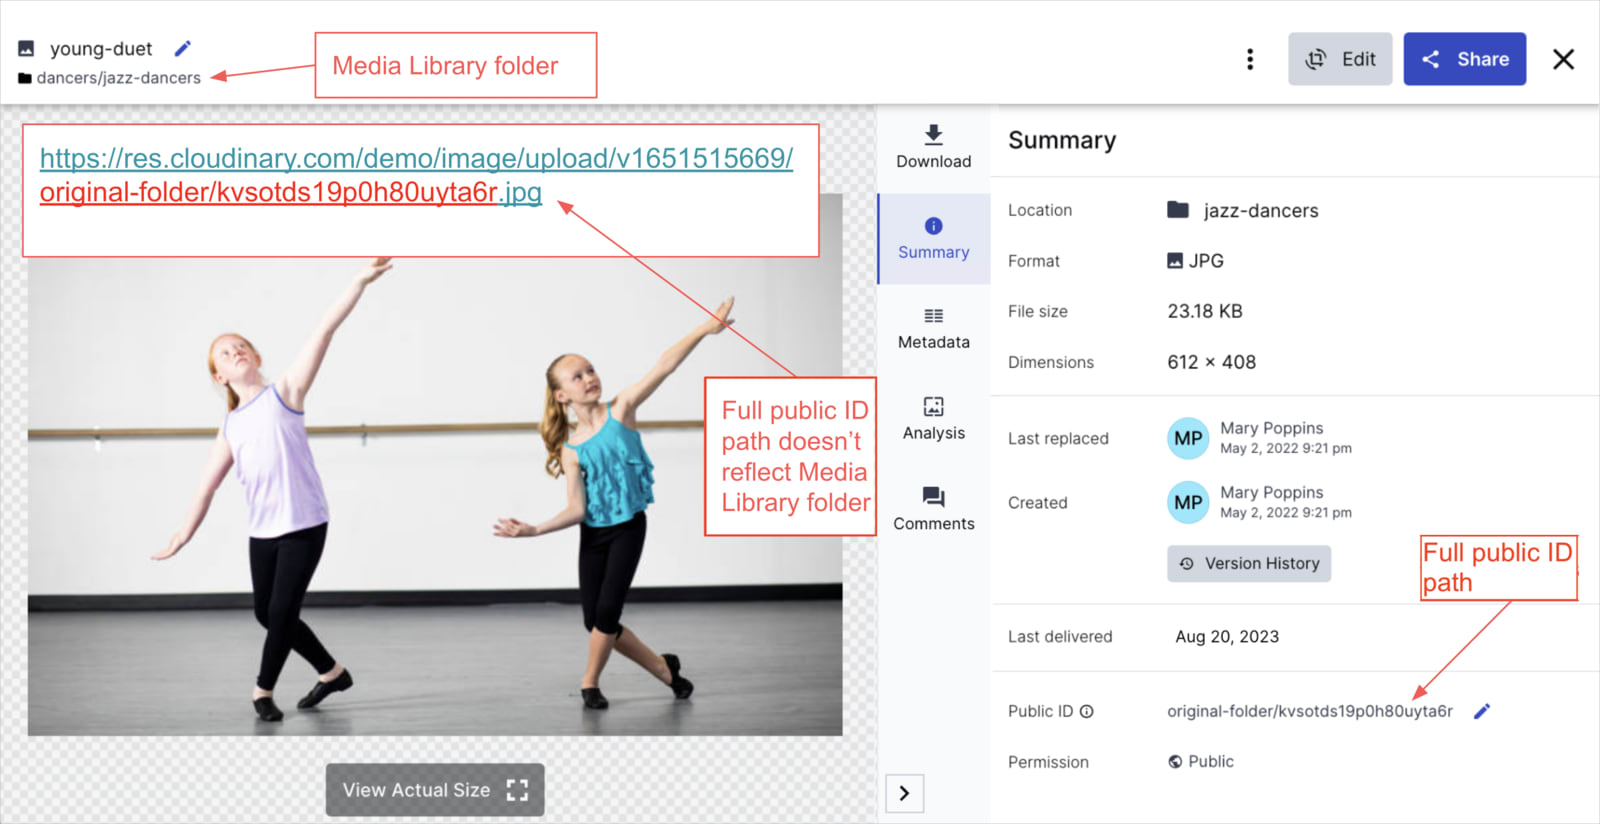
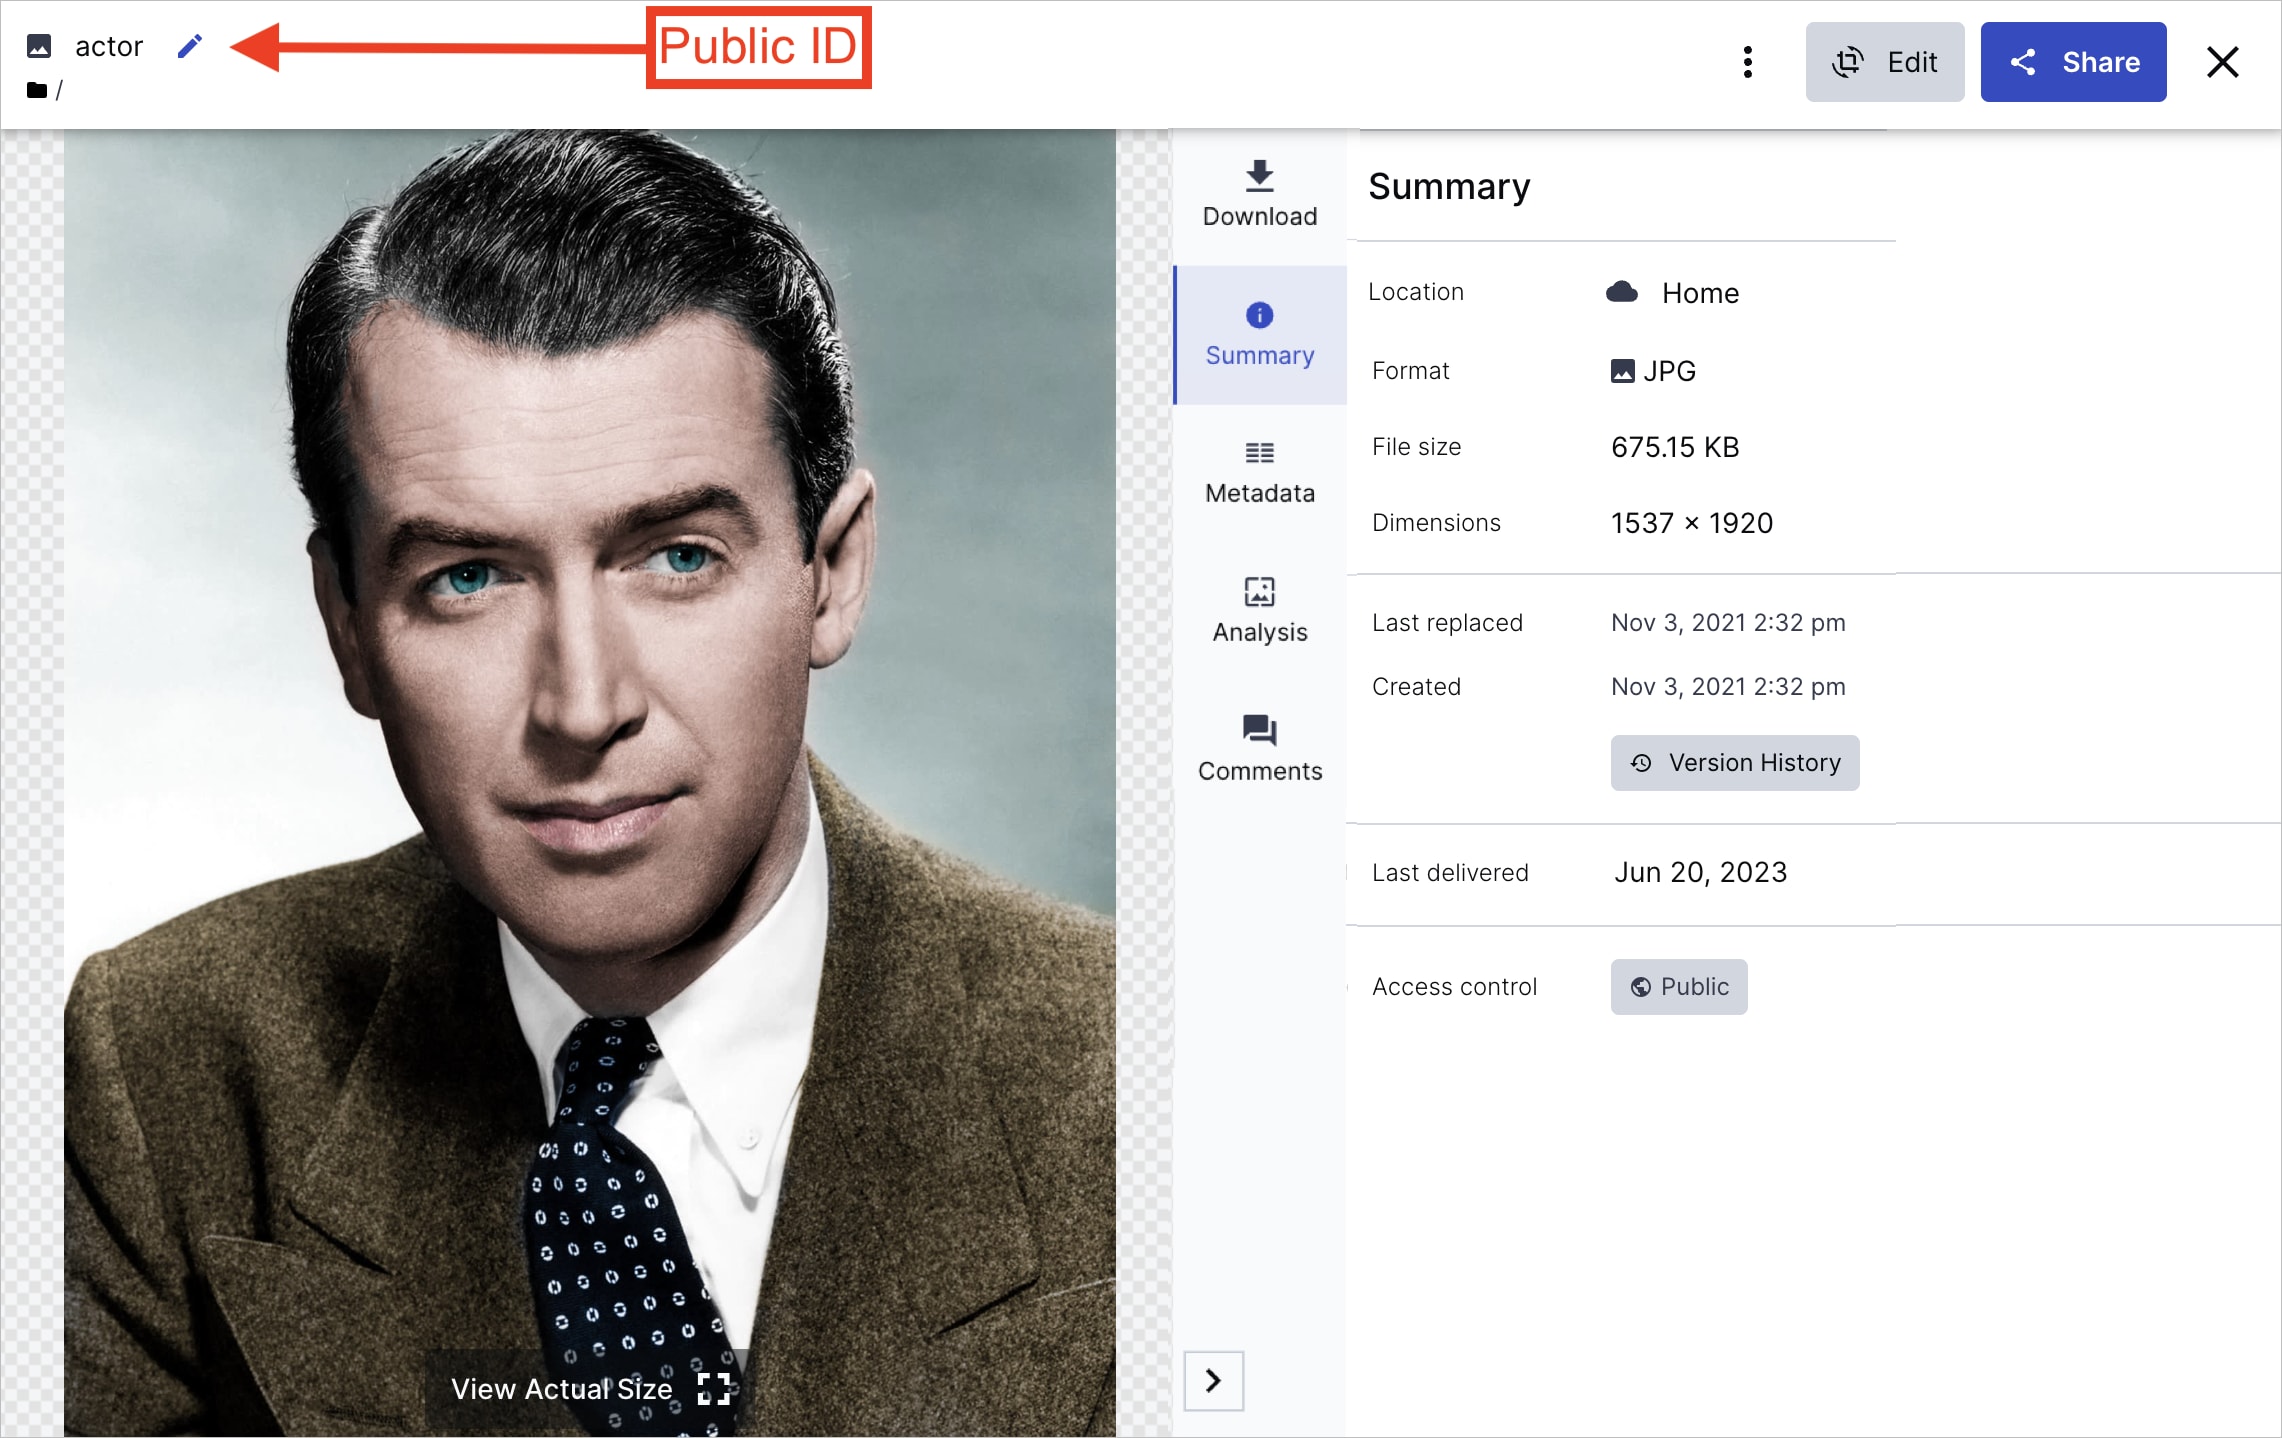
The public ID is used to identify assets in production and is part of their delivery URL. An asset's public ID value may be just a single name or it can be an entire path (with slashes). The public ID can be edited in the Media Library or programmatically, but if an asset is already being delivered in production, changing the public ID can break production code. Any edits to the public ID should be done carefully and in coordination with the developers on your team.
Any level of permission on the folder that the asset belongs to enables you to view the public ID. However, in order to edit the public ID you must have Can Edit or Can Manage permissions on the folder that the asset belongs to, and, depending on your setup, additional user permissions, as well.
The public ID can include any language character (including non-English letters) as well as characters such as dots (.) dashes (-), forward slashes (/).
It can't include spaces or any of these characters: ?, &, #, \, %, <, >.
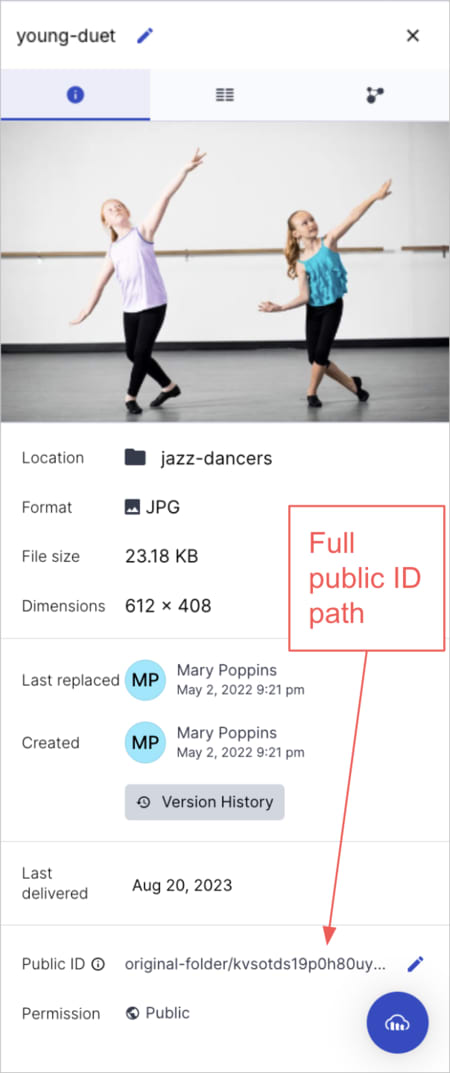
You can view and edit the public ID from both the asset management drill-down page and the Preview pane. Keep in mind that the public ID field shows the entire public ID value (full path). The entire public ID value is editable and isn't directly related to the Media Library folder where it's currently located.
Asset management drill-down page:
Preview pane:
Editing the public ID
If you have the necessary permissions (see User permissions), you can edit the public ID by clicking the edit icon ![]() and editing the public ID from the dialog box that opens.
and editing the public ID from the dialog box that opens.
Asset management drill-down
The asset management drill-down page provides access to many of the management tasks you can perform on your assets. Open the asset management drill-down page from the (3-dots) options menu on each asset or by double-clicking the asset.
Main drill-down page options
For both video and image assets, the asset management drill-down page enables you to perform the following actions from any tab (with access to certain actions contingent upon your permission level for the asset):
- Preview the asset. (Video previews are available to Assets Enterprise customers by request.)NoteYou can preview raw files such as JSON, TXT, VTT, and SRT formats, as well as PDFs using your browser's PDF viewer, directly within the asset management drill-down page.
- From the (3-dots) options menu at the top right of the page:
- Download the original asset. (Users on the Assets Free plan access this option as a button.)
- Rename the asset, which refers to changing the display name.
- Move the asset to a different folder.NoteIf your product environment is using the legacy fixed folder mode, renaming and moving assets affect the public ID and risk breaking links to assets in production. For more information, see Folder modes.
- Upload a new asset to replace and overwrite the existing one.NoteThis action is only accessible to users with Can edit permissions or higher for the asset. Moreover, it's restricted to assets with the
uploaddelivery type and is unavailable for authenticated, private, etc. delivery types. - View and restore previous versions of the asset.
- Delete the asset.
- Open one of the Media Editors by clicking Edit Image or Resize & Crop (depending on when your account was created), or Trim Video, from the Edit drop-down button. Make simple edits to assets such as cropping, rotating, or flipping an image, or trimming a video. You can either download or save the updated version.
- Open the Studio (for free accounts created after 15th December 2025) by clicking Edit from the Edit drop-down button. Build transformation templates to make complex edits to assets.
-
Share the asset directly with teammates to collaborate or share its delivery URL with external stakeholders. You can also generate a public link to a dedicated webpage displaying the asset.Related topicsUsers on the Assets Free plan can only share assets internally and externally by copying its delivery URL.
For images only:
- Preview the image with indications for detected elements, such as detected faces.
- View the actual size of the image.
- Rotate 3D models to view them from all sides. (Supported file formats include GLTF, GLB, GLTZ, OBJZ and FBXZ.)
Drill-down tabs
The asset management drill-down page provides multiple tabs that offer specialized information and various ways to manage your assets based on specific categories.
Download Options tab
- To learn more about the features available in the Assets Free plan and how they can support development workflows, see Media Library for Developers.
- For upgrade options or more information, contact us.
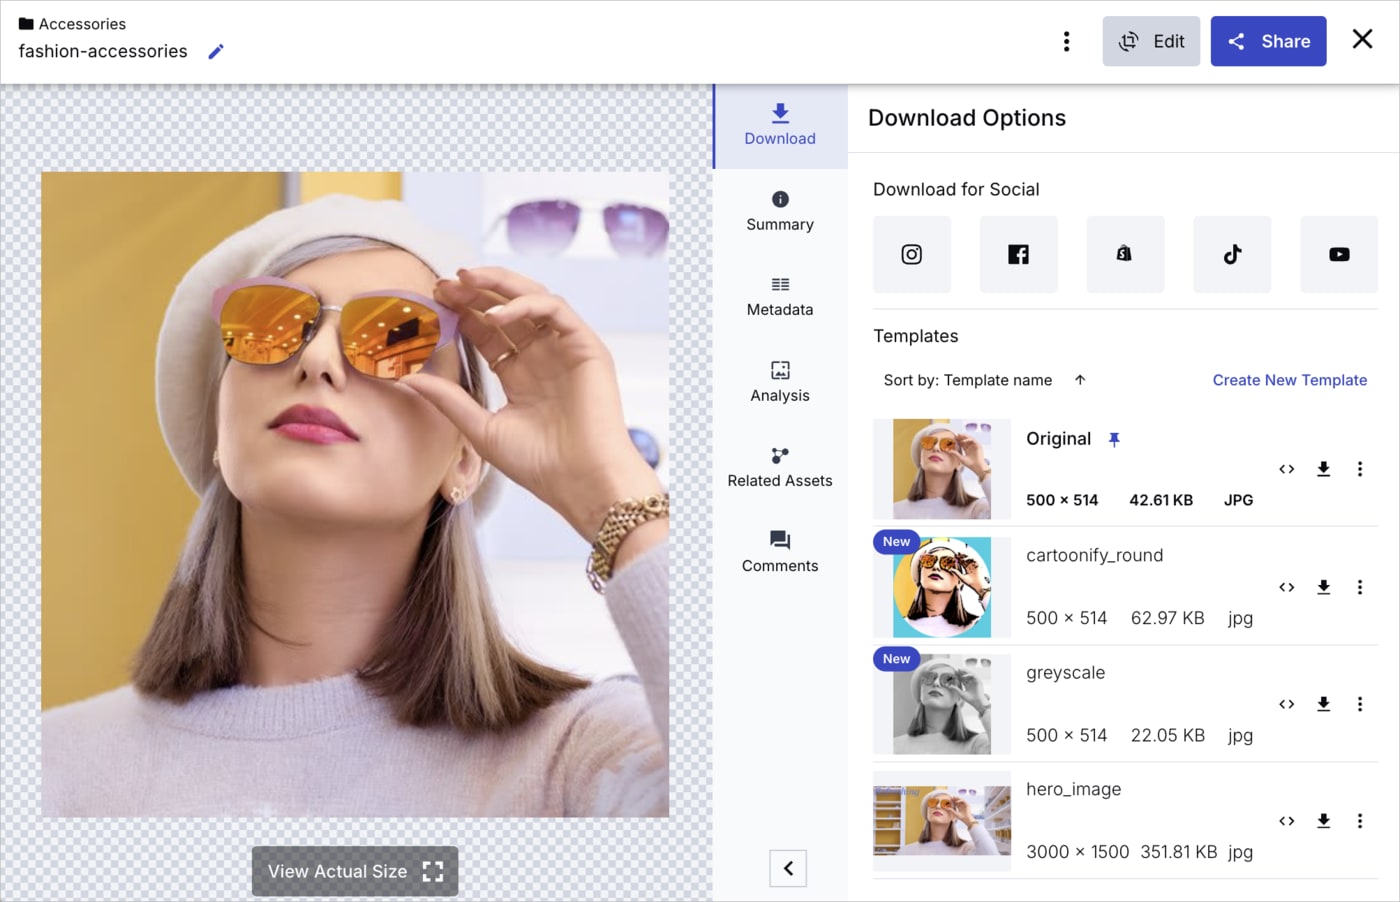
Download Options is the default tab, and the asset management drill-down page always opens to it.
You can perform several actions on the original asset or its transformed assets (variations of the original generated by applying transformation templates), including:
- Preview: Click the thumbnail belonging to the Original or transformed asset to view an enlarged preview.
- Download: Click the download icon.
-
Copy URL: Click the
<>icon to copy the original or transformed delivery URL for easy share with developers and other stakeholders. (Available if the asset's access control status is Public.) - Edit Transformation: Opens the original or transformed asset in the Transformation and Asset Details Editor or Advanced Editor for further editing. Select this option from the kebab menu next to the desired asset. (Requires Can Edit or Can Manage permissions.)
- Open in new tab: Opens the original or transformed asset in a new browser. (Available if the asset's access control status is Public.)
-
Create New Transformation: Administrators can click this button to open the original asset in Studio to apply transformations. Download the asset with the applied transformations or save the transformation settings as a transformation template. This template will be added to the existing options in the Download Options tab, making it available for all assets as a pre-applied transformation.TipWhen you click a transformation template in the asset management drill-down page to preview an asset with that template, it doesn't count against your transformation quota. However, the first time someone views that transformation template for a specific asset outside the Media Library (open in a browser tab, download, etc.), a derived asset is generated and counts like any other transformation.

Summary tab
If you don't have access to the Download Options tab, the Summary tab becomes the default tab, and the asset management drill-down page always opens to it.
In this tab, you can view basic details about the asset including when an asset was last externally delivered, such as through a website or app (unavailable for overlays/underlays, assets with special characters in public IDs, or deliveries over a year old), edit the asset's display name (not supported in product environments using the legacy fixed folder mode), edit the asset's public ID, and view or set the asset's access control.
If Access Control is set as the primary attribute, you'll see enhanced visibility information for time-restricted assets, including "Public now" labels for assets that were time-restricted but are now public, and hover-over details showing specific time windows for restricted access.
The Summary tab reflects the differences in the way public IDs and display names are used in dynamic and fixed folder mode. For more details, see [Asset identifiers](#asset_identifiers).
Metadata tab
View and update an asset's custom metadata and view its embedded metadata (available in the Media Library to Assets Enterprise customers by request). For more information, see Setting custom metadata values.
Comments tab
Collaborate on the asset with other Assets users. For more information, see Add comments.
Analysis tab
View, set, or adjust analysis data for a specific image. For more information, see Asset analysis.
Derived Assets tab
Derived assets are generated when you apply transformations and then use the resulting variations outside the Media Library, such as opening it in a browser tab, downloading it, delivering it in a website or app, etc.
Once generated, a derived asset can be delivered again without incurring transformation costs. However, derived assets do consume storage.
Double-click the asset to open its Manage page, then select the Derived Assets tab to view an asset's derived assets to manage storage or reuse a previously generated transformation.
For more information, see Derived Assets in the Media Library for developers guide.
 Ask AI
