Analysis and insights
Last updated: Jan-28-2026
The insights gained from running AI analysis on your assets serve various asset management purposes, such as better decision-making and enhance asset searchability. You can request diverse AI image analysis types to categorize, label, and tag your assets.
Furthermore, you can add insights by utilizing the related assets feature. This allows you to manually establish connections between associated assets, making it easier for other users to discover and locate related assets.
Asset analysis (images only)
You can view the results of automated AI analyses performed on an asset as well as perform new ones. Cloudinary runs some of these analyses automatically on every asset. Others require registration to an add-on. If you aren't already registered for a particular add-on, you can register for the add-on's free tier and run the engine on the displayed asset directly from this pane.
To view and perform AI analysis on an asset, open the asset management drill-down page by either double-clicking the asset or selecting Open from the asset (3-dots) options menu and select the Analysis tab.
Your asset contains all the analysis data, which you can use as the basis for various asset management features.
Auto-tagging - Utilizes one or more auto-tagging add-ons, each of which apply deep learning AI models to identify types of objects in your image and return the list of categories it finds. You can adjust the confidence level to view additional categories or limit the list to those with a higher confidence level. You can then mark specific categories to add them as tags on your asset, or choose the option to add all the displayed categories as tags.
-
Face and Celebrity detection - Utilizes various algorithms and AI engines to determine the number and location of faces in your image. For celebrity detection, it also indicates the names of any celebrities detected and the accuracy confidence level. Each face/celebrity detection option displays the coordinates of the faces it finds in the form of color-coded frames within the preview area on the right. You can use the show/hide buttons for each engine to show or hide these frames. You can use the detected faces data for a number of face-detection options. For example, you can use this data to add overlays to every captured face, to blur or pixelate faces, or to apply face-detection based cropping so that you never crop out a face, and more. For the built-in face detection, you also have the option to adjust, add, or remove face coordinates (frames) and save the new face data with your image.
NoteWhen using the Amazon Rekognition Celebrity Detection add-on, you can instantly add detected celebrity names as tags directly from the Analysis tab. Click Add tag next to a detected celebrity to apply it as a tag, making it easier to organize and search for assets. Click Remove tag to remove a previously added tag. -
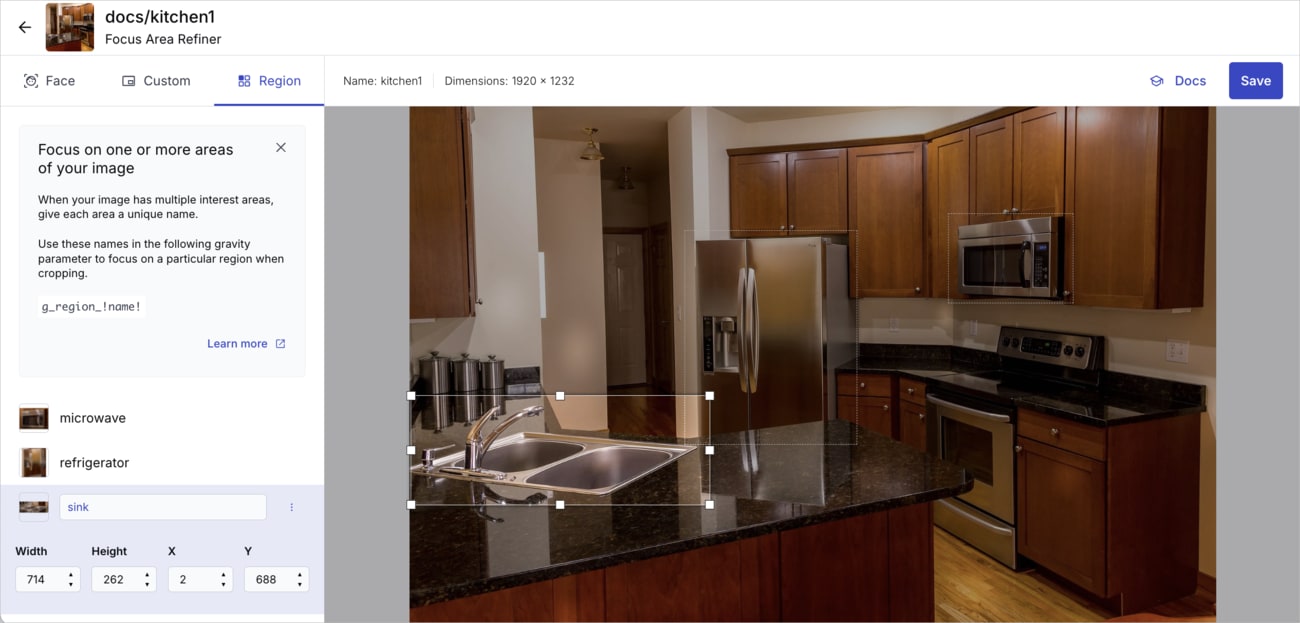
Define Area of interest and Fix / Add Faces (if faces were detected) - Opens the Focus Area Refiner, where you can define custom regions of an asset. These regions override automatically detected areas (such as faces or objects) and are used whenever Cloudinary applies a focal-area–based transformation (cropping, overlays, pixelation, etc.).
You can define focus areas either by drawing or resizing boxes or by entering exact X,Y coordinates. Use the following tabs:
- Faces: Adjust automatically detected faces or add new ones.
- Custom: Define or edit a single custom region for the image.
-
Regions: Define or edit multiple named regions (for example,
necklace,shoes) and reference them in transformations.For more information on how developers would use this feature, see Media Library for developers > Available analyses.
In the UI, you can draw or resize boxes manually, or enter exact X,Y coordinates, using the following tabs:
- Faces: Adjust automatically detected faces or add new ones.
- Custom: Define or edit a single custom region for the image.
-
Regions: Define or edit multiple named regions (for example,
necklace,shoes) and reference them in transformations withg_region_<name>.For programmatic details on using custom coordinates, custom regions, and custom face coordinates in transformations, see Custom focus areas.
- OCR - Captures text inside your images. It displays each phrase (line of text) that it captures in the tab and highlighted in the preview area. Similar to face-detection, you can add overlays to cover text, blur or pixelate text, or ensure that text doesn't get cut off if your images are automatically cropped for delivery.
- Color analysis - Gives you information about the main colors in your image. Cloudinary can use these colors to automatically add background padding to images in a color that looks good with your image. If you have access to the Image Analysis filters (premium) of the Media Library's advanced search, you can search for images based on their predominant colors. And of course your developers can retrieve these colors to implement color-related functionality in your application.
Related assets
- The related assets feature is a premium offering for Assets Enterprise plans, and its availability depends on your account setup. If related assets isn't yet enabled for your account and you'd like to activate it, please contact your Customer Success Manager.
Assets Free plans:
- This feature isn’t included in the Media Library available with the Assets Free plan, which offers basic management. It's part of the Media Library for Assets Enterprise plans.
- To learn more about the features available in the Assets Free plan and how they can support development workflows, see Media Library for Developers.
- For upgrade options or more information, contact us.
Cloudinary's related assets functionality allows users to establish relationships between assets based on specific organizational needs and criteria. By manually configuring these associations, users can create meaningful connections between assets within their library, making it easier for other users to discover and locate similar or associated assets.
Here are some use cases where you might need to use related assets:
- While looking at a logo, you want to easily access the 'Brand Guidelines' PDF, so you'll know how much spacing to use.
- You want to see a video's peripheral assets (transcript, poster, etc.)
- You want to access other images of the same product.
In addition, the related assets feature can help your team implement these and other use cases within your apps, as your developers can add, remove and view related assets programmatically.
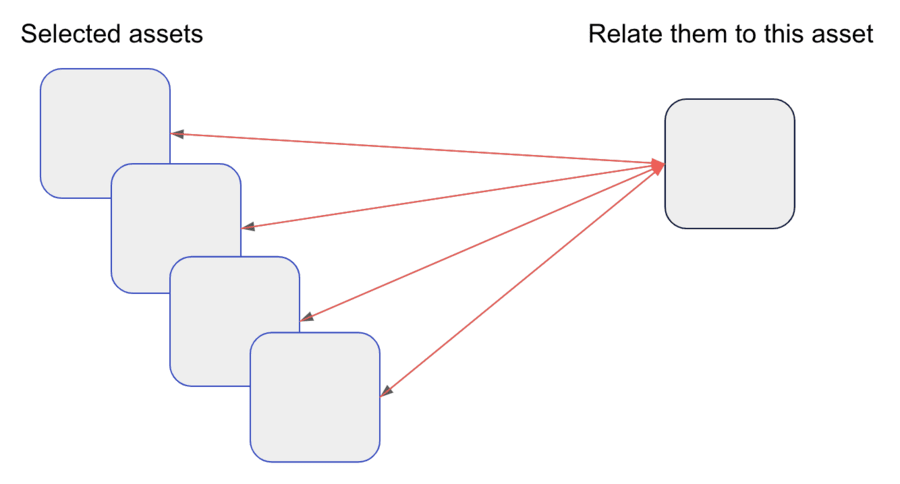
You can select one or more assets and link them to another asset. Linking assets creates a two-way relationship: each of the initially selected assets provides easy access to the related asset, and the related asset provides easy access to all the initially selected assets. However, the assets you selected initially aren't linked to each other.
Here's a diagram that illustrates this relationship:
Relating assets
To select multiple assets and relate one asset to all of them:
- Select one or more assets in your Media Library.
- Select Relate To... from the (3-dots) option menu:
- On the asset, if you've selected one asset.
- On the assets toolbar, if you've selected more than one asset.
- Find the asset that you want to relate the selected assets to by typing the asset’s display name in the dialog box.
- Click an asset to automatically create the relationships.
To select one asset and relate multiple assets to it:
- Open the asset's context menu.
Alternatively, go to the Related Assets tab in the manage page or preview pane.
- Click Relate to...
- Select one or more assets from the asset picker.
- Click Create Relationship.
This video demonstrates how to relate a single asset to multiple assets from the context menu:
Viewing related assets
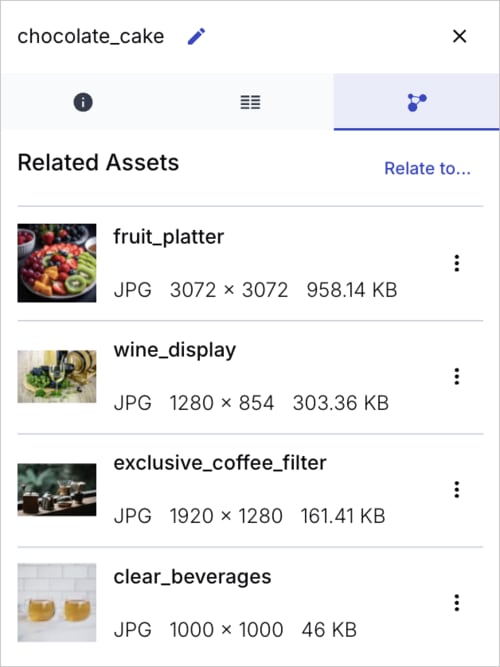
You can find an asset's related assets in the Related... tab of the Preview pane and Manage page. From there, you can Open or Download a related asset, or you can select Remove relationship so that the assets are no longer related. You can also click Relate to... for relating additional assets.
 Ask AI


