Asset protection
Last updated: Feb-09-2026
Cloudinary provides a variety of tools to help you manage asset visibility, control access to sensitive content, automate asset expiration, and restore or manage previous versions of assets.
This page covers:
Moderation: Moderate uploaded assets to meet your organization's quality and content standards.
Access control modes: Restrict asset access outside the Media Library, optionally setting a time limit for public availability.
Asset expiration: Manage asset expiration timelines and automate actions when assets expire.
FADEL rights management integration: Enhanced brand compliance and rights management capabilities through the FADEL integration.
Asset versions: Track and restore previous versions of assets.
Restoring deleted assets: Recover assets that were previously deleted and make them available again in the Media Library.
Asset moderation
Moderating assets uploaded to Cloudinary ensures that inappropriate or offensive content is excluded, assets meet your quality requirements, and uploaded images meet your specific needs (e.g., profile pictures with visible faces).
You can apply manual or automatic moderation, or a combination of both, during asset uploads. Below is an overview of how asset moderation works.
Manual vs. automatic moderation
- Manual moderation: Depending on administrator and folder permission levels, you or a moderator from your team reviews and approves or rejects the assets. Manual moderations can override decisions made by automatic moderations.
- Automatic moderation: Deep learning algorithms automatically flag inappropriate content or assets that don't meet quality standards.
You can use both manual and automatic moderation together during a single upload.
Setting up moderation
Assets are marked for moderation during upload using upload presets. Your administrator can either add a new upload preset or edit an existing one, and activate manual moderation or automatic moderation via add-ons. For more information, see Automatic and manual moderation from the Assets admin guides.
If your administrator has set an upload preset with the desired moderation settings as your Media Library default upload preset, newly uploaded assets will be automatically marked for moderation. You can also apply the moderation manually by using the Media Library Upload Widget and selecting an upload preset with the moderation settings you want.
Reviewing assets manually
Users with Master admin, Media Library admin, and Technical admin roles can moderate assets. Additionally, Media Library users with the Moderate asset administrator permission can moderate assets in folders that they have Can Edit or Can Manage permissions to. You can view all moderated assets from the Moderation page and filter assets by moderation type and decision status.
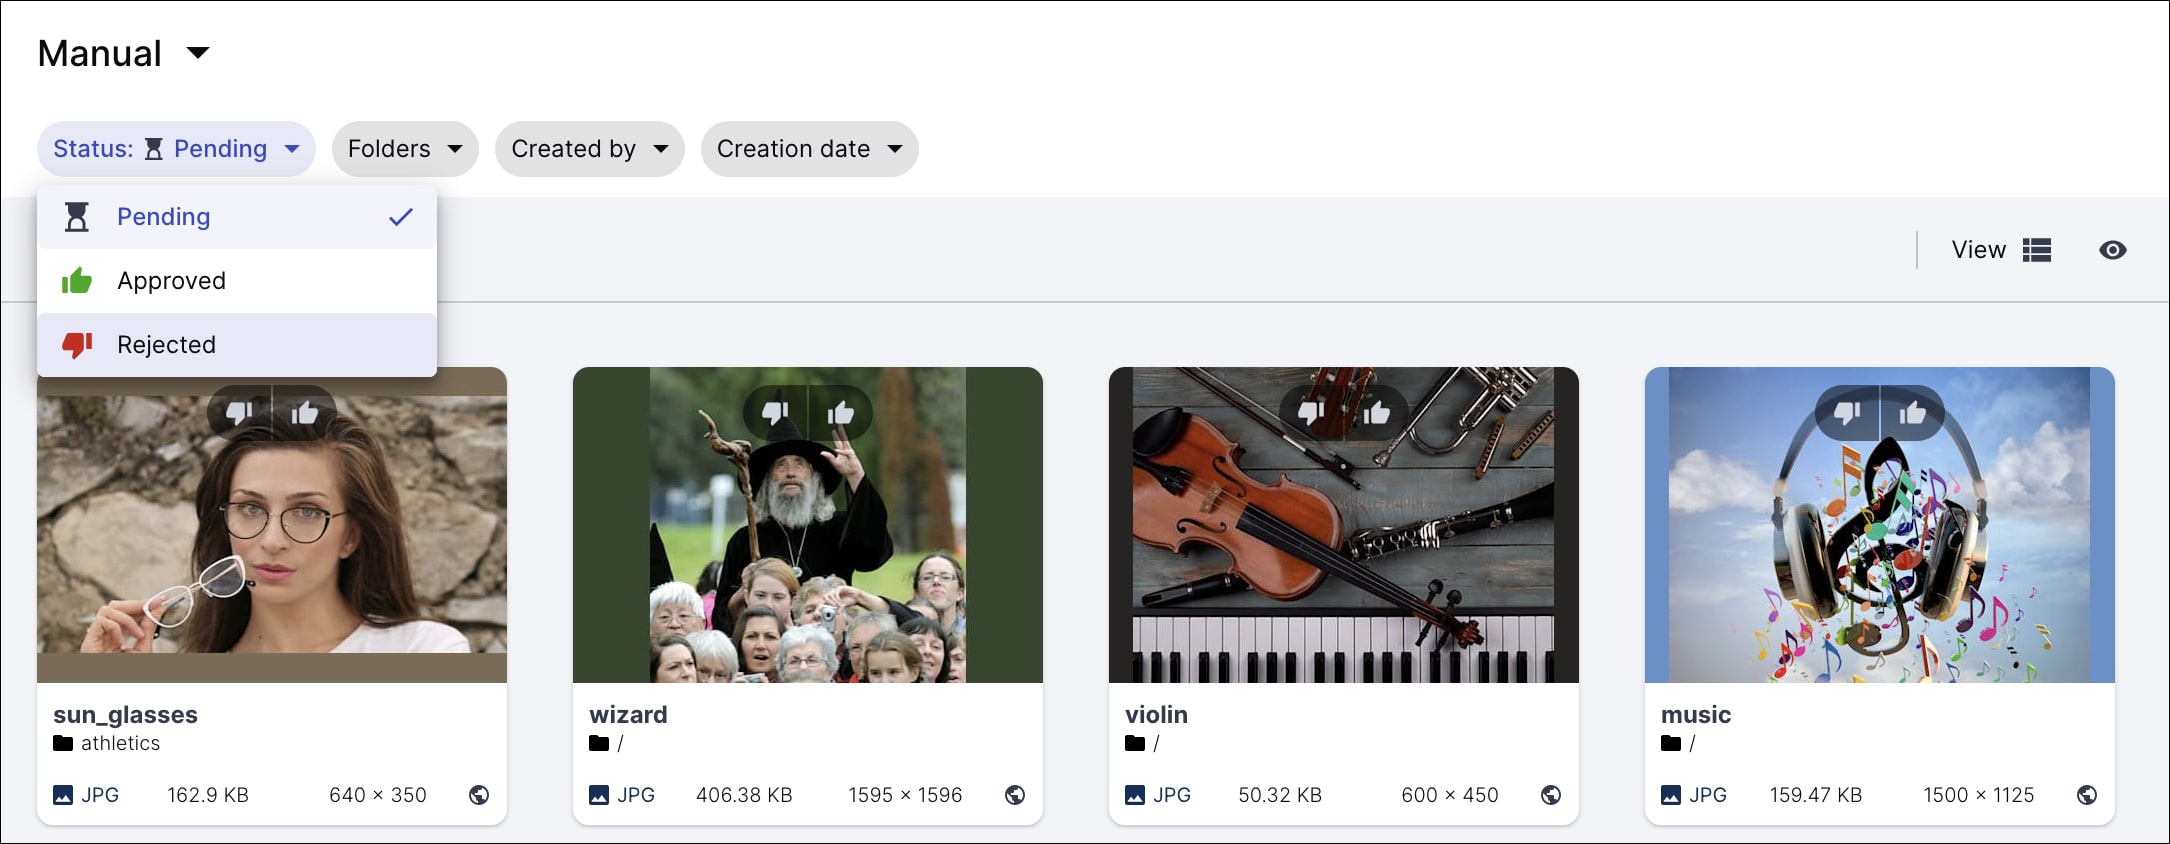
Manual moderation: When manual moderation is enabled, assets are marked as Pending after upload and are displayed on the Moderation page, where a moderator reviews them and decides whether to accept or reject based on the content.
-
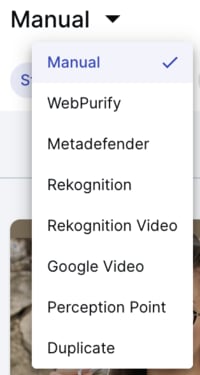
Automatic moderation: You can also view assets marked for automatic moderations on the Moderation page, along with their decision status.
- You can manually override automatic decisions, such as approving a rejected image or rejecting an approved one.
- If you manually approve or reject an asset, it will be considered manually moderated, even if it was initially flagged by automatic moderation. The asset will then appear under the Manual filter.
-
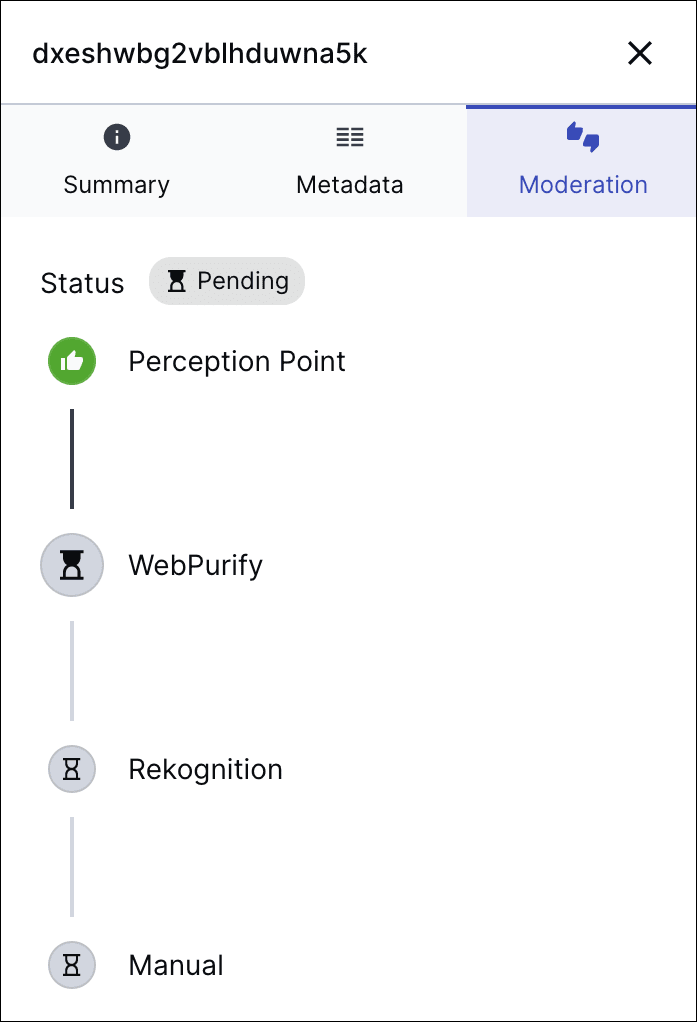
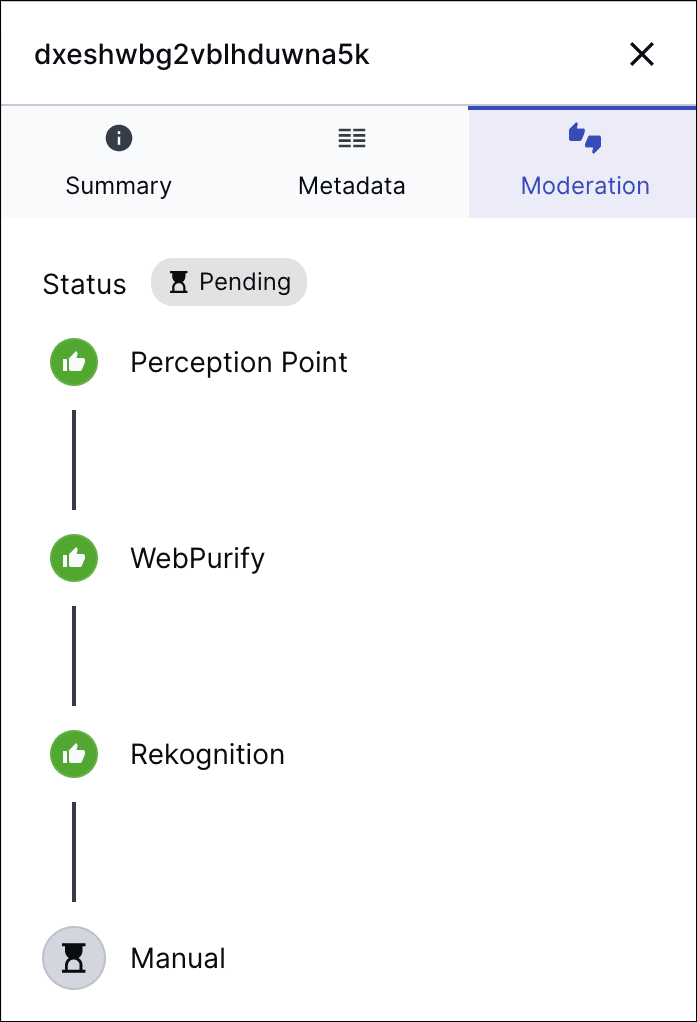
Multiple moderation: As each moderation type is applied and resolved, the asset’s moderation status changes.
- You can manually override moderation decisions for assets marked for multiple moderations, as well.
- You can also view the asset’s moderation history to track this progress.
For more information see Applying multiple moderations.
To review assets:
- From the Product Navigation menu, select Moderation.

- Browse the assets. Use the filters to select the moderation type and status of the assets you want to review.
To find assets marked for multiple moderations:
- While the asset is being processed, filter pending assets under the moderation type currently applied.
- If the asset's final status is rejected, the asset will be found under the moderation type that rejected it.
- If the asset's final status is accepted, the asset will be found under the last moderation type that was applied.
- If the final status was determined manually, the asset will be found under Manual moderation, regardless of whether the asset was originally marked for manual moderation.
- Accept or reject them.
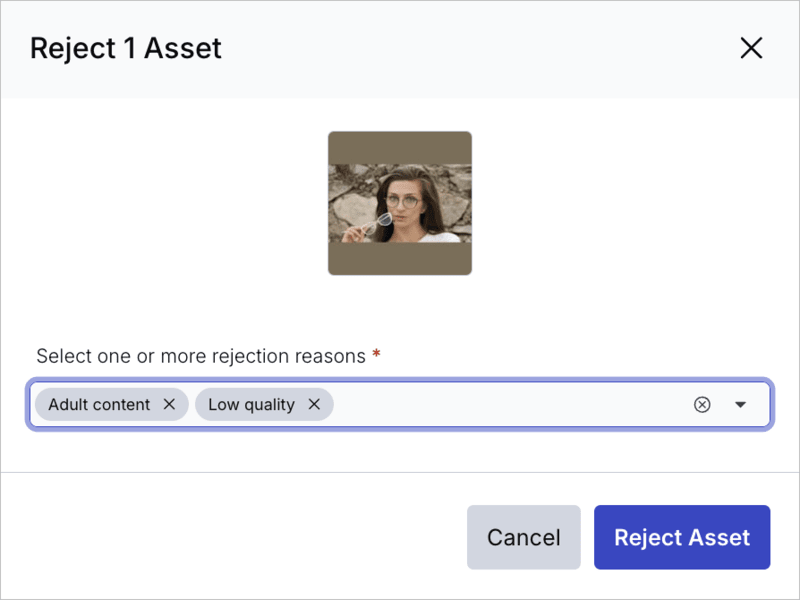
If you reject the asset and your administrator enabled requiring a rejection reason from the Asset Visibility page of the Media Library preferences, you'll be required to select a reason for rejection from a drop-down list.
To view an asset's moderation history:
Once you've opened the moderation page and found the asset you're looking for either:
- Double click the asset to open the Management drill-down and select the Moderation icon. OR
- Select the asset and open the Preview Pane, then click the Moderation tab.
See how the moderation changes after each moderation is applied:
Access control modes
You can view and update an asset's access control mode directly from the Media Library.
A person can view a Restricted asset outside the Media Library only if that person has both the asset URL and an authentication token. Downloads are also restricted if your administrator has turned on the Block restricted asset downloads option in the Early Access page of the Media Library Preferences. The restrictions apply except during an optional time-limited date range when the asset is defined as publicly accessible.
Time-limited restricted access can be useful for an image or video that's intended to be used for a special campaign or that shows a new product design, and it's imperative that the asset won't be shared outside the organization prior to an official launch date. Or conversely, it may be important to stop enabling the public to view or share an asset after the content is obsolete.
To view access control settings:
You can see whether your asset is set to Public  or Restricted
  in one of the following locations:
- The Summary tab of the Media Library Preview pane
- The Asset Management Summary tab
Uploading with access control
If you want to set the same access control settings for a set of assets you are uploading to the Media Library, an Assets administrator can apply the required access control settings in the upload preset(s) you are using as your Media Library upload preset defaults.
Alternatively, when you upload using the Media Library Upload Widget, you may be able to select an Upload Preset that has been set to upload with restricted access control settings.
Authentication tokens for access control
If you need to allow someone access to a restricted asset via a URL, outside the time range that an asset is set as public, you'll need to provide that person with the relevant authentication token. You should work with your Assets administrator or developers on your team to generate and distribute the required token.
Asset expiration
Managing asset expiration helps ensure outdated or licensed content isn't used beyond its intended timeframe. This is important for:
- Preventing accidental use of expired/licensed content, reducing legal risk.
- Keeping your DAM system clean by handling outdated assets.
- Ensuring teams access only current, approved content.
Cloudinary DAM currently offers a few ways to track and manage asset expiration.
Access control with time limit
You can automatically prevent delivery of an asset after a certain date by setting its access control to Restricted, and defining a time range when it’s Public. For more information, see Access control modes.
EasyFlows for automating expiration actions
For added flexibility, use EasyFlows to automate expiration-related actions based on changes in structured metadata, folder location, or other triggers.
Ask your administrator to create flows to automate expiration handling. For more information and detailed examples of how to do this, see Asset expiration in the Admin guide.
FADEL rights management integration (Beta)
The FADEL integration enhances Cloudinary Assets with advanced rights management, helping you understand where, when, and how your assets can be used. Once your admins configure the integration, you can check clearance details, confirm usage restrictions, and search for assets based on rights information without leaving the Media Library.
Enterprise plans:
- The FADEL integration is a premium offering for our Assets product. Availability depends on your account setup and requires that you have an active FADEL account. If the integration isn't yet enabled for your account and you'd like to activate it, please contact your Customer Success Manager.
Free plan:
- This feature isn’t included in the Media Library available with the Assets Free plan, which offers basic management. It's part of the Media Library for Assets Enterprise plans.
- To learn more about the features available in the Assets Free plan and how they can support development workflows, see Media Library for Developers.
- For upgrade options or more information, contact us.
Get started
Before you begin, your administrator must:
- Upload your organization's licensing and rights contracts to FADEL's Rights Cloud
- Configure the Cloudinary–FADEL integration
- Enable the structured metadata fields used for syncing
For more information, see FADEL Integration (Beta) in the Administrator guide
Add assets to FADEL
The Needs Rights Management structured metadata field controls whether an asset is added to FADEL for rights management tracking. When the value of this field is Yes, the asset is created in FADEL and connected for ongoing synchronization.
Add new uploads to FADEL
Depending on your setup, every uploaded asset may automatically be added to FADEL for rights management tracking.
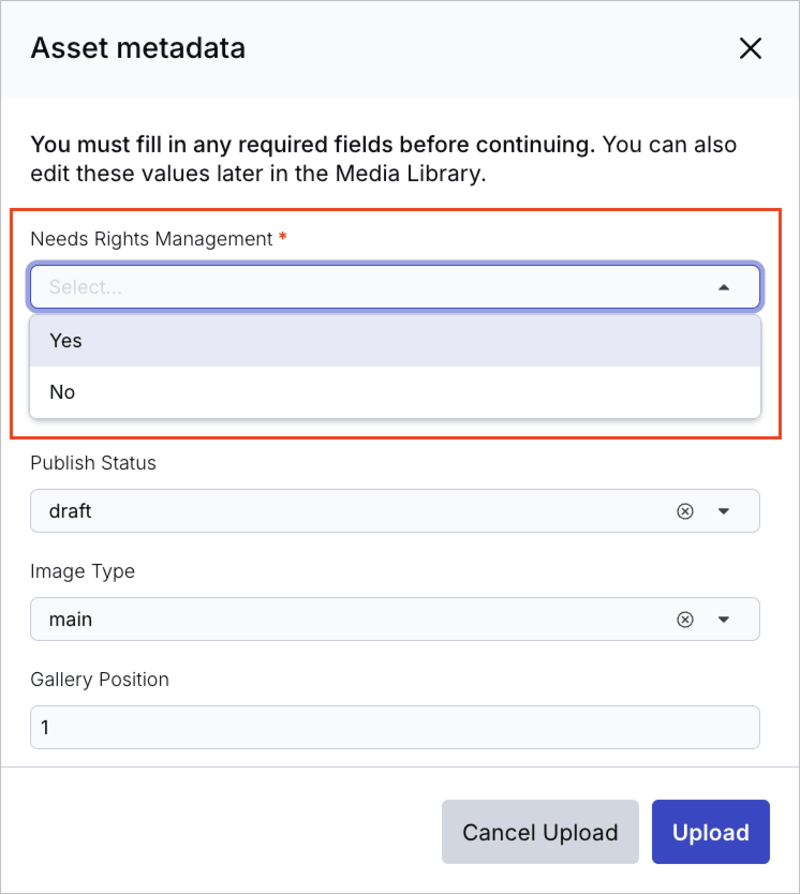
However, if your administrator configured FADEL sync on upload to require a decision, you'll be prompted to set Needs Rights Management for each upload.
To add assets to FADEL on upload:
- Upload your asset(s).
- When prompted, choose:
- Yes to add the asset to FADEL for rights tracking
- No to exclude it from rights tracking
Add existing assets to FADEL
Assets that weren't added to FADEL on upload may need to be tracked for rights management later. You can add existing assets to FADEL at any time.
To add existing assets to FADEL:
- Select the assets you want to add to FADEL.
- In the assets toolbar, select Metadata → Edit Structured Metadata.
- Set Needs Rights Management to Yes and click Update.
If your developers handle assets programmatically, they can set the Needs Rights Management metadata field during upload (directly or via an upload preset) or by updating existing assets.
Force immediate asset creation
By default, assets are created in FADEL on a scheduled basis. If you need an asset to appear in FADEL immediately, or if the initial asset creation failed, you can trigger an immediate asset creation using Force Sync.
To force an immediate asset creation:
- Select the asset.
- In the assets toolbar, select Metadata → Edit Structured Metadata.
- Verify Needs Rights Management is set to Yes (set it if needed).
- Set Force Sync to Yes.
- Click Update.
The asset is created immediately in FADEL and the Force Sync field automatically resets to No.
Find assets synced with FADEL
Quick label
Depending on how your admin configured the system, synced assets may display a Yes label (for assets synced with FADEL) or No label (for assets not synced). This helps you quickly scan for assets that are tracked in FADEL.
Search for synced assets
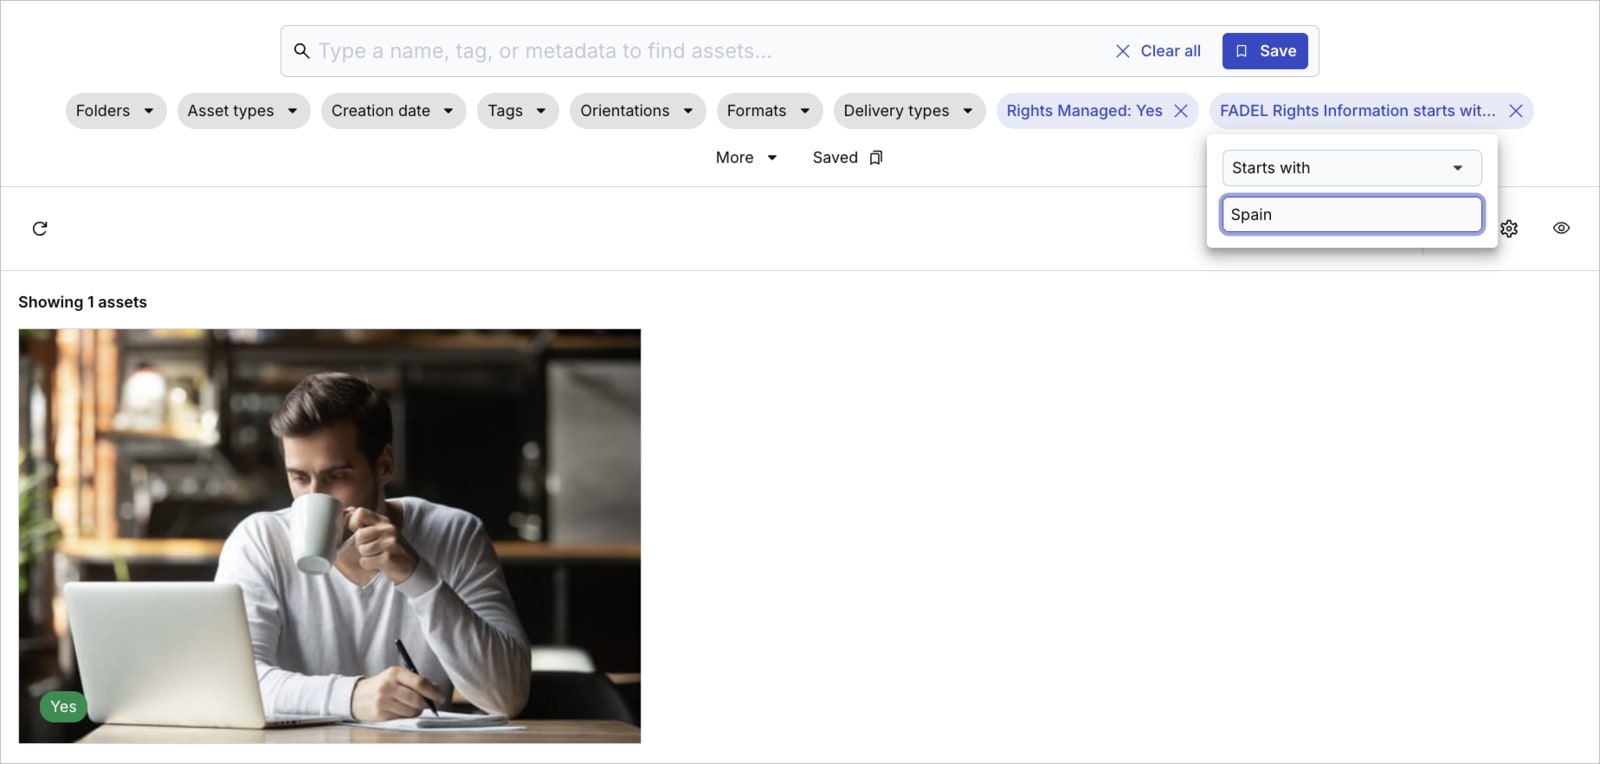
You can also use the Media Library’s Advanced Search to locate assets based on FADEL rights information.
To search by structured metadata:
- Click the Assets page of the Media Library to open the Advanced Search.
- Select the Rights Managed filter.TipIf the filter isn't visible, choose Add more to display additional metadata fields.
- Select Yes to find assets synced with FADEL.
- Optionally, add other filters to refine your search. For example:
- Select the FADEL rights information filter.TipIf the filter isn't visible, choose Add more to display additional metadata fields.
- Select Starts with from the dropdown and enter "Spain" to locate assets cleared for publishing in that region.
- Select the FADEL rights information filter.
Check rights information
After an asset has synced with FADEL, you can use FADEL's clearance interface or view rights details directly in Cloudinary.
Check clearance in FADEL
To view the most up-to-date digital rights information for an asset, you can open FADEL directly from within Cloudinary.
To check an asset's clearance in FADEL:
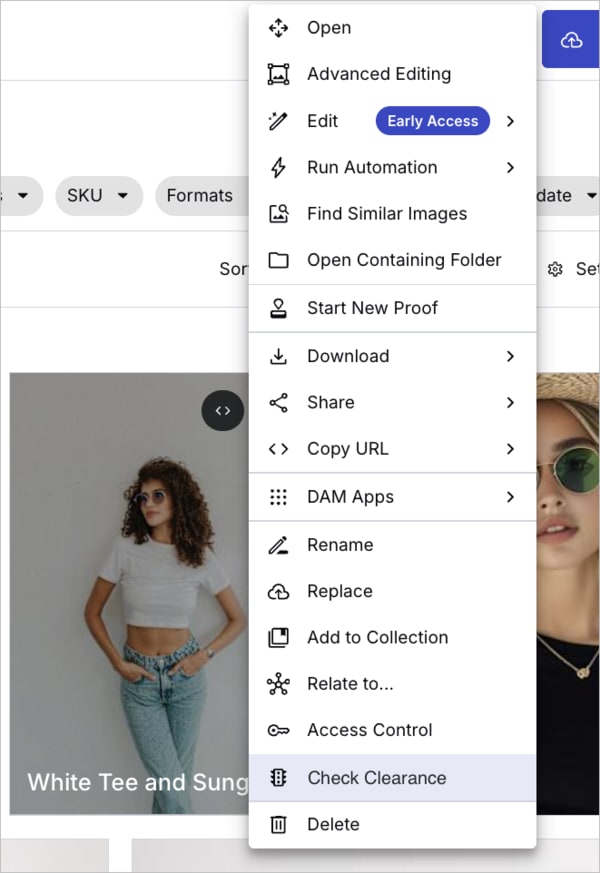
- Open the asset's context menu.
- Select Check Clearance.
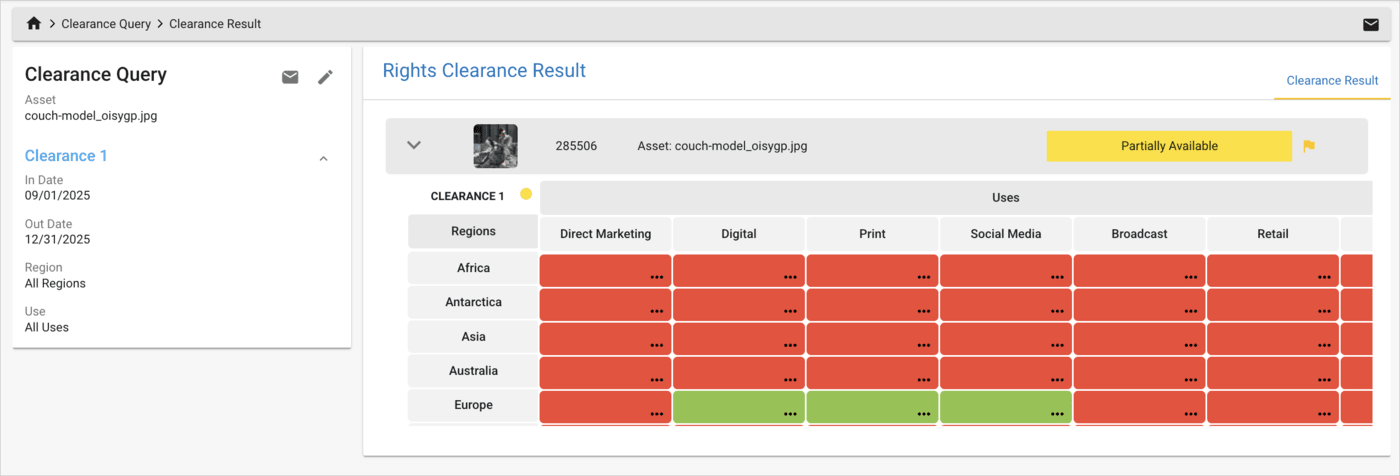
This opens FADEL's clearance view in a new browser window, where you can check:
- Usage restrictions
- Territory availability
- Key agreements
- Licensing periods
Review rights information inside Cloudinary
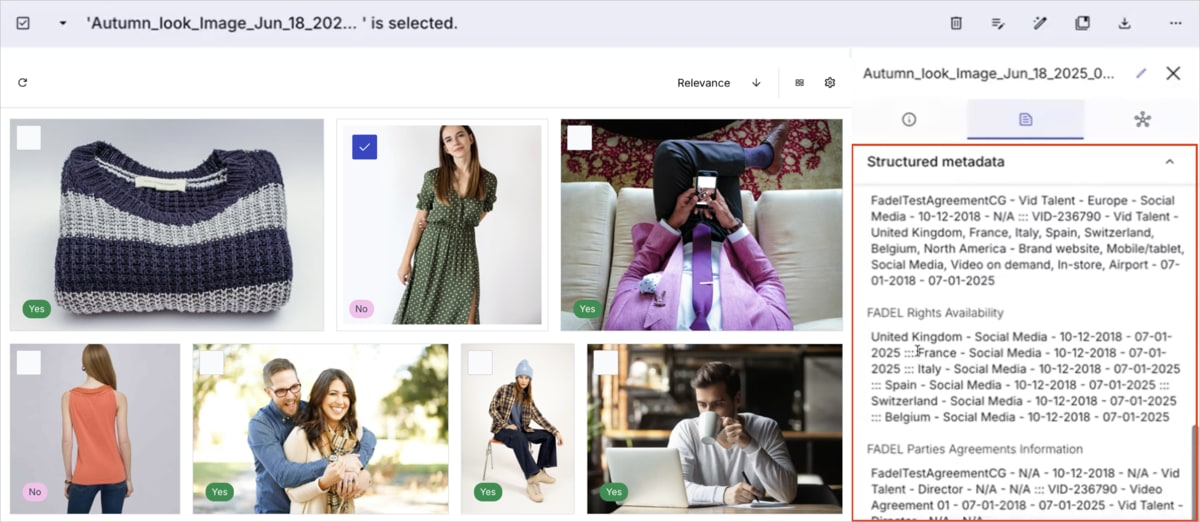
Cloudinary stores a subset of rights and agreement information returned from FADEL in its metadata. However, this information may not be up to date. It syncs automatically when agreements change in FADEL, or you can manually trigger a one-time refresh to update it. That refresh takes place during the next scheduled sync.
You can view this metadata in either the Manage page or the Preview Pane.
To view rights information in the Manage page:
- Double-click an asset.
- Click the Metadata tab.
To view rights information in the Preview Pane:
- Select an asset.
- Click the Preview icon to open the pane.
- Click the Metadata tab.
Fields may include:
- Rights availability (territories, channels)
- Agreement information
- Clearance summaries
- Resource details sent from FADEL
Refresh rights information
After an asset is integrated with FADEL, FADEL may update the asset's rights, agreements, territories, or availability. These updates sync automatically to Cloudinary when agreements change, but you can also manually trigger a refresh at any time.
To refresh rights information:
- Select the asset.
- In the assets toolbar, select Metadata → Edit Structured Metadata.
- Set Synced to No.
- Click Update.
During the next scheduled sync, Cloudinary pulls the latest rights information from FADEL and updates the asset's metadata fields, including FADEL Rights Information, FADEL Rights Availability, and FADEL Parties Agreements Information. The Synced field automatically updates back to Yes after the sync completes.
Some fields, labels, and workflows depend on how your administrator configured your FADEL and Cloudinary environments. For more information, ask your administrator or refer to the FADEL integration (Beta) documentation in the Admin guide.
Managing asset versions
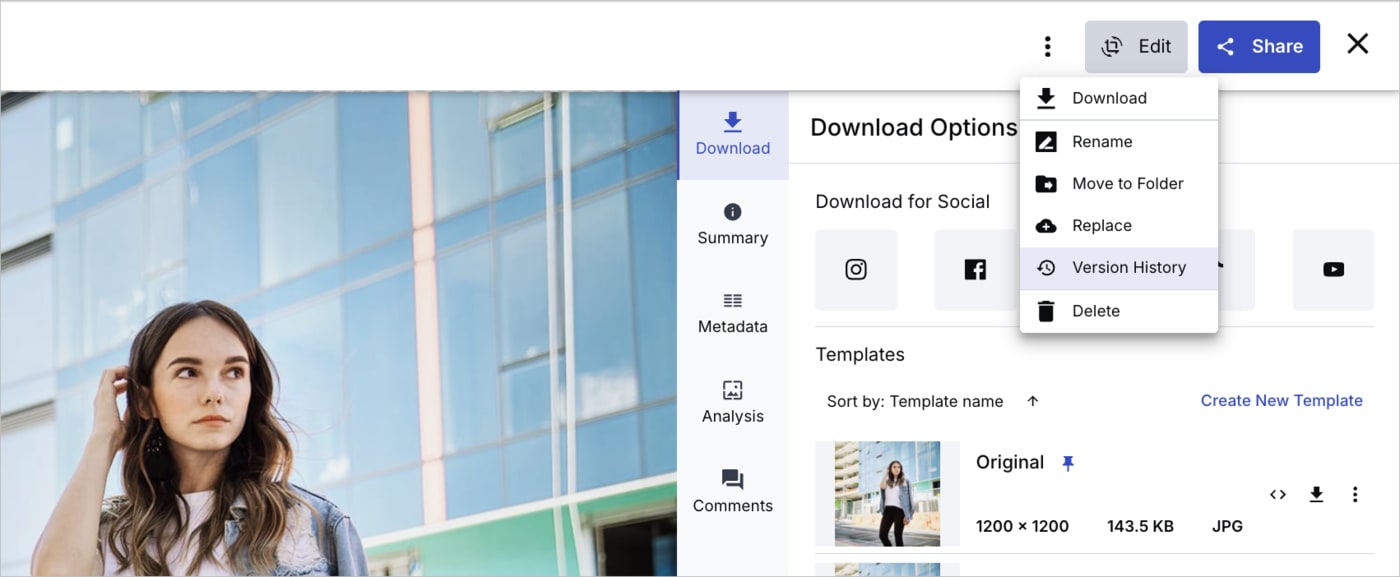
You can list, preview and restore previous versions of an asset from the asset management drill down page by clicking Version History from the kebab menu:
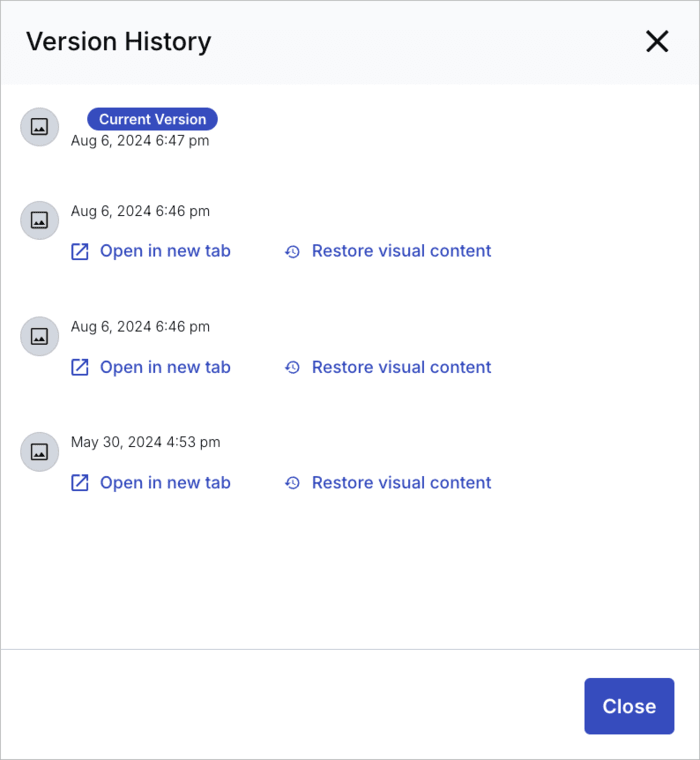
To preview a specific version of the asset, click Open in new tab. To restore a previous version, click the Restore version history link next to the listed version.
Restoring deleted assets
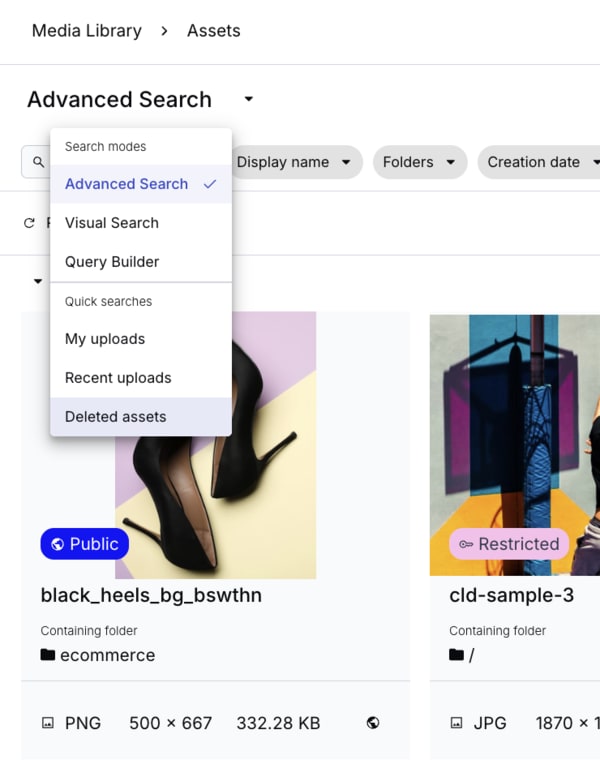
To restore deleted assets through the Media Library, navigate to the Assets page of the Media Library. In the Advanced Search drop down, select Deleted assets.
You can optionally narrow the search down further using Advanced Search filters.
In the Preview pane or the kebab menu for the asset management drill down page of the asset you want to restore, click Version History. Then, select a specific version to restore as described in Managing asset versions, and click Restore visual content.
Restoring deleted assets video tutorial
This video shows how to restore deleted assets in the Media Library:
 Ask AI
