
When displaying a set of product images, uniformity is key. Customers should be focusing on the product, not distracted by the background, especially if there are different backgrounds in each image. Therefore it makes sense to conduct product image background removal for any images that you want to group together. But have you ever noticed how products without backgrounds look like they’re floating in mid-air? Applying a realistic-looking product image shadow can ‘ground’ those floating objects and return a sense of depth to your images.
In this post you’ll learn how to leverage an image background React JS project to display product sets in a React application, first displaying the original images, resized and optimized for web delivery, then with their backgrounds removed, and finally with drop shadow applied.
There are plenty of advantages that would lead you to remove image backgrounds from your product images. First off, it can improve the appearance of an image by making the subject stand out from it’s surroundings. Secondly, it can make images more versatile by allowing them to be used in different contexts. Finally, it can also help by just reducing the file size of an image.
However, there are also some downsides that make give you pause before you go ahead and remove image backgrounds from your product images. Product image background removal can be a complex task, especially if it’s a complex image or detailed background. Image quality can also be reduced, if the background isn’t removed smoothly. Additionally, it can also be time-consuming if you need to do it at scale.
For several years, Cloudinary has offered an AI background removal add-on. Until recently, the only way to use it would have been to trigger it while uploading or updating an image, and only the background-removed version of the image would have been stored. Now, you can store the original image and remove the background on delivery, keeping the original intact. You still need to register for the add-on, but now you can simply use the background_removal effect transformation parameter (e_background_removal in the delivery URL), like this:
 Original
 Background removed
Another recent update to the background removal functionality is to recognise cars and remove background content displayed through car windows. A special effect is also added to the windows to simulate real windows. This is all done automatically, using the same e_background_removal parameter.
Drop shadow is applied to objects in background-removed images by setting up a virtual light source using the dropshadow effect (e_dropshadow in URLs):

You can set the azimuth, elevation and spread of the virtual light source (see the full syntax). Use the following model to help you understand the angles involved:
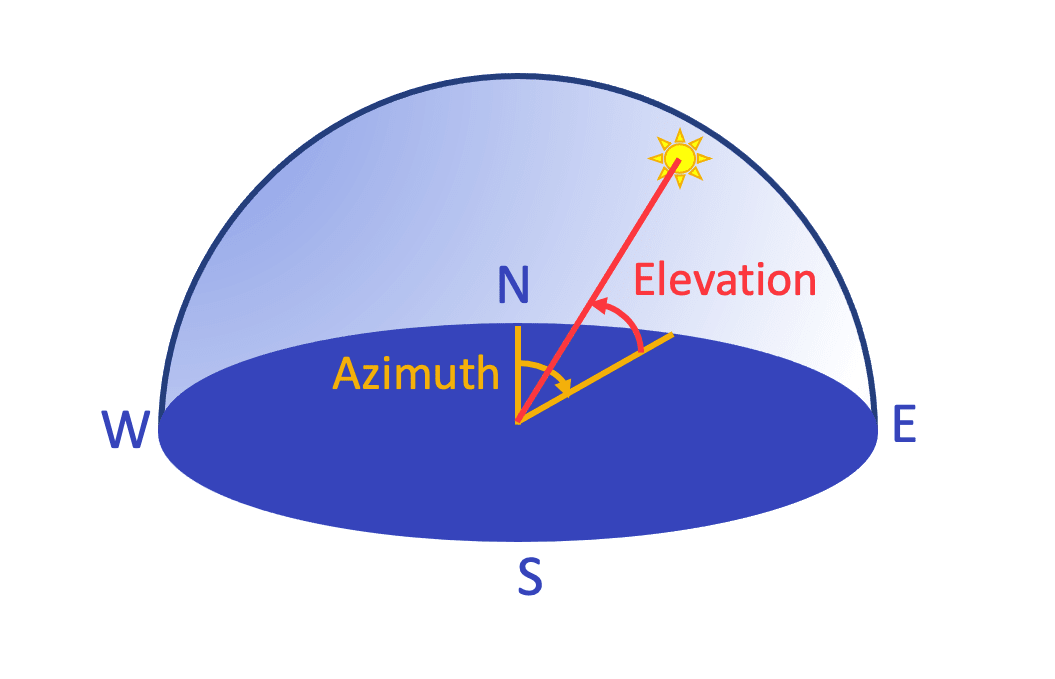
North (0°/360°) is behind the object, so the shadow falls directly in front of the object. Elevation ranges from ground level (0°) to above the object (90°), so the smaller the number, the longer the shadow.
Spread ranges from 0% to 100%, where the smaller the number, the closer the light source is to ‘point’ light, and larger numbers mean ‘area’ light.
Have a play with the parameters in this interactive demo.
The following React App demonstrates how to use the Cloudinary React SDK to remove backgrounds and apply drop shadow.
Before getting into the details, let’s start by trying it out. Go ahead and have a play.
This code is also available in GitHub.
If you want to try creating something similar you need to sign up for a free Cloudinary account, and register for the Cloudinary AI background removal add-on, which also has a free tier.
There are three different product sets to choose from and you can choose to display the originals or the background removed images, with or without drop shadow.
If you select Drop Shadow, you’ll see some additional options to set the light source that creates the shadow:
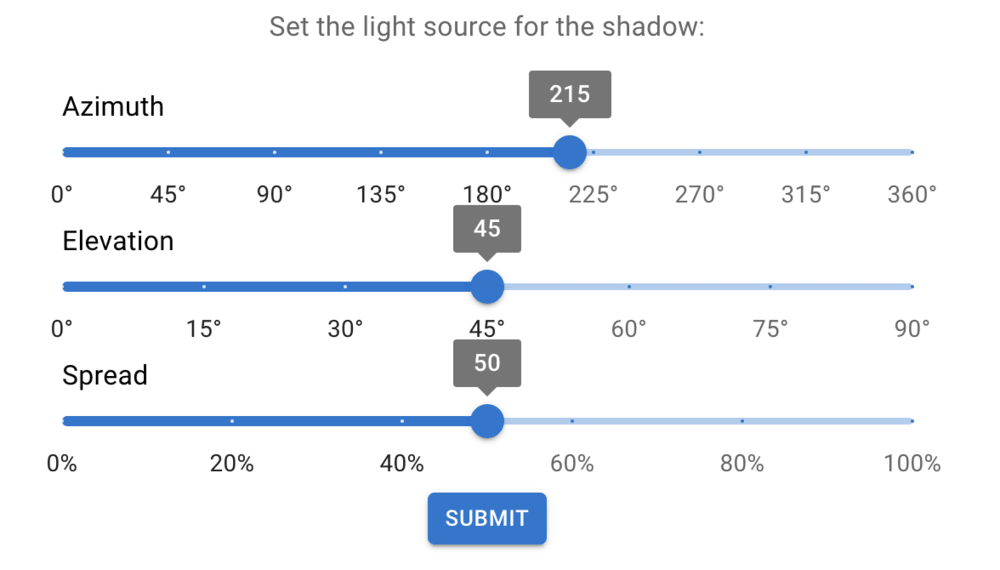
This virtual light source is uniformly applied to the product image shadow of all the images in the product set, casting shadows in the same direction for each object.
For this React app I decided to use React Photo Album as an easy way to display the images and also to show how to use Cloudinary delivery URLs together with other React libraries. At its most basic level, the PhotoAlbum component takes an array of images, together with their widths and heights. This is an example from their docs:
import PhotoAlbum from "react-photo-album";

const photos = [
    { src: "/images/image1.jpg", width: 800, height: 600 },
    { src: "/images/image2.jpg", width: 1600, height: 900 },
];

export default function Gallery() {
    return <PhotoAlbum layout="rows" photos={photos} />;
}

Code language: JavaScript (javascript)
The src of each of the photos can be set to a URL, and that’s where Cloudinary comes in. All the product images in the app are stored in the demo Cloudinary product environment, so they can be accessed with delivery URLs that look similar to this:
https://res.cloudinary.com/demo/image/upload/docs/image1
Having played with the app, you’ll see that there are five images for each product set, and three ‘flavors’ of each set (original, background removed, and background removed with shadow), so you might assume that you’d need fifteen different images for each product set. But no – with Cloudinary, you only need to store the original five images, and let Cloudinary create the others on the fly.
Moreover, React Photo Album supports responsive images when you provide smaller images in the the photo images attribute:
import PhotoAlbum from "react-photo-album";

const photos = [
    {
        src: "/images/image1_800x600.jpg",
        width: 800,
        height: 600,
        images: [
            { src: "/images/image1_400x300.jpg", width: 400, height: 300 },
            { src: "/images/image1_200x150.jpg", width: 200, height: 150 }
        ]
    },
    {
        src: "/images/image2_1600x900.jpg",
        width: 1600,
        height: 900,
        images: [
            { src: "/images/image2_800x450.jpg", width: 800, height: 450 },
            { src: "/images/image2_400x225.jpg", width: 400, height: 225 }
        ]
    }
];

export default function Gallery() {
    return <PhotoAlbum layout="rows" photos={photos} />;
}
Code language: JavaScript (javascript)
So, without Cloudinary, you’d need to create and store at least an additional two more variants of each image.
With Cloudinary, you can replace the src strings in the above code with delivery URLs that include transformation parameters, so rather than storing six different images, you store two images and create the resized versions on the fly:
import PhotoAlbum from "react-photo-album";

const photos = [
    {
        src: "https://res.cloudinary.com/demo/image/upload/c_scale,h_600,w_800/docs/image1",
        width: 800,
        height: 600,
        images: [
            { src: "https://res.cloudinary.com/demo/image/upload/c_scale,h_300,w_400/docs/image1", width: 400, height: 300 },
            { src: "https://res.cloudinary.com/demo/image/upload/c_scale,h_150,w_200/docs/image1", width: 200, height: 150 }
        ]
    },
    {
        src: "https://res.cloudinary.com/demo/image/upload/c_scale,h_900,w_1600/docs/image2",
        width: 1600,
        height: 900,
        images: [
            { src: "https://res.cloudinary.com/demo/image/upload/c_scale,h_450,w_800/docs/image2", width: 800, height: 450 },
            { src: "https://res.cloudinary.com/demo/image/upload/c_scale,h_225,w_400/docs/image2", width: 400, height: 225 }
        ]
    }
];

export default function Gallery() {
    return <PhotoAlbum layout="rows" photos={photos} />;
}
Code language: JavaScript (javascript)To make the images load fast, the app optimizes them for delivery. This is good practice for any images you want to deliver from Cloudinary, regardless of any other transformations that you apply.
The three basic factors in optimizing images for delivery, are the dimensions, format and compression (quality). By adding transformation parameters to the delivery URL, you can optimize your images in a flash:

Here’s what the transformation parameters mean:
-
c_scale,h_488,w_960: scale the image to a height of 488 pixels and a width of 960 pixels -
f_auto: let Cloudinary determine the best image format for the requesting browser -
q_auto: let Cloudinary determine the best level of compression to apply to reduce the file size with minimal impact to quality
You can build URLs like these using the Cloudinary React SDK, and specifically the @cloudinary/url-gen package. Look at OriginalUrl.js to see how to build the above delivery URL in React:
import cld from "./cld";
import { scale } from "@cloudinary/url-gen/actions/resize";

export function getOriginalUrl(publicID, width, height) {

 // Scale the image to the specified dimensions
 // and optimize format and quality
 const myImage = cld.image(publicID)
   .resize(scale().width(width).height(height))
   .format('auto')
   .quality('auto');

 // Return the URL of the image
 return myImage.toURL();
}
Code language: JavaScript (javascript)
First, we import cld. This is the Cloudinary instance that’s created once for the app in cld.js:
import { Cloudinary } from "@cloudinary/url-gen";

// Create a Cloudinary instance and set your cloud name.
const cld = new Cloudinary({
 cloud: {
   cloudName: "demo"
 }
});

export default cld;
Code language: JavaScript (javascript)
If you want to use images from your own Cloudinary account, then this is where you need to specify the cloud name of your product environment.
myImage is a CloudinaryImage instance, created from the public ID of the image stored in Cloudinary:
const myImage = cld.image(publicID);
Code language: JavaScript (javascript)
The public ID of the car image above is docs/cars/car5, which is set in PhotoAlbum.js and passed to getOriginalUrl as a parameter, together with the width and height of the image.
To resize and optimize the image, apply the resize, format and quality actions to myImage (notice you need to import the scale action too):
import { scale } from "@cloudinary/url-gen/actions/resize";
…
const myImage = cld.image(publicID)
   .resize(scale().width(width).height(height))
   .format('auto')
   .quality('auto');
Code language: JavaScript (javascript)
Finally, the toURL() function, called on myImage, returns the URL of the image to deliver.
return myImage.toURL();
Code language: JavaScript (javascript)Take a look at RemoveBackground.js to see the code required for background removal in React:
import { backgroundRemoval } from "@cloudinary/url-gen/actions/effect";
…
myImage.effect(backgroundRemoval());
Code language: JavaScript (javascript)
You’ll be familiar with the rest of the code in this file from OriginalUrl.js, as described in Optimizing for delivery.
The returned URL includes the resizing and optimization parameters too, and will look something like this, depending on the parameters passed into getBackgroundRemovedUrl:

For those working with React Native, an alternative to Cloudinary is the react-native-background-remover library. This library provides a function called removeBackground(), designed specifically for mobile application scenarios.
To make use of this library in a React Native application, first, you need to install it. Once that’s done, importing and utilizing it is quite straightforward.
Here’s a basic example:
import React, { useState } from 'react';
import { Image, View, Button } from 'react-native';
import BackgroundRemover from 'react-native-background-remover';

const App = () => {
  const [image, setImage] = useState(null);

  const handleImageChange = (event) => {
    setImage(event.target.files[0]);
  };

  const removeBackground = async () => {
    const { data } = await BackgroundRemover.removeBackground(image);
    setImage(data);
  };

  return (
    <View style={{ flex: 1 }}>
      <Image source={image} style={{ width: 100, height: 100 }} />
      <Button title="Remove Background" onPress={removeBackground} />
    </View>
  );
};

export default App;
A thing to note when working with React Native is the introduction of native UI components like Image, View, and Button. This code also introduces the useState hook within a functional component and an event handler tailored to React Native.
When discussing the number of images required for this app earlier, I didn’t mention the extra 16,200,000 images per product set you’d need to cover all variations of the drop shadow effect! (And that’s not including the many variations of size, format and compression!) Thanks to Cloudinary, we don’t have to create and store each of these manually. We don’t even have to create them at all, if they’re not requested.
In RemoveBackgroundAddShadow.js, you’ll see the React code required to add the drop shadow effect:
import { dropShadow } from "@cloudinary/url-gen/actions/effect";
…
myImage.effect(dropShadow().azimuth(az).elevation(el).spread(spr));
Code language: JavaScript (javascript)
Everything else is the same as in RemoveBackground.js as we’re adding the drop shadow to the background-removed images and applying the optimization as before.
Again, the returned URL includes the resizing and optimization parameters too, and will look something like this, depending on the parameters passed into getBackgroundRemovedShadowUrl:

When using the app, you’ll notice that it may take a few seconds to generate the images with drop shadow, and that’s because they haven’t been requested before. Once the images have already been requested, they’ll be cached on the CDN and will appear fast.
Applying background removal and drop shadow in a function such as getBackgroundRemovedShadowUrl demonstrates how scalable this solution is. The same transformation can be applied to as many images as you like. And if you need to tweak a parameter, then it’ll take just a few moments to re-apply shadow from the same light source to all the images.
Here’s a snippet from the PhotoAlbum.js file showing the getBackgroundRemovedShadowUrl function being called for each of the src properties:
  else if (props.data.displayOption === "shadow") {
     for (let i=0; i<5; i++)
     {
         photos.push({ src: getBackgroundRemovedShadowUrl(publicIds[i], widths[i], heights[i],
           props.data.az, props.data.el, props.data.spr), width: widths[i], height: heights[i],
           images: [
             { src: getBackgroundRemovedShadowUrl(publicIds[i], Math.ceil(widths[i]/2), Math.ceil(heights[i]/2),
               props.data.az, props.data.el, props.data.spr),
               width: Math.ceil(widths[i]/2), height: Math.ceil(heights[i]/2) },
             { src: getBackgroundRemovedShadowUrl(publicIds[i], Math.ceil(widths[i]/4), Math.ceil(heights[i]/4),
               props.data.az, props.data.el, props.data.spr),
               width: Math.ceil(widths[i]/4), height: Math.ceil(heights[i]/4) }
           ]});
     }
 }
Code language: JavaScript (javascript)The Cloudinary React SDK has a built-in AdvancedImage component that you can use to display images. It comes with plugins that provide extra functionality, such as responsiveness, lazy loading, accessibility and placeholders.
import {AdvancedImage, lazyload, accessibility, responsive, placeholder} from '@cloudinary/react';
…
<AdvancedImage cldImg={myImage} plugins={[lazyload(), responsive(), accessibility(), placeholder()]}/>
Code language: HTML, XML (xml)
Up for a challenge? Try modifying the app to use AdvancedImage components instead of the PhotoAlbum component.
If you’re working with React Native, you might want to explore similar advanced components or features tailored for mobile apps. Always remember, regardless of the platform – web or mobile – the essence remains: optimizing images for a seamless user experience. And with tools like Cloudinary and react-native-background-remover, developers are equipped to achieve just that.
You can learn more about the AdvancedImage component and its plugins in the React SDK guide.
There are many different use cases for background removal and drop shadow beyond product image background removal or adding a product image shadow, and of course, Cloudinary has a variety of SDKs for your preferred coding environment.
The following animated image was created from one image with the light source set at different points representing the sun’s cycle, so with azimuth starting from the east (90°), heading round to the north (0°), and ending in the west (270°). The elevation starts from 0°, peaks at 90°, and ends back at 0°, when the sun ‘sets’ in the west:

The node script used to create this animation can be found in GitHub.
Removing the background of an image on the fly, you can add an underlay of a different scene behind the object, rather than leaving it blank.

Or, you can do something a bit more funky using the Atropos component, like this (mouseover the image):
You can even overlay an image with a transparent background on a video, like this:
“Where we’re going, we don’t need roads!” but we definitely do need Cloudinary!

