
If you’ve come across this post and, based on the title, are expecting insights into object-oriented programming languages, then please forgive me for overloading the term object-oriented. I hope you don’t object when you discover that the objects in this post are not so much the instantiated class types, but real-life objects found in images. It is helpful though if you’re familiar with the likes of Java, PHP, Javascript or other popular frameworks, as you’ll be able to implement these automatic image cropping techniques in your code. Anyway, let’s cut to the chase – or should that be crop to the object…?
Automatic AI-driven object-aware cropping is a very powerful feature that can save you time, money and a lot of hassle when it comes to displaying images on your website or app. For example, a typical e-commerce website may have 10,000 products in its catalog, with four images per product. So, unless AI is used, it’s an expensive proposition to ensure that 40,000 images of different sizes and aspect ratios best portray the objects you are selling.
Cloudinary’s Object-Aware Cropping add-on applies advanced AI-based object detection algorithms on-the-fly during the crop process to keep specific objects in the picture. Like many of Cloudinary’s image transformation features, all you need to do is add a few parameters to the image delivery URL. In this case, you specify what you want to keep in your image along with one of Cloudinary’s many cropping options to suit your design and usability constraints. With an additional 600 objects now supported, you can spend less time focusing your efforts on image cropping and more time looking at the bigger picture.
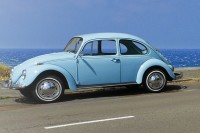
Let’s say your website allows users to upload photos of cars that they want to sell. You know nothing about the content of the photos, except that they are expected to contain cars. You want to save time for your users by automatically positioning the cars front and center, even if you will be displaying their photos in a different aspect ratio and size to the originally uploaded image. The simplest way to do this is to tell Cloudinary to keep only the car in the crop by using the crop parameter and setting the gravity to car (c_crop,g_car in URLs). You don’t even need to specify any dimensions:
 Original
 c_crop,g_car
You’ll notice that the crop is very exact, so to give the car a bit of room to breathe, you may want to zoom out slightly: z_0.9. And you’ll probably want to limit the dimensions of the image too, so having kept only the car, you can then scale the image, say to a width of 200 pixels: c_scale,w_200. Here’s the full URL:
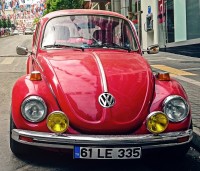
You’ve now got a reusable transformation that can be applied to any car picture (if there’s no car in the picture, the image won’t be cropped, only resized):
| Original (scaled to fit this table) |
Keep only the car (with a slight zoom out)c_crop,g_car,z_0.9/
|
|
|
|

|

|

|

|

|

|
If your website design calls for all images in a particular page or layout to be exactly the same size, then you’ll want to set the aspect ratio too (together with the width we’ve already added). You need to decide if you’re happy for more of the original image to be shown, or if you still only want to see the chosen object.
If you don’t mind more of the original image being in the picture, then set the aspect ratio (ar) in the c_crop component (c_crop,g_car,z_0.9,ar_1.5/c_scale,w_200). Otherwise, instead of c_scale, you could use the padding crop, c_pad and set the aspect ratio in that component (c_crop,g_car,z_0.9/c_pad,w_200,ar_1.5). This adds padding to the image to reach the required size. You can either choose the color of the background padding yourself, or let Cloudinary decide automatically (b_auto).
Show more of the picture in the crop
c_crop,g_car,z_0.9,ar_1.5/
|
Keep only the car (with a slight zoom out), and add automatically colored padding c_crop,g_car,z_0.9/
|

|

|

|

|

|

|

|

|
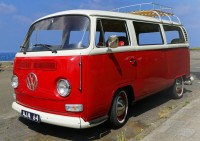
Now imagine it’s not just cars that you’re interested in, but vans and motorbikes too. You can add all three of these objects to your URL, but you’ll need to define an order of precedence in case a photo has more than one of these in it. If you’d prefer to see vans rather than cars, and cars rather than motorbikes, then specify this order: g_van:car:motorbike. Applying this to the image of the car and van above gives this result:
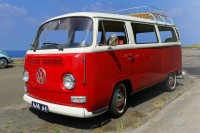
Changing the order, to give precedence to the car, gives the result we had before:
If there are no cars or vans present in the picture, but there is a motorbike, the motorbike will be the focus of the crop:
 Original
 c_crop,g_car:van:motorbike
If you don’t care what type of vehicle is kept in the crop, specifying the category, vehicle, rather than specific objects will keep the most prominent vehicle in the crop. In this case, it’s the van that wins.
If you want to keep all vehicles in the crop then it’s as simple as adding an ‘s’ (this works for specific objects too):

Currently, the list of supported categories and objects comes from two models: Common Objects in Context (COCO) and Google’s Open Images Dataset (OID). Included are a wide variety of objects, from home appliances to food, electronics to furniture, people to animals, sports balls to handbags…. The list is ever-expanding – object models enabling you to specify fashion items and parts of the body are coming soon. Additionally, in the near future, you’ll be able to specify custom object models that cater specifically to your needs.
We’ve seen how to fit different images into the same space, so now we’ll look at how to fit the same image into different spaces, while still keeping the desired object as the focus of attention.
An e-commerce website typically requires a handful of image crops for the same product images (thumbnails, product listing, detail view, and zoom). If you want your images to be responsive to different viewport sizes, yet more variations are required. Factor in social channels, and the number of different crops required quickly multiplies.
To ensure that in each situation, your product, be it a handbag, a shoe or a vase, remains fully in view is a huge undertaking, one which requires creative teams to manage different crops, very painstakingly, and often manually.
To help address this pain point, Cloudinary’s Object-Aware Cropping add-on automatically ensures that the object of interest, your product, is front and center for any crop, no matter which channel or device it’s being viewed on.
Let’s take a look at a product image of a handbag. Here’s the original image:
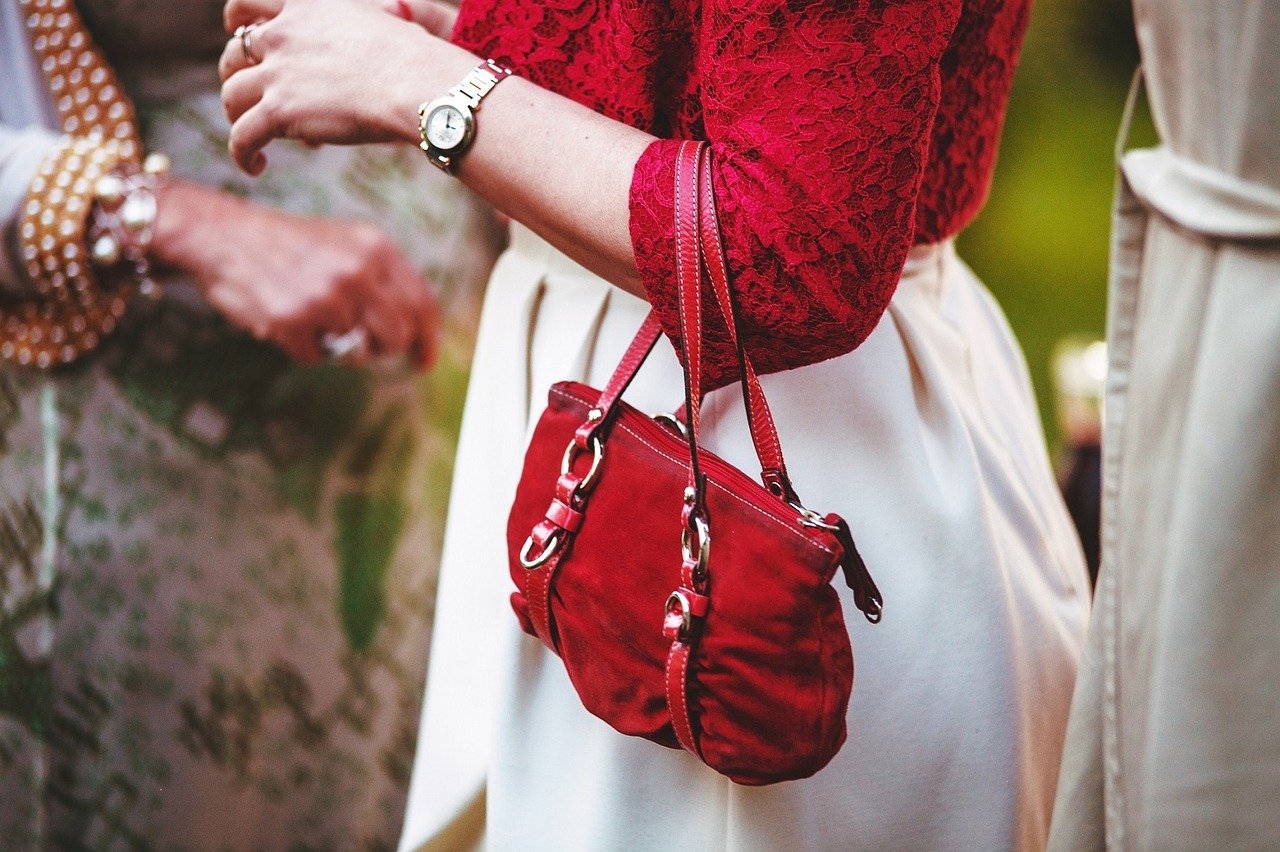
A square crop is required for a website product detail and here we can use the fill cropping method to fill the specified dimensions. To ensure that the handbag is kept in the crop we can choose between object-based automatic gravity (g_auto:handbag) and object-specific gravity (g_handbag). Object-based automatic gravity takes the whole picture into account, weighted by the handbag, whereas object-specific gravity focuses on the handbag over anything else, so the two can give different results. In this case, automatic gravity gives a slightly better crop because more of the hand, and less of the coat on the right is shown. Compare the two:
 c_fill,g_auto:handbag,h_800,w_800
 c_fill,g_handbag,h_800,w_800
Thumbnail crops are another option, and work well to scale down an image to fit the dimensions specified. Here’s an example for a Pinterest board crop:

This video demonstrates how different cropping methods and dimensions result in various crops of the same photo, all giving priority to the handbag:
The same image, presented in many different forms – sounds like polymorphism to me!
In addition to those already mentioned, Cloudinary offers many other types of resizing and cropping methods that you may want to use. To get a feel for how they behave, try out the interactive demo below. Be aware that not all combinations of cropping and gravity are valid, for example, gravity can’t be used together with ‘scale’, or any of the ‘fit’ or ‘pad’ options (except ‘fill with padding’), and ‘fill with padding’ only works with auto-gravity options. The demo lets you choose from two sizes of each image to show how some modes can give different results depending on the resolution.
Choose your starting image, viewport dimensions, cropping mode and gravity, then click the button to generate the new image.
Large
|
Small
|
Large
|
Small
|
|
|
|

Remember that Cloudinary supports a wide range of programming languages and frameworks, so have a go and see how easy it is to implement these cropping methods in your preferred environment. To use object-aware cropping, you’ll need to subscribe to the Cloudinary Object-Aware Cropping add-on (there’s a free tier you can use for experimenting), and also bear in mind that unless you’ve allowed unsigned add-on transformations in your account security settings, you’ll need to sign your delivery URLs. Find out more about the add-on and signing URLs in our documentation.
If you’re new to Cloudinary, you might also want to check out the many other image and video transformations that we support, providing more great ways to automate your media delivery and make your website or app first class!