
Video ads need to grab attention fast, as viewers often decide within seconds whether to keep watching or scroll past. A plain video sometimes isn’t enough, so some advertisers will add animated overlays such as CTAs, logos, and visual effects.
The problem is that manually adding these overlays with video editing software is slow and inefficient. Every small tweak means going back, making changes, re-exporting, and re-uploading. This becomes even more challenging when managing multiple ads across different platforms.
To make this process easier, you can use transformation parameters to apply overlays like different CTAs and promo messages dynamically with simple URL changes, eliminating the need to edit (and re-edit) the base video.
This guide walks you through how to create and test overlays using Cloudinary Studio, deploy variations with dynamic URLs, and track performance to optimize your ads.
You can enhance images, videos, and other media using transformation parameters.
But what are these parameters, and how do they work? They’re simple modifications you can add to an image or video URL to apply changes dynamically. Instead of editing files manually, you can adjust overlays, resize elements, or apply effects just by tweaking a URL.
They follow this syntax:
https://res.cloudinary.com/YOUR_CLOUD_NAME/video/upload/transformation_params/your-video.mp4Code language: JavaScript (javascript)While you can go through the documentation to learn all the possibilities (which is definitely useful), you can also use the Transformation Center, a visual tool where you can apply transformations without writing any code. Just fill out a few fields, and Cloudinary takes care of the rest.
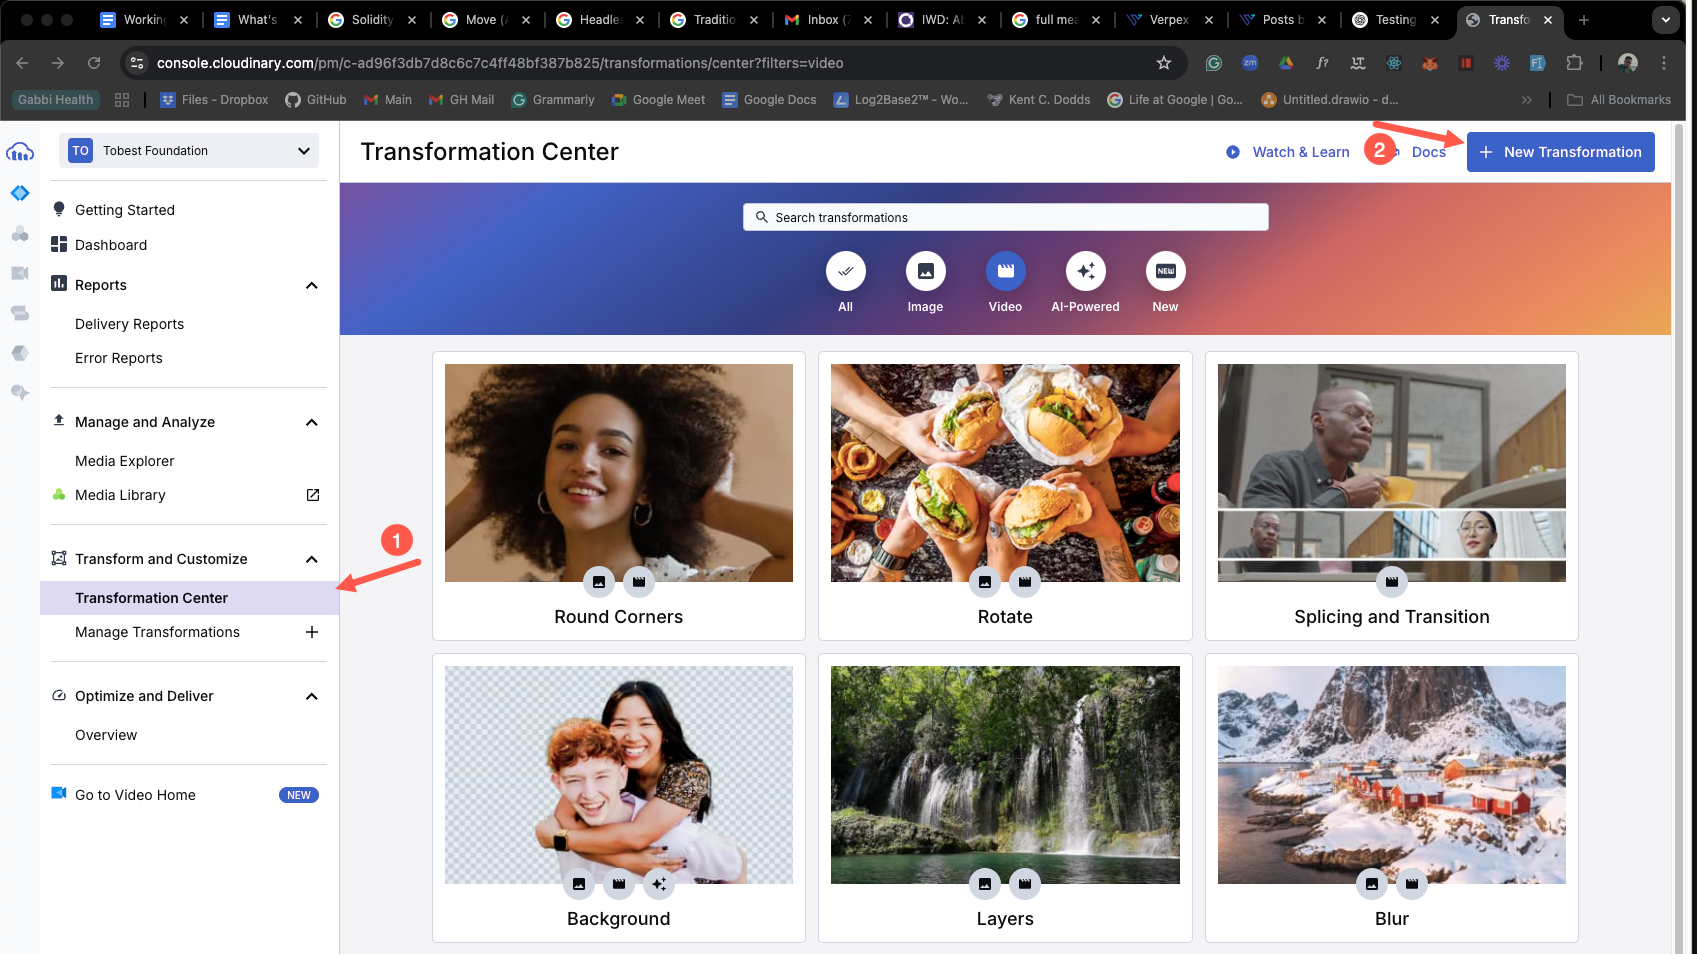
If you haven’t already, sign up for a free Cloudinary account or log in. Then, navigate to the Transformation Center in your dashboard and click New Transformation.
Switch from the Image tab to the Video transformation screen by clicking the video icon:
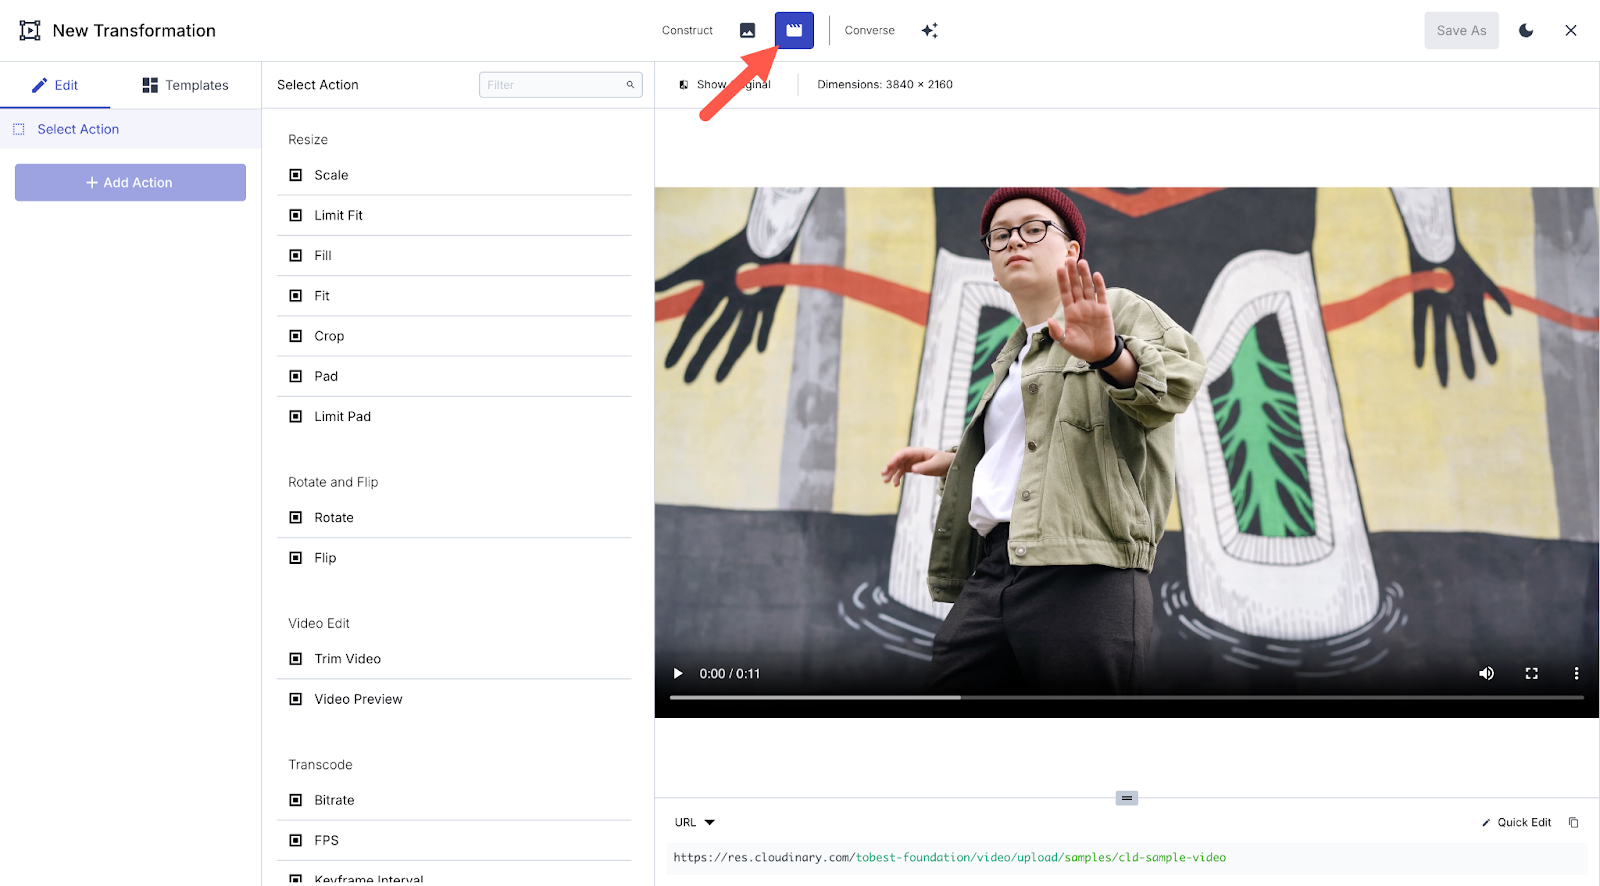
Here, you can add text layers, image overlays, or other effects. Cloudinary provides a default sample video on this page, allowing you to preview transformations before applying them to your own videos.
Let’s add a “New Arrivals” text overlay to a video. This preview screen shows how the transformation will look before applying it to multiple videos.
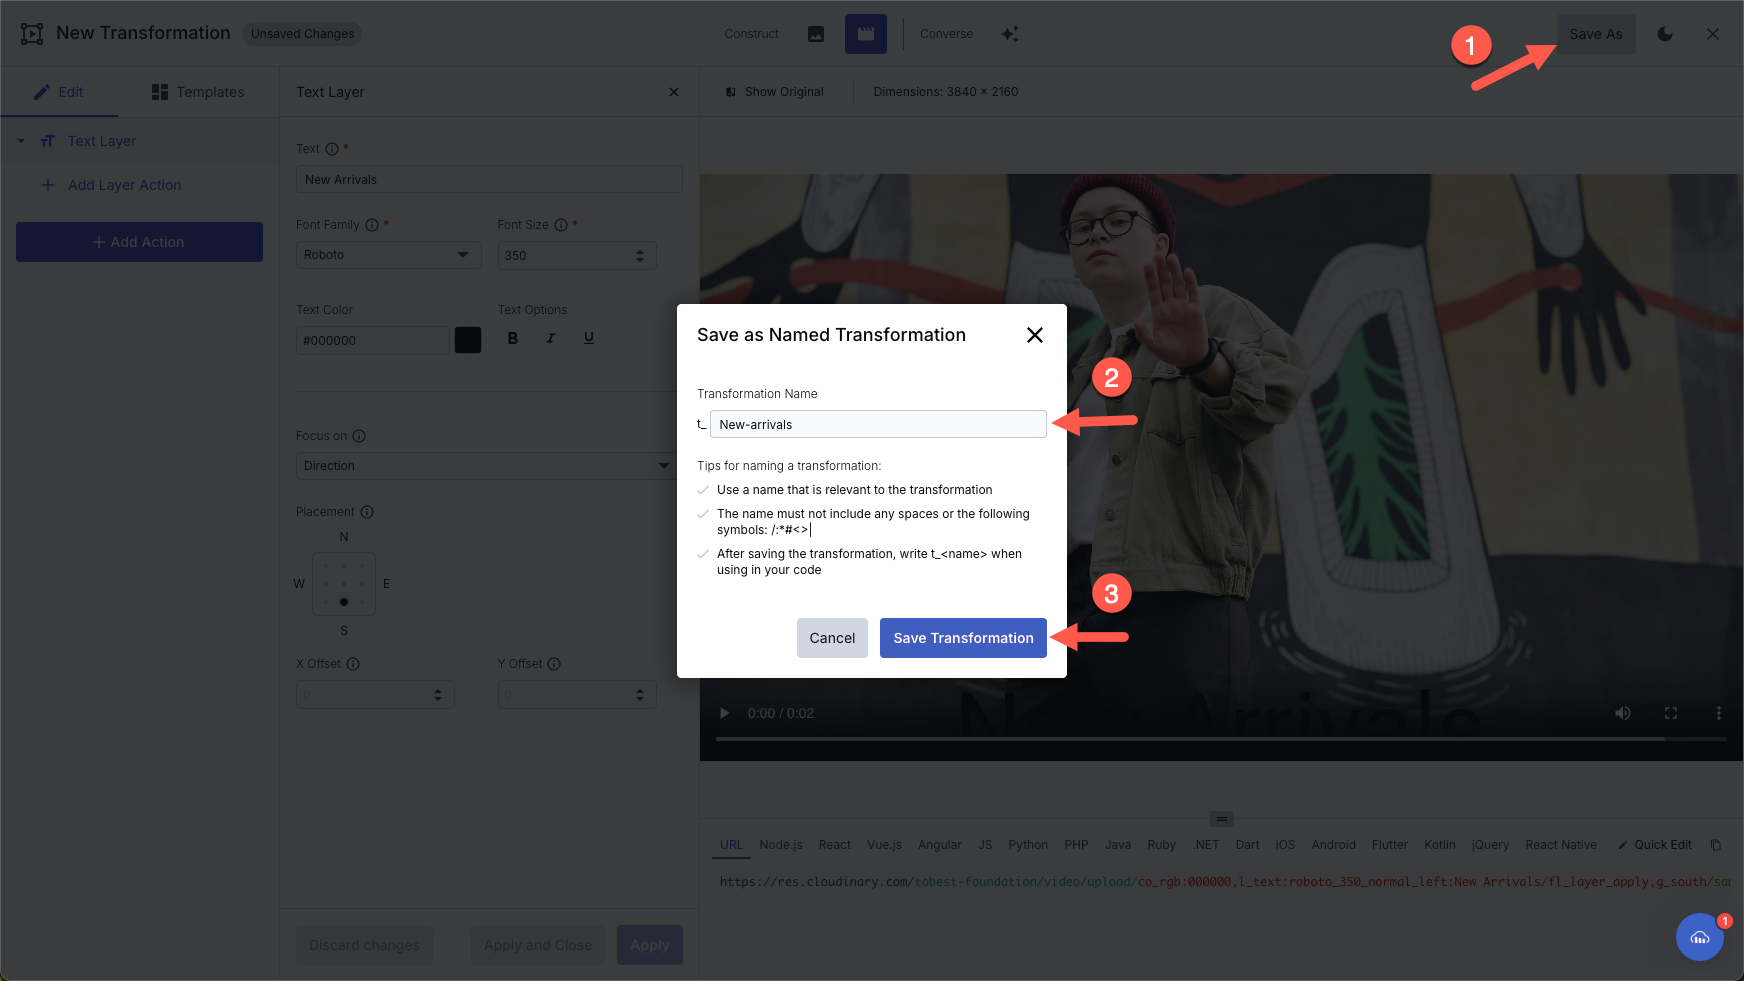
Click the Text Layer action and fill in the form:
- Text: “New Arrivals”
- Font Family: Roboto
- Font Size: 350
- Text Color: Black
- Focus On: Direction (Select South for bottom placement)
- Y Offset: Adjust to move the text slightly above the bottom edge (e.g., 0.15)

Click Apply to see the transformation on the sample video. You can make further adjustments, such as adding a logo overlay or fade-in and fade-out effects.
Once everything looks good, click Save As at the top right, name the transformation, and save it for future use.
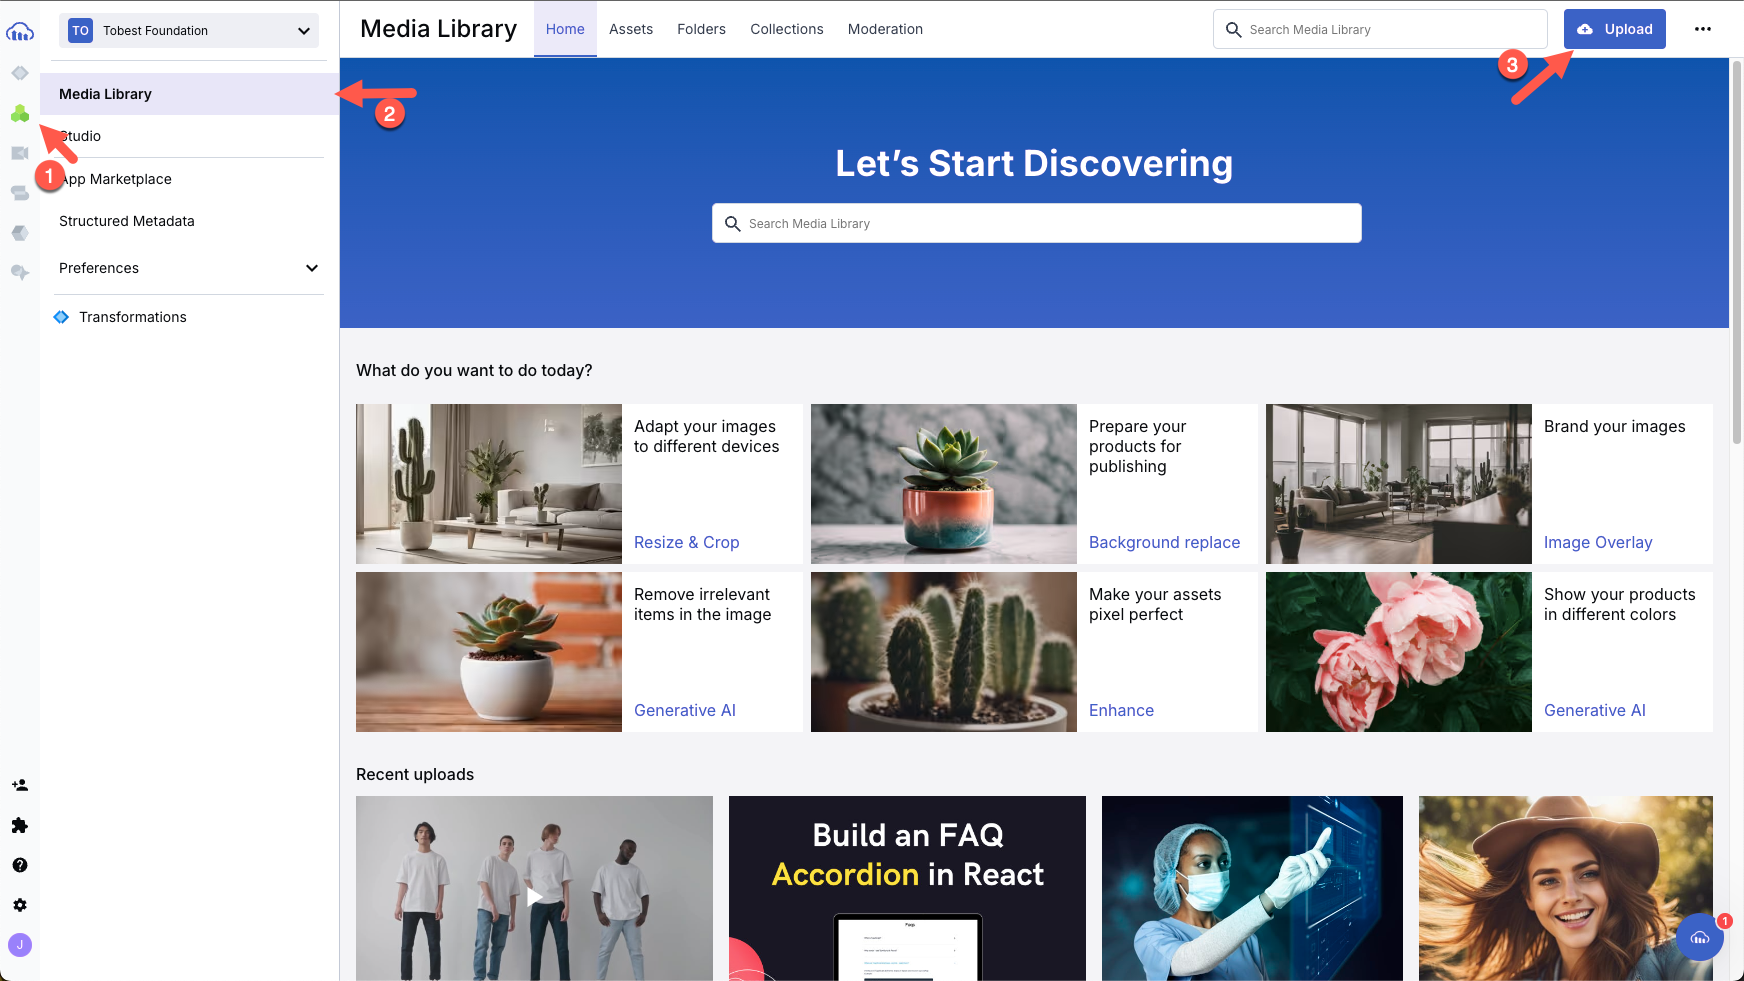
Now, upload your ad videos to Cloudinary. Go to the Media Library and click Upload.
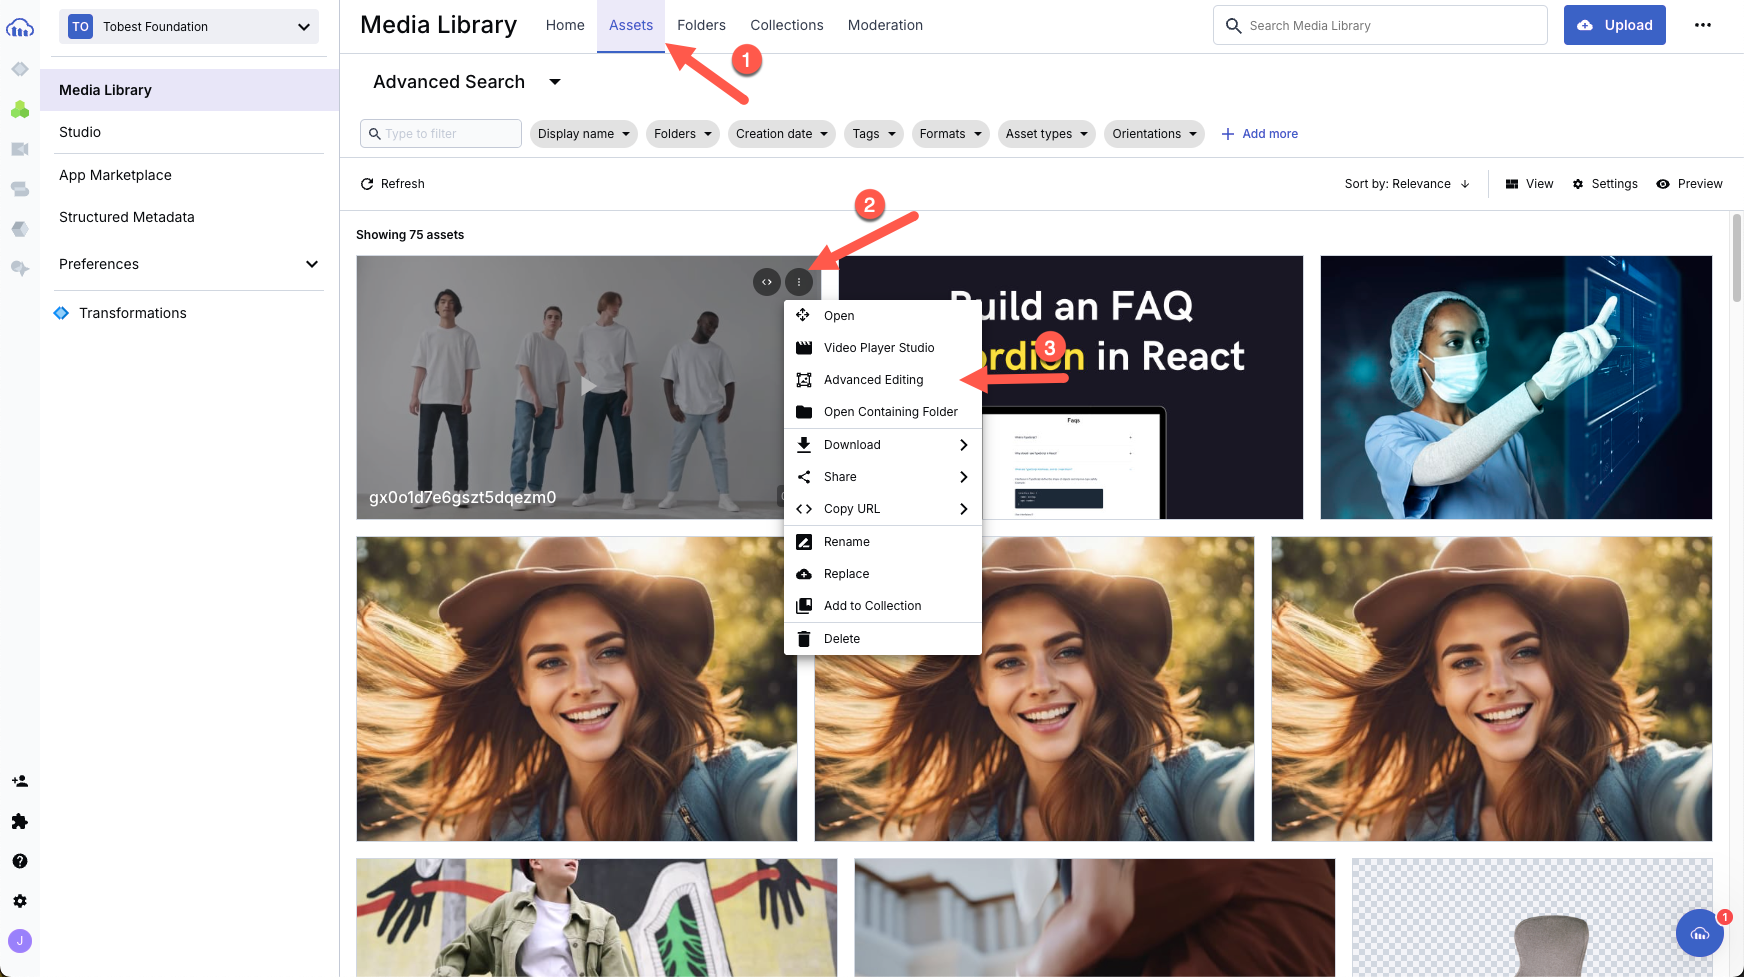
Once uploaded, go to the Assets tab. Hover over a video, click the three-dot menu, and select Advanced Editing to open Cloudinary Video Studio.
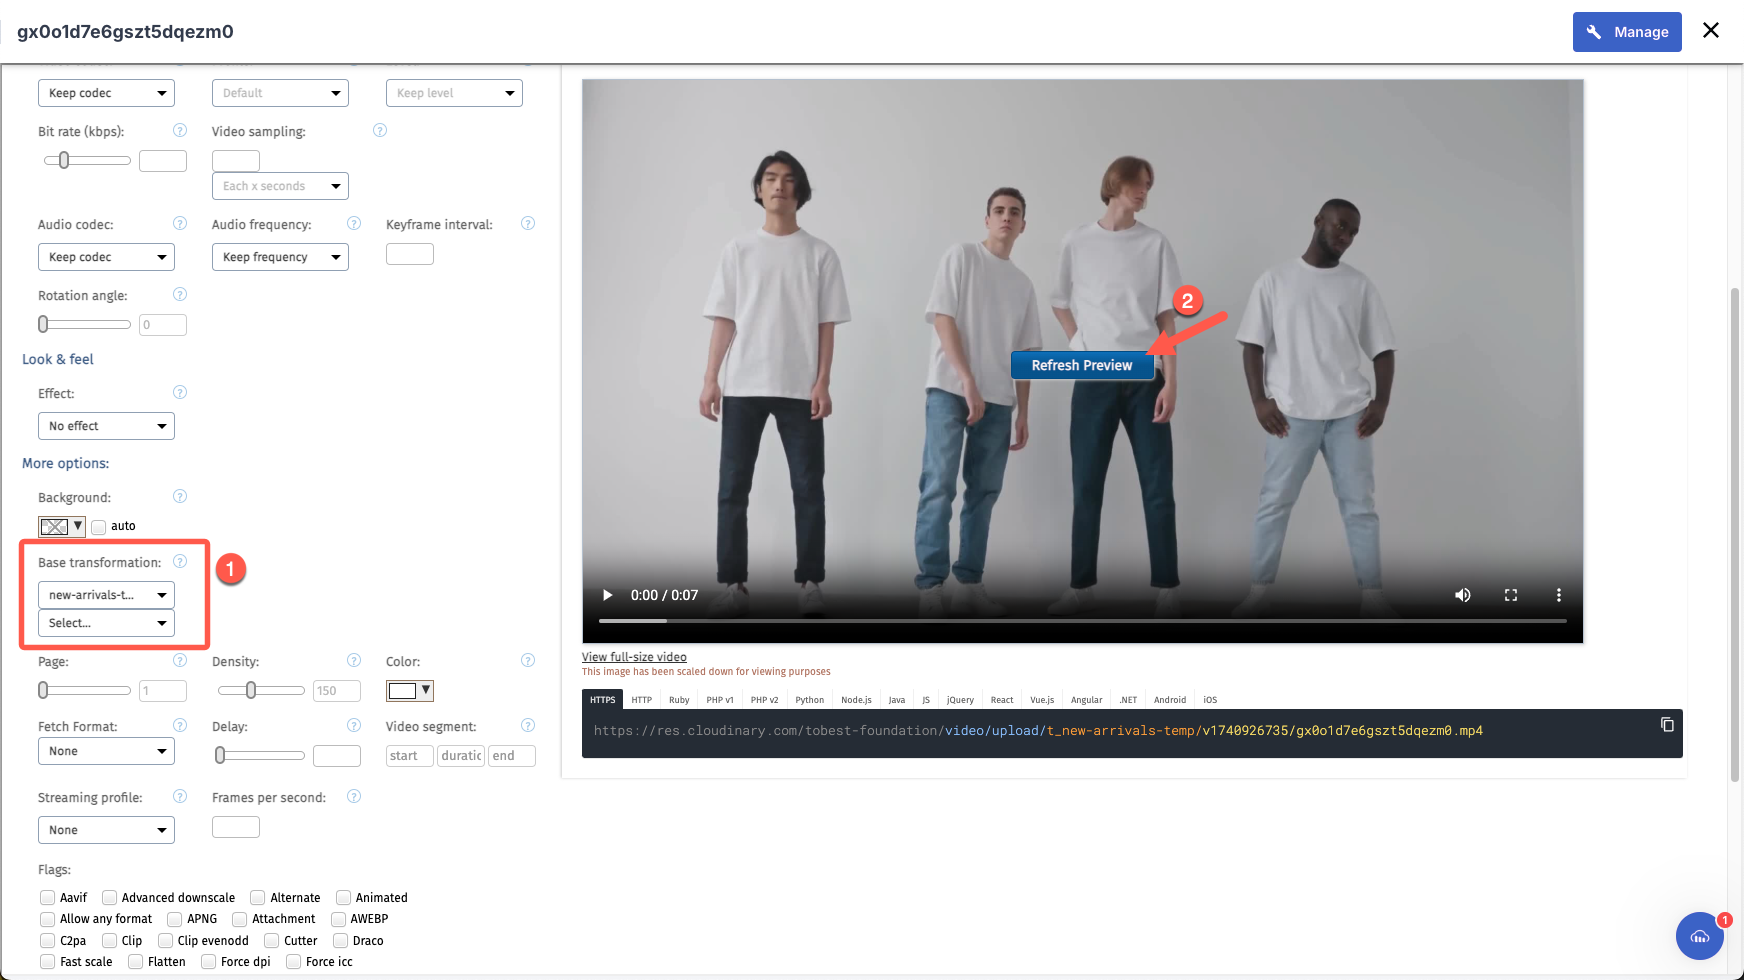
Inside the Cloudinary Video Studio, click More Options, then open the Base Transformation dropdown. You’ll see the transformation you just created. Select it and click Refresh Preview.
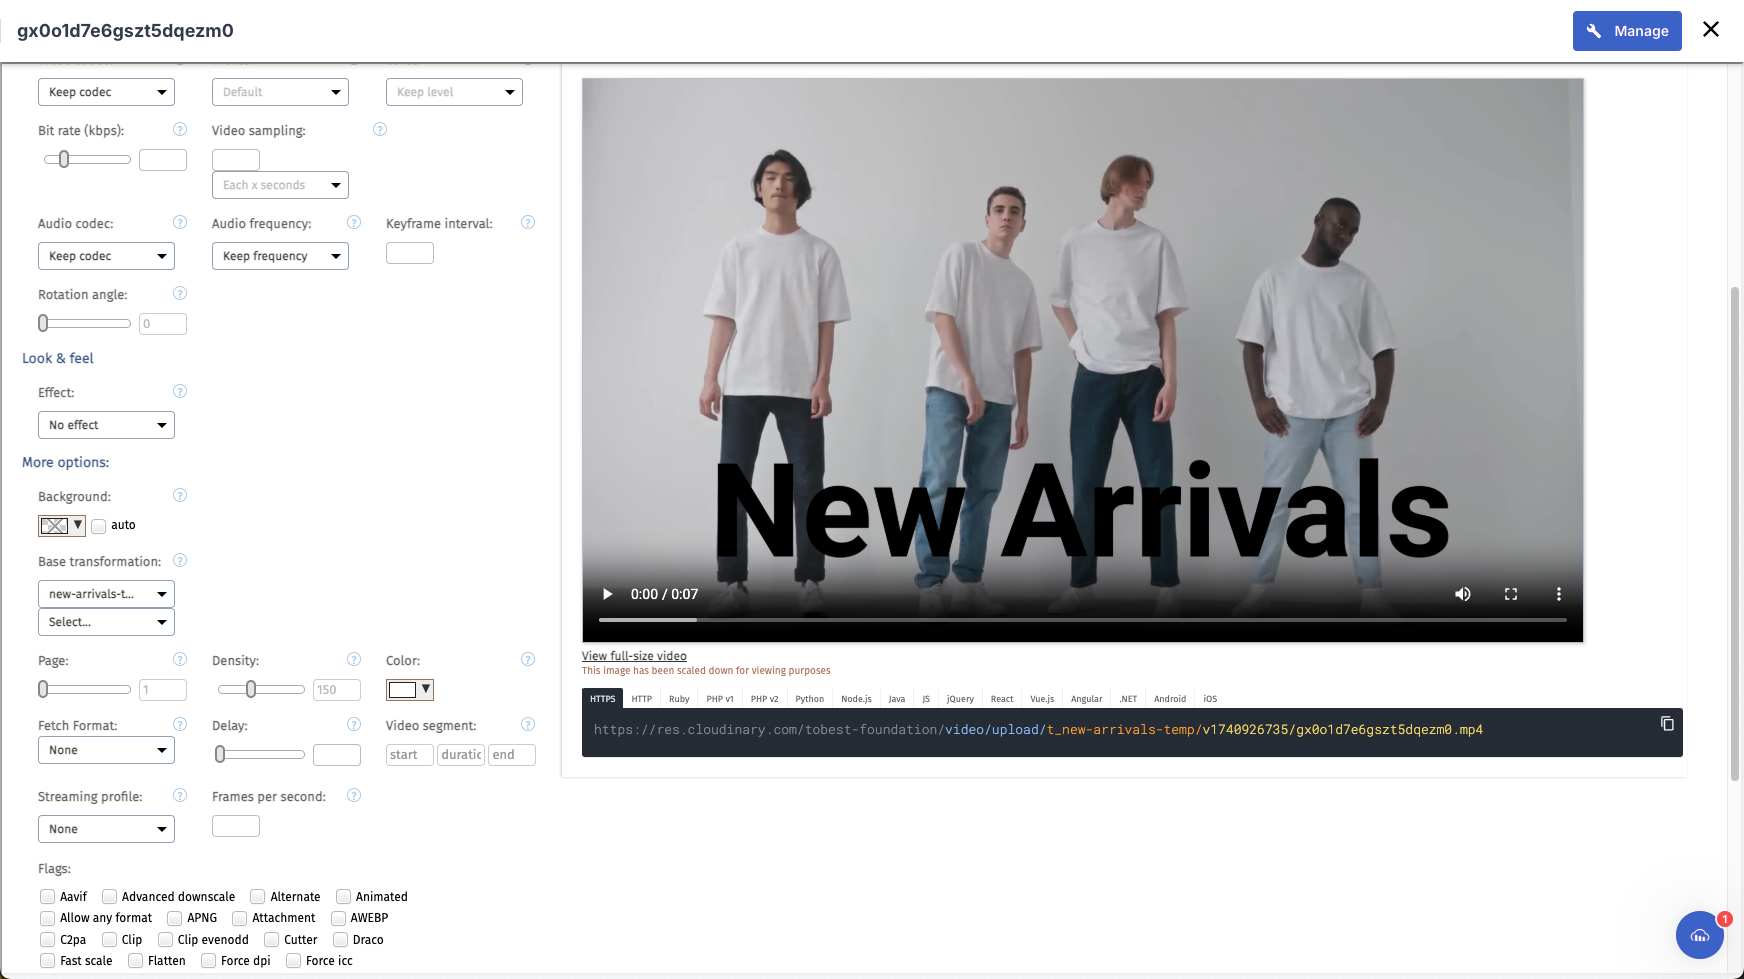
After refreshing, the video will now display the overlay transformation:
You can now apply this transformation across your ad variations, test how it fits different screen sizes, and make further adjustments as needed.
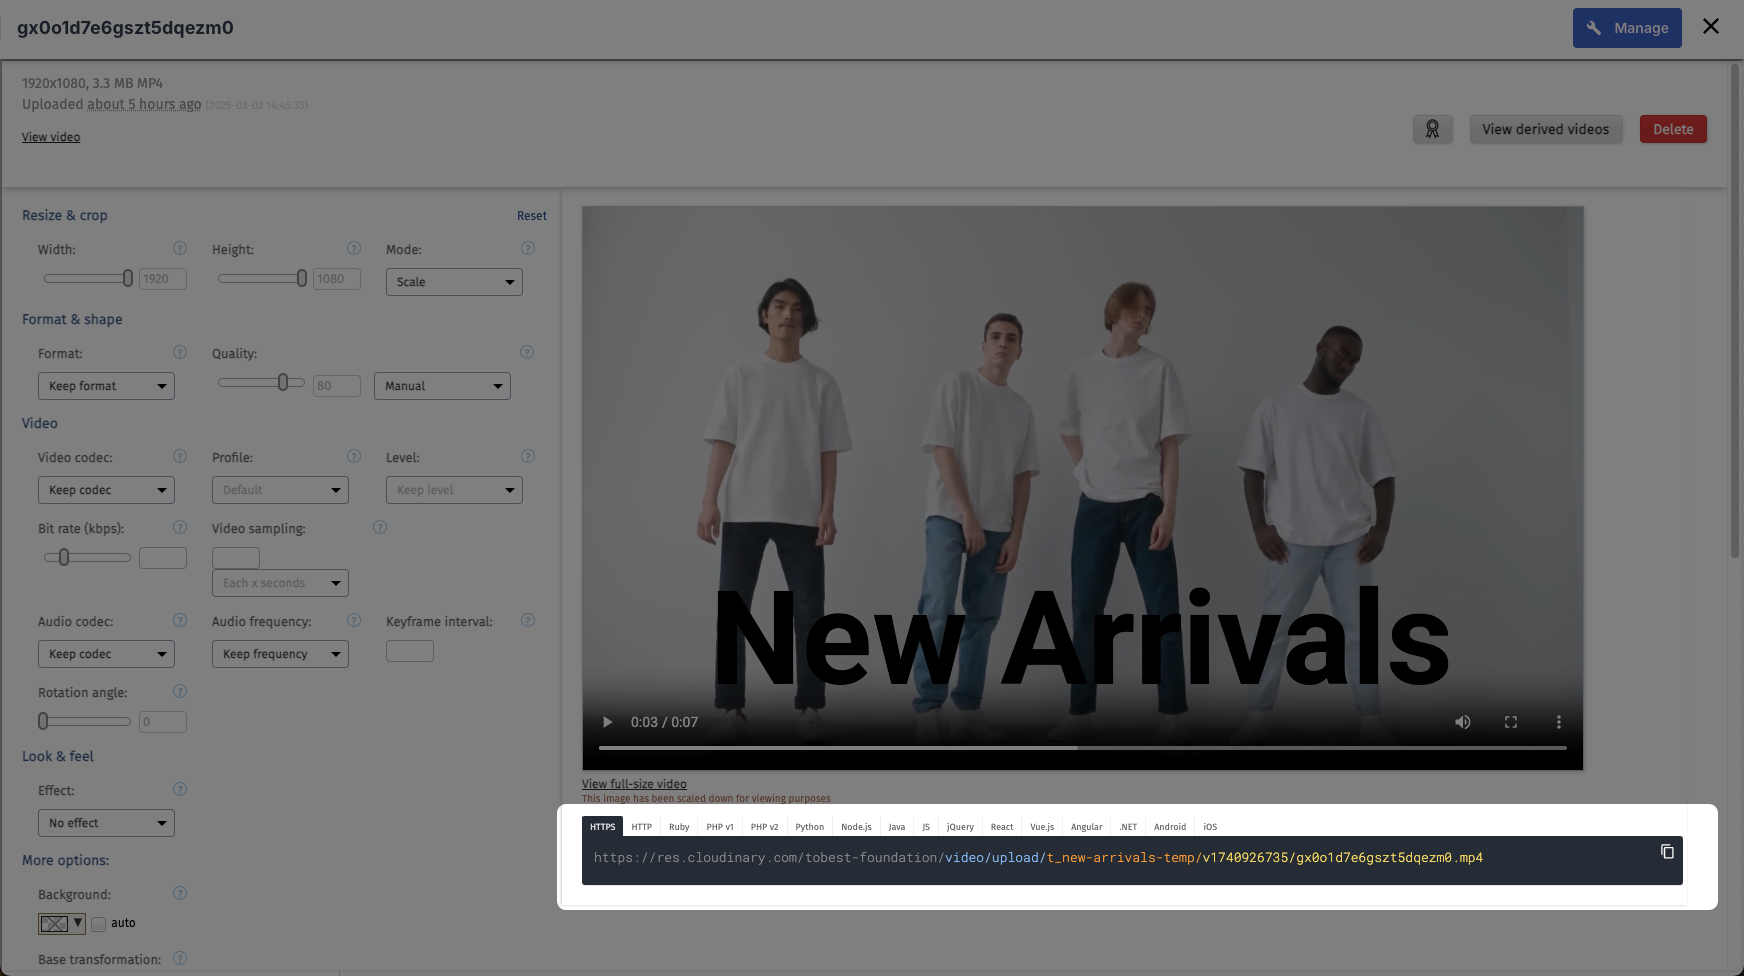
Additionally, you’ll see a URL and SDK code that you can use to seamlessly integrate this transformation into your development workflow:
Since overlays stay separate from the original video, you can test different versions without re-editing.
Now that you’ve set up and applied overlays, let’s move on to deploying different versions dynamically for A/B testing and performance optimization.
A dynamic URL in Cloudinary refers to a URL that allows you to transform an image or video on the fly by adding parameters directly into the URL.
In the previous section, you saw how to use Studio to apply transformations through the UI. You can achieve the same results, and even more, by manually tweaking the URL or doing it programmatically.
Every Cloudinary video has a base URL, but instead of serving a static file, you can add parameters to control how overlays appear. These parameters adjust text, images, animations, and positioning, all without touching the original video.
For example, take this URL from our previous section, where we added a text overlay:
https://res.cloudinary.com/YOUR_CLOUD_NAME/video/upload/co_rgb:000000,l_text:roboto_350_normal_left:New%20Arrivals,fl_layer_apply,g_south,y_0.15/samples/cld-sample-videoCode language: JavaScript (javascript)This generates a video with the text “New Arrivals” displayed at the bottom. But what if we need to test different CTA texts, logos, or even animations? Instead of editing the video manually, we just tweak the URL.
Let’s say we want to improve the overlay by making the text fade in and out instead of just appearing statically. We modify the URL like this:
https://res.cloudinary.com/YOUR_CLOUD_NAME/video/upload/co_rgb:000000,l_text:roboto_250_bold_normal_left:New%20Arrivals,du_7.5,e_fade:1000,e_fade:-1000,fl_layer_apply,g_south,y_0.15/samples/cld-sample-video.mp4Code language: JavaScript (javascript)What’s happening here?
du_7.5. The text will be visible for 7.5 seconds before disappearing.e_fade:1000. The text fades in over 1 second instead of appearing instantly.e_fade:-1000. The text fades out over 1 second before disappearing.
Now, the overlay doesn’t just sit there. It animates smoothly, creating a more engaging ad. And this was done just by modifying the URL.
With dynamic URLs, you avoid the hassle of re-editing and re-uploading videos just to test different overlays. Instead, you adjust elements like text, logos, and effects in real-time, instantly deploying variations and optimizing ads without extra storage or processing. This keeps campaigns flexible and efficient.
Now, let’s learn how to track overlay performance to refine your ads even further.
Once you’ve deployed different overlay variations using dynamic URLs, the next step is understanding which versions perform best.
Cloudinary‘s Delivery Reports is a built-in analytics tool that helps track how different transformations impact performance. Instead of guessing which overlay works better, you can rely on data to optimize your ads.
To access these insights, go to Delivery Reports under the Programmable Media section in your Cloudinary dashboard.
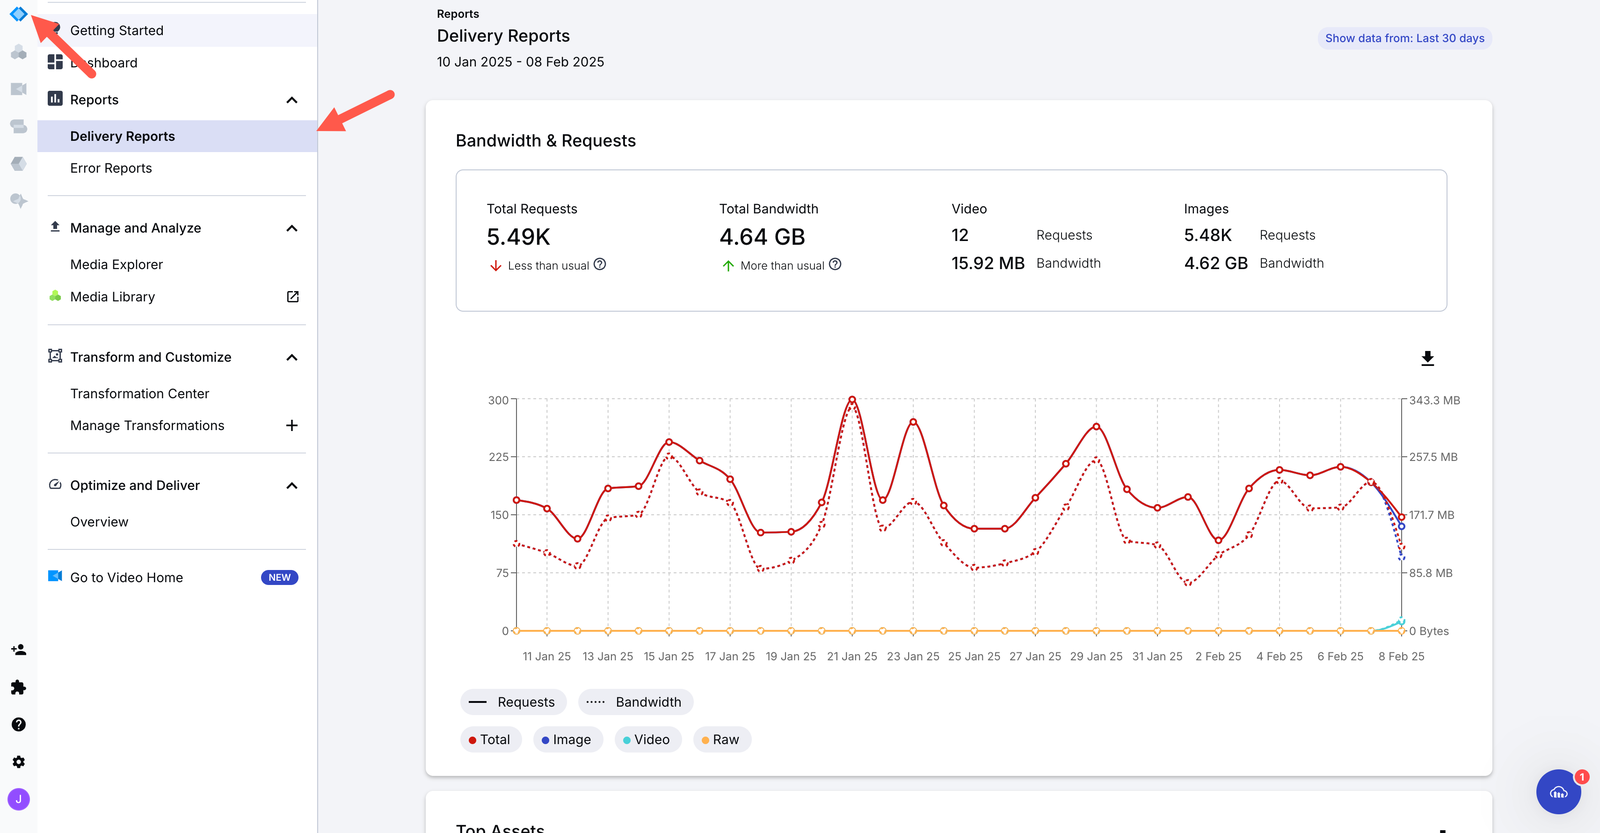
Here, you’ll find stats on load times, bandwidth usage, and the number of requests for each URL variation. This helps you see which overlays are being viewed the most and how they affect overall video performance.
Scroll down to the Top Transformations section, where you can analyze the most frequently used transformations.

This section breaks down details like which overlay styles get the most engagement and how different aspect ratios impact delivery speed. To focus only on video data, simply click the Video filter at the top.
But Cloudinary isn’t the only tool you can use. If your ads run on platforms like YouTube, Instagram, or TikTok, their built-in analytics provide deeper insights into views, engagement rates, watch time, and audience demographics.
Combining Cloudinary’s transformation data with these platform-specific metrics gives you a complete picture of what’s working, allowing you to focus on high-performing overlays and refine underperforming ones.
Optimizing video ads with dynamic overlays improves not only aesthetics but also efficiency and performance. Instead of manually editing and re-uploading multiple video versions, you can streamline everything with Cloudinary’s dynamic URLs and Transformation Studio. This approach makes it easy to test, adjust, and personalize overlays in real time from one original video.
Sign up for Cloudinary and start experimenting with dynamic overlays today.


