
In modern web pages and platforms, a less than stellar user experience could lead to a significant drop in conversion. This can be said for media content, including videos and images.
So how do you improve the user experience of video content on your application?
This article outlines how to autoplay video content when a user scrolls to the video on a Next.js page. We’ll use the Cloudinary video player to render the video.
Next.js is a React framework that enables server-rendered and static web applications to be built. It’s used by renowned companies such as Netflix, Uber, and Airbnb. This framework is not just about enhancing the user experience with media content but offers a comprehensive solution for building both dynamic and static websites. Some of its standout features include server-side rendering, which can significantly boost the performance of your website, especially for pages that aren’t updated frequently. Additionally, Next.js supports hot reloading, ensuring that changes to your code are instantly visible in the browser without a server restart. This feature is particularly beneficial during the development phase. Furthermore, with built-in routing, creating and managing website navigation becomes a breeze. For those who prefer using TypeScript, Next.js has got you covered, enhancing the maintainability of your code.
Cloudinary provides a robust media experience for any media type, covering image and video uploads, storage, and optimizations. With Cloudinary, you can store and render your video assets on a Next.js landing page.
You can find a complete version of the application on Codesandbox.
To get the most out of this article, you should have basic knowledge of JavaScript and React and understand Next.js.
Getting Started with Next.js: Installing and setting up Next.js is straightforward. With just a single command, you can have Next.js installed and ready to go. Once installed, you can kick off your website development by creating a new React project. For beginners or those looking for a quick start, Next.js offers several starter projects. These projects can serve as a foundation, allowing you to build upon them and customize as per your requirements.
To get started, we’ll install the Next.js CLI, and create a new Next application using NPX — a node package runner. You can also use yarn to install packages and create a new project. Next.js ships with starters, and we’ll use the Next.js defaulter starter in our application.
To get a Next.js project started, navigate to your desired directory and run the command below:
npx create-next-app
The command above will return an input, asking you for the project name. You can use your desired project name. Once done, it will create a Next.js project using the default starter.
We’ll use the Cloudinary video player shipped in the cloudinary-react package. The video player is efficient because we can use a public ID that’s a unique identifier of the video on Cloudinary. We’ll use this ID to fetch our uploaded video asset and build dynamic delivery. Also, robust video transformations from Cloudinary are available when using the video player.
Proceed to install the following dependencies using the command below:
npm install Cloudinary-react react-intersection-observer
cloudinary-react is a Software Development Kit (SDK) that allows us to seamlessly utilize Cloudinary’s image and video features in a React app.
react-intersection-observer tells us when an element enters or leaves a particular viewport. This is essential to know when our video player is in view.
First, we’ll create a new directory called Videoplayer in our app’s src/components directory. Next, we’ll create a file called VideoPlayer.jsx that will house the video player component. Then, we’ll import the required dependencies using in the component with:
    // src/components/Videoplayer/VideoPlayer.jsx
    import React, { useEffect, useref } from "react";
    import { Video, CloudinaryContext } from "Cloudinary-react";
    import { useInView } from "react-intersection-observer";
Code language: JavaScript (javascript)
Intersection observer API provides a way to asynchronously observe changes in the intersection of a target element with a parent element, or viewport, in the browser.
react-intersection-observer is a declarative wrapper component for Intersection observer API.
We’ll create a function component for the video player, which takes in a video ref. The component will return a Cloudinary Video component wrapped in a Cloudinary Context component. CloudinaryContext allows you to define shared parameters that apply to all child elements.
Let’s add the snippet below to our VideoPlayer component:
    const VidPlayer = React.memo(({ videoref }) => {
      return (
        <CloudinaryContext cloud_name="codedog">
          <Video
            publicId="videoplayer-demo"
            width="100%"
            controls
            innerref={videoref}
          />
        </CloudinaryContext>
      );
    });
Code language: JavaScript (javascript)
In the code above, our component is wrapped in React.memo.
[React.memo()](https://reactjs.org/docs/hooks-reference.html#usememo) is a higher-order component (HOC) that takes a component as a prop, and returns a component, preventing a component from re-rendering if the props haven’t changed. React.memo() implements memoization on React components, and prevents our Video player from rerendering even if its parent component rerenders.
The Cloudinary context specifies the cloud_name, with which we fetch media assets from Cloudinary. To obtain your cloud_name, you need to create an account on Cloudinary, and get the cloud name value from your Cloudinary dashboard.
We also specified options for our video player, including the publicId of our video on Cloudinary.
In src/components/VideoPlayer.jsx, we’ll create a function component named VideoPlayer. Inside it, we’ll use the useInView hook, imported from react-intersection-observer to track a DOM element for when it gets in view.
    const VideoPlayer = () => {
      const videoref = useref();
      const { ref, inView } = useInView({
        threshold: 0
      });
      useEffect(() => {
        if (inView === true) {
          videoref.current.play();
        }
      });
      return (
        <div ref={ref}>
          <VidPlayer videoref={videoref} />
        </div>
      );
    };
    export default VideoPlayer;
Code language: JavaScript (javascript)
We assigned the ref value, destructured from the useInView hook, to the DOM element we want to monitor. In this case, it’s the div enclosing the rendered VidPlayer component.
In the VideoPlayer component’s useEffect function, we’ll play the video when in view.
The videoRef reference is created using React’s useRef() hook, and is assigned to the ref prop of video player. This ref value will be used to access the video player methods in our VideoPlayer component. The HTML video element’s .play() method is then used to play the video when it’s in view.
refs are references to objects. They can include DOM nodes or values. useRef returns a mutable object with a .current property set to the initial value we passed to the hook. The code below should be added to our VideoPlayer.jsx file.
In the site’s home page, located in the src/pages, we’ll create a new file named index.jsx. This is the home page of the website. In this file, we’ll render the VideoPlayer component in the parent Home component along with other page content. The code snippet below should be copied into our newly created index.jsx file in src/pages directory.
    import Head from "next/head";
    import styles from "../styles/Home.module.css";
    import VideoPlayer from "../components/VideoPlayer/VideoPlayer";

    const Home = () => {
      return (
        <div className={styles.container}>
          <Head>
            <title>Video Player with Cloudinary</title>
            <link rel="icon" href="/favicon.ico" />
          </Head>
          <header className={styles.header}>
            <h1>Video Player</h1>
          </header>
          <main className={styles.main}>
            <section className={styles.intro}>
              <p>NOW EASILY</p>
              <h1 className={styles.title}>
                Render Your Videos with Cloudinary, <br /> And Observer Intersection
                Library.
              </h1>
            </section>
Code language: HTML, XML (xml)
In the code block above, we created a Home component, with the title and icons for our landing page. Next, we’ll add content and render the VideoPlayer component. The code block below will be added to our index.jsx file above.
<section className={styles.img_wrapper}>
<img src="/assets/video.svg" alt="illustration" />
</section>
</main>
<section className={styles.description}>
<p>
There is no one who loves pain itself, who seeks after it, and wants to have it, simply because it is pain.
There is no one who loves pain itself, who seeks after it and wants to have it, simply because it is pain.
</p>
</section>
<section className={styles.video_player}>
<VideoPlayer />
</section>
</div>
);
};
export default Home;
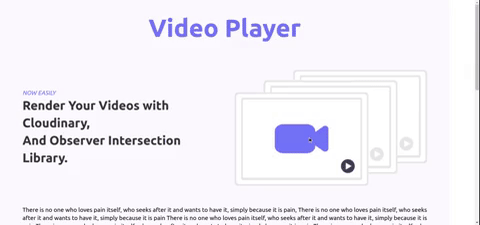
Code language: HTML, XML (xml)The home page should look like this:
In this article, we created a Next.js landing page and made a video player using the Cloudinary video player. We also added autoplay when in the video is in view, using React Observer Intersection. You can improve the application by utilizing other video player events.
As we’ve seen, Next.js is a versatile React framework that offers a plethora of features, making it a top choice for web developers. From server-side rendering to static site generation, it provides tools that can significantly enhance the performance and SEO of your website. Furthermore, with features like hot reloading and built-in routing, development becomes a breeze. Its compatibility with TypeScript ensures that your code remains maintainable and robust. Whether you’re building a dynamic web application or a static portfolio site, Next.js has got you covered.
Check out these other useful resources:

