A successful e-commerce website or app uses images that enhance the buyer’s experience. Appealing images can spell the difference between a buyer doing a quick perusal, or staying on your site for hours.
As such, you might be tempted to spend time editing each image. At face value, it seems like you’ll need a human to do the job — to actually look at the images and make decisions about how to handle them, like which shade of purple would make the best background. However, doing this manually can quickly drain your resources, and computer vision can do these types of tasks just as well.
If you work with a lot of images simultaneously, or if you welcome user-generated content (UGC) on your website or app, computer vision image analysis can help make sure your site looks its very best.
Computer vision is a field of artificial intelligence (AI) that enables computers to “observe” and “understand” the content of photos and videos. Image analysis means extracting meaningful information from that content. As a result, using computer vision image analysis gives insight into how to automate actions.
If you manage images in bulk, you can use computer vision image analysis for your e-commerce website to automatically crop, size, and place each image in a way that looks natural.
For example, if you’re building an e-commerce app for an appliance retailer, computer vision can detect which appliance appears in the images. You can then easily write an app that automatically handles the image.


With Cloudinary, a platform that empowers you to manage your media files end-to-end.
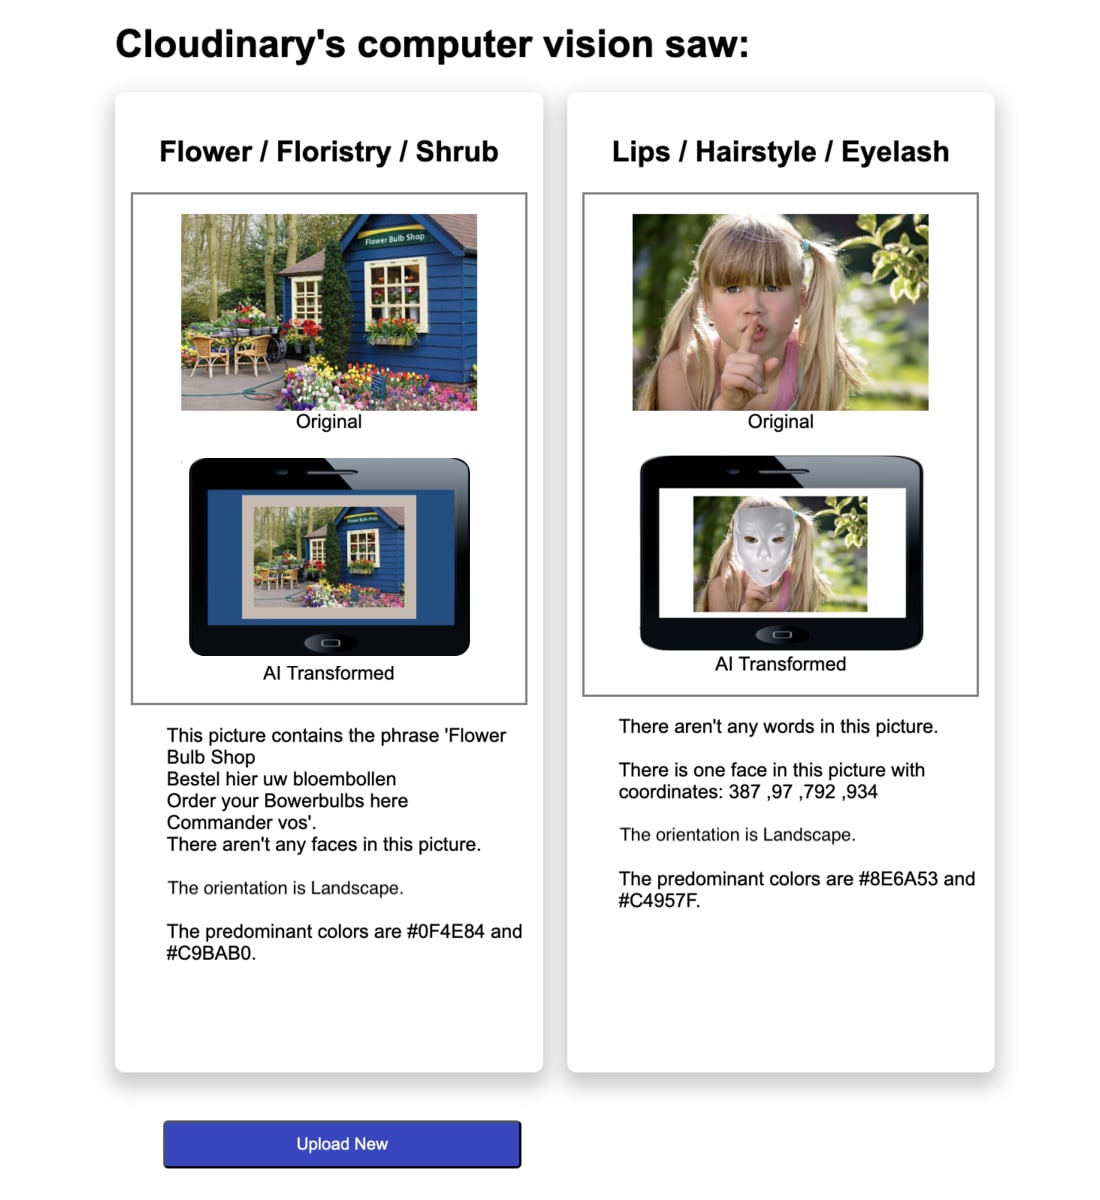
When you upload images, Cloudinary can use computer vision to return lots of information, including whether or not the image contains adult content, which objects are detected; the coordinates of any faces, the width, and height; the predominant colors; any detectable text… and so much more.
Use that information to make decisions about how to handle your images. For example, don’t display images that have adult content, give the images an automatically generated title that reflects the recognized objects, place an overlay on each person, group images on your sites according to color scheme, or create a border around the images using predominant colors.
The possibilities are endless!
This demo shows how you can use Cloudinary’s computer vision to handle your images. You can use it as a starting point for embedding Cloudinary’s computer vision and image analysis in your e-commerce website.
In this demo, you’ll upload up to three images of your choice. Then, Cloudinary will automatically use computer vision to analyze them and transform them accordingly. You’ll also see a description of your images based on computer vision.
Go to GitHub to try it out.
You can replicate all of the functionality described in this blog on your own product environment. Just sign up for your free Cloudinary account and save the cloud name and API Environment variable from your credentials.
Then, either copy and paste the source code onto your own environment.
Don’t forget to set your environment variable and configure the Upload widget in the index.html file with your cloud name.
-
When writing your own applications, follow your organization’s policy on storing secrets and don’t expose your API secret.
-
Don’t store your .env under version control for maximum security.
Let’s focus on some of the more interesting aspects of the demo you just experienced.
You can select which types of computer vision analysis to perform on your uploaded images by creating an upload preset, a centrally defined set of upload options. The upload preset in the demo requests auto-tagging with confidence threshold, text recognition, and image moderation. In addition, it assigns a hardcoded tag, computer_vision_demo, so that you can later easily retrieve the newly uploaded images.
You’ll need to create an upload preset in your environment only once. If you’re running the demo code in your product environment for the first time, uncomment this snippet in the server.py file to create the upload preset. If you’ve run the demo before in your product environment, the upload preset already exists and you don’t need to run it again.
  # Create the upload preset only once:
  cloudinary.api.create_upload_preset(
    name = "docs_computer_vision_demo",
    unsigned = True,
    use_filename=True,
    folder="docs/computer_vision_demo",
    tags="computer_vision_demo",
    colors= True,
    faces= True,
    categorization = "google_tagging", auto_tagging = 0.7,
    ocr = "adv_ocr",
    moderation = "aws_rek"
) Code language: PHP (php)In the demo, you’ll upload your images using the Upload widget with the docs_computer_vision_demo upload preset applied.
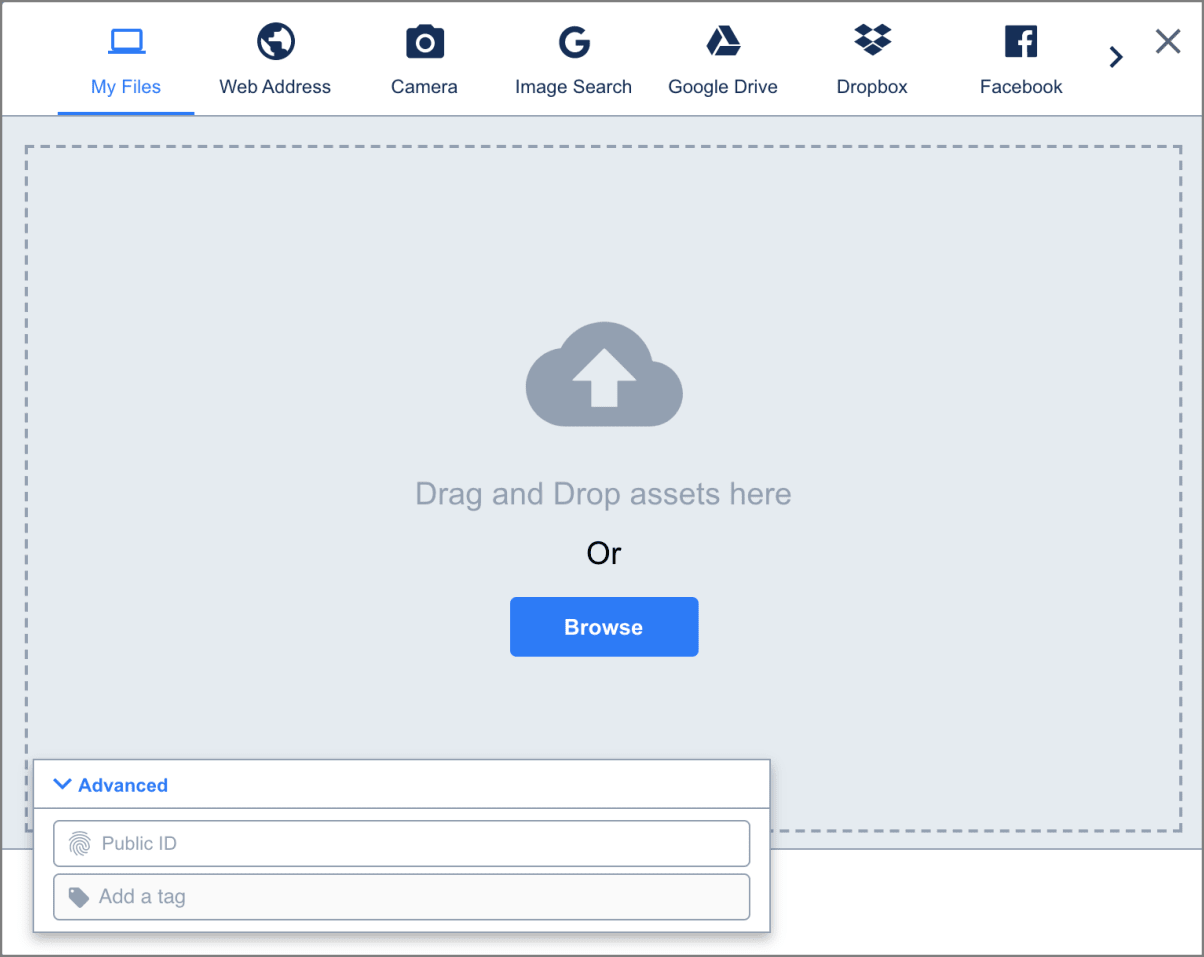
The Upload widget is a complete interactive user interface that enables visitors to your site to upload files to your website or app from a variety of sources, such as your local device, a remote URL, popular social media accounts, and more. In addition, the widget, which only requires a couple lines of JavaScript code to integrate, eliminates the need to develop in-house interactive media upload capabilities. Easy to use within any web development framework, the Upload widget is totally responsive to fit on any device.
Feel free to use the Upload widget in your e-commerce website for any UGC you invite.
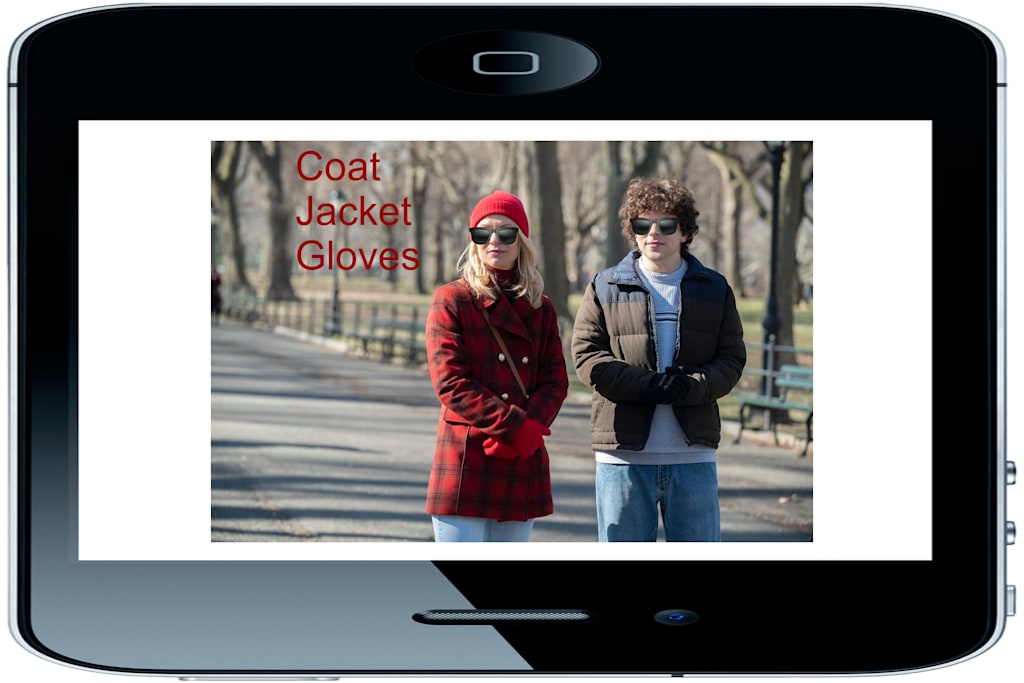
Depending on the computer vision image analysis retrieved for the uploaded images, this demo places sunglasses over any detected faces and underlays an iPhone beneath the images.
Use this code to upload the images only the first time you run this demo in your product environment, so that these images are available to apply as overlays:
# Upload overlays only once:
    cloudinary.uploader.upload("https://res.cloudinary.com/demo/image/upload/v1572554533/iphone.png", public_id=“iphone”, unique_filename = False, overwrite=True)
    cloudinary.uploader.upload("https://res.cloudinary.com/demo/image/upload/v1532000565/sunglasses_emoji.png", public_id=“l_sunglasses_emoji”, unique_filename = False, overwrite=True) Code language: PHP (php)
Once you’ve uploaded your images and the applied computer vision using an upload preset, the demo retrieves that information and uses it to decide which action to take.
First, create a list of identifiers for all the uploaded images and loop through the list so each image in the list is handled separately:
assetList=cloudinary.api.resources_by_tag("computer_vision_demo")


  for asset in assetList['resources']:
    publicIds.append(asset["public_id"])
  . . .
  for publicId in publicIds:Code language: JavaScript (javascript)
Next, use the following code snippet to retrieve the full information about the image, including its computer vision image analysis:
     details=cloudinary.api.resource(publicId,
                                    faces=True,
                                    colors=True)Code language: PHP (php)
faces=True to include face coordinates in the response.
colors=True to include predominant colors in the response.
"info": {
   "categorization": {
     "google_tagging": {
       "status": "complete",
       "data": [
         {"confidence": 0.9827,
           "tag": "Face"},
         {"confidence": 0.98,
           "tag": "Smile"},
         {"confidence": 0.9455,
           "tag": "Dog"},
         . . .
         {"confidence": 0.5382,
           "tag": "Family"}
       ]
     }
   },
   "ocr": {
     "adv_ocr": {
       "status": "complete",
       "data": [
         {}
       ]
     }
   }
 },
 "public_id": "docs/computer_vision_demo/happy-kids-playing-with-puppy_td792d",
 "version": 1684677941,
 "tags": [
   "child",
   "companion dog",
   "sports equipment",
   "toddler",
   . . .
 ],
 "derived": [],
 "height": 675,
 "colors": [
   ["#DDC9BC", 13.9],
   ["#E0EEF6", 11.9],
  . . .
   ["#7E788E",0.5]
 ],
 "next_cursor": "da6058e1816cb9c892a7e0bff3956f9fea52a9ba8560bdb11a43adfe2896c074",
 "moderation_status": "approved",
 "pages": 1,
 "asset_id": "84aafb6fd6e416b1636b77f85c427d9c",
 "secure_url": "https://res.cloudinary.com/hzxyensd5/image/upload/v1684677941/docs/computer_vision_demo/happy-kids-playing-with-puppy_td792d.jpg",
 "url": "http://res.cloudinary.com/hzxyensd5/image/upload/v1684677941/docs/computer_vision_demo/happy-kids-playing-with-puppy_td792d.jpg",
 "predominant": {
   "cloudinary": [
     ["white", 38.4],
     ["olive", 24.3],
     . . .
     ["orange", 9.9],
   ],
   "google": [
     ["white", 38.4],
     ["yellow", 15.6],
     . . .
     ["brown", 13.7],
   ]
 },
 "created_at": "2023-05-21T14:05:41Z",
 "format": "jpg",
 "bytes": 162155,
 "moderation": [
   {
     "status": "approved",
     "kind": "aws_rek",
     "response": {
       "moderation_model_version": "6.1",
       "moderation_labels": []
     },
     "updated_at": "2023-05-21T14:05:42Z"
   }
 ],
 "width": 1080,
 "etag": "d307f75e75d39b900ee31633ac23ccba",
 "resource_type": "image",
 "original_filename": "happy-kids-playing-with-puppy",
 "faces": [
   [698,3,160,203],
   [201,59,140,179],
   [432,147,155,162],
   [739,452,87,99]
 ],
 "usage": {},
 "folder": "docs/computer_vision_demo",
 "access_mode": "public",
 "type": "upload",
 "moderation_kind": "aws_rek"
}Code language: JavaScript (javascript)Next, it’s time to decide how to handle each image based on the computer vision image analysis.
The demo handles each image one at a time directly within the loop.
Use Cloudinary’s image moderation to make sure your site displays the appropriate assets:
if details["moderation"][0]["status"]=="approved":
   # Perform actions on the images based on computer vision image analysis.
   . . .
else:
   display="no"
message="This picture can't be displayed."Code language: PHP (php)The demo creates a title and description for each image. In particular, the description points out any words in the picture, the coordinates of any faces in the picture, image orientation, and predominant colors.
      # OCR
      if "textAnnotations" in details["info"]["ocr"]["adv_ocr"]["data"][0]:
        word = details["info"]["ocr"]["adv_ocr"]["data"][0]
        message=message+"This picture contains the phrase '" + word["textAnnotations"][0]["description"] + "'.\n"
      else:
        message=message+"There aren't any words in this picture.\n\n"

      # Face detection
      faces=len(details["faces"])

      if faces==0:
        message=message+"There aren't any faces in this picture.\n\n"
      elif faces==1:
        coordinates = details["faces"][0]
        message=message+"There is one face in this picture with coordinates: " + ' ,'.join(str(e) for e in coordinates)+ "\n\n"
      else:
        message=message+"There are " + str(faces) + " faces in this picture with coordinates:\n "
        for coordinates in (details["faces"]):
          message=message+' '.join(str(e) for e in coordinates)+' \n'
        message=message+"\n"

      # Orientation
      if details["width"]/details["height"]>1:
        orientation="landscape"
        message=message+"The orientation is Landscape.\n\n"
      elif details["width"]/details["height"]==1:
        orientation="square"
        message=message+"The picture is a square.\n\n"
      else:
        orientation="portrait"
        message=message+" The orientation is Portrait.\n\n"

      # Colors
      color1=details["colors"][0][0]
      color2=details["colors"][1][0]
message=message+"The predominant colors are " + details["colors"][0][0] + " and " + details["colors"][1][0] + "."Code language: PHP (php)Cloudinary transforms your images on the fly. Use computer vision to tailor and personalize each image according to its content. The demo places an iPhone underlay that’s positioned according to the image orientation, places sunglasses over any detected face, and draws a border using the predominant colors.
 # Build transformations
      place=url.find("upload/")+7
      # Add phone underlay
      if orientation=="portrait" or orientation=="square":
        transformation = url[ :place] +"u_iphone,w_1.7,h_1.7,fl_relative/"+ transformation[place: ]
      else:
        transformation = url[ :place] +"u_iphone,a_180,w_1.7,h_1.7,fl_relative/"+ transformation[place: ]

      # Place sunglasses over faces in images
      if faces>0:
        transformation=transformation[ :place] +"l_sunglasses_emoji/fl_layer_apply,w_1.1,fl_region_relative,g_faces/" + transformation[place: ]

      # Make border using predominant colors
      if faces==0:
        color1=color1.replace("#","")
        color2=color2.replace("#","")
        transformation = transformation[ :place] + "b_rgb:"+color1+"/bo_35px_solid_rgb:"+color2+"/"+ transformation[place: ]

      transformation=transformation[ :place] +"h_300/f_auto/q_auto/" + transformation[place: ]
      transformations.append(transformation)
messages.append(message)Code language: PHP (php)This demo demonstrates just a few of Cloudinary’s computer vision image analysis capabilities for your e-commerce website. Here are a few other important things you could do with Cloudinary’s computer vision:
- Analyze your images for accessibility to help you to choose the best images for people with color blindness.
- Return the perceptual hash (pHash) on the uploaded image as a fingerprint that allows checking image similarity.
- Return a list of detected content using the Cloudinary AI Content Analysis add-on. It can be used together with the auto_tagging parameter to apply tags automatically.
- Return a list of facial attributes using the Advanced Facial Attribute Detection add-on.
- Return a list of detected celebrities and facial attributes using the Amazon Rekognition Celebrity Detection add-on. It can be used together with the auto_tagging parameter to apply tags automatically.
See the documentation for more ideas!
You’ve just gotten a taste of some of the cool things you can do with Cloudinary using computer vision image analysis for your e-commerce website. Cloudinary takes the place of a human to “observe” and “understand” the content of photos and videos, only faster than any human possibly could. After that, it’s up to you to write an app that automates image handling based on Cloudinary’s insights.
How can your business use computer vision to augment your unique offering?