Creating color variants for products on an e-commerce site can be expensive and time-consuming, especially if it involves reshoots. With Cloudinary’s generative AI tool, Generative Recolor, you can target items based on the given prompts and apply the specified colors to them. This makes it easy to retouch images quickly, removing the manual and tedious approach to updating the colors of your product images.
In this blog post, you’ll build a simple e-commerce store using Next.js and use Cloudinary’s Generative Recolor feature.
To follow along, you need a basic understanding of TypeScript or JavaScript and a free Cloudinary account. The completed app is in this GitHub Repository.
To start building this project, you’ll first need to clone the starter project using the command below:
<code>$ git clone https://github.com/folucode/cloudinary-generative-recolor-app-starter.git</code>Code language: HTML, XML (xml)This project contains all the building blocks you need so that you can focus on the Generative Recolor feature.
Next, install the Cloudinary SDK, where you’ll get the components and functions you need to use the Generative Recolor feature in your app:
$ npm install @cloudinary/url-gen
Before you proceed, you need to upload an image to your Cloudinary account so you can test the Recolor feature. Check here to learn how to upload an image to Cloudinary.
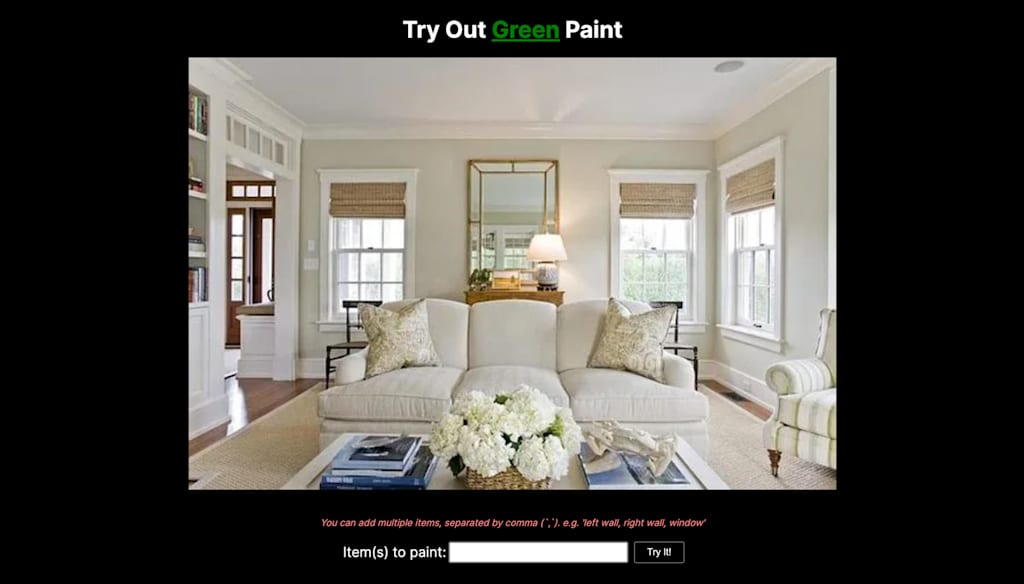
After that, you want to set up the display for the image and the input field. The input field will take prompts that tell Cloudinary where to apply the color. Paste the following code in the page.tsx file in the try-out folder:
// src/app/try-out/page.tsx

'use client';

import { CSSProperties, FormEvent, useState } from 'react';
import styles from '../page.module.css';
import { useSearchParams } from 'next/navigation';

export default function TryOut() {
  const searchParams = useSearchParams();

  const [imageUrl, setImageUrl] = useState('LINK_TO_IMAGE_ON_CLOUDINARY');
  const [prompts, setPrompts] = useState('');

  const imageRelativePath: string = 'IMAGE_RELATIVE_PATH_ON_CLOUDINARY';
  const color: string = searchParams.get('color') || '';

  const colorStyle: CSSProperties = {
    color: color || 'initial',
    textDecoration: 'underline',
  };

  async function recolor(e: FormEvent) {
    e.preventDefault();
  }

  return (
    <main className={styles.main}>
      <h1>
        Try Out{' '}
        <span style={colorStyle}>
          {color?.replace(color.charAt(0), color.charAt(0).toUpperCase())}
        </span>{' '}
        Paint
      </h1>
      <div className={styles['try-out-image']}>
        <img className={styles.img} src={imageUrl} alt='living area' />
      </div>
      <div className={styles['try-out-area']}>
        <span>
          You can add multiple items, separated by comma (`,`). e.g. 'left wall,
          right wall, window'
        </span>
        <div className={styles['try-out-input']}>
          <p>Item(s) to paint: </p>
          <input
            type='text'
            value={prompts}
            onChange={(e) => setPrompts(e.target.value)}
          />
          <button className={styles.button} onClick={recolor}>
            Try It!
          </button>
        </div>
      </div>
    </main>
  );
}Code language: JavaScript (javascript)
In the code above, you defined a React component named TryOut. The use client directive at the top indicates that this component is a client component. Additionally, the useSearchParams from Next.js handles the URL query parameters.
Within the component, the useState hook manages the state variables: imageUrl, which initially holds a link to an image on Cloudinary, and prompts, which store user input. The searchParams object extracts the ‘color’ parameter from the URL query string; this is the color you’ll use to paint the image.
The LINK_TO_IMAGE_ON_CLOUDINARY is the full path to the image on Cloudinary – here is an example. The IMAGE_RELATIVE_PATH_ON_CLOUDINARY is the image location on your Cloudinary account. For the earlier example image, it will be /docs/white-sofa.jpg.
Finally, a colorStyle object sets the text color to the value of the color query parameter, if it exists, or to initial otherwise. It also underlines the text. The recolor function handles the functionality to recolor the image.
You can navigate to this page by clicking any of the paint options on the home page:
Now that you have finished the setup, to build the Recolor logic, your app will need to call the Cloudinary API to apply your specified color to the individual parts of the image indicated in the prompt. First, import the necessary Cloudinary modules and create a new Cloudinary instance configured with your cloud name.
Then, navigate to the Cloudinary developer dashboard to get your cloud name. You should see it under the Product Environment Credentials section.

Next, paste the code below at the top of the page.tsx file in the try-out folder. This will import the components needed to use the Generative Recolor feature and it also creates an instance of Cloudinary with your cloud name:
// src/app/try-out/page.tsx

...

import { generativeRecolor } from '@cloudinary/url-gen/actions/effect';
import { CloudinaryImage, Cloudinary } from '@cloudinary/url-gen';

const cloudinary = new Cloudinary({
  cloud: {
    cloudName: '[your-cloudinary-cloud-name]',
  },
});

export default function TryOut() {
...Code language: JavaScript (javascript)
After this, in the Recolor function you defined earlier, you’ll send your image to Cloudinary and apply the color to the parts of the image specified in the prompt, using the code snippet below:
// src/app/try-out/page.tsx

...

 async function recolor(e: FormEvent) {
    e.preventDefault();

    if (!prompts) return;

    const img: CloudinaryImage = cloudinary
      .image(imageRelativePath)
      .effect(generativeRecolor(prompts.split(','), color));

    setImageUrl(img.toURL());
    setPrompts('')
  }

...Code language: JavaScript (javascript)
In the code above, when the form is submitted, the function’s first action is to call e.preventDefault(). This prevents the form’s default behavior, which will generally cause the page to reload.
Next, the function checks if the prompts state is empty. If empty, the function returns early, effectively doing nothing further. If the prompts aren’t empty, the function proceeds to generate a new CloudinaryImage object using the Cloudinary.image() method, which takes the imageRelativePath as an argument. The method.effect() is then chained to apply the Generative Recoloring effect to the image. The generativeRecolor function, which defines this effect, takes two arguments: the prompts split into an array by commas and the color. The image is recolored based on the user’s input and the specified color.
After the image with the applied effect is generated, the function converts this image to a URL using the img.toURL() method. This URL is then set to the imageUrl state using the setImageUrl function, which updates the image displayed in the component with the newly recolored version.
In the image below, the prompt specifies applying the green paint on the left wall, right wall, and the wall at the back. Cloudinary finds and recognizes these parts of the image and applies the color to them:
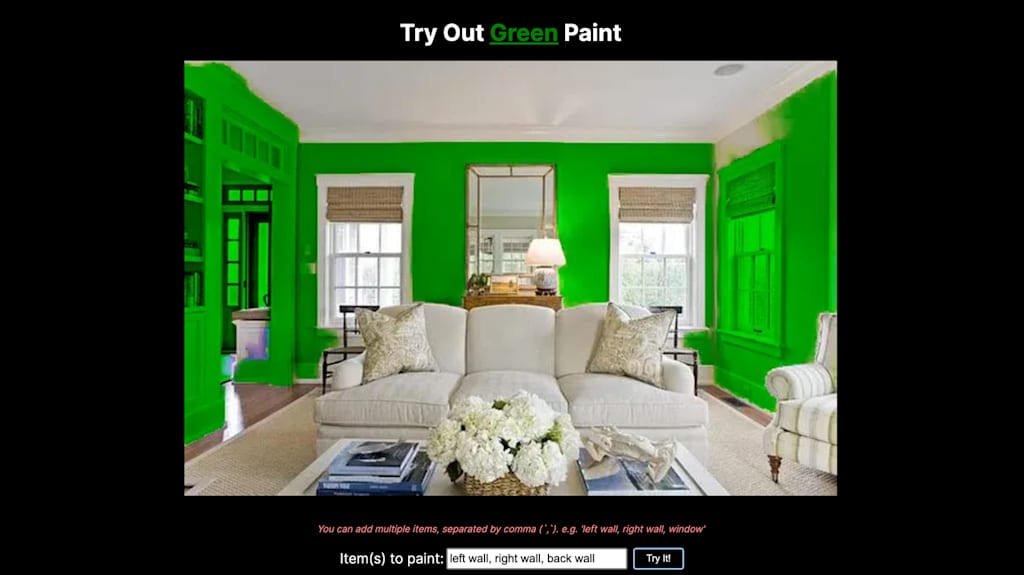
This demo used different paint colors in various parts of the living area. It shows how you can specify an item or area to apply the color to and see the result.
In this blog post, you learned how to use Cloudinary’s Generative Recolor tool to test paint colors on images of a living area or any space. Try extending this app by adding more features, like allowing users to upload their images and utilizing a loader to show the new image is being generated. To learn more about Cloudinary’s suite of AI features, contact us today.
If you found this blog post helpful and want to discuss it more, join the Cloudinary Community forum and its associated Discord.