
As a mobile developer, enabling users to upload images and share them with other users is a very common requirement. When developing those capabilities, we need to take into account that most users won’t think twice about uploading the massive images that their high-resolution mobile cameras capture. Those huge files are not only overkill for on-screen display, but can also cause significant slow downs in upload and delivery times. And of course those same users wouldn’t think twice about complaining or abandoning our app if their overall user experience wasn’t smooth and fast.
Today, Cloudinary is happy to introduce two cool iOS and Android SDK features to seamlessly integrate within your current upload and delivery flow, and help to enhance your app’s speed and performance while saving you lots of time and energy in your mobile development efforts.
We’ll do this in two parts. In this post, we’ll cover our new pre-upload image processing feature. In part 2, we’ll show you how to apply Cloudinary’s responsive images solution for optimizing the image delivered based on the device’s resolution and the dimensions available.
As mentioned above, users often select high resolution images to upload. To make our apps more performance and network-friendly, it makes sense to scale these images down before uploading them to the cloud. Cloudinary’s new preprocessing feature allows you to resize (or in fact perform any action on) the images before uploading them to your Cloudinary account. This kind of upload-optimization functionality can dramatically reduce the time needed to upload, save bandwidth, and increase our app’s performance.
But how much should we scale down the image before uploading it to Cloudinary? To answer that, we need to calculate the maximum size image we will ever need to deliver.
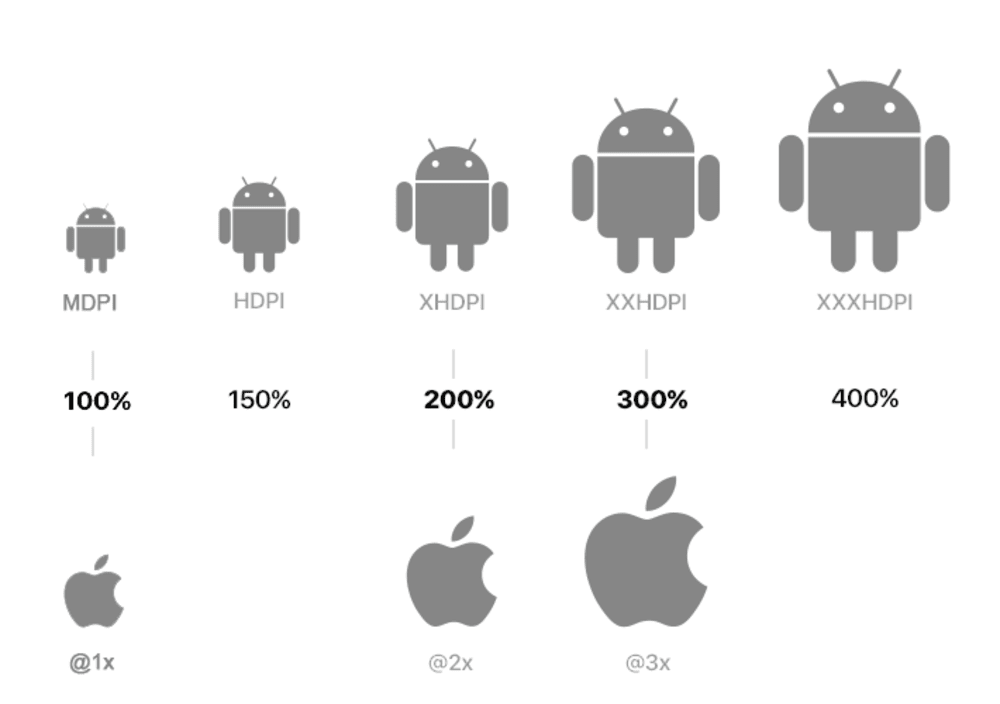
Let’s start with Android calculations. The Android platform has a wide range of devices, and a seemingly unlimited variety of screen sizes and DPI. Fortunately, some are used more frequently than others; some are even deprecated. Android has 7 different DPIs, and it’s generally accepted that you should pay attention to these 5: mdpi, hdpi, xhdpi, xxhdpi, and xxxhdpi.
Because we want to ensure that our images will look great on every Android device, we probably want to support the maximum density, which is the xxxhdpi resolution.
For example, let’s assume that the image that we want to upload is a profile image and our ImageView size is 150*150dp (device-independent pixels, which defines a size independent of the device multiplier). To convert from dp to pixels, we should use the following formula provided by Google:
px = dp * (dpi / 160)So to calculate the relevant pixel size with xxxhdpi resolution (640 dpi):
px =150 * (640 / 160) = 600pxIn other words, to ensure that all Android devices can display our image without a loss of information, the image we upload should have a resolution of 600X600 px.
What about iOS? This is much simpler to calculate than Android, we just take the largest DPR multiplier needed, which is @3x, and then multiply the target size by the scale factor (px = pt * scaleFactor) , 150 * 3 = 450px. This is smaller than the maximum size needed for Android devices and is so is only relevant when your app will only run on iOS devices. But since we’re assuming your app is for both operating systems, we’ll pick 600px as our max required image size.
As mentioned, with our new pre-processing feature we can add pre-upload actions like image resizing and image formatting. Let’s take a look at these android and iOS upload code snippets:
This code performs three pre-processing actions:
- It scales down any image above 600*600 pixels.
- It re-encodes the image format to WebP when uploading from an Android device and to JPG when uploading from iOS.
- It changes the quality to 80 to retain a good visual appearance at a much smaller file size.
These actions will take place before uploading the file, and in combination will result in a significantly faster and more optimized upload compared to the original high-resolution, relatively slow-to-upload images.
So to sum up, in addition to taking advantage of Cloudinary to easily optimize transform your images on-the-fly to any required format, style and dimension on delivery, it’s also important to pay attention to, and optimize, the upload process. As a mobile developer, whenever you need to upload images, make sure you take into consideration the maximum size image you’ll need to deliver and then never upload anything bigger. Click here to claim your free forever Cloudinary account.
In part 1 of this ‘mobile app boost’ blog series, we covered how you can use the new preprocess object to help save bandwidth and optimize the upload process by reducing the image size to the largest size needed. You can also use this object to perform other preprocessing actions such as converting to other formats, changing the quality setting as we showed in the sample code above, or even defining your own custom preprocess functions.
This pre-upload processing feature is the latest among a rich selection of image management features that are available in our Android and iOS SDKs.
For more details about preprocessing image uploads, check out our Android and iOS SDK documentation.
So, now that you know how you can limit the max size of an image during upload, does that mean you have to deliver that same size to all devices? Of course not. Optimal, responsive delivery demands that we deliver just the right size to each device.
In part 2 of this series, we will show you how to do just that, using the new responsive images functionality in our latest iOS and Android SDKs versions. Stay tuned!
You can now start playing with these capabilities.
If you don’t have a Cloudinary account yet, sign up for a free one, install the iOS and/or Android SDKs, and check out how quickly you can start improving your users’ experience. Let us know how it goes!