Adding names to invitations can be tedious, especially when dealing with large guest lists. But what if you could automate the process with just a simple file upload? In this blog post, we’ll build an invite maker using React and Cloudinary, allowing users to upload a CSV file and automatically populate invitations with invitee names. No manual entry required.
- CSV upload and name auto-population. Upload a CSV file with names and let the app generate personalized invites automatically.
- Text overlay with Cloudinary. Dynamically place guest names on beautifully designed invitation templates.
- Cloud storage and optimization. Store your files securely on Cloudinary using the Cloudinary Upload widget with upload presets, ensuring fast, optimized delivery.
- Downloadable invitations. Download all the invitations you created with just one click.
By leveraging Cloudinary, we ensure high-quality image optimization, fast content delivery, and seamless management. Whether you’re building an event management tool or just looking for ways to streamline your workflow, this solution will help you automate and enhance the invite creation process.
To begin, log in to your Cloudinary account or create a free account. If prompted with the question, “What’s your main interest?”, select Coding with APIs and SDKs or Skip.

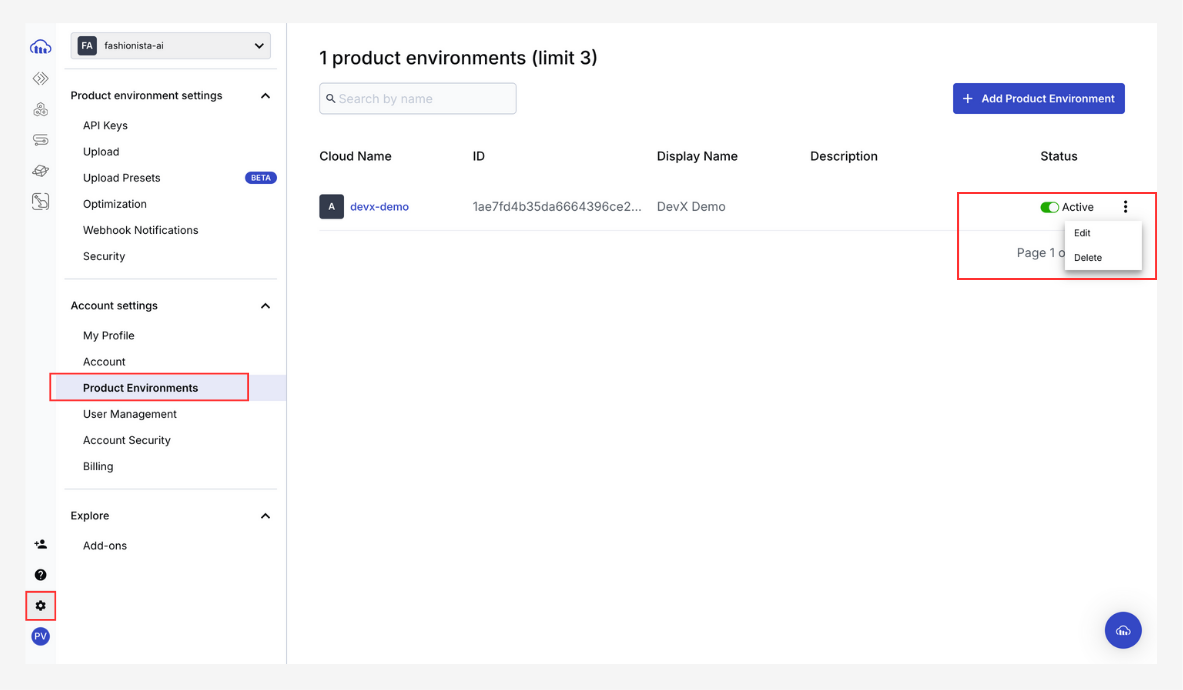
In your account, select Settings > Product Environments. Here, you’ll see the cloud that you’ve created. Click the three-dot menu to edit your Cloudinary cloud name.
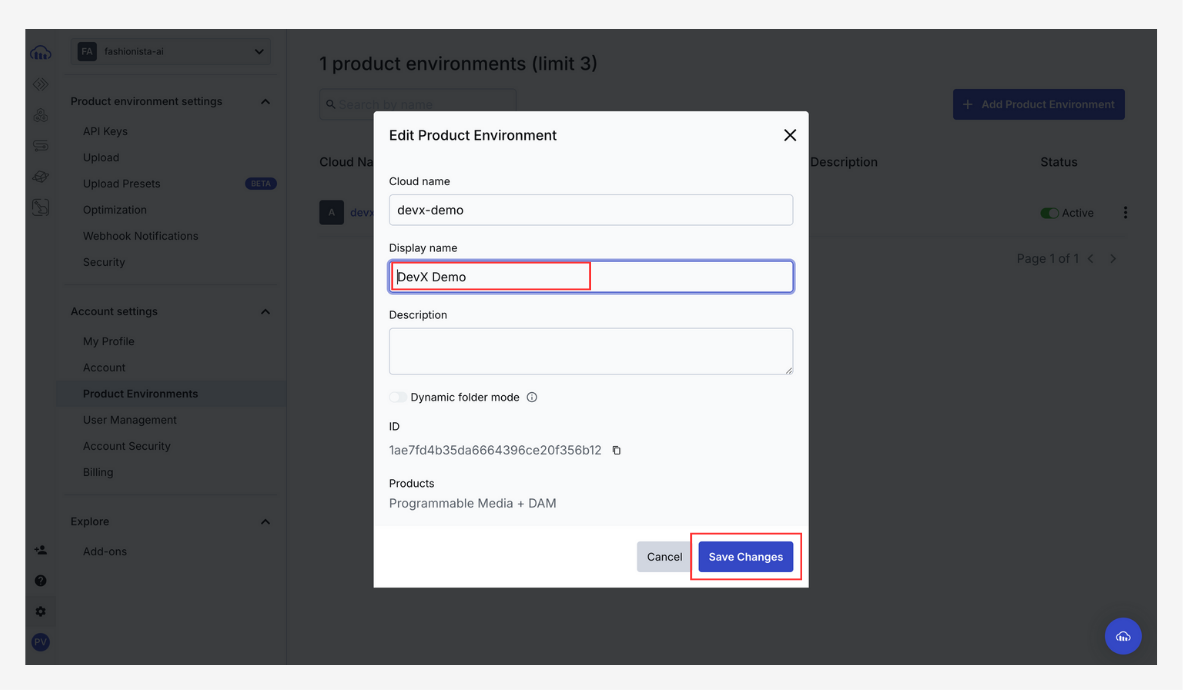
Edit the product environment and name your cloud, then click Save Changes.
It’s important to keep the same cloud name across different tools to be consistent.
In your account, select Settings > Product Environments Setting > API Keys. Click Generate New API Key and save these credentials in a safe place. We’ll use them later.
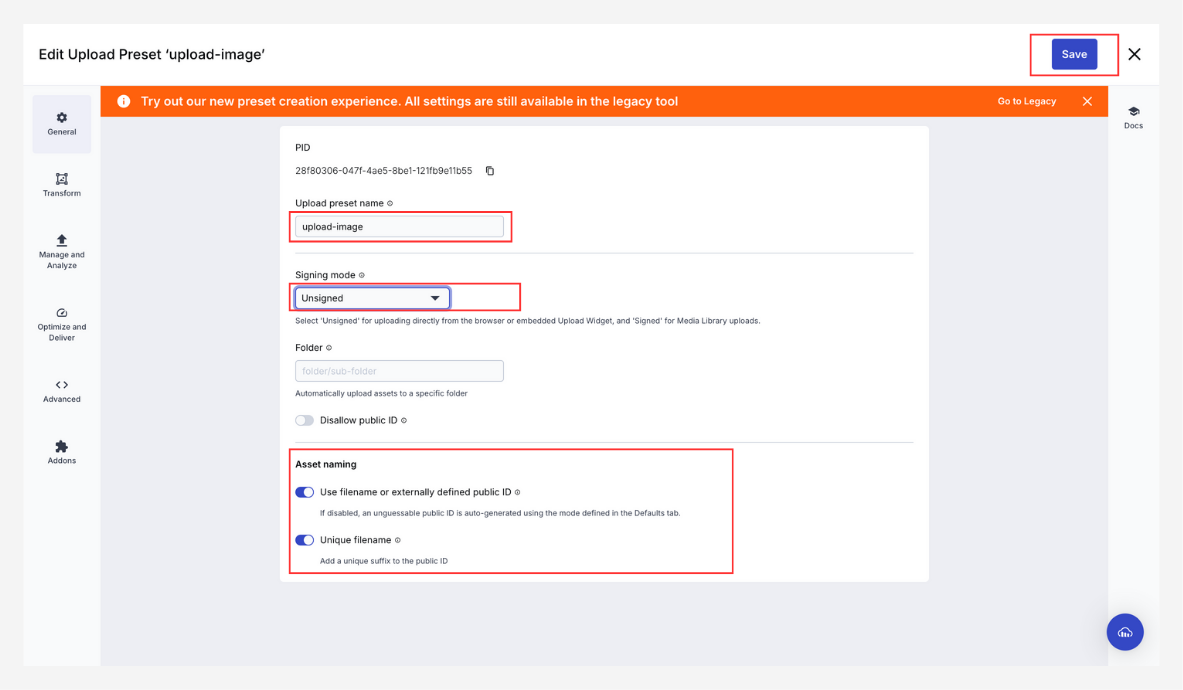
In your account, ensure you’re inside the product environment you just created, then select Settings > Upload. Click + Add Upload Preset.

Enter the name of your preset. I named my preset “upload-images”. Now enter the folder name where they will live; mine is “flyers”. Click the Signing Mode dropdown and select Unsigned. For asset naming, make sure the two switches are turned on. Your upload preset should look like this:
In this tutorial, I’m using Vite to build my React application. I recommend that you do the same. Follow the instructions on Vite’s official website to create a React application.
In your App.tsx file, replace the existing code with the following:
import LeftSideBar from "./LeftSideBar";

import PlayGround from "./PlayGround";

import RightSideBar from "./RightSideBar";

import { TemplateProvider } from "./TemplateContext";

import { TextOverlayProvider } from "./TextOverlayContext";

function App() {

  return (

    <div className="flex">

      <TemplateProvider>

        <TextOverlayProvider>

          <LeftSideBar />

          <PlayGround />

          <RightSideBar />

        </TextOverlayProvider>

      </TemplateProvider>

    </div>

  );

}

export default App;Code language: JavaScript (javascript)Time to work on the TemplateContext. This provider will help you share across components the template the user has selected to start adding the overlay text to it.
Create a TemplateContext.tsx file and copy/paste the following code:
import { createContext, useContext, useState, ReactNode } from "react";

interface TemplateContextType {

  selectedTemplate: string;

  setSelectedTemplate: (template: string) => void;

}

const TemplateContext = createContext<TemplateContextType | undefined>(undefined);

export const TemplateProvider = ({ children }: { children: ReactNode }) => {

  const [selectedTemplate, setSelectedTemplate] = useState<string>("");

  return (

    <TemplateContext.Provider value={{ selectedTemplate, setSelectedTemplate }}>

      {children}

    </TemplateContext.Provider>

  );

};

export const useTemplate = () => {

  const context = useContext(TemplateContext);

  if (!context) {

    throw new Error("useTemplate must be used within a TemplateProvider");

  }

  return context;

};Code language: JavaScript (javascript)Now we’ll need to create another context. This context will be in charge of sharing the state of everything related to the text overlay we’re adding to the image.
Create a TextOverlayContext.tsx file and copy/paste the following code:
import { createContext, useContext, useState } from "react";

interface TextOverlayContextProps {

  text: string;

  setText: (text: string) => void;

  color: string;

  setColor: (color: string) => void;

  font: string;

  setFont: (font: string) => void;

  fontSize: number;

  setFontSize: (size: number) => void;

  position: { x: number; y: number };

  setPosition: (pos: { x: number; y: number }) => void;

  imgSize: { width: number; height: number };

  setImgSize: (size: { width: number; height: number }) => void;

  imgOriginalSize: { width: number; height: number };

  setImgOriginalSize: (size: { width: number; height: number }) => void;

}

const TextOverlayContext = createContext<TextOverlayContextProps | undefined>(undefined);

export const TextOverlayProvider = ({ children }: { children: React.ReactNode }) => {

  const [text, setText] = useState("");

  const [color, setColor] = useState("#000000");

  const [font, setFont] = useState("Arial");

  const [fontSize, setFontSize] = useState(24);

  const [position, setPosition] = useState({ x: 50, y: 50 });

  const [imgSize, setImgSize] = useState({ width: 500, height: 500 });

  const [imgOriginalSize, setImgOriginalSize] = useState({ width: 500, height: 500 });

  return (

    <TextOverlayContext.Provider

      value={{ text, setText, color, setColor, font, setFont, fontSize, setFontSize, position, setPosition, imgSize, setImgSize, imgOriginalSize, setImgOriginalSize }}

    >

      {children}

    </TextOverlayContext.Provider>

  );

};

export const useTextOverlay = () => {

  const context = useContext(TextOverlayContext);

  if (!context) {

    throw new Error("useTextOverlay must be used within a TextOverlayProvider");

  }

  return context;

};Code language: JavaScript (javascript)This file represents the left sidebar, where we display the settings for adding text to the flyer. In this sidebar, we also have the button to upload the list of invites, and a table will render with all the names, allowing us to generate the flyers with the names of the invitees.
Create a LeftSideBar.tsx file and copy/paste the following code:
import { Cloudinary } from "@cloudinary/url-gen/index";

import { useTemplate } from "./TemplateContext";

import { fill } from "@cloudinary/url-gen/actions/resize";

import CloudinaryUploadWidget from "./CloudinaryUploadWidget";

import { useEffect, useState } from "react";

const templates = ["1.png", "2.png", "3.png", "4.png", "5.png", "6.png"];

const myFlyers = ["f7.png", "f8.png", "f9.png", "f10.png", "f11.png", "f12.png"];

const LeftSideBar = () => {

  const { selectedTemplate, setSelectedTemplate } = useTemplate();

  const [flyers, setFlyers] = useState(myFlyers);

  const cld = new Cloudinary({

    cloud: {

      cloudName: "invite-maker",

    },

  });

  const getFlyersFromCloudinary = (images: string[], folderName: string) => {

    return images.map((image, index: number) => {

        const tempImg = cld.image(`${folderName}/${image}`);

        return (

        <div

          key={index}

          className={`flex justify-center items-center relative cursor-pointer rounded-md overflow-hidden border-2 transition-all duration-300 hover:shadow-lg ${

            selectedTemplate === `/` + image ? "border-blue-500" : "border-transparent"

          }`}

          onClick={() => setSelectedTemplate(tempImg?.publicID)}

        >

          <img src={tempImg.resize(fill().height(320)).toURL()} alt={`Template ${index + 1}`} className="object-cover hover:opacity-80" />

        </div>

      )})

  }

  return (

    <div className="w-200 bg-gray-100 p-4 shadow-lg rounded-lg h-screen flex flex-col">

      <h1 className="text-lg font-semibold mb-4 sticky top-0 bg-gray-100 p-2 z-10">

        InviteMaker

      </h1>

      <div className="flex-1 overflow-y-auto">

        <h2 className="text-lg font-semibold mb-4 sticky top-0 bg-gray-100 p-2 z-10">Templates</h2>

        <div className="grid grid-cols-2 gap-3">

          {getFlyersFromCloudinary(templates, "templates")}

        </div>

      </div>

      <div className="border-t border-gray-300 my-2"></div>

      <div className="flex-1 overflow-y-auto">

        <h2 className="text-lg font-semibold mb-4 sticky top-0 bg-gray-100 p-2 z-10">My Flyers</h2>

        <div className="grid grid-cols-2 gap-3">

          {getFlyersFromCloudinary(flyers, "flyers")}

        </div>

      </div>

      <CloudinaryUploadWidget getFlyers={getFlyersFromCloudinary} folderName="flyers" files={flyers} setFlyers={setFlyers}/>

    </div>

  );

};

export default LeftSideBar;Code language: JavaScript (javascript)This file plays a very important role because we’re using the state from different components and rendering the flyer selected with the text overlay we want to add. Additionally, this file renders the flyer scaled to the size of the screen.
Create a PlayGround.tsx file and copy/paste the following code:
import { useTemplate } from "./TemplateContext";

import { useTextOverlay } from "./TextOverlayContext";

import { useRef, useState, useEffect } from "react";

const PlayGround = () => {

  const { selectedTemplate } = useTemplate();

  const {

    text,

    color,

    font,

    fontSize,

    position,

    imgSize,

    setImgSize,

    setImgOriginalSize,

  } = useTextOverlay();

  const imgRef = useRef<HTMLImageElement>(null);

  const textRef = useRef<HTMLDivElement>(null);

  const [textSize, setTextSize] = useState({ width: 0, height: 0 });

  useEffect(() => {

    const updateSize = () => {

      if (imgRef.current && selectedTemplate && imgRef.current.complete) {

        const containerWidth = window.innerWidth * 0.8;

        const containerHeight = window.innerHeight * 0.8;

        const aspectRatio =

          imgRef.current.naturalWidth / imgRef.current.naturalHeight || 1;

        let newWidth = Math.min(

          containerWidth,

          imgRef.current.naturalWidth || containerWidth

        );

        let newHeight = newWidth / aspectRatio;

        if (newHeight > containerHeight) {

          newHeight = containerHeight;

          newWidth = newHeight * aspectRatio;

        }

        setImgSize({

          width: newWidth,

          height: newHeight,

        });

        setImgOriginalSize({

          width: imgRef.current.naturalWidth || containerWidth,

          height: imgRef.current.naturalHeight || containerHeight,

        });

      }

    };

    if (selectedTemplate) {

      const checkImageLoad = setInterval(() => {

        if (imgRef.current && imgRef.current.complete) {

          updateSize();

          clearInterval(checkImageLoad);

        }

      }, 100);

    }

    window.addEventListener("resize", updateSize);

    return () => {

      window.removeEventListener("resize", updateSize);

    };

  }, [selectedTemplate]);

  useEffect(() => {

    if (textRef.current) {

      setTextSize({

        width: textRef.current.clientWidth,

        height: textRef.current.clientHeight,

      });

    }

  }, [text, font, fontSize, position, imgSize]);

  const safeX = Math.max(

    0,

    Math.min(position.x, imgSize.width - textSize.width)

  );

  const safeY = Math.max(

    0,

    Math.min(position.y, imgSize.height - textSize.height)

  );

  return (

    <div className="flex flex-col items-center w-full h-screen bg-gray-200">

      {selectedTemplate ? (

        <div

          className="relative"

          style={{ width: imgSize.width, height: imgSize.height }}

        >

          <img

            ref={imgRef}

            src={`https://res.cloudinary.com/invite-maker/image/upload/v1/${selectedTemplate}`}

            alt="Selected Template"

            className="w-full h-auto"

          />

          {text && (

            <div

              ref={textRef}

              className="absolute"

              style={{

                top: `${safeY}px`,

                left: `${safeX}px`,

                color: color,

                fontFamily: font,

                fontSize: `${fontSize}px`,

                fontWeight: "bold",

                whiteSpace: "nowrap",

                overflow: "hidden",

                maxWidth: `${imgSize.width}px`,

              }}

            >

              {text}

            </div>

          )}

        </div>

      ) : (

        <p className="text-gray-600">Select a template to preview it here.</p>

      )}

    </div>

  );

};

export default PlayGround;Code language: JavaScript (javascript)
Let’s explain our frontend code:
The component ensures that the selected image doesn’t take up the entire screen but instead scales down to fit within 80% of the viewport width and height. The updateSize function calculates the new dimensions of the image while preserving its original aspect ratio.
const updateSize = () => {

      if (imgRef.current && selectedTemplate && imgRef.current.complete) {

        const containerWidth = window.innerWidth * 0.8;

        const containerHeight = window.innerHeight * 0.8;

        const aspectRatio =

          imgRef.current.naturalWidth / imgRef.current.naturalHeight || 1;

        let newWidth = Math.min(

          containerWidth,

          imgRef.current.naturalWidth || containerWidth

        );

        let newHeight = newWidth / aspectRatio;

        if (newHeight > containerHeight) {

          newHeight = containerHeight;

          newWidth = newHeight * aspectRatio;

        }

        setImgSize({

          width: newWidth,

          height: newHeight,

        });

        setImgOriginalSize({

          width: imgRef.current.naturalWidth || containerWidth,

          height: imgRef.current.naturalHeight || containerHeight,

        });

      }

};Code language: JavaScript (javascript)The text is positioned over the image dynamically based on position.x and position.y. Since text can vary in size, it’s necessary to ensure it doesn’t overflow beyond the image boundaries. This is done using the safeX and safeY calculations.
const safeX = Math.max(0, Math.min(position.x, imgSize.width - textSize.width));

const safeY = Math.max(0, Math.min(position.y, imgSize.height - textSize.height));Code language: JavaScript (javascript)
These calculations guarantee that safeX and safeY values keep the text within the image area, preventing it from being placed outside the visible image.
Additionally, the useEffect() hook listens for changes to text, font, fontSize, position, and imgSize, updating textSize accordingly.
useEffect(() => {

    if (textRef.current) {

      setTextSize({

        width: textRef.current.clientWidth,

        height: textRef.current.clientHeight,

      });

    }

  }, [text, font, fontSize, position, imgSize]);Code language: JavaScript (javascript)
This ensures that text dimensions are recalculated whenever the user makes changes, keeping the layout responsive and accurate.
This component will handle the majority of the functionality of the application and the text overlay (size, color, positioning, font family, etc), allowing the user to upload a list of names to automatically generate the invites.
Create a RightSideBar.tsx file and copy/paste the following code:
import { Cloudinary } from "@cloudinary/url-gen/index";

import { useTextOverlay } from "./TextOverlayContext";

import Papa from "papaparse";

import { useState, useRef, useEffect } from "react";

import { source } from "@cloudinary/url-gen/actions/overlay";

import { text as cloudinaryText } from "@cloudinary/url-gen/qualifiers/source";

import { TextStyle } from "@cloudinary/url-gen/qualifiers/textStyle";

import { Position } from "@cloudinary/url-gen/qualifiers";

import { compass } from "@cloudinary/url-gen/qualifiers/gravity";

import { fill } from "@cloudinary/url-gen/actions/resize";

import JSZip from "jszip";

import { saveAs } from "file-saver";

import { useTemplate } from "./TemplateContext";

const RightSideBar = () => {

  const {

    text,

    setText,

    color,

    setColor,

    font,

    setFont,

    fontSize,

    setFontSize,

    position,

    setPosition,

    imgSize,

    imgOriginalSize,

  } = useTextOverlay();

  const [csvData, setCsvData] = useState<string[]>([]);

  const [, setGeneratedLinks] = useState<string[]>([]);

  const fileInputRef = useRef<HTMLInputElement>(null);

  const { selectedTemplate } = useTemplate();

  useEffect(() => {

    if (csvData.length > 0) {

      setText(`${csvData[0]} ${text}`);

    }

  }, [csvData]);

  // Create and configure your Cloudinary instance.

  const cld = new Cloudinary({

    cloud: {

      cloudName: "invite-maker",

    },

  });

  useEffect(() => {

    if (selectedTemplate && selectedTemplate.length > 0) {

      const myImage = cld.image(`${selectedTemplate}`);

      // Compute precise scaling ratios

      const scaleX = imgOriginalSize.width / imgSize.width;

      const scaleY = imgOriginalSize.height / imgSize.height;

      // Scale font size proportionally

      const adjustedFontSize = Math.round(fontSize * scaleX);

      // Estimate text width and height using an approximate character size multiplier

      const estimatedTextWidth = adjustedFontSize * text.length * 0.6; // Approximate width

      const estimatedTextHeight = adjustedFontSize; // Text height is usually 1 line height

      // Compute safe positions for text placement

      const mappedX = Math.max(

        0,

        Math.min(position.x * scaleX, imgOriginalSize.width - estimatedTextWidth)

      );

      const mappedY = Math.max(

        0,

        Math.min(

          position.y * scaleY,

          imgOriginalSize.height - estimatedTextHeight

        ) // Prevent Y overflow

      );

      // Adjust offsets only if there's enough space

      const adjustedX =

        mappedX +

        (mappedX + estimatedTextWidth < imgOriginalSize.width

          ? estimatedTextWidth / 8

          : 0);

      const adjustedY =

        mappedY +

        (mappedY + estimatedTextHeight <

        imgOriginalSize.height - estimatedTextHeight

          ? adjustedFontSize / 2

          : 0); // Prevents text from going below the image

      // Apply position mapping using absolute values

      const safeFont = font && font.length > 0 ? font : "Arial"; // Default to Arial if font is missing

      const safeFontSize = fontSize > 0 ? fontSize : 20; // Default to 20px if fontSize is invalid

      const adjustedFontSizes = Math.round(safeFontSize * scaleX);

      // Check if adjustedFontSizes is valid before using it

      if (adjustedFontSizes > 0 && safeFont) {

        myImage.overlay(

          source(

            cloudinaryText(text, new TextStyle(safeFont, adjustedFontSizes)) // Scale font size correctly

              .textColor(color)

          ).position(

            new Position()

              .gravity(compass("north_west"))

              .offsetX(Math.round(adjustedX))

              .offsetY(Math.round(adjustedY)) // Use absolute values

          )

        );

        // Generate the Cloudinary URL

        const myUrl = myImage.toURL();

        console.log(myUrl);

      }

    }

  }, [text, color, font, fontSize, position, imgSize, imgOriginalSize, selectedTemplate]);

  const handleCSVUpload = (event: React.ChangeEvent<HTMLInputElement>) => {

    const file = event.target.files?.[0];

    if (!file) return;

    Papa.parse<string[]>(file, {

      complete: (result) => {

        const filteredData = result.data

          .filter(

            (row, index) =>

              index !== 0 || (row[0] && row[0].toLowerCase() !== "name")

          )

          .map((row) => row[0]);

        setCsvData(filteredData);

      },

    });

  };

  const generateFlyers = async () => {

    if (!selectedTemplate || selectedTemplate.length === 0) return;

    const previewName = csvData[0] || "";

    const links: string[] = csvData.map((name) => {

      const myImage = cld.image(`${selectedTemplate}`);

      myImage.resize(

        fill().width(imgOriginalSize.width).height(imgOriginalSize.height)

      );

      const scaleX = imgOriginalSize.width / imgSize.width;

      const scaleY = imgOriginalSize.height / imgSize.height;

      const adjustedFontSize = Math.round(fontSize * scaleX);

      const estimatedTextWidth =

        adjustedFontSize * (name.length + text.length) * 0.65;

      const estimatedTextHeight = adjustedFontSize;

      let mappedX = Math.max(

        0,

        Math.min(

          position.x * scaleX,

          imgOriginalSize.width - estimatedTextWidth * 0.9

        )

      );

      const mappedY = Math.max(

        0,

        Math.min(

          position.y * scaleY,

          imgOriginalSize.height - estimatedTextHeight

        )

      );

      // Prevent overflow on X-axis with finer adjustment

      if (mappedX + estimatedTextWidth > imgOriginalSize.width) {

        mappedX = imgOriginalSize.width - estimatedTextWidth * 0.6;

      }

      if (mappedX < 0) {

        mappedX = 0;

      }

      const safeFont = font || "Arial"; // Default to Arial if font is missing

      const safeFontSize = fontSize > 0 ? fontSize : 20; // Default to 20px if fontSize is invalid

      const adjustedFontSizes = Math.round(safeFontSize * scaleX);

      if (adjustedFontSizes > 0 && safeFont) {

        myImage.overlay(

          source(

            cloudinaryText(

              `${name} ${text.replace(previewName, "")}`,

              new TextStyle(safeFont, adjustedFontSizes)

            ).textColor(color)

          ).position(

            new Position()

              .gravity(compass("north_west"))

              .offsetX(Math.round(mappedX))

              .offsetY(Math.round(mappedY))

          )

        );

      }

      return myImage.toURL();

    });

    console.log(links[1]);

    setGeneratedLinks(links);

    if (links.length === 1) {

      const link = document.createElement("a");

      link.href = links[0];

      link.download = "flyer.png";

      document.body.appendChild(link);

      link.click();

      document.body.removeChild(link);

    } else {

      const zip = new JSZip();

      const folder = zip.folder("Flyers");

      if (folder) {

        await Promise.all(

          links.map(async (url, index) => {

            const response = await fetch(url);

            const blob = await response.blob();

            folder.file(`flyer_${index + 1}.png`, blob);

          })

        );

        const zipBlob = await zip.generateAsync({ type: "blob" });

        saveAs(zipBlob, "flyers.zip");

      }

    }

  };

  return (

    <div className="w-64 bg-gray-100 p-4 shadow-lg rounded-lg h-screen flex flex-col">

      <div className="flex-1">

        <h2 className="text-lg font-semibold mb-4">Customize Text</h2>

        <label className="mb-2">Text</label>

        <input

          type="text"

          value={text}

          onChange={(e) => setText(e.target.value)}

          className="border p-2 rounded mb-2"

        />

        <div>

          <label className="mb-2">Color</label>

          <input

            type="color"

            value={color}

            onChange={(e) => setColor(e.target.value)}

            className="border p-2 rounded mb-2 w-full"

          />

        </div>

        <div>

          <label className="mb-2">Font</label>

          {/* As for font families, we offer several built-in options, including Arial, Verdana, Helvetica, Trebuchet MS, Times New Roman, Georgia, Courier New, Open Sans, Roboto, and Montserrat. */}

          <select

            value={font}

            onChange={(e) => setFont(e.target.value)}

            className="border p-2 rounded mb-2 w-full"

          >

            <option value="Arial">Arial</option>

            <option value="Times New Roman">Times New Roman</option>

            <option value="Courier New">Courier New</option>

            <option value="Verdana">Verdana</option>

          </select>

        </div>

        <div>

          <label className="mb-2 w-full">Font Size {fontSize}px</label>

          <input

            type="range"

            min="10"

            max="100"

            value={fontSize}

            onChange={(e) => setFontSize(Number(e.target.value))}

            className="mb-2 w-full"

          />

        </div>

        <div>

          <label className="mb-2">X Position</label>

          <input

            type="range"

            min="0"

            max={imgSize.width - fontSize}

            value={position.x}

            onChange={(e) =>

              setPosition({ ...position, x: Number(e.target.value) })

            }

            className="mb-2 w-full"

          />

        </div>

        <div>

          <label className="mb-2">Y Position</label>

          <input

            type="range"

            min="0"

            max={imgSize.height - fontSize}

            value={position.y}

            onChange={(e) =>

              setPosition({ ...position, y: Number(e.target.value) })

            }

            className="mb-2 w-full"

          />

        </div>

      </div>

      <div className="flex-1 flex flex-col overflow-hidden">

        <input

          type="file"

          accept=".csv"

          onChange={handleCSVUpload}

          ref={fileInputRef}

          className="hidden"

        />

        <button

          onClick={() => fileInputRef.current?.click()}

          className="mt-4 px-4 py-2 bg-blue-600 text-white rounded-lg hover:bg-blue-500"

        >

          Upload Name List

        </button>

        {csvData.length > 0 && (

          <button

            onClick={generateFlyers}

            className="mt-4 px-4 py-2 bg-green-600 text-white rounded-lg hover:bg-green-500"

          >

            Generate Flyers

          </button>

        )}

        {csvData.length > 0 && (

          <div className="w-full max-w-xs mt-4 p-2 bg-white shadow-lg rounded-lg flex-1 overflow-y-auto">

            <h3 className="text-lg font-semibold mb-2">CSV Names</h3>

            <table className="w-full border-collapse border border-gray-300">

              <tbody>

                {csvData.map((name, index) => (

                  <tr key={index} className="border border-gray-300">

                    <td className="p-2">{name}</td>

                  </tr>

                ))}

              </tbody>

            </table>

          </div>

        )}

      </div>

    </div>

  );

};

export default RightSideBar;Code language: JavaScript (javascript)
Let’s explain our frontend code:
const handleCSVUpload = (event: React.ChangeEvent<HTMLInputElement>) => {

    const file = event.target.files?.[0];

    if (!file) return;

    Papa.parse<string[]>(file, {

      complete: (result) => {

        const filteredData = result.data

          .filter(

            (row, index) =>

              index !== 0 || (row[0] && row[0].toLowerCase() !== "name")

          )

          .map((row) => row[0]);

        setCsvData(filteredData);

      },

    });

  };Code language: JavaScript (javascript)
The handleCSVUpload function reads the uploaded CSV file, extracts names from the first column, and updates csvData. It ignores the first row if the first column contains “name” to filter out headers.
The generateFlyers function dynamically creates flyers using Cloudinary by overlaying text on a template image. It scales font size, calculates text position, and prevents text from overflowing.
First, the function retrieves the first name in the list to use as a reference for centering text. Then, it iterates through each name in csvData, applies the overlay, and generates a URL for each flyer.
const generateFlyers = async () => {

    if (!selectedTemplate || selectedTemplate.length === 0) return;

    const previewName = csvData[0] || "";

    const links: string[] = csvData.map((name) => {

      const myImage = cld.image(`${selectedTemplate}`);

      myImage.resize(

        fill().width(imgOriginalSize.width).height(imgOriginalSize.height)

      );

      const scaleX = imgOriginalSize.width / imgSize.width;

      const scaleY = imgOriginalSize.height / imgSize.height;

      const adjustedFontSize = Math.round(fontSize * scaleX);

      const estimatedTextWidth =

        adjustedFontSize * (name.length + text.length) * 0.65;

      const estimatedTextHeight = adjustedFontSize;

      let mappedX = Math.max(

        0,

        Math.min(

          position.x * scaleX,

          imgOriginalSize.width - estimatedTextWidth * 0.9

        )

      );

      const mappedY = Math.max(

        0,

        Math.min(

          position.y * scaleY,

          imgOriginalSize.height - estimatedTextHeight

        )

      );

      // Prevent overflow on X-axis with finer adjustment

      if (mappedX + estimatedTextWidth > imgOriginalSize.width) {

        mappedX = imgOriginalSize.width - estimatedTextWidth * 0.6;

      }

      if (mappedX < 0) {

        mappedX = 0;

      }

      const safeFont = font || "Arial"; // Default to Arial if font is missing

      const safeFontSize = fontSize > 0 ? fontSize : 20; // Default to 20px if fontSize is invalid

      const adjustedFontSizes = Math.round(safeFontSize * scaleX);

      if (adjustedFontSizes > 0 && safeFont) {

        myImage.overlay(

          source(

            cloudinaryText(

              `${name} ${text.replace(previewName, "")}`,

              new TextStyle(safeFont, adjustedFontSizes)

            ).textColor(color)

          ).position(

            new Position()

              .gravity(compass("north_west"))

              .offsetX(Math.round(mappedX))

              .offsetY(Math.round(mappedY))

          )

        );

      }

      return myImage.toURL();

    });

    setGeneratedLinks(links);

    if (links.length === 1) {

      const link = document.createElement("a");

      link.href = links[0];

      link.download = "flyer.png";

      document.body.appendChild(link);

      link.click();

      document.body.removeChild(link);

    } else {

      const zip = new JSZip();

      const folder = zip.folder("Flyers");

      if (folder) {

        await Promise.all(

          links.map(async (url, index) => {

            const response = await fetch(url);

            const blob = await response.blob();

            folder.file(`flyer_${index + 1}.png`, blob);

          })

        );

        const zipBlob = await zip.generateAsync({ type: "blob" });

        saveAs(zipBlob, "flyers.zip");

      }

    }

  };Code language: JavaScript (javascript)
This function ensures:
- Proper scaling of text size and positioning based on the image’s original size.
- Prevention of text overflow on the X-axis by adjusting
mappedXwhen needed. - Maintaining correct text centering relative to the preview name.
Once the flyers are generated, they’re either downloaded individually (if there’s only one) or bundled into a ZIP file (if there are multiple).
If only one flyer is generated, it’s downloaded directly as a PNG:
if (links.length === 1) {

      const link = document.createElement("a");

      link.href = links[0];

      link.download = "flyer.png";

      document.body.appendChild(link);

      link.click();

      document.body.removeChild(link);

 }Code language: JavaScript (javascript)
If multiple flyers are generated, they’re fetched as blobs, added to a ZIP file using JSZip, and then saved using file-saver:
else {

      const zip = new JSZip();

      const folder = zip.folder("Flyers");

      if (folder) {

        await Promise.all(

          links.map(async (url, index) => {

            const response = await fetch(url);

            const blob = await response.blob();

            folder.file(`flyer_${index + 1}.png`, blob);

          })

        );

        const zipBlob = await zip.generateAsync({ type: "blob" });

        saveAs(zipBlob, "flyers.zip");

      }

    }

};Code language: JavaScript (javascript)In the root of the project, you have the package.json. Replace everything that you currently have in the package.json, then copy and paste the content of this file into your package.json.
Then run:
npm installThis command will install the following dependencies:
@cloudinary/react. React SDK for Cloudinary, enabling dynamic image rendering and transformations in React components.@cloudinary/url-gen. Generates Cloudinary URLs for image transformations like resizing, overlays, and text placement.@tailwindcss/vite. Optimizes Tailwind CSS integration with Vite for faster builds and better performance.file-saver. Allows users to download files (images, ZIPs) directly from the browser.jszip. Creates ZIP files on the client side for bulk downloads of generated flyers.papaparse. Parses CSV files efficiently, extracting name data for flyer customization.
Run the following commands:
npm install tailwindcss @tailwindcss/viteCode language: CSS (css)Add the @tailwindcss/vite plugin to your Vite configuration.
import { defineConfig } from 'vite'

import tailwindcss from '@tailwindcss/vite'

export default defineConfig({

 plugins: [

   tailwindcss(),

 ],

})Code language: JavaScript (javascript)
Now in the index.css file, add the following:
@import "tailwindcss";Code language: CSS (css)The first thing we have to do is to run npm install in the root of your project to install the frontend and backend dependencies.
Open your other terminal, run npm run dev, and navigate to http://localhost:5173/.
Building an automated invite maker with React and Cloudinary streamlines the invitation process, saving time and effort while ensuring a seamless user experience. By leveraging Cloudinary for image storage, optimization, text overlays, and downloadable assets, we’ve created a solution that efficiently generates personalized and automated invitations.
This approach demonstrates how powerful media automation can be. Try it out, expand on it, and take your event management workflow to the next level!
To stay updated with the latest product features, follow Cloudinary on Twitter or explore other sample apps. Sign up for a free Cloudinary account today to get started.
- GitHub Repo: Cloudinary-React-Image-to-Blog-AI