
In this blog post, we’ll show you how to leverage Cloudinary’s face detection algorithm using Next.js. We’ll build a simple but fun demo of a virtual try-on app that showcases one of the many things you can do with this feature.
But first, we’ll need to set up the following:
- A free Cloudinary account. If you haven’t already, sign up for a Cloudinary account. It’s where our images will live and be managed.
- Next.js App. Make sure you have the Next.js App Router. We can use the pages router, but for this demo, let’s stick with the App Router to stay on the cutting edge.
- Next-Cloudinary package. The next-cloudinary package is a handy tool that makes integrating Cloudinary into our Next.js app a breeze.
- Cloudinary package. This is the Cloudinary SDK for Node.js.
We need to display and upload images to Cloudinary using Next.js. Because of this, we highly recommend checking out our previous blog post: Using Next.js and Cloudinary to Upload, Transform, and Moderate Your Images to learn how to display and upload images to Cloudinary using Next.js.
Once we have our Cloudinary account ready, it’s time to kick things off by setting up our Next.js app. Let’s start with this command:
npx create-next-app@latest
Code language: CSS (css)
After running the command you’ll see a few prompts that will set the details of the app for you. Let’s go step by step:
- Name your app. Pick a cool name that resonates with your project.
- Enable app router. Make sure to turn this feature on.
The other steps are optional and entirely up to you. In my case, I also chose to use TypeScript and Tailwind CSS.
Now that’s done, we need to install our Cloudinary package for easy Cloudinary integration in our app:
npm install next-cloudinary
We’re almost there, just one more thing, and we’re ready to start hacking! We need to set up some environment variables that will help us to securely store key information required for our app to communicate with Cloudinary:
- NEXT_PUBLIC_CLOUDINARY_CLOUD_NAME. This is your Cloudinary cloud name, a unique identifier for your Cloudinary account.
- NEXT_PUBLIC_CLOUDINARY_API_KEY. The private key used for secure connections with the Cloudinary API
- CLOUDINARY_API_KEY. The public key used to authenticate your requests to the Cloudinary API
The NEXT_PUBLIC is essential here, as we need to read these environment variables from the client side. The way to tell Next.js that these are client-side usable is by adding this prefix.
For this demo, we’ll build a simple try-on app where users can upload their profile picture and try on some eyeglass frames.
We’ll use two components we created in our previous blog post, Using Next.js and Cloudinary to Upload, Transform, and Moderate Your Images: UploadButton and CldImage. Please check out that blog to see how we built these components in detail.
We’ll use our Cloudinary SDK to retrieve our images. Let’s create a new utility function to retrieve a Cloudinary SDK instance for us. In our app folder, create a new folder called “utils” and inside it, let’s add the file getCloudinary and write the following:
app
 ↳utils
  ↳getCloudinary.ts

import { v2 as cloudinary } from "cloudinary";

export default function getCloadinary() {
  // Config our Cloudinary instance
  cloudinary.config({
    cloud_name: process.env.NEXT_PUBLIC_CLOUDINARY_CLOUD_NAME,
    api_key: process.env.NEXT_PUBLIC_CLOUDINARY_API_KEY,
    api_secret: process.env.CLOUDINARY_API_SECRET,
  });
  return cloudinary;
}
Code language: JavaScript (javascript)
Now, we’ll create a simple UI to upload a profile picture. For that, let’s create the following UI:
app
 ↳page.tsx

import UploadButton from "@/app/components/UploadButton";
import getCloudinary from "@/app/utils/getCloudinary";
import CldImage from "@/app/components/CldImage";
import CldImageButton from "@/app/components/CldImageButton";

const PROFILE_IMAGE_PUBLIC_ID = "profile-image";

const cloudinary = getCloudinary();

export default async function Home() {
  // Search for a resource with the public ID of "profile-image"
  const { resources: profileImage } = await cloudinary.search
    .expression(`public_id=${PROFILE_IMAGE_PUBLIC_ID}`)
    .execute();

  return (
    <main>
      <section className="flex flex-col gap-10 mt-10 items-center min-h-screen">
       {/* If profileImage resource is found, render it */}
        {profileImage.length ? (
          <CldImage
            className="max-w-sm overflow-hidden shadow-lg"
            alt={PROFILE_IMAGE_PUBLIC_ID}
            src={profileImage[0].secure_url}
            width={500}
            height={500}
          />
        ) : null}

        {/* Upload an image with publicId "profile-image" */}
        <UploadButton
          // The signatureEndpoint prop is the path to the route that will sign the Cloudinary params
          signatureEndpoint="/api/sign-cloudinary-params"
          className="bg-blue-500 hover:bg-blue-700 text-white font-bold py-2 px-4 rounded-full"
          options={{
            publicId: PROFILE_IMAGE_PUBLIC_ID,
            multiple: false,
          }}
        />
      </section>
    </main>
  );
}

Code language: JavaScript (javascript)
In the above snippet, we’ll get our Cloudinary instance using the getCloudinary function.
const cloudinary = getCloudinary();
Code language: JavaScript (javascript)
In our Server Component Home, we’ll fetch an image with the public ID “profile-image”. If we find it, we’ll display it using our CldImage component.
 // Search for a resource with the public ID of "profile-image"
  const { resources: profileImage } = await cloudinary.search
    .expression(`public_id=${PROFILE_IMAGE_PUBLIC_ID}`)
    .execute();

    ...

    {/* If profileImage resource is found, render it */}
    {profileImage.length ? (
      <CldImage
        className="max-w-sm overflow-hidden shadow-lg"
        alt={PROFILE_IMAGE_PUBLIC_ID}
        src={profileImage[0].secure_url}
        width={500}
        height={500}
      />
    ) : null}

Code language: JavaScript (javascript)
Finally, we’ll add a button that uses the UploadButton component to upload our image with the same public ID “profile-image”. In this component, we’ll set the multiple option to false to prevent uploading multiple images at once. Every time we use this button to upload our image, the previous image will be replaced, as they both share the same public ID.
{/* Upload an image with publicId "profile-image" */}
<UploadButton
// The signatureEndpoint prop is the path to the route that will sign the Cloudinary params
signatureEndpoint="/api/sign-cloudinary-params"
className="bg-blue-500 hover:bg-blue-700 text-white font-bold py-2 px-4 rounded-full"
options={{
publicId: PROFILE_IMAGE_PUBLIC_ID,
multiple: false,
}}
/>
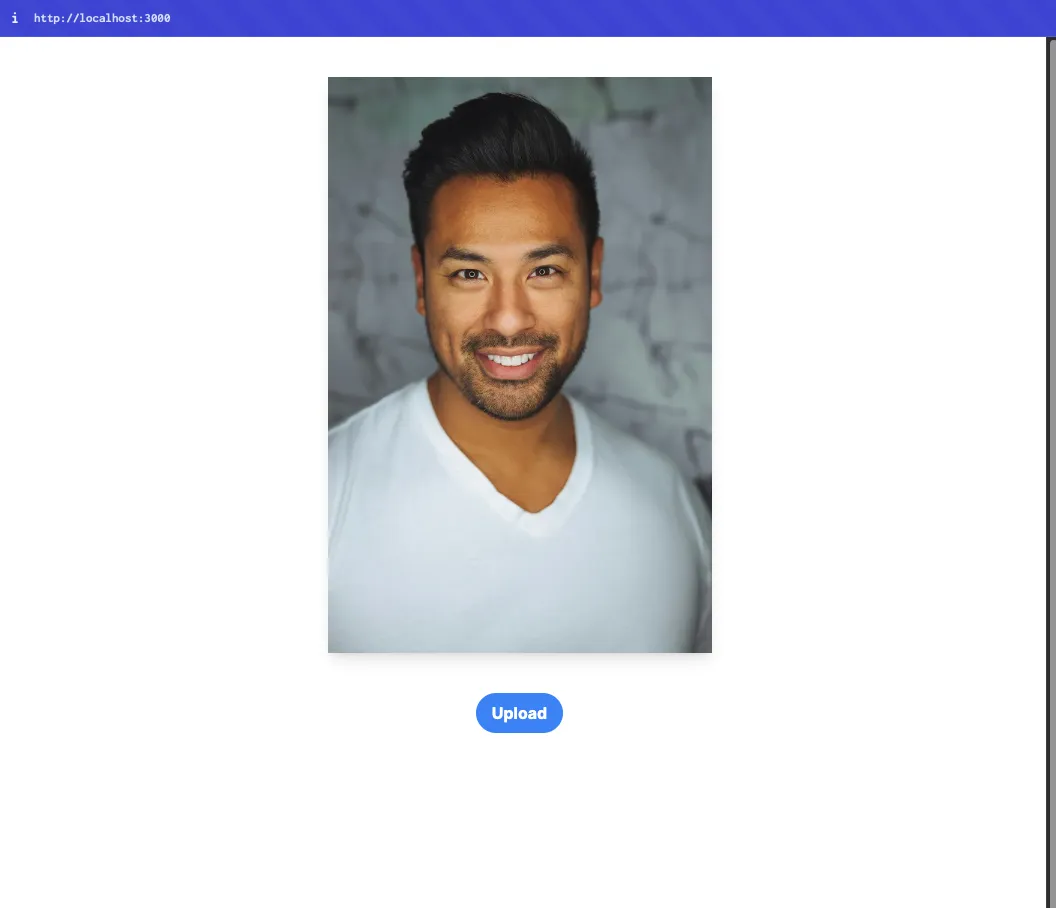
Code language: PHP (php)The result, with the aggregated styles using Tailwind, will be like this:

Now, if we use our button to upload a profile picture and then refresh the page, we’ll see our image:
Refreshing the page every time we upload a new image can be a real hassle. To make things smoother, let’s create a Server Action that automatically revalidates the page whenever an image is successfully uploaded.
Create a new folder called “actions” inside our “app” folder, and then create a file called getProfileImage.ts. Here, we’ll have the following code:
app
 ↳actions
  ↳getProfileImage

"use server";
import { revalidatePath } from "next/cache";

export async function getProfileImage() {
  // wait 5 seconds for Cloudinary to update
  await new Promise((resolve) => setTimeout(resolve, 5000));
  // revalidate home page
  revalidatePath("/");
}

Code language: JavaScript (javascript)
The timeout we’re using here isn’t ideal because it keeps the connection open. A better approach might be, for example, to have the frontend poll for updates instead. We’ll leave it as is just for this tutorial.
Let’s import and use this server action in our UploadButton component:
app
 ↳components
  ↳UploadButton.tsx

"use client";
import { CldUploadButton, type CldUploadButtonProps } from "next-cloudinary";
import { getProfileImage } from "@/app/actions/getProfileImage";

function UploadButton(props: CldUploadButtonProps) {
  return (
    <CldUploadButton
      {...props}
      onSuccess={async () => {
        // when image finish uploading call server action
        await getProfileImage();
      }}
    />
  );
}

export default UploadButton;

Code language: JavaScript (javascript)
If we upload a new image using our app, the page will update the image without the need to refresh the page.
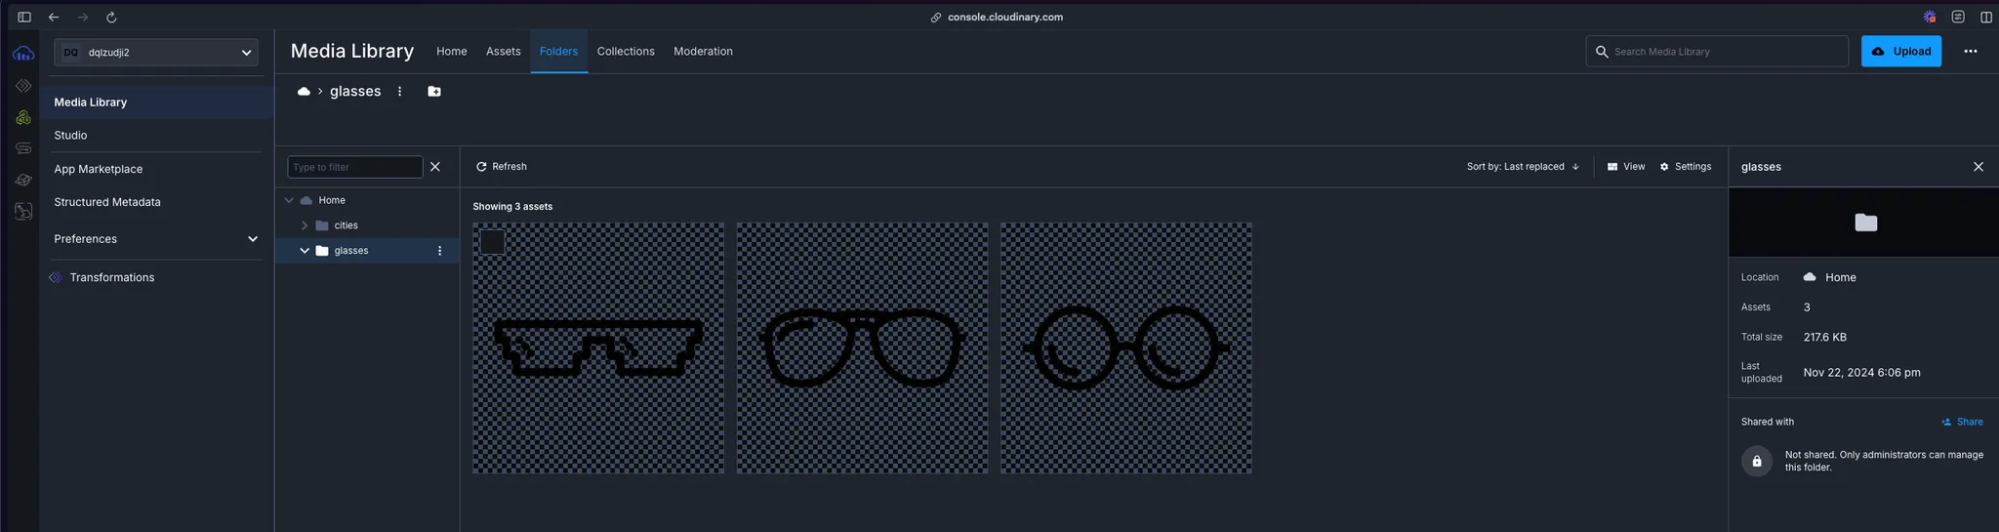
Now, we’ll need a way to choose the eyeglass frames we want to try on our profile picture. To do this, let’s first upload a few eyeglass frames and store them in a glasses folder inside Cloudinary:
In our code, we can now fetch these resources and list them on our Home page:
app
 ↳page.tsx

import UploadButton from "@/app/components/UploadButton";
import getCloudinary from "@/app/utils/getCloudinary";
import CldImage from "@/app/components/CldImage";
import CldImageButton from "@/app/components/CldImageButton";

const PROFILE_IMAGE_PUBLIC_ID = "profile-image";

const cloudinary = getCloudinary();

export default async function Home()

  const { resources: profileImage } = await cloudinary.search
    .expression(`public_id=${PROFILE_IMAGE_PUBLIC_ID}`)
    .execute();

  // Search for our resources inside our "glasses" folder
  const { resources: glassResources } = await cloudinary.search
    .expression("folder=glasses")
    .execute();

  return (
    <main>
      <section className="flex flex-col gap-10 mt-10 items-center min-h-screen">
        {profileImage.length ? (
          <CldImage
            className="max-w-sm overflow-hidden shadow-lg"
            alt={PROFILE_IMAGE_PUBLIC_ID}
            src={profileImage[0].secure_url}
            width={500}
            height={500}
          />
        ) : null}

        <UploadButton
          signatureEndpoint="/api/sign-cloudinary-params"
          className="bg-blue-500 hover:bg-blue-700 text-white font-bold py-2 px-4 rounded-full"
          options={{
            publicId: PROFILE_IMAGE_PUBLIC_ID,
            multiple: false,
          }}
        />

        {/* Listing our glass frames */}
        <ul className="grid grid-cols-3 gap-4">
          {glassResources.map((image: ResourceImage) => (
            <li key={image.public_id}>
              <CldImage
                className="max-w-sm overflow-hidden shadow-lg hover:shadow-2xl"
                alt={image.public_id}
                src={image.secure_url}
                width={100}
                height={100}
               />
            </li>
          ))}
        </ul>

      </section>
    </main>
  );
}

type ResourceImage = {
  public_id: string;
  secure_url: string;
  width: number;
  height: number;
};
Code language: JavaScript (javascript)
We’ll fetch the resources that reside in the glasses folder.
  // Search for our resources inside our "glasses" folder
  const { resources: glassResources } = await cloudinary.search
    .expression("folder=glasses")
    .execute();
Code language: JavaScript (javascript)
Then, we’ll list them using our CldImage component.
       {/* Listing our glass frames */}
        <ul className="grid grid-cols-3 gap-4">
          {glassResources.map((image: ResourceImage) => (
            <li key={image.public_id}>
              <CldImage
                className="max-w-sm overflow-hidden shadow-lg hover:shadow-2xl"
                alt={image.public_id}
                src={image.secure_url}
                width={100}
                height={100}
               />
            </li>
          ))}
        </ul>
Code language: HTML, XML (xml)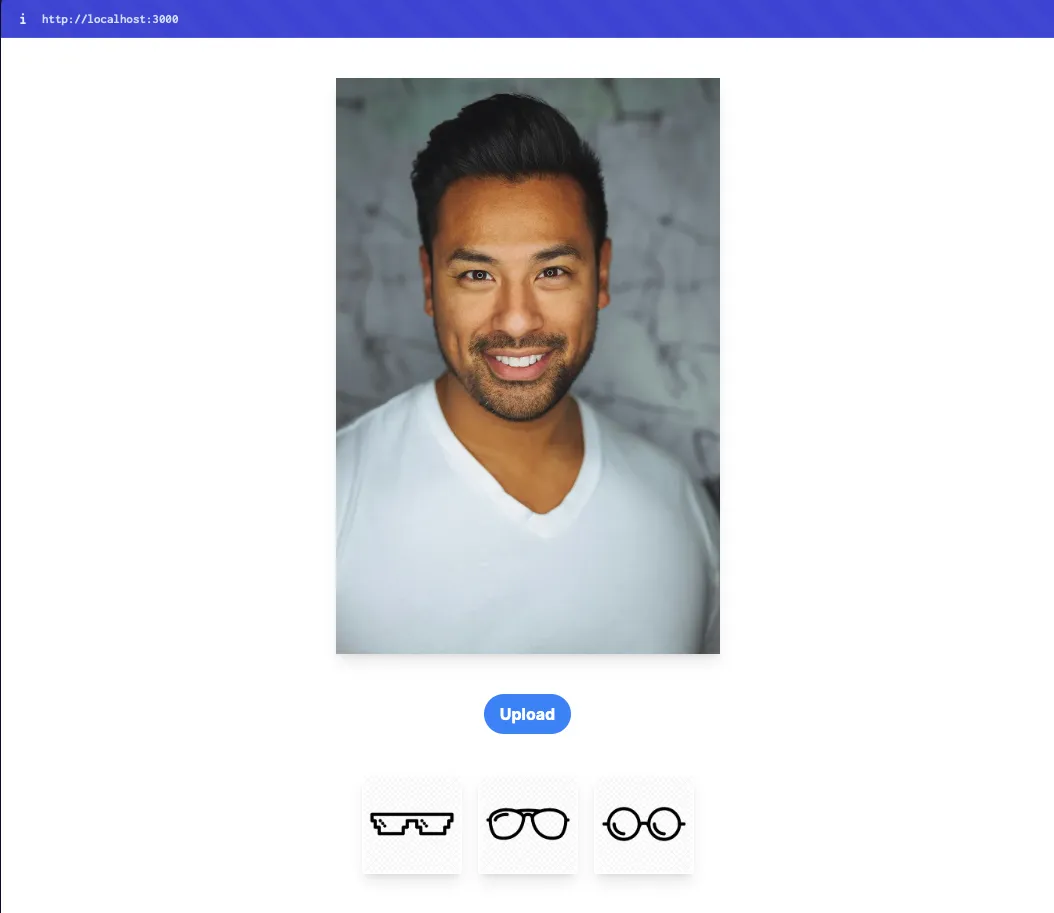
In our demo, the end-user should be able to click these eyeglass frames and try them on. So, instead of just rendering them as images, let’s create a button where the user can interact later. Create a new component inside our components folder called CldImageButton:
app
 ↳components
  ↳CldImageButton.tsx

"use client";
import CldImage from "@/app/components/CldImage";

function CldImageButton({ image }: { image: ResourceImage }) {
  return (
    <button>
      <CldImage
        className="max-w-sm overflow-hidden shadow-lg hover:shadow-2xl"
        alt={image.public_id}
        src={image.secure_url}
        width={100}
        height={100}
      />
    </button>
  );
}

export default CldImageButton;

export type ResourceImage = {
  public_id: string;
  secure_url: string;
  width: number;
  height: number;
};

Code language: JavaScript (javascript)
And replace it in our Home server component:
app
 ↳page.tsx
 ...
 <ul className="grid grid-cols-3 gap-4">
    {glassResources.map((image: CldImage) => (
       <li key={image.public_id}>
          <CldImageButton image={image} />
        </li>
      ))}
  </ul>
  ...
Code language: HTML, XML (xml)To try on our eyeglass frames, we’ll need to position them correctly on our profile picture. We’ll use Cloudinary’s face-detection algorithm to find the face in our image and place the frames accurately over it.
Cloudinary offers face-detection algorithms that automatically apply transformations to images based on the faces it detects.
First, let’s get the public ID of the frame the user selects. When they click on a frame, we will add a search param to the URL using useRouter from Next.js.
"use client";
import CldImage from "@/app/components/CldImage";
import { useRouter } from "next/navigation";

function CldImageButton({ image }: { image: ResourceImage }) {
  const router = useRouter();

  return (
    <button
      // add selectedImagePublicId search param with the public id of the image
      onClick={() => router.push(`/?selectedImagePublicId=${image.public_id}`)}
    >
      <CldImage
        className="max-w-sm overflow-hidden shadow-lg hover:shadow-2xl"
        alt={image.public_id}
        src={image.secure_url}
        width={100}
        height={100}
      />
    </button>
  );
}

export default CldImageButton;

export type ResourceImage = {
  public_id: string;
  secure_url: string;
  width: number;
  height: number;
};

Code language: JavaScript (javascript)
Then, on our Home page, we’ll get this parameter:
import UploadButton from "@/app/components/UploadButton";
import getCloudinary from "@/app/utils/getCloudinary";
import CldImage from "@/app/components/CldImage";
import CldImageButton, { type ResourceImage } from "@/app/components/CldImageButton";

const PROFILE_IMAGE_PUBLIC_ID = "profile-image";

const cloudinary = getCloudinary();

export default async function Home({
  searchParams,
}: {
  searchParams: Promise<{ [key: string]: string | string[] | undefined }>;
}) {
  // get our search params
  const searchParamsObj = await searchParams;

  const { resources: glassResources } = await cloudinary.search
    .expression("folder=glasses")
    .execute();

  // Search for a resource with the public ID of "profile-image"
  const { resources: profileImage } = await cloudinary.search
    .expression(`public_id=${PROFILE_IMAGE_PUBLIC_ID}`)
    .execute();

  return (
    <main>
      <section className="flex flex-col gap-10 mt-10 items-center min-h-screen">
        {profileImage.length ? (
          <CldImage
            className="max-w-sm overflow-hidden shadow-lg"
            alt={PROFILE_IMAGE_PUBLIC_ID}
            src={profileImage[0].secure_url}
            width={500}
            height={500}
          />
        ) : null}

        <UploadButton
          signatureEndpoint="/api/sign-cloudinary-params"
          className="bg-blue-500 hover:bg-blue-700 text-white font-bold py-2 px-4 rounded-full"
          options={{
            publicId: PROFILE_IMAGE_PUBLIC_ID,
            multiple: false,
          }}
        />

        <ul className="grid grid-cols-3 gap-4">
          {glassResources.map((image: ResourceImage) => (
            <li key={image.public_id}>
              <CldImageButton image={image} />
            </li>
          ))}
        </ul>
      </section>
    </main>
  );
}

Code language: JavaScript (javascript)
To make use of this algorithm and to automatically position an overlay over the detected face(s) in an image, we need to set the gravity value to either “face” or “faces” (if we want to add the overlay to each of the detected faces in the image).
To add the overlay in our CldImage component, we are going to use the overlays property:
 ...
  <CldImage
    className="max-w-sm overflow-hidden shadow-lg"
    alt={PROFILE_IMAGE_PUBLIC_ID}
    src={profileImage[0].secure_url}
    width={500}
    height={500}
    // check if an image has been selected to try-on
    {...(searchParamsObj.selectedImagePublicId
      ? {
         overlays: [
          {
            // Our search param with the public ID of the image
            publicId: searchParamsObj.selectedImagePublicId as string,
            position: {
             // our gravity value
             gravity: "face",
            },
           },
          ],
        }
        : null)}
    />
  ...

Code language: JavaScript (javascript)
We can set our gravity value by using the position prop inside overlays. We’ll also specify the image we want to use as the overlay with the publicId prop by providing the ID of our image.
If we select a frame, we’ll see something similar to the following:
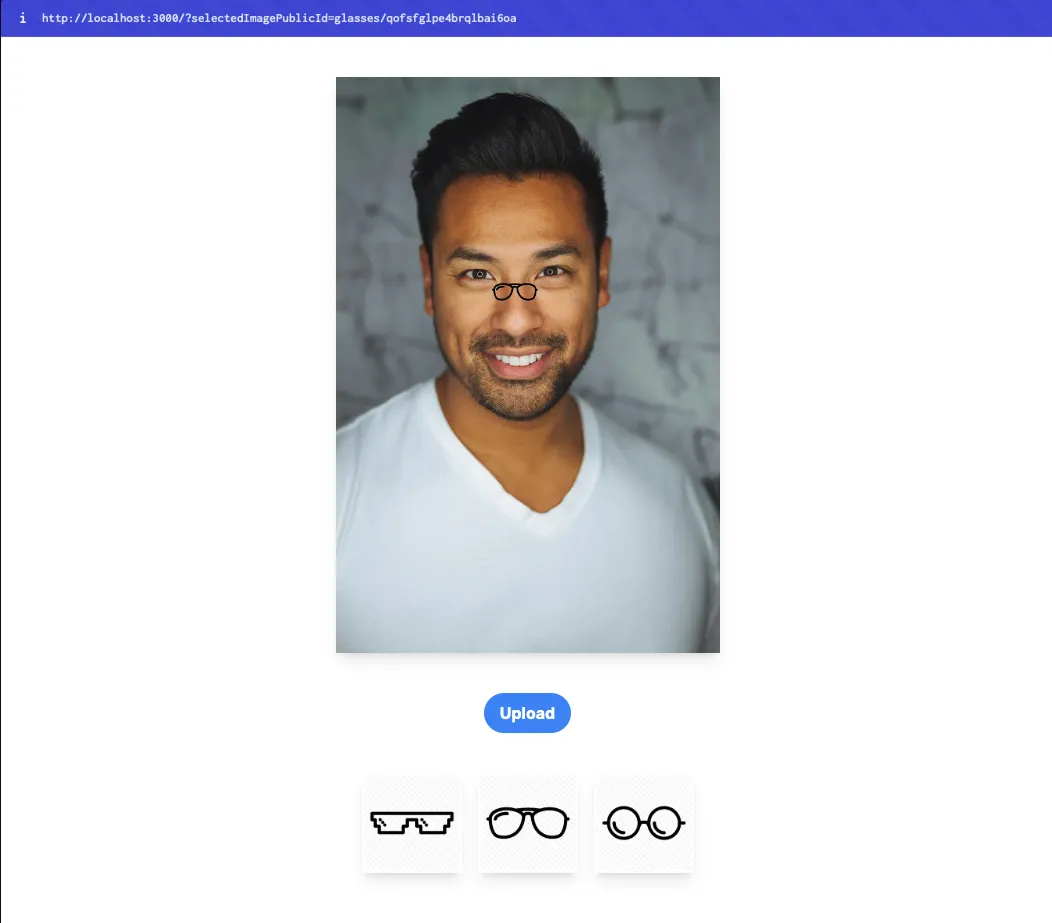
However, the frames aren’t fitting quite right yet. We’ll need to resize them to match the size of the detected face. To achieve this, we’ll use the region_relative flag and specify a width that scales based on this flag.
The region_relative flag tells Cloudinary to interpret percentage-based width and height values for an image layer (like an overlay) as percentages relative to the size of the detected region — in our case, the face. So, if we set the width to 1.0 (100%), the overlay will scale to 100% of the face’s size. This ensures that the eyeglass frames adjust proportionally to fit the face in the image.
...
<CldImage
className="max-w-sm overflow-hidden shadow-lg"
alt={PROFILE_IMAGE_PUBLIC_ID}
src={profileImage[0].secure_url}
width={500}
height={500}
// check if an image has been selected to try-on
{...(searchParamsObj.selectedImagePublicId
? {
overlays: [
{
// Our search param with the public ID of the image
publicId: searchParamsObj.selectedImagePublicId as string,
flags: ["region_relative"],
position: {
// our gravity value
gravity: "face",
},
effects: [
{
width: "1.0",
},
],
},
],
}
: null)}
/>
...
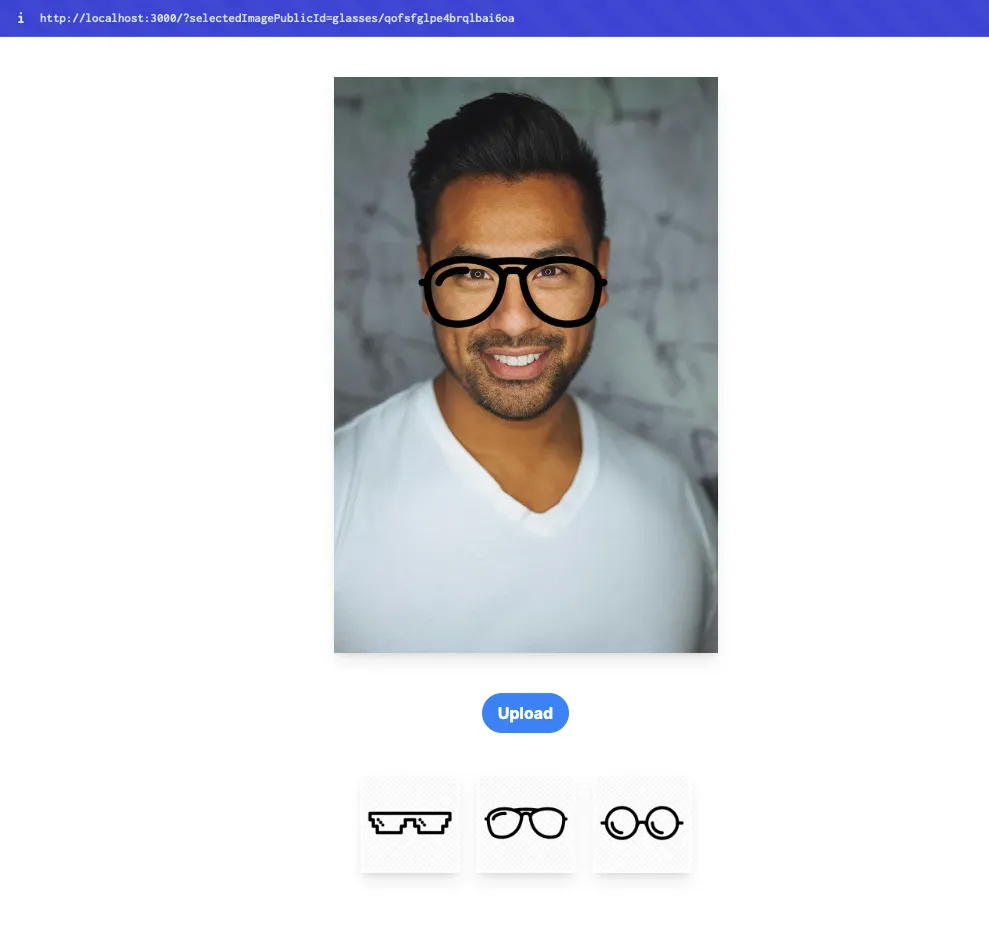
Code language: JavaScript (javascript)If we check our app one more time, we’ll notice that the frames are now fitting right based on the face size:
In this blog post, we built a Next.js app that works smoothly with Cloudinary to create a fun, virtual try-on experience. We used Cloudinary’s face detection to figure out where to place eyeglass frames on profile pictures, and then applied overlays and region-relative transformations to make them fit nicely. We also took advantage of server actions so the page updates automatically when a new image is uploaded, and we set up a user-friendly interface with next-cloudinary to keep everything running smoothly.
If you haven’t already, sign up for a free Cloudinary account and try creating your live stream today.