
This is part two of our three-part series on leveraging Cloudinary for more effective management of your UGC.
Part one, where we covered the definition of UGC, its value, and strategies for effectively managing UGC using Cloudinary, can be found here.
Additionally, you can explore our free 45-minute self-paced workshop in the Cloudinary Academy which expands on the content in this blog series.
As you begin to handle UGC with Cloudinary you’ll want to establish a workflow with as much automation and as little manual interaction as possible.
In this blog post, we’ll show you how Cloudinary streamlines UGC workflows:
Why resize assets received from users? Firstly, resizing upon upload prevents unnecessary storage of large assets. Secondly, it ensures a consistent style, like maintaining a 1:1 aspect ratio for seamless grid placement, for example. Additionally, it enhances user experience by reducing load times through serving smaller assets.

Scaling and cropping are image and video manipulation capabilities offered by Cloudinary to crop and focus on the subject of an asset, all in the same upload method.
Scaling involves adjusting the dimensions of an asset to a desired size (often a smaller size) by reducing it while maintaining its aspect ratio. This process ensures that the asset fits specific display requirements without distorting its proportions.

Here’s an example of a scaled down version of the cheeseburger asset on the right which maintains the exact same aspect ratio as the original on the left. There aren’t any portions of the image removed while scaling down. You can see that the file size has decreased by approximately 99.27% (1.70 MB to 13.91KB)!

The Node.js code above shows how to scale an image to a width of 500 pixels, with Cloudinary dynamically determining the height to maintain the aspect ratio of the original asset. We are also applying automatic compression which drastically reduces the image size without a change in quality. So, win/win.
A crop (see below) involves removing portions of the image to focus on a particular subject or to achieve a desired composition.

You can see that the scaled down version of the cheeseburger on the right does not maintain the same aspect ratio as the original on the left. We have removed some of the background while cropping to focus on the subject of the photo. Notice that the file size has decreased by 98.79%! (1.70 MB to 21.03KB)
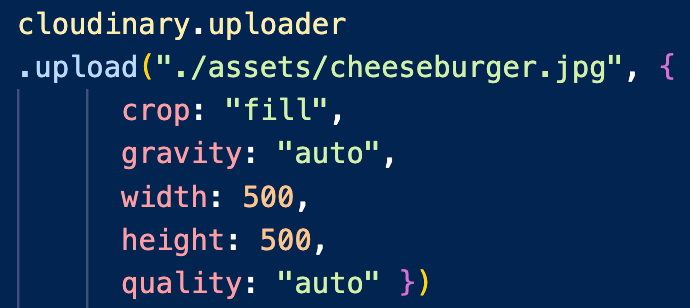
This Node.js code demonstrates the implementation of the automatic gravity feature for achieving a perfect 500px x 500px square crop (1:1 aspect ratio). We are also applying automatic compression which, again, significantly improves image quality in ways that go beyond the human eye’s ability to see.
Videos, due to their notably larger size, present a great opportunity for significant enhancements in both storage efficiency and user experience. By implementing transformations and optimizations prior to storing, you can effectively reduce storage usage and enhance load times, improving the overall user experience through reduced file sizes.
For example, this user-uploaded video, stored in a .mov format, weighs a substantial 29 MB — significantly larger than the optimal size for viewing on a mobile device.

If you wanted to upload this video, you might want to scale the video down and apply automatic quality and compression transformations upon upload. This would be cleanest to apply as an upload preset, but there are many different ways to achieve these transformations with Cloudinary.

This transformation would additionally implement a scale crop, which is automatically applied as the default crop when specifying either the height or width parameters.
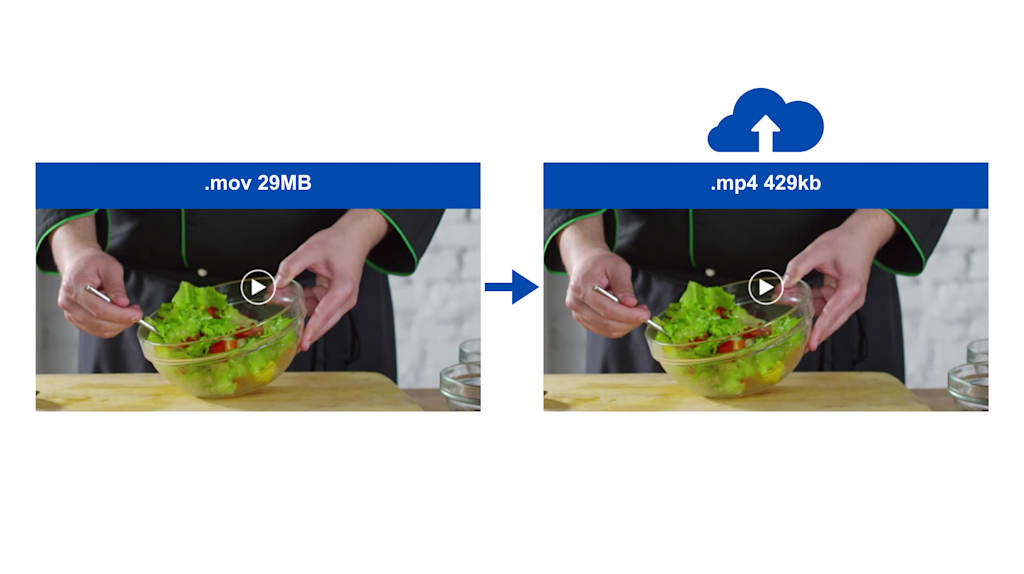
With those transformations, the video automatically transforms to an (.mp4) format, which is known to perform better on the web, and is compressed to 429 kb, resulting in an impressive 86% reduction in file size!
All of these optimizations are executed without any visual degradation discernible to the human eye.
We always recommend putting transformations like these into a custom upload preset, so that they are reusable, scalable, and eliminate the chance of human error.
Now that your asset upload process is established, let’s simplify your organizational structure for storing user-generated content.
Creating an organizational structure enhances access and retrieval of assets, facilitates future-proofing and scalability, fosters cross-team collaboration, and enables implementation of access control and security measures. Most of all, it simplifies asset searching.
There’s no universal way to organize assets, but the structure should align with your specific needs and requirements. Cloudinary provides the flexibility you need over asset arrangement and distribution.
In this example, the assets are organized with a fixed folder structure that integrates directly into the workflow.
While there are many ways to specify how assets will be organized, below are two common approaches.
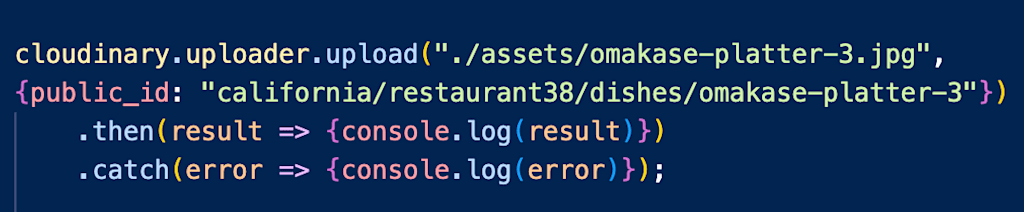
The above example specifies the folder structure in the public_id parameter on the upload call. It’s implementing the geolocation/restaurant name/dishes/dish folder structure.

The other approach specifies the folder structure within the folder parameter on the upload call. In this example you’re not setting the folder as part of the public_id parameter, but are explicitly specifying the folder this asset should be placed in upon upload.
These are essentially two different ways of doing the same thing. In both cases, all folders would be displayed in the asset’s public ID.
It is possible to decouple the public ID and delivery URL from the display names and folders in the media library. This is called dynamic folder mode and involves a variety of new options and behavior changes in both the media library and the APIs.
If this is something you’re interested in implementing, we suggest reaching out to our Support team before doing so as there is no way to revert this decision.
Lastly, we wanted to touch on watermarking, as it’s a common use case for user-generated content. Watermarking via Cloudinary can be viewed as an image layer placed on top of your user generated image or video. It’s a simple transformation.


By leveraging Cloudinary’s advanced watermarking capabilities, you can embed watermarks onto any image or video you deliver, using standard image or video layers. This functionality serves as a powerful tool for bolstering the security of your content, it also enhances branding potential. Whether you’re looking to imprint logos, trademarks, or any other identifying markers, Cloudinary’s watermarking feature provides the flexibility and customization options necessary to tailor the watermark to your specific needs.
When employing image layers for watermarking purposes, Cloudinary offers a range of transformation options such as adjusting opacity and brightness. These transformations ensure that the watermark maintains optimal visibility while seamlessly integrating with the underlying content, thereby maximizing its impact without compromising the overall aesthetic appeal. By incorporating these techniques into your asset management strategy, you can effectively safeguard your content’s integrity, reinforce your brand identity, and elevate the visual experience for your audience.
You can include any of the transformations and organizational structures above in an Upload Preset which we discussed in part one (upload presets specific section link). This will mean all images and videos uploaded by users will get the same transformations applied uniformly across all asset uploads.
Once these assets land in your account, they’re already ready to go into production.
To dive deeper into managing your UGC with Cloudinary, explore our comprehensive UGC guide in the documentation.
In the final installment of this series, we’ll examine object recognition, auto-tagging, and show you how automations and add-ons can enhance and extend image and video management capabilities.
We’ll also take a look at MediaFlows, Cloudinary’s latest low-code platform, showcasing how to simplify the development of your own code base.
Ready to try Cloudinary now? Sign up here.


