
The by-product of human evolution with the internet has become ambitious web applications to cater for our ever-growing list of web application needs. As larger websites usually mean slower websites, Vite provides faster development experiences.
Being platform-agnostic means Vite is versatile and can be used across various platforms, providing an optimized development environment, especially beneficial for Vue.js projects. Vite not only handles images as assets, but it also detects other common media and font filetypes automatically. This detection ensures a more holistic asset management approach, taking the pain out of manual configurations.
In this article we’ll cover the full spectrum of Vite images Vue.JS including:
- A codesandbox environment to get started.
- What you need to work with Vue images in Vite.
- A little background on Vite.
- Details on the Vite import image process with Vue and how to handle assets in the Vite images Vue environment.
While we’re talking about Vue images in this article, it’s worth noting that Cloudinary integrates with Vite and Vue while offering an expanded offering for image handling, transformations, and more, all for free for life. Take a minute to see how the Cloudinary Image API can create transformative visual experiences with image APIs.
This article will discuss Vite, why it’s becoming an essential tool in the front-end universe, and how to utilize it in image bundling by building an image gallery.
The completed project is on Codesandbox. Check out the Codesandbox to get started quickly.
https://github.com/Iheanacho-ai/image-assets-bundling-vue
To get the most out of this article, we must have the following:
- A basic understanding of CSS, JavaScript and Vue.js.
- Node and its package manager, npm. We run the terminal command
node -v && npm -vto verify they’re installed, or we install them from here. - Alternatively, we can use another package manager, Yarn.
Vite is a build tool that aims to provide a faster and leaner development experience for modern web projects. It acts as a no-bundler dev environment for Vue.js, speeding up the overall front-end development process.
It’s an excellent front-end tooling that provides developers with NPM Dependency Resolving, Pre-Bundling, and Hot Module Replacement. It’s advantageous in local development as it swiftly handles refreshing file changes.
Vite leverages the availability of native ES modules in the browser and the rise of JavaScript tools written in compile-to-native languages to solve the slow feedback loop that arises in developing larger applications.
Vite is also a frontend tool for building fast and optimized web applications. Apart from referencing images in the usual manner, you can utilize images in Vite by placing them in the public folder, importing files individually, leveraging dynamic images from APIs, or using dynamic inline background images. You can also pull in an image from your assets folder using a static URL or the static import method directly on the src attribute. Additionally, you can extend Vite’s internal list of assets using the assetsInclude option, which ensures that referenced assets are incorporated as part of the build assets graph, benefitting from hashed file names and potential optimization processing by plugins. It handles images as assets automatically, so you don’t need to specify configurations for the images. You can use a standard <img> tag with the src attribute to display an image from a URL.
For instance, you can use a URL that links to platforms like Unsplash or Pexels. If you’re looking to pull in an image from your assets folder, you can use static import or directly on the Vue Vite image src attribute. It’s essential to reference the images in the PWA Manifest icons using the assets directory path relative to the root folder.
To create a Vite app, we’ll open our terminal and run the code block below.
**NOTE: If you’re on windows and using Git Bash, you might have issues with the arrows, so you should use the Powershell terminal instead. **
    npm create vite@latest

    #or

    yarn create vite

    #or

    pnpm create vite

Code language: PHP (php)
Running this command will trigger a set of question prompts. Answer these questions as follows.
    Project name: <name of our project>
    Select a framework: vue.js
    Select a variant: vue

Code language: HTML, XML (xml)
Next, we’ll run these commands.
    cd <name of our project>
    npm install
    npm run dev

Code language: HTML, XML (xml)
This command above will change the directory to our project and create a local development server running on http://localhost:3000/.
Vite handles images as assets automatically, so we don’t need to specify configurations for the images. Learn more about static asset handling in Vite here.
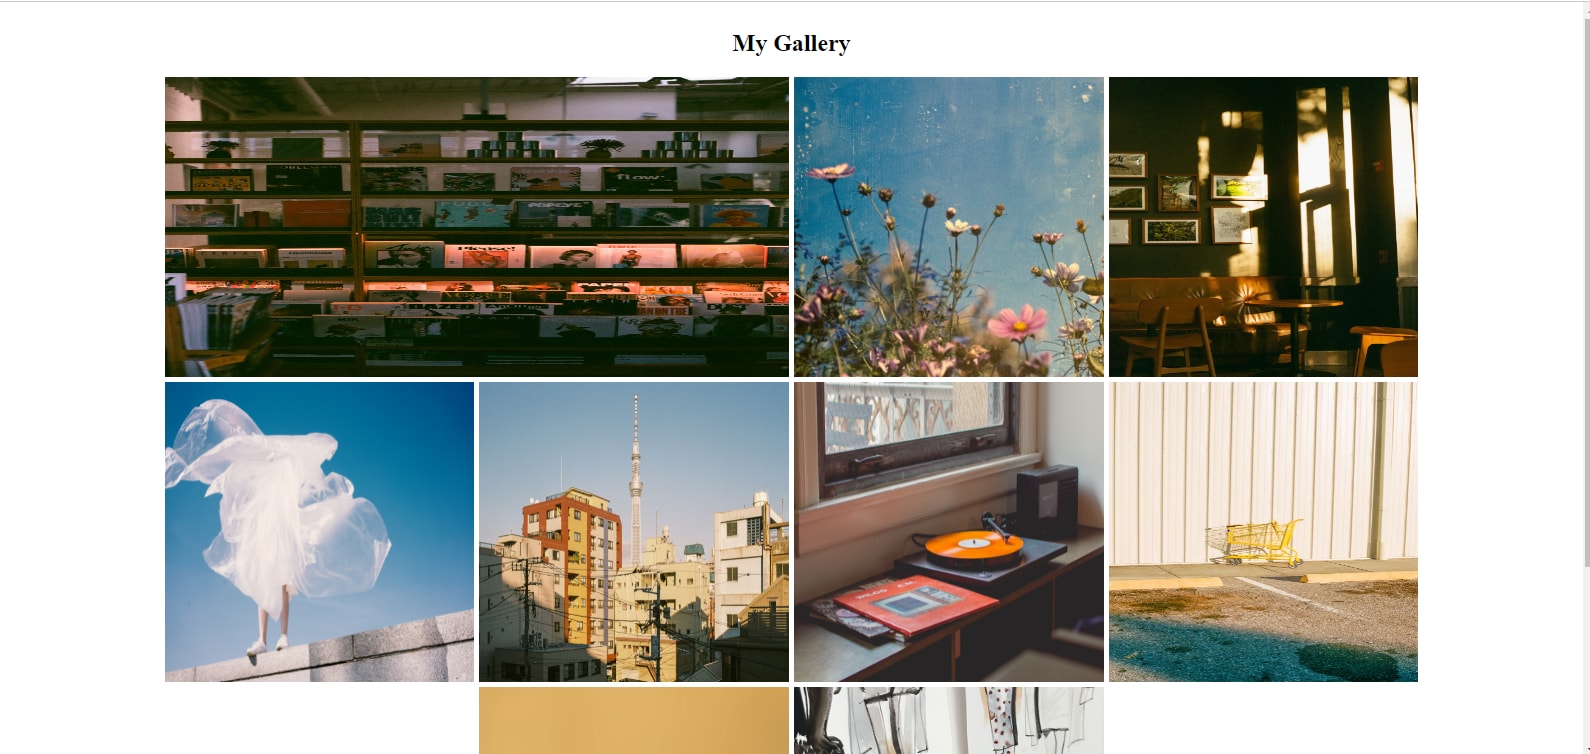
We’ve added nine images to our src/``assets folder. To download the images we’ll use for our gallery, check out here.
Next, we’ll import the images in the script section of our App.vue file.
<script>
      import Img1 from './assets/photo-1.jpg'
      import Img2 from './assets/photo-2.jpg'
      import Img3 from './assets/photo-3.jpg'
      import Img4 from './assets/photo-4.jpg'
      import Img5 from './assets/photo-5.jpg'
      import Img6 from './assets/photo-6.jpg'
      import Img7 from './assets/photo-7.jpg'
      import Img8 from './assets/photo-8.jpg'
      import Img9 from './assets/photo-9.jpg'
</script>
Code language: HTML, XML (xml)
For those who are interested in advanced image handling, you can use vite-imagetools to load and transform images using a toolbox of import directives. To start using vite-imagetools in your project, simply run npm i vite-imagetools.
Following our imports in our `App.vue` file, we’ll create an `images` array to hold all the images we’ve just imported.
    export default {
      data(){
        return{
          images: [Img1, Img2, Img3, Img4, Img5, Img6, Img7, Img8, Img9]
        }
      },
    }

Code language: JavaScript (javascript)
After importing the images, we’ll loop over and render our images in the array in the template section of our App.vue file.
    <template>
      <div>
        <div class="image-container">
          <div class="image" v-for = "image in images" :key="image">
            <img :src="image">
          </div>
        </div>
      </div>
    </template>

Code language: HTML, XML (xml)
Our App.vue file should look like this.
    <template>
      <div>
        <div class="image-container">
          <div class="image" v-for = "image in images" :key="image">
            <img :src="image">
          </div>
        </div>
      </div>
    </template>

    <script>
      import Img1 from './assets/photo-1.jpg'
      import Img2 from './assets/photo-2.jpg'
      import Img3 from './assets/photo-3.jpg'
      import Img4 from './assets/photo-4.jpg'
      import Img5 from './assets/photo-5.jpg'
      import Img6 from './assets/photo-6.jpg'
      import Img7 from './assets/photo-7.jpg'
      import Img8 from './assets/photo-8.jpg'
      import Img9 from './assets/photo-9.jpg'

      export default {
        data(){
          return{
            images: [Img1, Img2, Img3, Img4, Img5, Img6, Img7, Img8, Img9]
          }
        },
      }
    </script>

Code language: HTML, XML (xml)
Our image gallery is incomplete without the styling. We’ll write the following styles in our App.vue file.
    <style>
      #app {
        width: 100%;
        height: 100%;
        display: flex;
        justify-content: center;
        align-items: center;
      }
      h2{
        text-align: center;
      }
      .image-container{
        width: 80%;
        margin-left: 10%;
        display: grid;
        grid-template-columns: repeat(4, 1fr);
        gap: 5px;
      }
      .image-container div:first-child {
        grid-column-start: 1;
        grid-column-end: 3;
      }
      .image-container div:last-child {
        grid-row-start: 2;
        grid-row-end: 5;
      }
      .image{
        width: 100%;
        height: 300px;
      }
      .image img {
        width: 100%;
        height: 100%;
      }

    </style>

Code language: HTML, XML (xml)
In the code block above, we’ve:
- Centered our gallery using CSS native
justify-content: centerandalign-items. - Defined how many columns our gallery should have using
grid-template-columns: repeat(4, 1fr). - Targeted the first and last div in the
image-containerand specified how many columns or rows each should take up using CSS selectors.
With that, we’ve successfully created our image gallery.
This article discussed what Vite is, the advantages of building our applications with Vite and, most importantly, how to integrate Vite in our project to handle image assets bundling. Using this knowledge, we created an image gallery.


