
As you may have heard, Cloudinary, the end-to-end media management solution, now has a certified cartridge with Salesforce Commerce Cloud (formerly Demandware), one of the industry’s most agile and scalable eCommerce platforms. The Cloudinary cartridge enables you to simplify and automate the process of manipulating, optimizing, and delivering images and videos throughout your entire Commerce Cloud store, including product images and videos, category assets, and site catalogs.
The cartridge provides access to Cloudinary’s powerful media management capabilities, including cutting edge dynamic image and video manipulation features, responsive images, image optimization, fast multi-CDN delivery and much more. With Cloudinary, you can quickly and easily enhance images and videos as well as automate management and publication of visual media. Your customers can then enjoy an optimal shopping experience across browsers, channels, and devices, raising the conversion rates for your site.
The announcement mentioned above shares more about the ‘what’ and ‘why’ of this exciting integration. In this post, we’ll get a bit more into the nitty gritty and show you how it all works.
The Cloudinary cartridge is now available in the marketplace.

Setting up the Cloudinary cartridge is pretty standard and entails installing and configuring the cartridge in Demandware Studio and then adding the cartridge, int_cloudinary, to your sites. Of-course you’ll need a Cloudinary account as well (you can sign up for a free account if you don’t have one yet).
All of this information is covered in detail in the Cloudinary cartridge integration guide (available for registered Cloudinary cartridge users), so let’s dive right in and show you what you can do after it’s up and running!
One of the major advantages of using Cloudinary is that you will only ever need to upload a single high-res version of any media asset. Cloudinary can then deliver any version of the image you may need, whether a thumbnail or banner, whether landscape or portrait, and take care of all the resizing, optimization and transformations from that single uploaded asset for you automatically.
Cloudinary can even replace the dominant (or any specified) color in your images, including appropriate shadows and shades, so you don’t even need to upload multiple images to present your products in different colors. For example, just applying a single transformation parameter definition: e_replace_color:darkgreen:80:2b38aa on the blue burlap bag image shown below (exact blue shade to replace = #2b38aa), enables you to also deliver that same image in dark green or any other color you choose.
 Original product: blue
 Auto-recolor: dark green
 Auto-recolor: red
With this in mind, you continue to upload your product and catalog assets to SFCC as usual, but now these assets will also automatically be synchronized with your Cloudinary account.
Cloudinary transformations enable you to generate virtually unlimited variations of a single image to achieve a variety of optimizations and special effects. Cloudinary has a remarkable set of image transformations available for your use.
These transformations can be applied at various levels in your store, with the transformations for the most specific level taking precedence. So, for example, a transformation set that includes a text overlay showing 50% Off for an image on the product level will override a transformation set with a text overlay saying 25% Off that was set for an image on the catalog level. The order of precedence is: Image -> Product -> Catalog -> Site. This gives you the power to apply transformations to groups of images, but still retain the flexibility to apply special transformations to specific images. This is handled with a new option in the Image Settings page of each of the 4 levels, where you can add the desired transformation.
For example, if you have a briefcase that is currently selling at a 20% discount, you may want to navigate to the Global Image Settings tab of that specific product and add a text overlay with the following definitions: Arial, bold, 30px, and the text “20% Off” in white font with a black border (so it will show up on any image background), 10 pixels from the bottom-right corner and rotated at an angle of -45 degrees.

While you are at it, you can also add an SEO suffix so that the product will be more likely to be displayed by search engines. Here’s the short definition you would add to achieve all of this:
{
 "Transformations":
    "l_text:Arial_30_bold_stroke:20%25%20Off,
    g_south_east,co_white,bo_3px_solid_black,y_10,x_10,a_-45",
    "seoSuffix": "bag-sale"

}
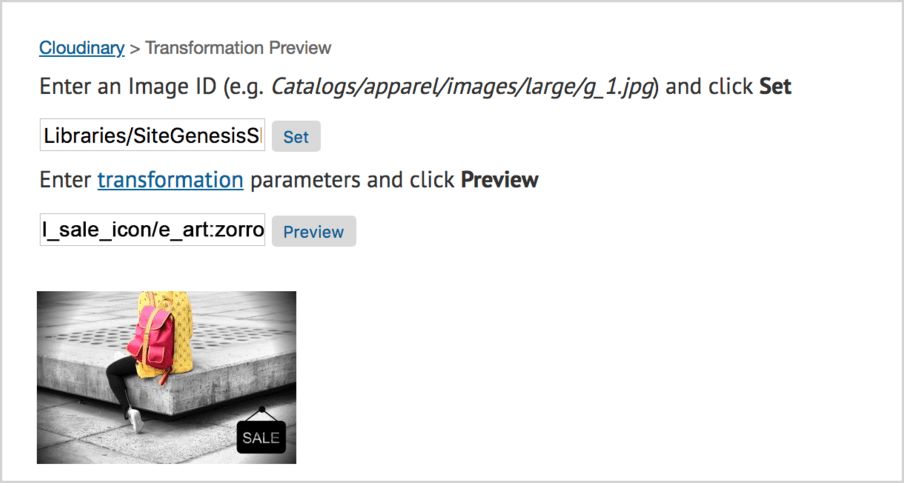
The Cloudinary cartridge also provides you with a Transformation Preview page to help you visualize the transformations before you apply them. For example, below a Commerce Cloud developer has defined transformation parameters that overlays a ‘SALE’ sign on a product and applies an artistic filter to focus on and enhance the product image. Before applying the transformation to a whole set of products, he can preview it on a selected image:
Cloudinary uses simple HTTPS URLs to deliver your assets to users via a worldwide fast CDN. The URL contains the Public ID of the requested asset plus any optional transformation parameters.
Cloudinary also lets you add responsive behavior to your images to make sure that the optimal image size is delivered to each user based on the available space on their viewing device. Cloudinary’s URL-generation method optionally accepts a JSON object that maps viewport sizes to image sizes and then automatically generates the values to be used for the srcset and sizes attributes of the image tag.
The following code example shows how to:
- Include the Cloudinary
URLgeneratorscript file - Use the
getUrlForProductImagefunction to generate the URL for a product image and calculate thescrsetfrom the supplied custom values - Set the
srcandsrcsetattributes of the productimgtag to be equal to the values returned by the function
<isset         //include the script
  name="cloudinaryURLgenerator"
  value="${require('int_cloudinary/cartridge/scripts/lib/URLgenerator')}"
  scope="page" />

<isset         //generate the URL and srcset for displaying a product image
  name="cloudinaryUrl"
  value="${cloudinaryURLgenerator.getUrlForProductImage(
    product, product.getImage('large', 0),
    { width: 225, height: 300}, true,
    { size75w : { style: "(max-width: 480px) 75px", width:"75" , height:"100"},
      size113w : {style: "(max-width: 768px) 113px", width:"113" , height:"150"},
      size225w : {style: "225px", width:"225" , height:"300"})}"
  scope="page" />

<isset       //retrieve the image URL from the returned data
  name="imageUrl"
  value="${cloudinaryUrl.imageUrl}"
  scope="page" />

<isset        //retrieve the srcset from the returned data
  name="imageSrcset"
  value="${cloudinaryUrl.srcset}"
  scope="page" />

<img src="${imageUrl}" ${imageSrcset} … />
Code language: PHP (php)
The code above would then generate the following image tag and attributes for the my_prod.png image:
<img
  src="
    https://.../w_225,h_300,c_fit/my_prod.png"
  srcset="
    https://.../w_75,h_100,c_fit/my_prod.png 75w,
    https://.../w_113,h_150,c_fit/my_prod.png 113w,
    https://.../w_225,h_300,c_fit/my_prod.png 225w"
  sizes="
    (max-width: 480px) 75px,
    (max-width: 768px) 113px,
    225px"
>
Code language: HTML, XML (xml)Videos are the next big thing in engaging your customers with your amazing products and increasing your conversion rates. The Cloudinary cartridge makes it relatively simple to add videos to your site while leaving all the heavy lifting of video optimization and fast delivery to Cloudinary. Videos are displayed in your storefront with the Cloudinary Video Player, which is fully responsive to any device or screen size, and supports adaptive streaming up to full HD quality for video playback starting almost instantaneously.
Videos are uploaded to your products as a new View Type called video . You can then update any product templates where you want to display the video by including the provided Cloudinary video scripts and then calling the iscloudinaryproductvideo tag to display the actual video. For example, the following code displays all the videos uploaded to a specified product (pdict.Product):
<isinclude template="cloudinary/video/scripts"/>
<isinclude template="cloudinary/util/modules"/>
...
<isif condition="${pdict.Product.getImages('videos').size() > 0}">
  <isloop
      items="${pdict.Product.getImages('videos')}"
      var="video"
      status="videoSmStatus">
    <li>
      <iscloudinaryproductvideo
          product="${pdict.Product}"
          video="${video}"
          counter="${videoSmStatus.index}" />
    </li>
  </isloop>
</isif>
Code language: HTML, XML (xml)By leveraging the power of Commerce Cloud and the new cartridge from Cloudinary, storefronts can now deliver an improved and fully optimized shopping experience. Cloudinary provides an easy and automated way to manage and optimize your media assets and deliver them with the smallest possible file size while maintaining visual quality, saving bandwidth and improving the performance of your online store. Cloudinary can automatically implement various image optimizations and offers many other features for transforming the media assets you deliver to your users. Make sure to check the cartridge documentation as well as the Cloudinary solutions page for more information. The cartridge is already available in the marketplace. And if you don’t have a Cloudinary account yet, you can easily sign up for a free account and give us a whirl.