
TikTok is one of the biggest social media platforms in the world for sharing video content. Users create short-form videos to entertain their viewers, but they often have to find tools to customize and resize their videos to suit TikTok. Imagine building a tool that allows users to customize their videos for the app.
In this blog post, we’ll learn how to build a simple web app in Next.js that can help users customize their videos to fit platforms like TikTok using Cloudinary’s video management functionalities.
A basic understanding of TypeScript or JavaScript is enough to follow along with this blog post. You’ll also need a Cloudinary account; create one for free. Also, you can find the completed app in this GitHub repository.
Before we start building the core functionality, let’s set up the Next.js project. We‘ll use the Next.js app router for this project because of its modern features, performance, and ability to create server components and actions.
To begin, clone the starter project using the command below:
$ git clone https://github.com/folucode/cloudinary-video-snipper-starter.gitCode language: PHP (php)Next, navigate to the cloned project directory and install the dependencies using any package manager, either npm install or yarn.
The starter project folder already has all the styles and components we need to build this app, enabling us to focus on building the core functionality.
In the project’s root directory, add a new file, .env.local, and paste the code below in that file. This file will house all the app keys we need to use Cloudinary.
CLOUDINARY_CLOUD_NAME=<CLOUDINARY_CLOUD_NAME>
CLOUDINARY_API_KEY=<CLOUDINARY_API_KEY>
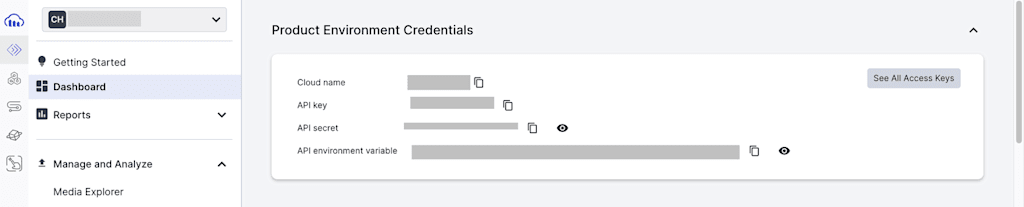
CLOUDINARY_API_SECRET=<CLOUDINARY_API_SECRET>Code language: HTML, XML (xml)To get these details, click this link to navigate to the Cloudinary developer dashboard. We can see all the details under the Product Environment Credentials.
Now that we’re all set up, let’s start building the functionality. First, we want to set up our Cloudinary library. To do this, we’ll add a new folder called lib in the src folder; in that folder, we add a file and name it cloudinary.ts. In the cloudinary.ts file, we’ll set up Cloudinary like so:
import { v2 as cloudinary } from 'cloudinary';

cloudinary.config({
  cloud_name: process.env.CLOUDINARY_CLOUD_NAME,
  api_key: process.env.CLOUDINARY_API_KEY,
  api_secret: process.env.CLOUDINARY_API_SECRET,
});

export default cloudinary;Code language: JavaScript (javascript)
In the code above, we’ll import the Cloudinary library. The v2 version is being used and aliased as cloudinary. The cloudinary.config() method is called to configure the Cloudinary client with the account details we retrieved from our dashboard in the last section.
We’ll then export the configured Cloudinary object as this module’s default export. This setup allows other parts of our application to import and use the configured Cloudinary client without configuring it again.
Before we begin, add these import statements to the top of the VideoUploadForm.tsx file.
import { redirect } from 'next/navigation';
import cloudinary from '../lib/cloudinary';
import { UploadApiResponse } from 'cloudinary';Code language: JavaScript (javascript)
There’s a function called upload in the VideoUploadForm.tsx file in the app folder under the src folder. In that upload function, the first step is to get the data from the form.
<span style="background-color: initial; color: inherit; font-size: inherit; text-wrap: wrap;"> 'use server';</span><div><code spellcheck="false" class="listtype-code listindent1 list-code1 lang-typescript"></code><code spellcheck="false" class="listtype-code listindent1 list-code1 lang-typescript"><span class=" author-d-1gg9uz65z1iz85zgdz68zmqkz84zo2qovwitz89zz76zcsz82zz84zluz65zz73zz84zz69zwpz71zcz87z0z73zz70zhz82ziz90z4oz78zz82z"> const file = <i>formData</i>.get('video') as File; const start = <i>formData</i>.get('start') as string; const end = <i>formData</i>.get('end') as string;</span></code><code spellcheck="false" class="listtype-code listindent1 list-code1 lang-typescript"></code><code spellcheck="false" class="listtype-code listindent1 list-code1 lang-typescript"><span class=" author-d-1gg9uz65z1iz85zgdz68zmqkz84zo2qovwitz89zz76zcsz82zz84zluz65zz73zz84zz69zwpz71zcz87z0z73zz70zhz82ziz90z4oz78zz82z"> const buffer: Buffer = Buffer.from(await file.arrayBuffer());</span></code><code spellcheck="false" class="listtype-code listindent1 list-code1 lang-typescript"></code><code spellcheck="false" class="listtype-code listindent1 list-code1 lang-typescript"><span class=" author-d-1gg9uz65z1iz85zgdz68zmqkz84zo2qovwitz89zz76zcsz82zz84zluz65zz73zz84zz69zwpz71zcz87z0z73zz70zhz82ziz90z4oz78zz82z"> let url: string = '';</span></code></div>Code language: HTML, XML (xml)Since we’re using the latest version of Next.js, all components are server components by default. If we want to run an asynchronous function on the server instead of the client, we’ll use Next.js server actions. Placing the use server directive at the top of the function signals to Next.js that the enclosed code is meant to run on the server. This prevents the function from being exposed to the client, enhancing security and performance.
We’ll then move on to handling the data from the form submission. First, we’ll retrieve the video file from the form data and cast it as a File object. Then, we’ll get the start and end times from the form, casting these values as strings.
Next, we’ll convert the video file into a binary Buffer by reading the file’s content as an ArrayBuffer and then converting this Buffer into a Buffer object using Buffer.from(). This conversion is necessary for efficiently handling the binary data of the video file on the server.
Finally, we’ll initialize an empty string variable url, which will store the URL of the processed video.
The next step is to upload the video file from the form data to Cloudinary, apply specific transformations, and then redirect our app to the processed video URL.
The process will be done within a try-catch block in the upload function, in the VideoUploadForm.tsx file, which ensures that any errors during the upload process are caught and logged for debugging purposes.
try {
  const base64Image: string = `data:${file.type};base64,${buffer.toString(
    'base64'
  )}`;

  const uploadResult: UploadApiResponse = await cloudinary.uploader.upload(
    base64Image,
    {
      resource_type: 'video',
      transformation: [
        { start_offset: start, end_offset: end },
        { aspect_ratio: '9:16', crop: 'fill' },
      ],
      public_id: `video-snippets/${Date.now()}`,
    }
  );

  url = uploadResult.secure_url;
 } catch (error: any) {
  console.error(error);
}

redirect(url);Code language: JavaScript (javascript)
First, we’ll convert the video file from Buffer into a Base64-encoded string. We’ll construct the string using the video file’s MIME type (file.type) and binary data (Buffer). The buffer object, previously created by converting the video file to a binary buffer, is transformed into a Base64 string using Buffer.toString(‘base64’). We’ll then prefix the Base64 string with the data URI scheme to form a valid Base64 image string, which is necessary for uploading to Cloudinary.
Next, upload the Base64-encoded video to Cloudinary using the upload method we set up from the Cloudinary client (cloudinary.uploader.upload). This method takes two main parameters: the Base64 string of the video and an options object. Within the options object, the resource_type is set to video to indicate that the file being uploaded is a video.
The transformation option is where we do the actual transformation of the video. In this case, we’ll trim the video to the specified start and end times ({ start_offset: start, end_offset: end }) gotten from the form data, and we adjust its aspect ratio to 9:16 while cropping it to fill the frame ({ aspect_ratio: '9:16', crop: 'fill' }). This aspect ratio is used in TikTok videos.
Additionally, we’ll set public_id to a unique identifier generated using the current timestamp to ensure that each uploaded video has a unique identifier in Cloudinary.
After the video has successfully uploaded, the result returned by Cloudinary (uploadResult) includes the secure URL (uploadResult.secure_url) pointing to the uploaded video. We’ll then store this URL in the url variable.
If errors occur during this process, they’re caught in the catch block and logged to the console.
Finally, we’ll redirect to the uploaded video’s URL using the redirect (url) function.
Our final code snippet in the VideoUploadForm.tsx file should look like this:
import { redirect } from 'next/navigation';
import cloudinary from '../lib/cloudinary';
import { UploadApiResponse } from 'cloudinary';
import { SubmitButton } from '@/app/submit-button';
import formStyles from './form.module.css';

export default function VideoUploadForm() {
  async function upload(formData: FormData) {
    'use server';

    const file = formData.get('video') as File;
    const start = formData.get('start') as string;
    const end = formData.get('end') as string;
    const buffer: Buffer = Buffer.from(await file.arrayBuffer());

    let url: string = '';

    try {
      const base64Image: string = `data:${file.type};base64,${buffer.toString(
        'base64'
      )}`;

      const uploadResult: UploadApiResponse = await cloudinary.uploader.upload(
        base64Image,
        {
          resource_type: 'video',
          transformation: [
            { start_offset: start, end_offset: end },
            { aspect_ratio: '9:16', crop: 'fill' },
          ],
          public_id: `video-snippets/${Date.now()}`,
        }
      );

      url = uploadResult.secure_url;
    } catch (error: any) {
      console.error(error);
    }
    redirect(url);
  }

  return (
  ...
  );
}Code language: JavaScript (javascript)When we successfully run the application, we can select a video to upload and choose the start and end times to crop. The video is then sent to Cloudinary, and the crop transformation is done. Once that’s completed, our app will redirect to the transformed video.

Here’s the complete source code.
In this blog post, you learned how to use Next.js and the powerful media tools provided by Cloudinary to build a simple TikTok video-snipping app. The Cloudinary video management library is an incredible resource for even more video transformations.
Try extending this app to have a dropdown list of video aspect ratios for other video platforms. Users can select a platform and video quality and the video is transformed to fit that specification.
If you enjoyed this post and want to discuss it in more detail, feel free to join the the Cloudinary Community forum and its associated Discord.


