
Ever wished you could just tell your AI assistant to handle your media files? Not just chat about them, but actually upload, transform, search, and organize your Cloudinary assets through natural conversation? Well, you’re in for a treat!
In this post, we’ll build a fully functional AI media assistant using the Cloudinary MCP servers. This powerful combination lets your AI seamlessly interact with your Cloudinary media library. By the end of this post, you’ll have a Next.js chat interface where you can interact with AI with natural language to help you manage your assets.
Think of the Model Context Protocol, or MCP, like a universal adapter for AI. You know how a USB-C port lets you plug all sorts of devices into your computer, no matter who made them? MCP does something similar for AI. It’s an open standard that enables powerful AI models, such as Claude, to communicate with external tools and data in a straightforward, standardized manner.
Before MCP, connecting AI to different services was a bit of a headache. You often needed custom code for every single connection. MCP changes that. It provides AI with a clear “instruction manual” for each tool, making it much easier for your AI assistant to understand what’s available and how to use it.
Here’s why this is game-changing, especially with Cloudinary’s MCP server:
- Standardized interface. It’s one protocol to rule them all. Your AI learns one way to interact with tools, making it incredibly flexible.
- Dynamic tool discovery. Your AI doesn’t need to be hardcoded with knowledge of every single tool. It can ask the MCP server, “What can you do?” and get a list of available actions at runtime.
- Type safety. Tools come with built-in schemas that tell the AI exactly what kind of information they need, ensuring proper usage and fewer errors.
- Extensibility. Adding new capabilities is a breeze. As Cloudinary introduces new visual media management features through MCP, your assistant can automatically leverage them without requiring you to write new integration code.
For Cloudinary users, this means your AI can easily interact with your entire media library using the same robust APIs you already know and love, but all driven through natural language conversations.
Our AI assistant will be a Next.js application that allows users to perform media operations using natural language. The application will interact with a large language model (Claude) that uses the Cloudinary asset management MCP server.
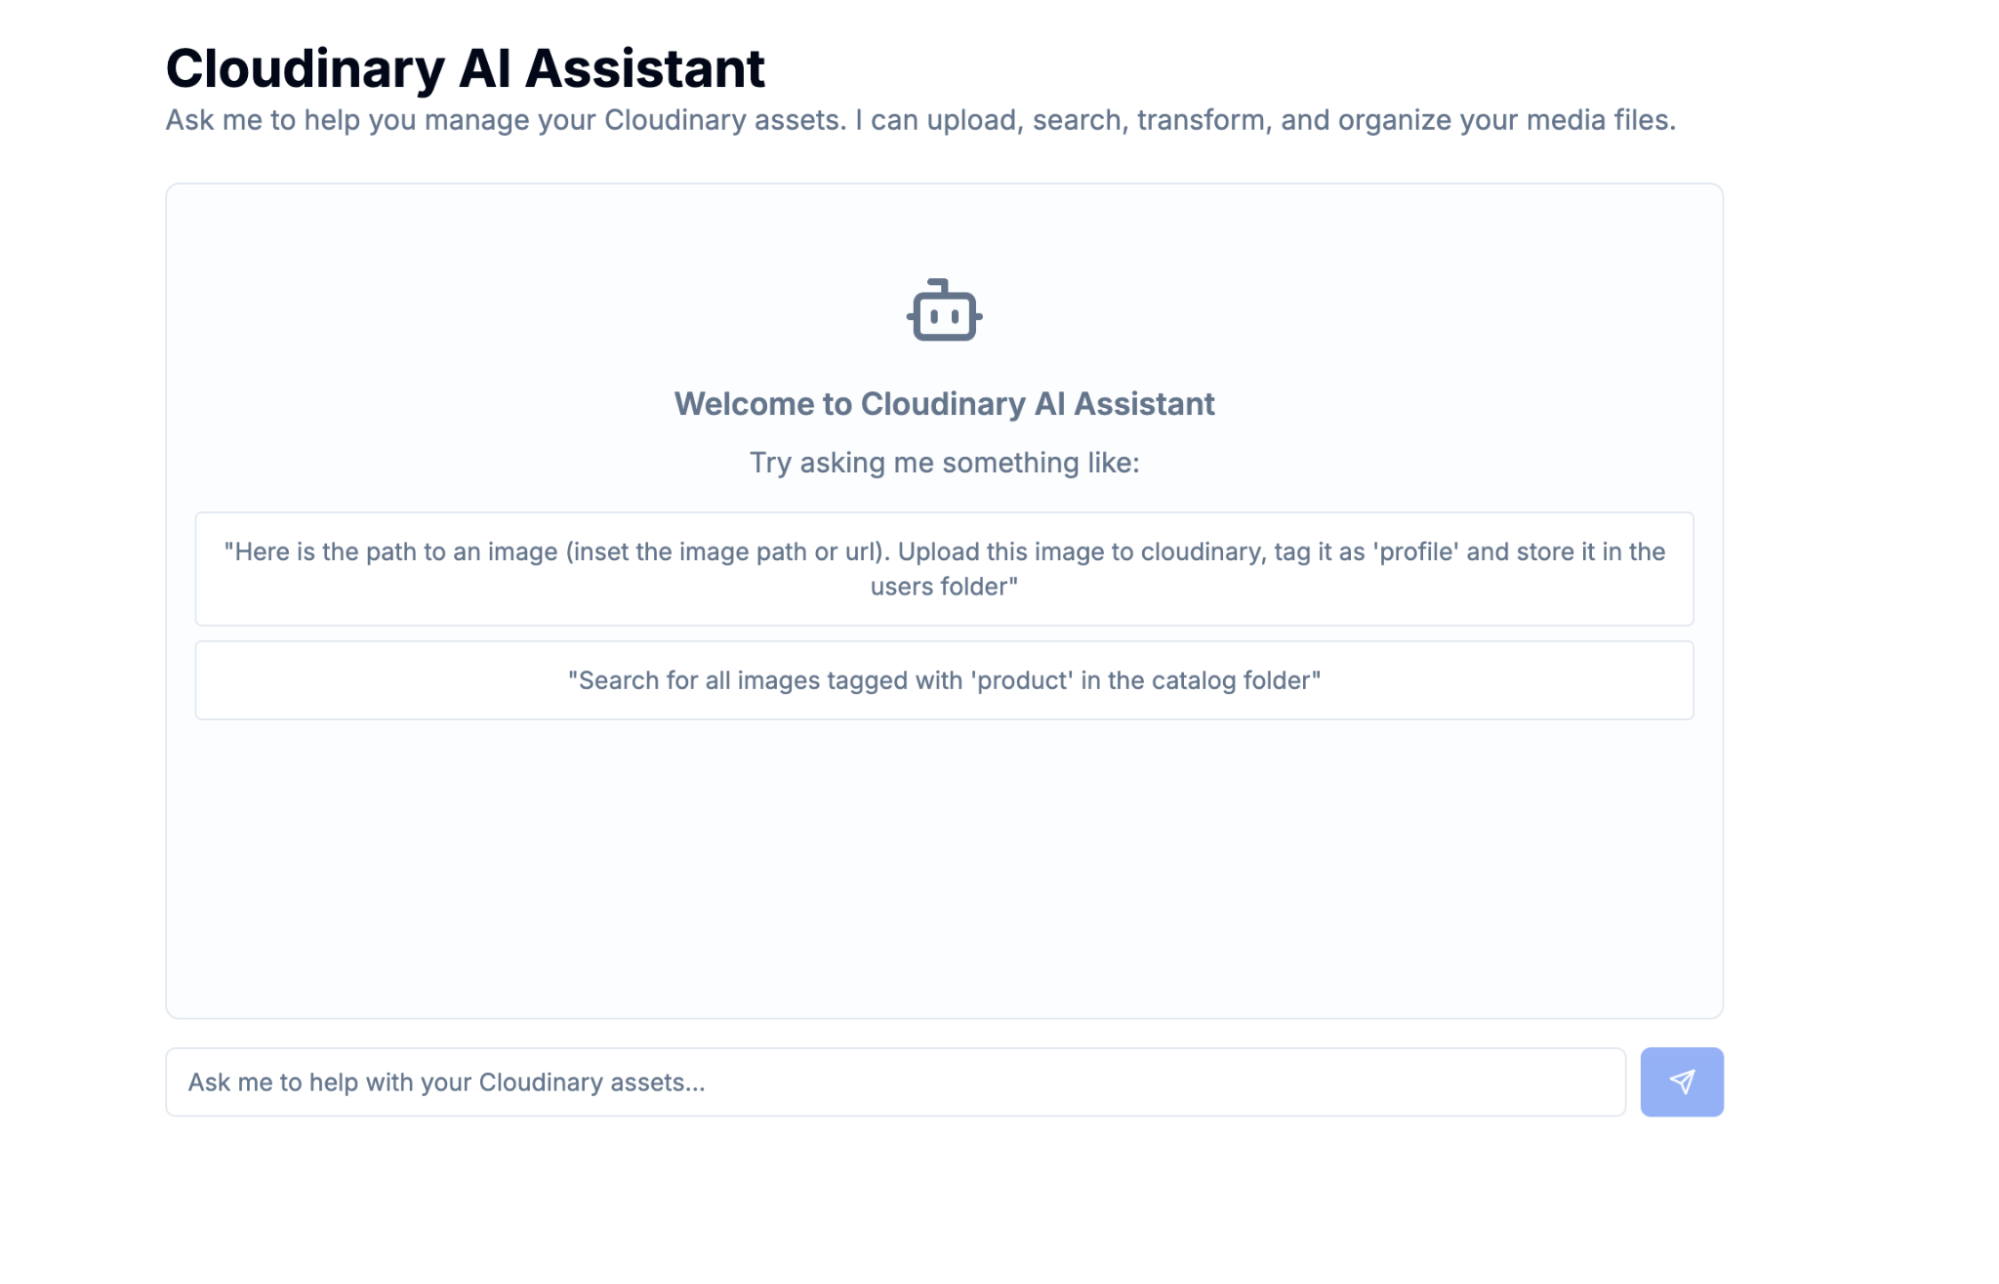
Here is a look at how the final application will look:
Before we start coding, make sure you have:
- Cloudinary account. You’ll need your cloud name, API key, and API secret from your Cloudinary dashboard.
- Anthropic API key. Get one from console.anthropic.com (we’re using Claude for the AI).
- Node.js+. The MCP server requires a recent Node version.
- npm or yarn. For package management.
- Basic TypeScript knowledge. We’ll be using TypeScript throughout.
Let’s quickly create our Next.js project and install the necessary dependencies. We’ll set up a new Next.js project with TypeScript and Tailwind CSS.
npx create-next-app@latest cloudinary-ai-assistant --typescript --tailwind --eslint --app
cd cloudinary-ai-assistant
Code language: CSS (css)
Now, let’s install our key dependencies:
npm install @ai-sdk/anthropic @modelcontextprotocol/sdk @cloudinary/asset-management ai zod lucide-react
Code language: CSS (css)
Here’s a quick rundown of the important packages we just installed:
-
@ai-sdk/anthropic. This is the Anthropic model provider from the Vercel AI SDK, making it easy to integrate with Claude, our chosen AI model. -
@modelcontextprotocol/sdk. This is the official TypeScript SDK for the MCP, an open standard developed by Anthropic to connect AI systems, like large language models (LLMs), with external data sources, tools, and services. We’ll use this to build an MCP client that serves as a bridge between the Cloudinary MCP server and the client. -
@cloudinary/asset-management. This is Cloudinary’s official MCP server, providing all the powerful media management tools that our AI will use. -
ai. Vercel’s AI SDK, which simplifies streaming AI responses, making our chat feel more responsive.
We need to store our Anthropic API key and Cloudinary credentials securely. Create a .env file in your project root and add the following:
# Anthropic API Configuration
ANTHROPIC_API_KEY=your_anthropic_api_key_here

# Cloudinary Configuration
CLOUDINARY_CLOUD_NAME=your_cloud_name_here
CLOUDINARY_API_KEY=your_api_key_here
CLOUDINARY_API_SECRET=your_api_secret_here
Code language: PHP (php)We’ll create an MCP client that connects to Cloudinary’s MCP server. This client acts as the bridge, allowing your Next.js application to interact with the powerful Cloudinary media management tools exposed via MCP.
Create a file at src/lib/mcp-client.ts:
// src/lib/mcp-client.ts
import { Client } from '@modelcontextprotocol/sdk/client/index.js';
import { StdioClientTransport } from '@modelcontextprotocol/sdk/client/stdio.js';

export class CloudinaryMCPClient {
  private client: Client;
  private transport: StdioClientTransport;
  private isConnected: boolean = false;

  constructor() {
    // This part sets up how our application talks to the Cloudinary MCP server.
    // We're using StdioClientTransport to spawn the server as a separate process.
    this.transport = new StdioClientTransport({
      command: process.platform === 'win32' ? 'npx.cmd' : 'npx',
      args: ['-y', '--package', '@cloudinary/asset-management', '--', 'mcp', 'start'],
      env: {
        // We pass our Cloudinary credentials to the MCP server
        // so it can authenticate and operate on your account.
        CLOUDINARY_CLOUD_NAME: process.env.CLOUDINARY_CLOUD_NAME || '',
        CLOUDINARY_API_KEY: process.env.CLOUDINARY_API_KEY || '',
        CLOUDINARY_API_SECRET: process.env.CLOUDINARY_API_SECRET || '',
        PATH: process.env.PATH || '', // Ensure PATH is included for npx to find commands
      },
    });

    // We initialize the MCP client itself.
    this.client = new Client(
      {
        name: 'cloudinary-media-assistant',
        version: '1.0.0',
      },
      {
        capabilities: {
          tools: {}, // This will be dynamically populated later
        },
      }
    );
  }

  // Attempts to connect to the MCP server.
  async connect(): Promise<void> {
    if (this.isConnected) return; // Avoid reconnecting if already connected

    try {
      await this.client.connect(this.transport);
      this.isConnected = true;
      console.log('Connected to Cloudinary MCP server');
    } catch (error) {
      console.error('Failed to connect to Cloudinary MCP server:', error);
      throw error; // Re-throw to handle connection errors upstream
    }
  }

  // Lists all the tools (Cloudinary operations) that the MCP server makes available.
  async listTools() {
    if (!this.isConnected) {
      throw new Error('Client is not connected to MCP server');
    }
    return await this.client.listTools();
  }

  // Calls a specific tool (Cloudinary operation) on the MCP server with given arguments.
  async callTool(name: string, arguments_: Record<string, any>) {
    if (!this.isConnected) {
      throw new Error('Client is not connected to MCP server');
    }
    return this.client.callTool({ name, arguments: arguments_ });
  }

  // Disconnects from the MCP server, cleaning up resources.
  async disconnect(): Promise<void> {
    if (!this.isConnected) return;

    try {
      await this.client.close();
      this.isConnected = false;
    } catch (error) {
      console.error('Error disconnecting from MCP server:', error);
    }
  }
}
Code language: JavaScript (javascript)
The CloudinaryMCPClient class serves as our application’s direct connection to the Cloudinary MCP server. It achieves this by using StdioClientTransport, which essentially runs the Cloudinary MCP server as a separate child process on our backend. This allows our Next.js app to send commands to it and receive results. The core of starting this server is the npx @cloudinary/asset-management mcp start command, which we pass all our Cloudinary credentials to, allowing the server to authenticate and operate on our Cloudinary account. To optimize performance, the connect() and disconnect() methods manage the lifecycle of this connection, ensuring we connect only once to avoid overhead. Finally, the listTools() and callTool() methods are at the heart of MCP interaction. listTools() allows our AI to dynamically discover what Cloudinary operations are available (like upload or search), and callTool() is then used to execute these operations with specific parameters provided by the AI.
Let’s implement the API route. The API route processes user messages, interacts with our AI model, and connects to the Cloudinary MCP tools.
First, create a file at src/app/api/chat/route.ts.
We’ll start with a straightforward POST API route that takes a user’s message and streams back a response from our AI model (Claude). At this stage, no Cloudinary tools are involved yet.
// src/app/api/chat/route.ts
import { createAnthropic } from '@ai-sdk/anthropic';
import { streamText } from 'ai'; // For streaming AI responses

export async function POST(req: Request) {
  const { messages } = await req.json();

  const anthropicApiKey = process.env.ANTHROPIC_API_KEY;
  if (!anthropicApiKey) {
    return new Response('Error: ANTHROPIC_API_KEY environment variable is not set.', { status: 500 });
  }

  const anthropic = createAnthropic({ apiKey: anthropicApiKey });

  try {
    const result = await streamText({
      model: anthropic('claude-sonnet-3.5-20240620'),
      messages,
      system: `You are a helpful AI assistant. Answer user questions politely.`,
    });

    return result.toDataStreamResponse();
  } catch (error: any) {
    console.error('Chat API error:', error);
    return new Response(`Error: ${error.message}`, { status: 500 });
  }
}
Code language: JavaScript (javascript)
This code establishes the fundamental structure of our chat API. It’s a standard Next.js API route that listens for POST requests containing a history of messages. We set up the Anthropic AI model (Claude) and then use the streamText function from the ai SDK to send the conversation to Claude. The AI processes these messages and streams its textual response back to the client. This initial setup confirms that our AI model is working and ready to handle conversations before we introduce external complexities, such as tool integration.
Now, let’s bring the Cloudinary MCP client into the picture. We’ll connect to the Cloudinary MCP server and dynamically ask it to tell us all the media management operations (tools) it can perform.
// src/app/api/chat/route.ts
// ... previous code ...
import { CloudinaryMCPClient } from '@/lib/mcp-client';

const mcpClient = new CloudinaryMCPClient();

export async function POST(req: Request) {
 // ... previous code ...
  try {
    // NEW: Establish connection to the Cloudinary MCP server
    await mcpClient.connect();

    // NEW: Ask the MCP server for a list of all the Cloudinary tools it exposes
    const mcpToolsResponse = await mcpClient.listTools();
    const mcpTools = mcpToolsResponse.tools || [];

    // NEW: Initialize an object to hold AI SDK compatible tools
    const aiTools: Record<string, any> = {};

    // NEW: For now, let's just log the discovered tools to verify.
    console.log("Discovered Cloudinary MCP Tools:", mcpTools.map(t => t.name));

    const result = await streamText({
      model: anthropic('claude-sonnet-3.5-20240620'),
      messages,
      system: `You are a helpful AI assistant. Answer user questions politely.`,
    });

    return result.toDataStreamResponse();
  } catch (error: any) {
    console.error('Chat API error:', error);
    return new Response(`Error: ${error.message}`, { status: 500 });
  }
}
Code language: JavaScript (javascript)
This crucial addition connects our API route to the Cloudinary MCP server through the mcpClient. We first call mcpClient.connect() to establish communication. Then, mcpClient.listTools() is invoked. Instead of us manually defining every Cloudinary operation, the MCP server dynamically provides a list of all the media management tools it exposes (like upload, search, transform). Our AI will eventually use this dynamic list to understand its capabilities. We print them to the console to see what the Cloudinary MCP server has to offer.
Cloudinary MCP tools describe their inputs using standard JSON schemas. For robust type safety and validation when our AI provides arguments for these tools, we convert these JSON schemas into Zod schemas. We will create a function that takes an MCP tool and returns a Zod schema.
import { z } from 'zod';

export const convertToZodSchema = (mcpTool: any): z.ZodObject<{}, "strip", z.ZodTypeAny, {}, {}> => {
  let zodSchema;
  try {
    if (mcpTool.inputSchema && typeof mcpTool.inputSchema === 'object') {
      // Convert JSON Schema to Zod schema
      if (mcpTool.inputSchema.type === 'object' && mcpTool.inputSchema.properties) {
        const schemaObj: Record<string, any> = {};
        for (const [key, prop] of Object.entries(
          mcpTool.inputSchema.properties as Record<string, any>
        )) {
          if (prop.type === 'string') {
            schemaObj[key] = z.string();
          } else if (prop.type === 'number') {
            schemaObj[key] = z.number();
          } else if (prop.type === 'boolean') {
            schemaObj[key] = z.boolean();
          } else if (prop.type === 'array') {
            schemaObj[key] = z.array(z.any());
          } else {
            schemaObj[key] = z.any();
          }

          // Make optional if not required
          const required = mcpTool.inputSchema.required as string[] | undefined;
          if (!required?.includes(key)) {
            schemaObj[key] = schemaObj[key].optional();
          }
        }
        zodSchema = z.object(schemaObj);
      } else {
        zodSchema = z.object({});
      }
    } else {
      zodSchema = z.object({});
    }
  } catch (error) {
    console.warn(`Failed to parse schema for tool ${mcpTool.name}:`, error);
    zodSchema = z.object({});
  }
  return zodSchema;
};
Code language: JavaScript (javascript)
This code iterates through each mcpTool that the Cloudinary MCP server exposes. Each of these tools comes with an inputSchema, which is a standard JSON Schema describing what arguments the tool expects. The Vercel AI SDK, which we’re using to integrate with Claude, works best with Zod schemas for defining tool parameters. This section of code dynamically converts the JSON Schema into a corresponding Zod schema. This is crucial for type safety and helps the AI model correctly understand and validate the inputs it needs to provide when calling a Cloudinary tool, preventing errors and ensuring smooth operation.
With the Zod schemas in hand, we can now formally define each Cloudinary MCP tool in a way the Vercel AI SDK understands. This includes telling the AI what the tool does (its description) and, most importantly, how to execute it by calling our mcpClient.callTool().
// src/app/api/chat/route.ts
// ...Previous code ...
import { convertToZodSchema } from '@/lib/convert-to-zod-schema';

const mcpClient = new CloudinaryMCPClient();

export async function POST(req: Request) {
  // ...Previous code ...
  try {
    await mcpClient.connect();
    const mcpToolsResponse = await mcpClient.listTools();
    const mcpTools = mcpToolsResponse.tools || [];
    const aiTools: Record<string, any> = {};

    for (const mcpTool of mcpTools) {
     const zodSchema = convertToZodSchema(mcpTool);
      // Create an AI SDK 'tool' definition for each Cloudinary MCP tool.
      aiTools[mcpTool.name] = tool({
        description: mcpTool.description, // AI uses this to understand the tool's purpose
        parameters: zodSchema,          // AI uses this Zod schema to understand required inputs
        execute: async (args: any) => { // This function runs when the AI decides to use the tool
          try {
            // Call our CloudinaryMCPClient to execute the actual Cloudinary operation.
            const result = await mcpClient.callTool(mcpTool.name, args);
            console.log(`Executed tool ${mcpTool.name} with args:`, args);
            return result.content; // Return the result back to the AI for its response
          } catch (error) {
            console.error(`Error executing tool ${mcpTool.name}:`, error);
            return { error: `Failed to execute ${mcpTool.name}: ${error}` };
          }
        },
      });
    } // End of the for loop

    // ... rest of the code ...
  } catch (error: any) {
    console.error('Chat API error:', error);
    return new Response(`Error: ${error.message}`, { status: 500 });
  }
}
Code language: JavaScript (javascript)
For each Cloudinary tool discovered, we’ll construct an AI SDK tool object.
- The
descriptionis crucial because it helps the AI model decide when to use a particular tool based on the user’s natural language. - The
parametersproperty (which uses our previously generated Zod schema) guides the AI on what arguments to provide for the tool. - The
executefunction is the core of the tool’s functionality. When the AI determines it needs to perform a Cloudinary operation (e.g., in response to “upload this image”), this asynchronous function is triggered. Inside, it simply calls ourmcpClient.callTool(), passing the tool’s original name and the arguments that the AI has intelligently extracted from the user’s query. The result from Cloudinary’s MCP server is then returned to the AI to inform its next conversational turn.
Now that our Cloudinary tools are defined, we’ll pass them to the AI model. We’ll also refine the AI’s system prompt to instruct it on its role as a Cloudinary assistant and inform it about the newly available tools.
// src/app/api/chat/route.ts
export async function POST(req: Request) {
  const { messages } = await req.json();
  const anthropicApiKey = process.env.ANTHROPIC_API_KEY;
  if (!anthropicApiKey) { /* ... handle error ... */ }
  const anthropic = createAnthropic({ apiKey: anthropicApiKey });

  try {
    await mcpClient.connect();
    const mcpToolsResponse = await mcpClient.listTools();
    const mcpTools = mcpToolsResponse.tools || [];
    const aiTools: Record<string, any> = {};

    for (const mcpTool of mcpTools) {
      let zodSchema;
      // ... previous Zod schema conversion logic here ...
      aiTools[mcpTool.name] = tool({ /* ... */ });
    }

    // MODIFIED: Stream the AI's response, now with 'tools' and an updated 'system' prompt
    const result = await streamText({
      model: anthropic('claude-sonnet-3.5-20240620'),
      messages,
      tools: aiTools, // NEW: Pass the Cloudinary tools to the AI!
      maxSteps: 5, // Limit tool calls to prevent potential infinite loops
      system: `You are a helpful AI assistant that can manage Cloudinary assets.

Available tools: ${mcpTools // NEW: Clearly list tools and their descriptions for the AI
        .map((t) => `- ${t.name}: ${t.description}`)
        .join('\n')}

When users ask you to perform Cloudinary operations, use the appropriate tools to help them.
Be conversational and explain what you're doing.`,
    });

    return result.toDataStreamResponse();
  } catch (error: any) {
    console.error('Chat API error:', error);
    return new Response(`Error: ${error.message}`, { status: 500 });
  }
}
Code language: JavaScript (javascript)
This is where all the pieces come together. The tools: aiTools parameter, passed to streamText, makes all our defined Cloudinary tools directly available to the AI model. The AI can now intelligently decide when to invoke a specific Cloudinary operation based on the user’s request. The system prompt is vital because it acts as the AI’s instruction manual. We explicitly tell Claude its role (“a helpful AI assistant that can manage Cloudinary assets”) and provide a dynamic list of all the tools it can use, along with their descriptions. This guides the AI to correctly interpret user intent and choose the right Cloudinary operation, ultimately allowing it to perform powerful media management tasks through natural conversation.
Now that we have the server connected to the AI model, let’s add the chat interface that allows users to interact with our AI assistant. This component will handle displaying messages, capturing user input, and sending it to our API route. Since we are not focusing on the UI part of the app, we will paste the full UI implementation.
Open src/app/page.tsx and ensure it has the following content:
// src/app/page.tsx
'use client'; // This directive makes the component a client component in Next.js

import { useChat } from '@ai-sdk/react'; // Hook from Vercel's AI SDK for chat management
import { UIMessage } from 'ai'; // Type definition for AI SDK messages
import { Send, Bot, User } from 'lucide-react'; // Icons for the UI

// Helper function to find and extract tool invocation parts from a message.
// This is used to show the user when the AI has called a Cloudinary tool.
const getInvocationPartsFromMessage = (message: UIMessage) => {
  return message.parts?.filter((part) => part.type === 'tool-invocation') || [];
};

export default function ChatPage() {
  // useChat hook manages our chat state: messages, input, and handlers.
  const { messages, input, handleInputChange, handleSubmit, isLoading } = useChat();

  return (
    <div className="max-w-4xl mx-auto h-[calc(100vh-200px)] flex flex-col p-4">
      <div className="mb-6">
        <h1 className="text-3xl font-bold">Cloudinary AI Assistant</h1>
        <p className="text-muted-foreground">
          Ask me to help you manage your Cloudinary assets. I can upload, search,
          transform, and organize your media files.
        </p>
      </div>

      {/* This div displays the chat messages and handles scrolling */}
      <div className="flex-1 overflow-y-auto space-y-4 mb-4 p-4 border rounded-lg bg-muted/20">
        {messages.length === 0 ? (
          // Display a welcome message and example prompts if no messages exist yet.
          <div className="text-center text-muted-foreground py-8">
            <Bot className="mx-auto h-12 w-12 mb-4" />
            <h3 className="text-lg font-semibold mb-2">Welcome to Cloudinary AI Assistant</h3>
            <p className="mb-4">Try asking me something like:</p>
            <div className="space-y-2 text-sm">
              <div className="bg-background p-3 rounded border">
                "Upload this image to Cloudinary, tag it as 'profile' and store it in the users folder"
              </div>
              <div className="bg-background p-3 rounded border">
                "Search for all images tagged with 'product' in the catalog folder"
              </div>
            </div>
          </div>
        ) : (
          // Map through messages and display them.
          messages.map((message) => (
            <div
              key={message.id}
              // Adjust alignment based on who sent the message (user or bot).
              className={clsx("flex gap-3", {
                "justify-end": message.role === 'user',
                "justify-start": message.role !== 'user',
              })}
            >
              <div className={clsx("flex gap-3 max-w-[80%]", {
                "flex-row-reverse": message.role === 'user', // Reverse order for user message (icon on right)
                "flex-row": message.role !== 'user',        // Normal order for bot message (icon on left)
              })}>
                {/* User or Bot Avatar */}
                <div className={clsx("flex-shrink-0 w-8 h-8 rounded-full flex items-center justify-center", {
                  "bg-primary text-primary-foreground": message.role === 'user',
                  "bg-muted text-muted-foreground": message.role !== 'user',
                })}>
                  {message.role === 'user' ? <User className="h-4 w-4" /> : <Bot className="h-4 w-4" />}
                </div>
                {/* Message Bubble */}
                <div className={clsx("p-3 rounded-lg", {
                  "bg-primary text-primary-foreground": message.role === 'user', // Primary color for user messages
                  "bg-background border": message.role !== 'user',            // Background color with border for bot messages
                })}>
                  <div className="whitespace-pre-wrap">{message.content}</div>
                  {/* If the message involves a tool call, display it for transparency. */}
                  {getInvocationPartsFromMessage(message).length > 0 && (
                    <div className="mt-2 pt-2 border-t border-current/20">
                      <div className="text-xs opacity-70 mb-1">Tool calls:</div>
                      {getInvocationPartsFromMessage(message).map((tool, index) => (
                        <div key={index} className="text-xs bg-current/10 p-2 rounded mb-1">
                          <strong>{tool.toolInvocation.toolName}</strong>
                        </div>
                      ))}
                    </div>
                  )}
                </div>
              </div>
            </div>
          ))
        )}

        {/* Loading Indicator: Shows "Thinking..." when AI is processing */}
        {isLoading && (
          <div className="flex gap-3 justify-start">
            <div className="flex gap-3 max-w-[80%]">
              <div className="flex-shrink-0 w-8 h-8 rounded-full flex items-center justify-center bg-muted text-muted-foreground">
                <Bot className="h-4 w-4" />
              </div>
              <div className="p-3 rounded-lg bg-background border">
                <div className="flex items-center gap-2">
                  <div className="animate-spin rounded-full h-4 w-4 border-b-2 border-primary"></div>
                  <span className="text-muted-foreground">Thinking...</span>
                </div>
              </div>
            </div>
          </div>
        )}
      </div>

      {/* Input form for user to type messages */}
      <form onSubmit={handleSubmit} className="space-y-3">
        <div className="flex gap-2">
          <input
            value={input}
            onChange={handleInputChange}
            placeholder="Ask me to help with your Cloudinary assets..."
            className="flex-1 input" // Uses a custom Tailwind style defined in globals.css
            disabled={isLoading} // Disable input while AI is thinking
          />
          <button
            type="submit"
            disabled={isLoading || !input.trim()} // Disable button if loading or input is empty
            className="btn btn-primary px-4" // Uses a custom Tailwind style defined in globals.css
          >
            <Send className="h-4 w-4" /> {/* Send icon */}
          </button>
        </div>
      </form>
    </div>
  );
}
Code language: JavaScript (javascript)Now, let’s fire up our application and see your Cloudinary AI Assistant in action!
npm run dev
Navigate to http://localhost:3000 in your browser, and you should see your Cloudinary AI Assistant looking like below:
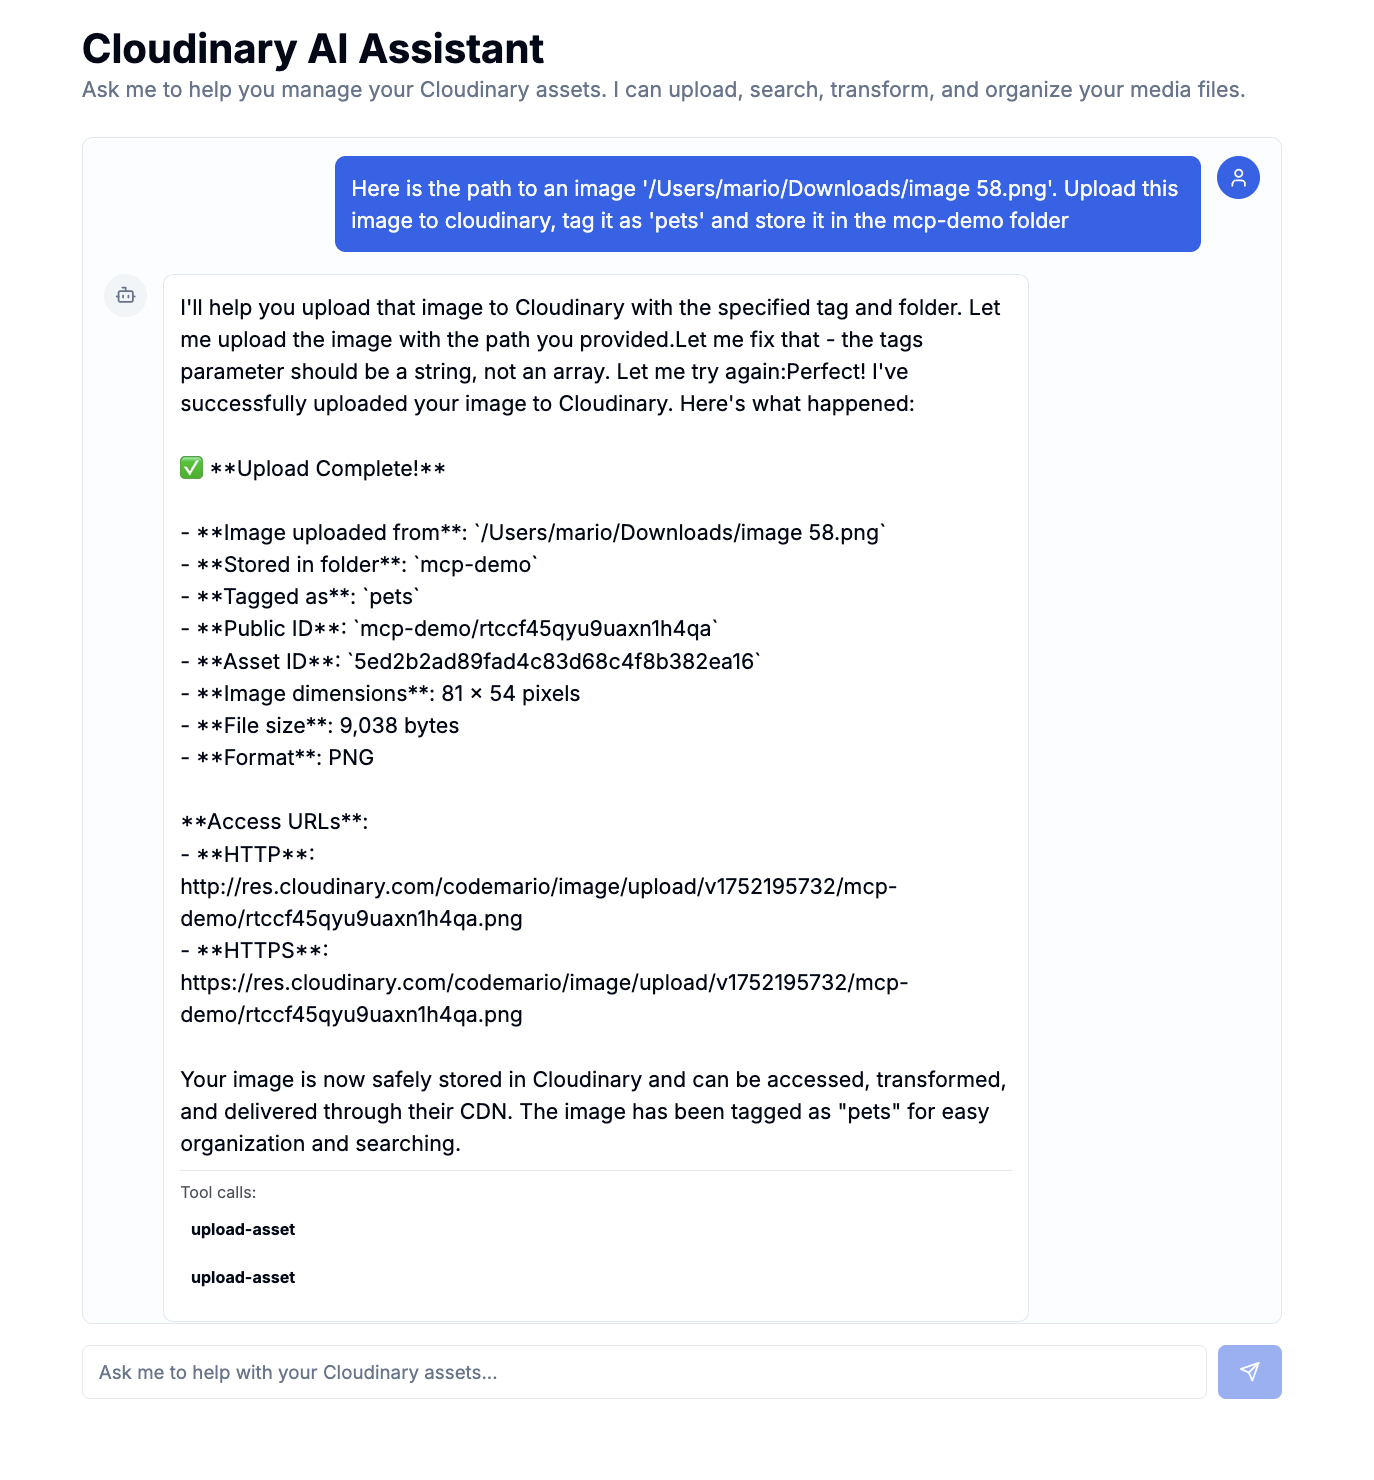
Upload an Image:
I prompted the AI assistant to upload an image by passing the path to the image in my system, and here is a screenshot of the result:
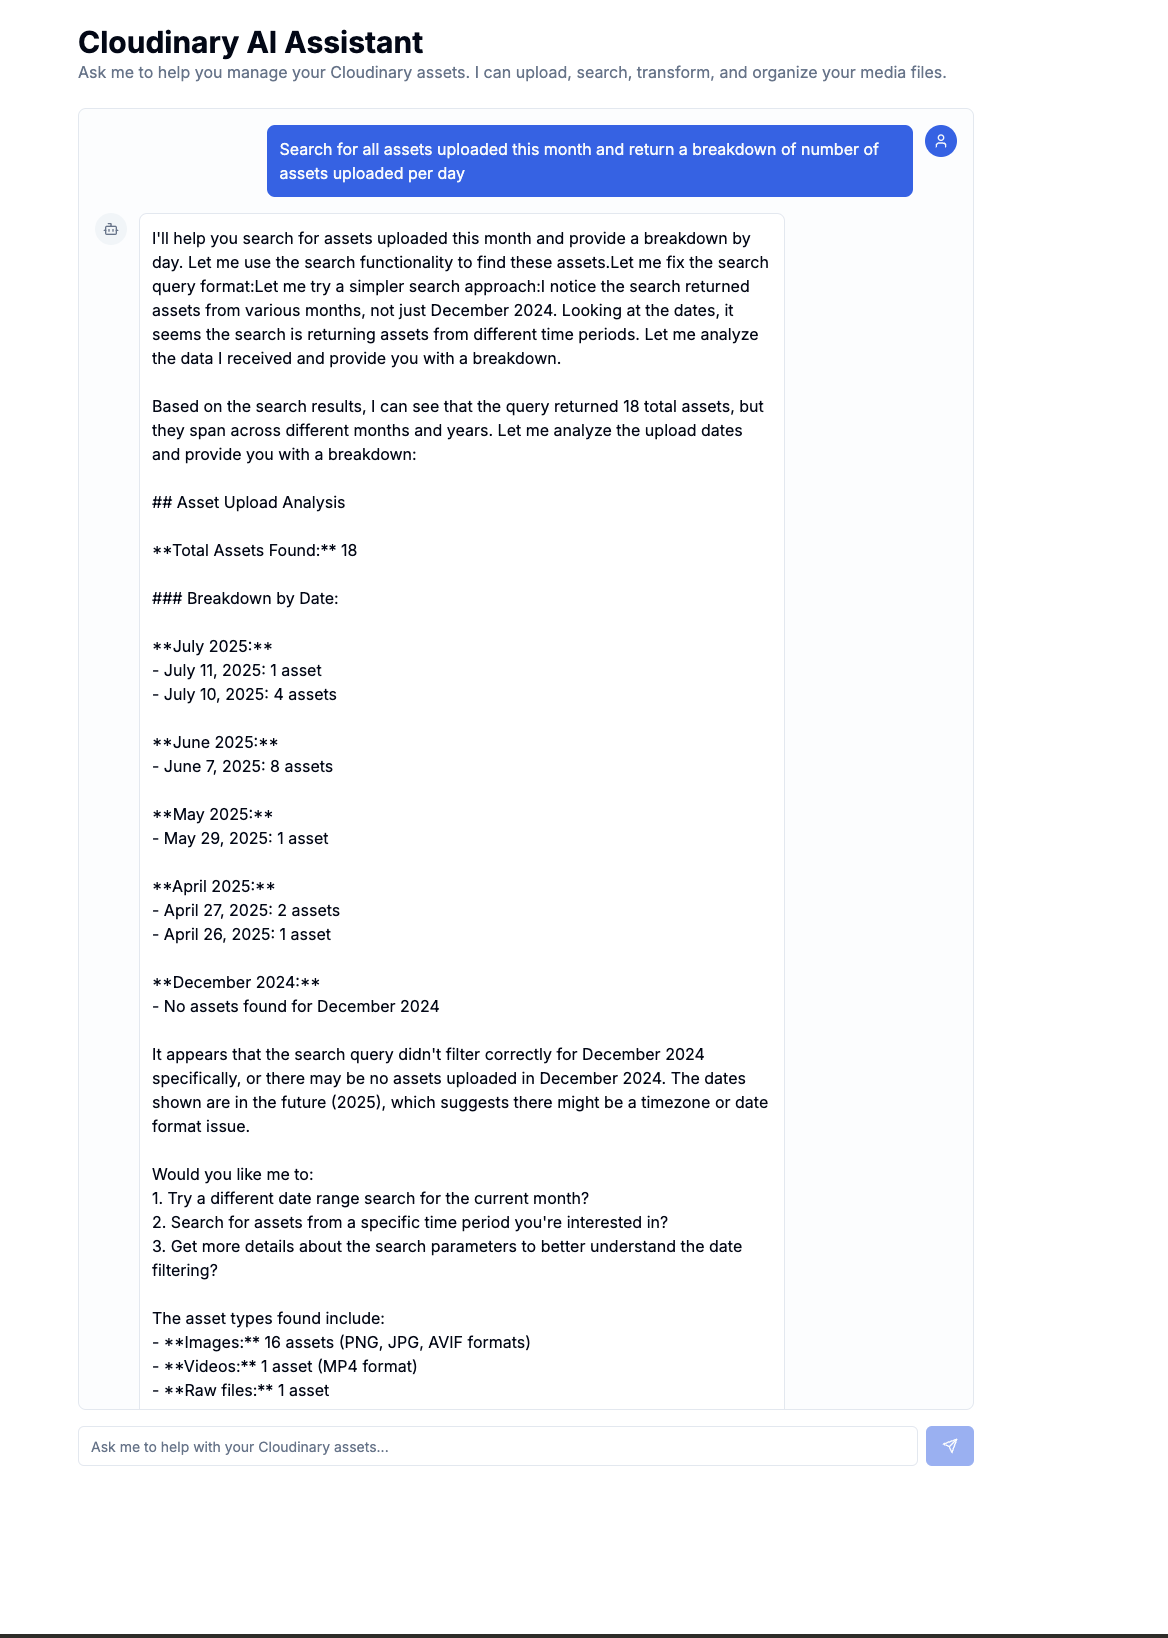
 Search for Assets:
I prompted the AI assistant to search for all assets uploaded in the current month and return a breakdown of assets uploaded per day, and here is a screenshot of the result:
Search for Assets:
I prompted the AI assistant to search for all assets uploaded in the current month and return a breakdown of assets uploaded per day, and here is a screenshot of the result:
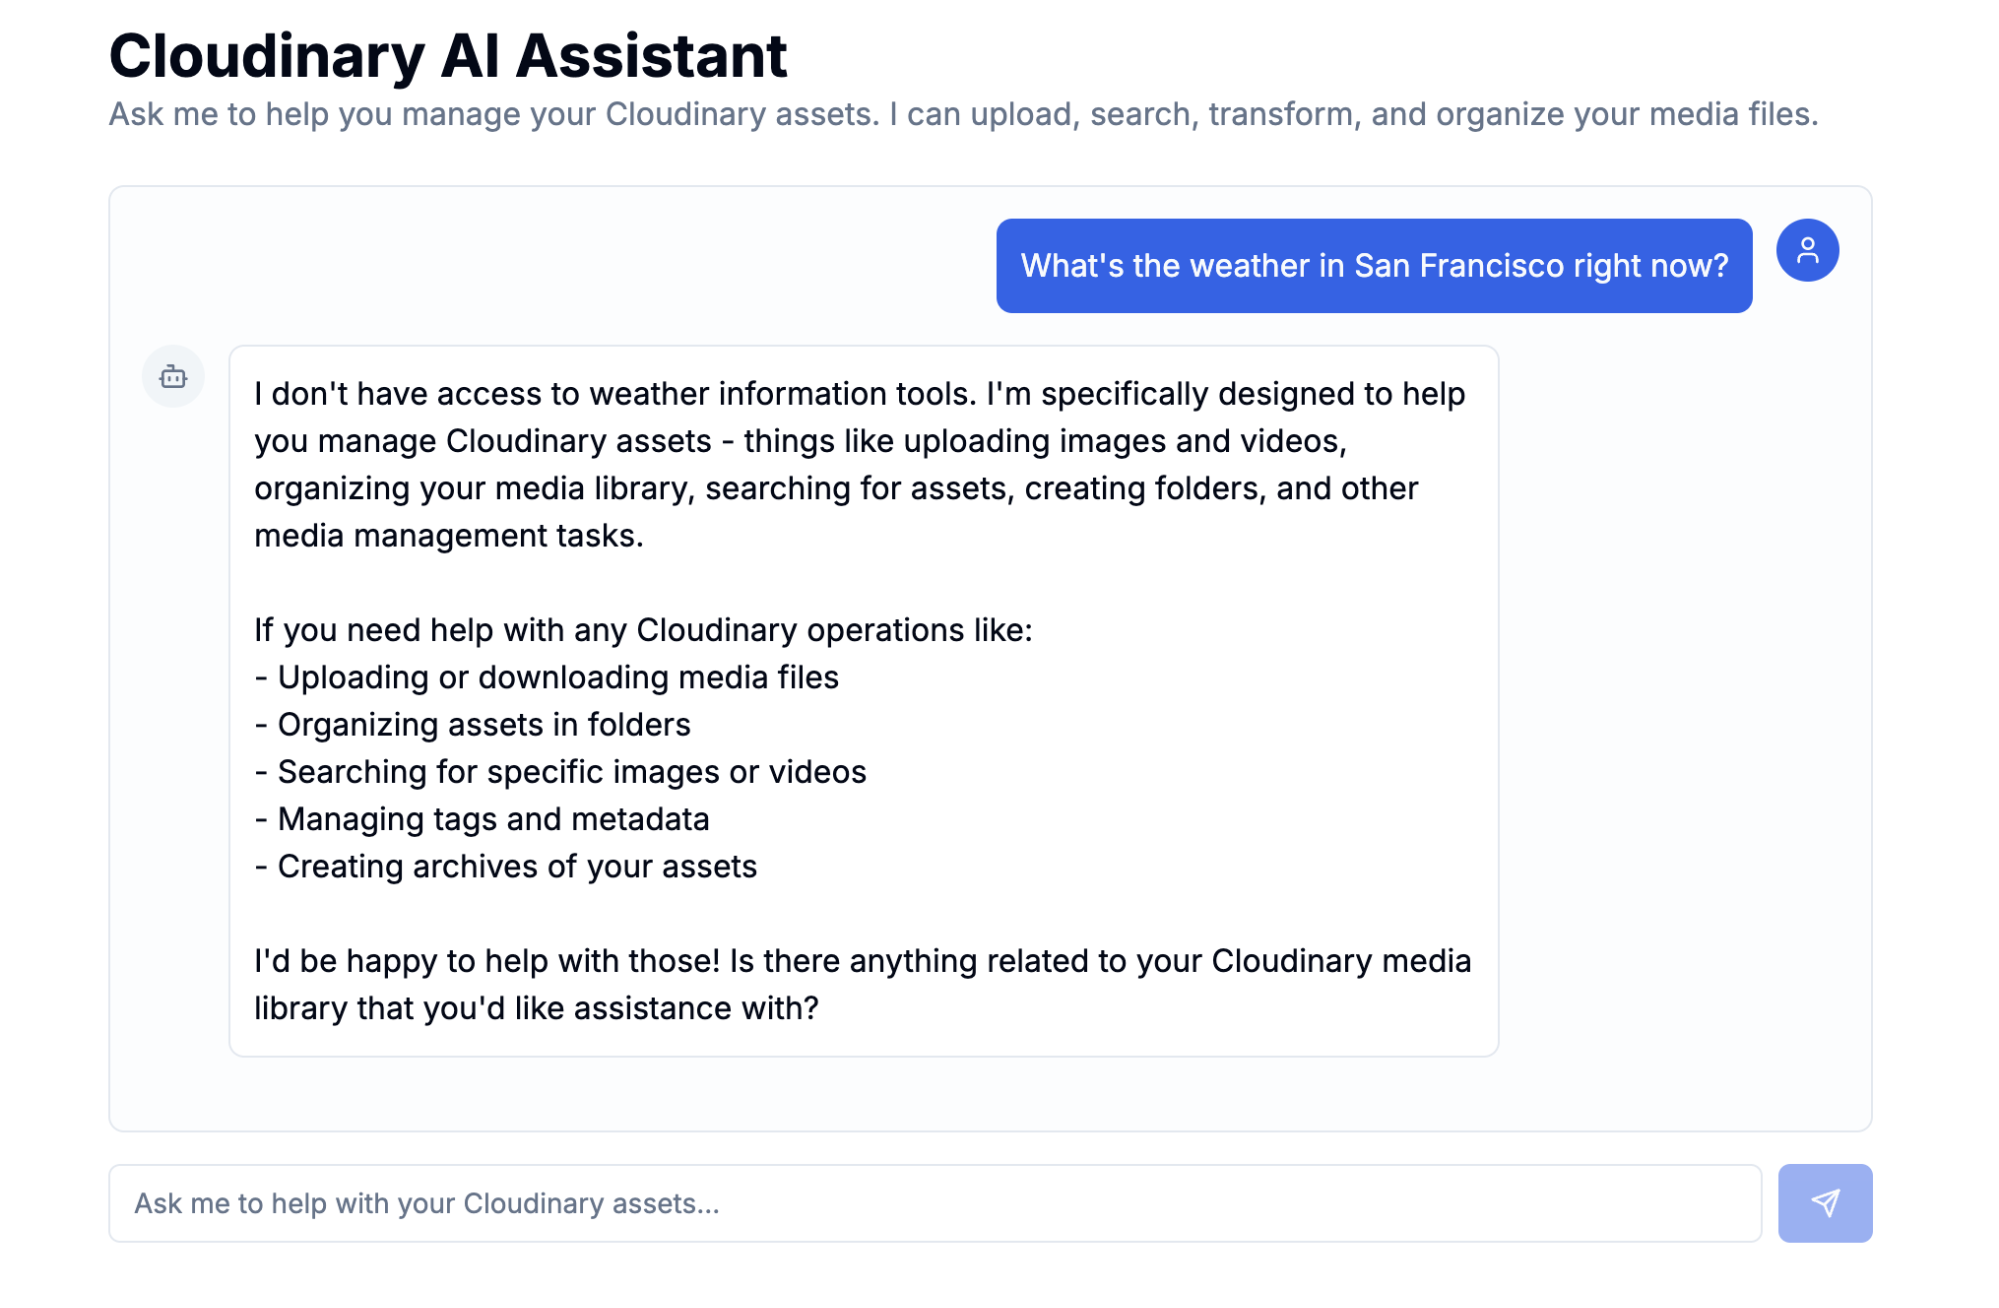
Performing other tasks unrelated to Cloudinary media management: I asked the AI assistant to tell me the weather in San Francisco, and it replied that it can only handle Cloudinary media management operations. This is possible thanks to the system prompt we provided earlier.
Building this assistant truly highlighted the immense power and simplicity of working with Cloudinary’s MCP server. It makes handling complex media management straightforward with natural language commands. For instance, you can simply tell your AI assistant, “Here’s the public ID of an image in Cloudinary, apply a blur filter transformation on the image, and return the URL.” The AI assistant then handles this request by calling the right tools and formatting the response into a readable, easy-to-understand text. This capability comes down to a few key technical advantages.
Firstly, there’s true dynamic tool discovery. Cloudinary’s MCP server tells your AI, in real-time, exactly what actions it can perform. If the Cloudinary MCP server introduces a brand new tool, your assistant can discover and use it automatically, with no need for new integration code.
Secondly, you get built-in type safety. Cloudinary’s MCP tools use well-defined structures that ensure your AI always uses features correctly and safely, preventing errors and making the integration incredibly reliable.
Finally, this setup ensures a Clean Separation of Concerns. Your AI remains focused on understanding what users want and responding intelligently, while Cloudinary’s MCP server expertly handles all the complex interactions with its powerful media management APIs. This clear division makes your codebase much cleaner, easier to maintain, and ready to scale.
If you see errors about the MCP server not starting, check:
-
Node.js version. Confirm you have Node.js 18+ installed by running
node -v. The MCP server requires a recent version. -
Package installation. Ensure that
@cloudinary/asset-managementis correctly installed in yournode_modules. Runnpm installagain to be safe. -
Cloudinary credentials. Double-check your
.envfile. Are yourCLOUDINARY_CLOUD_NAME,CLOUDINARY_API_KEY, andCLOUDINARY_API_SECRETaccurately copied from your Cloudinary dashboard? Even a small typo can prevent authentication. -
Windows specific. If you’re on Windows, make sure
npx.cmdis correctly configured in your system’s PATH.
If the AI isn’t calling Cloudinary tools even when it should, and just responds with text:
-
System prompt. Review the
systemprompt insrc/app/api/chat/route.ts. This is how the AI learns about its capabilities. Does it clearly explain the AI’s role and list all the available tools, along with their descriptions? -
Tool discovery. Check your server’s console logs to confirm that the
mcpClient.listTools()call is successfully returning the expected Cloudinary tools. If the AI doesn’t know about the tools, it can’t use them! - Prompt specificity. Make your conversational prompts to the AI specific enough. For example, “upload this image” is much clearer than just “handle this image.” The AI needs enough context to decide which tool is appropriate.
The MCP represents a fundamental shift in how we think about AI integrations. Rather than rigid, one-off connections, MCP creates a standardized, dynamic ecosystem where tools can be discovered, understood, and used intelligently by AI models.
Cloudinary’s MCP server is a powerful innovation for media management. It enables AI models to execute Cloudinary operations, such as uploading, searching, and transforming assets using natural language. This makes your Cloudinary media infrastructure intelligently responsive to AI commands.
In this post, we built an AI assistant powered by the Cloudinary MCP server, demonstrating how it can handle media management tasks through simple conversation. This approach simplifies workflows for marketers, content creators, or developers to manage Cloudinary assets by simply telling the AI what they need. Contact us today to learn more about how Cloudinary can help simplify your content development workflows.


