
Let’s say you’re reviewing a batch of product photos for an online marketplace. You want to upload them, tag them with AI, check for unsafe content, and generate metadata for accessibility without writing code or jumping between tools.
This tutorial shows you how to build a local, AI-powered media review system using Claude Desktop and Cloudinary MCP servers.
With this setup, you can speak natural language commands like:
Upload the image of the dress from my desktop and generate tags, alt text, and a safety score.
Claude will process the image, talk to Cloudinary, and return a clean, organized result automatically.
You’ll create a local workflow that can:
- Upload images to Cloudinary from your desktop.
- Run AI-based analysis (auto-tagging, safety, OCR).
- Generate alt text, titles, and summaries.
- Save metadata locally in
.txtor.jsonreports. - Organize everything using natural language prompts inside Claude.
Everything runs on your local machine without custom scripts or dashboards. Claude acts as your assistant, Cloudinary provides the infrastructure, and MCP connects the two.
Claude Desktop is a local version of Anthropic’s Claude language model. Unlike the browser-based Claude, it can interact with tools on your computer in real time through a system called MCP.
This is what makes the entire workflow possible.
MCP stands for Model Context Protocol. It’s a new standard for connecting AI models to tools in a controlled, structured way. Instead of building plugins or hardcoding APIs, you run MCP servers, which are small, local services that declare what they do and how the AI can talk to them.
As Eric Lisowski explains in his article, MCP gives AI context in a clear and safe way to interact with real systems like files, APIs, databases, and cloud services.
Each MCP server defines a set of tools (or actions) and resources (like directories or cloud folders). Claude reads this definition and uses it when you give commands.
Cloudinary’s suite of MCP servers makes visual media management one of the most powerful use cases for MCP. These servers allow Claude to:
- Upload, delete, rename, and tag assets.
- Analyze images for unsafe content.
- Generate alt text or OCR text.
- Manage metadata and folder structure.
- Write environment or transformation settings.
Instead of opening Cloudinary’s dashboard or writing scripts, you just talk to Claude. Cloudinary’s MCP servers do the work.
This tutorial focuses on using two MCP servers:
-
filesystem. Lets Claude access your Desktop and Downloads folders. -
cloudinary-asset-mgmt. Lets Claude upload and organize images in Cloudinary.
With just these two, you can build an end-to-end AI visual media workflow from Claude.
Before you can start using Claude to manage files and interact with Cloudinary, you need to install a few tools and prepare your environment. This ensures Claude can communicate with both your local files and your Cloudinary account.
Claude uses local MCP servers that run through Node.js. To install it:
- Visit https://nodejs.org.
- Download and install the LTS version (Node 18 or newer).
After installation, verify it by running:
node  -v
npx  -v
You should see version numbers for both.
Claude Desktop allows local AI actions through MCP servers. The browser version doesn’t support this.
Open it once after installation and leave it running. We’ll configure it next.
To let Claude access files in your Desktop or Downloads folder, you must grant it permission in macOS.
- Open System Settings.
- Go to Privacy & Security > Files and Folders.
- Look for Terminal, iTerm, or Claude.
- Make sure Desktop and Downloads are enabled.
Next, check Privacy & Security > Full Disk Access:
- Enable it for Terminal or iTerm.
- Optionally enable it for Claude.
These permissions are required for the file system MCP server to work correctly.
If you don’t already have a Cloudinary account, sign up for a free one here: https://cloudinary.com/users/register_free
After signing up:
- Open your Cloudinary Dashboard.
- Copy your Cloud Name, API Key, and API Secret.
- Save them for use in the next step.
Now that Claude Desktop and Node.js are installed, the next step is to connect Claude to your file system and Cloudinary account using MCP servers.
These servers run locally and give Claude safe, structured access to real tools like reading files from your Desktop or uploading images to Cloudinary.
We’ll start with two servers:
-
filesystem. Gives Claude access to local folders like Desktop and Downloads. -
cloudinary-asset-mgmt. Allows Claude to upload and manage images in your Cloudinary account.
Step 1. Open Claude’s Config file.
- Open Claude Desktop.
- Go to Settings > Developer.
- Click Edit Config.
This will open the file claude_desktop_config.json in your default text editor.
Step 2. Add the MCP server setup.
Replace the contents of the file with the following:
{
  "mcpServers": {
    "filesystem": {
      "stdio": true,
      "command": "npx",
      "args": [
        "-y",
        "@modelcontextprotocol/server-filesystem",
        "/Users/eugenemusebe/Desktop",
        "/Users/eugenemusebe/Downloads"
      ]
    },
    "cloudinary-asset-mgmt": {
      "command": "npx",
      "args": [
        "-y",
        "--package",
        "@cloudinary/asset-management",
        "--",
        "mcp",
        "start"
      ],
      "env": {
        "CLOUDINARY_CLOUD_NAME": "your_cloud_name_here",
        "CLOUDINARY_API_KEY": "your_api_key_here",
        "CLOUDINARY_API_SECRET": "your_api_secret_here"
      }
    }
  }
}

Code language: JSON / JSON with Comments (json)
Notes:
- Replace the Cloudinary values in the
envblock with your actual credentials. - Make sure the file paths in the
filesystemsection match your system exactly. - Use absolute paths (not
~) to avoid errors.
Step 3. Restart Claude.
Save the file, then:
- Quit Claude completely (Command + Q).
- Reopen Claude Desktop.
Go to Settings > Developer and you should see both servers listed with a Running badge.
Claude may also prompt you to approve these tools. Click Allow Always to avoid being asked repeatedly.
If the servers fail to start or appear as “disconnected,” check the following:
Claude MCP servers require Node 18 or newer. Run this in Terminal:
node  -v
npx  -v
If Node.js is not installed or the version is too old, download the latest LTS from https://nodejs.org.
macOS may block access to folders like Desktop or Downloads. You must enable permissions manually:
- Open System Settings
- Go to Privacy & Security > Files and Folders
- Find Terminal, iTerm, or Claude
- Enable access for Desktop and Downloads
Then go to Privacy & Security > Full Disk Access:
- Enable full disk access for Terminal or iTerm.
- Optionally enable it for Claude as well.
Try launching the server from Terminal to see if it works outside Claude:
npx  -y  @modelcontextprotocol/server-filesystem  /Users/eugenemusebe/Desktop  /Users/eugenemusebe/Downloads
Code language: CSS (css)
You should see:
Secure MCP File System Server running on stdio
If you get an error here, fix it before trying again in Claude.
If the server continues to disconnect or fail unexpectedly, Anthropic recently introduced Desktop Extensions, which outlines how MCP works under the hood and offers practical debugging tips.
You can read more about it here.
This is a helpful reference if your configuration looks correct but Claude still won’t connect to your local tools.
To verify everything is working, open Claude and go to: Settings > Developer.
You should see your MCP servers listed,as shown below:

If any server shows as “failed,” check your config, Node.js version, and folder permissions before moving on.
With your servers running, Claude can now upload images from your local machine to Cloudinary using natural language commands.
Claude reads the image using the filesystem server and uploads it using the cloudinary-asset-mgmt server.
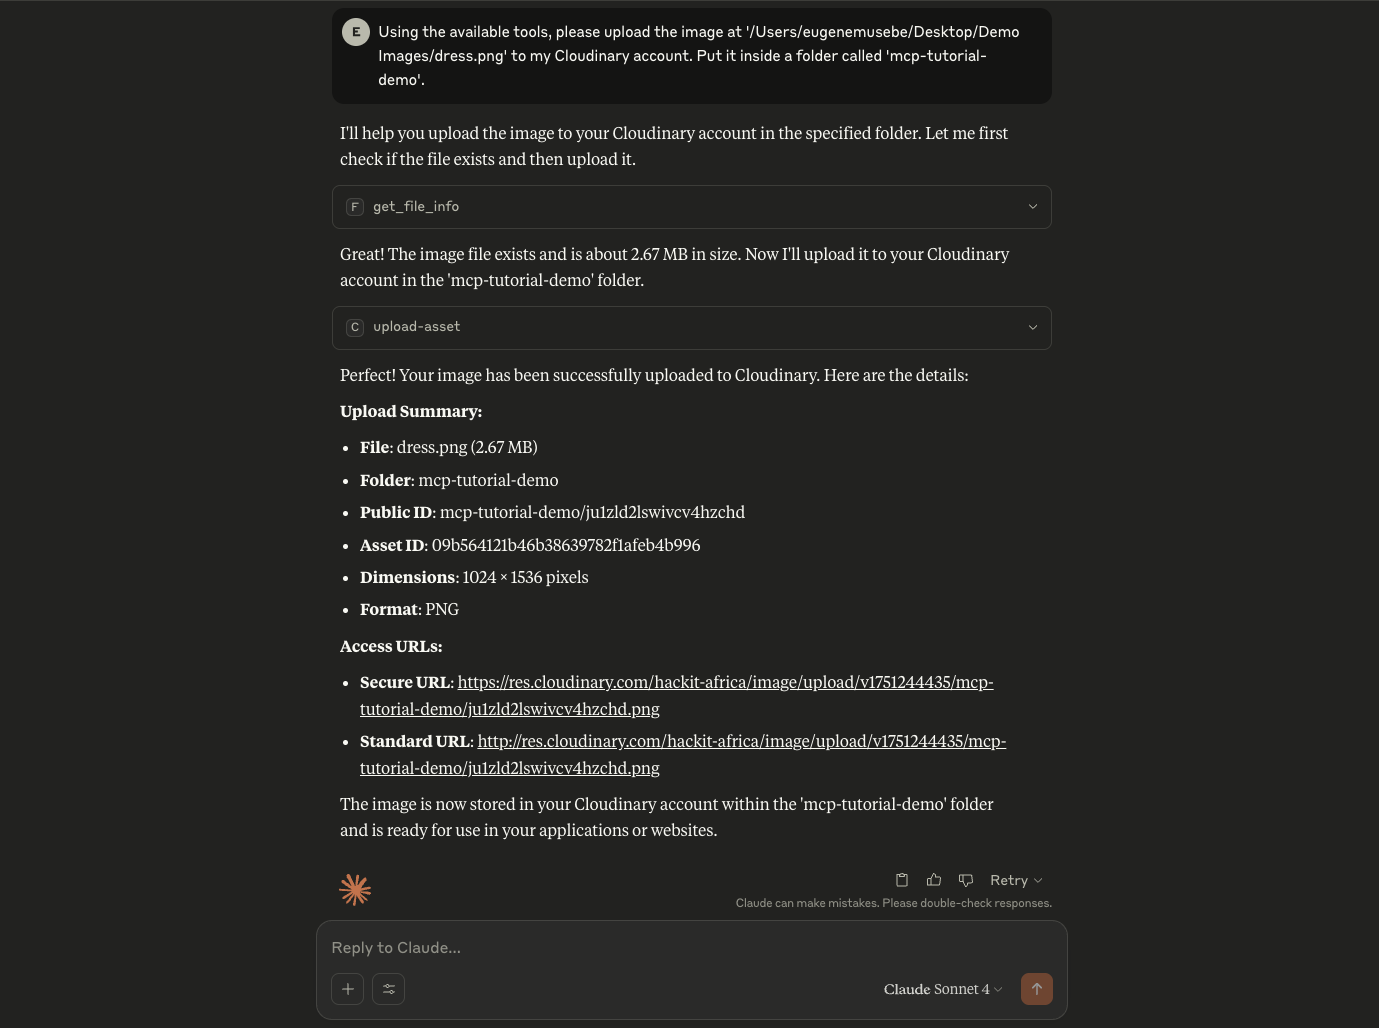
In Claude Desktop, try this:
Using the available tools, please upload the image at '/Users/eugenemusebe/Desktop/Demo Images/dress.png' to my Cloudinary account. Put it inside a folder called 'mcp-tutorial-demo'.
You can also say:
Upload the dress image from my Desktop to Cloudinary under 'mcp-tutorial-demo'.
Claude will:
- Access the image on your Desktop.
- Create the folder in Cloudinary (if needed).
- Upload the file.
- Return a Cloudinary URL.
If this is your first time using a tool, Claude will ask for permission to access the file system and Cloudinary. Click Allow Always to avoid repeated prompts.
Visit your Cloudinary Media Library and check for a folder named mcp-tutorial-demo. The uploaded image should appear there.
If all goes well, you should see a confirmation message similar to the one shown in the demo image below. It includes a summary with details such as:
-
File name:
dress.png -
Folder:
mcp-tutorial-demo -
Dimensions:
1024 × 1536 pixels - Format: PNG
- Asset ID and Public ID (unique identifiers)
- Access URLs (secure and standard)
This confirms the image has been successfully uploaded and is ready for use in your applications or websites.
After uploading your image, you can use Cloudinary’s AI tools to analyze the content. This includes detecting objects, reading embedded text, tagging automatically, and flagging unsafe content.
These tools are available through the cloudinary-analysis MCP server.
Ask Claude:
Analyze the image I just uploaded in 'mcp-tutorial-demo' and return tags, alt text, and any safety issues.
Claude will:
- Use the Cloudinary URL from the previous upload.
- Run the image through Cloudinary’s analysis tools.
- Return structured output such as tags, object labels, and moderation results.
The analysis typically includes:
- AI-generated tags
- Detected text (OCR)
- Alt text suggestions
- Safety labels (e.g., adult, medical, spoof)
This metadata can be used later to improve accessibility, search, or filtering.
Once Claude returns raw analysis results, you can ask it to format that information into human-friendly content. This includes:
- Keyword tags for search.
- Descriptive alt text for accessibility.
- Brief content summaries or captions.
Claude uses the output from the Cloudinary analysis tools and rewrites it in a more useful format.
You can say:
Based on the analysis, generate descriptive alt text and keyword tags for the image.
Or:
Write a one-sentence caption and alt attribute using the AI tags and OCR output.
Claude will combine tags, detected objects, and any visible text into complete descriptions as shown below.

- Image Successfully Uploaded
-
Location:
mcp-tutorial-demofolder in your Cloudinary account -
Asset ID:
f75b2da1040e31af8f9c64abe178e069 - Public URL: https://cloudinary-marketing-res.cloudinary.com/image/upload/v1764207915/blog-Automated_Visual_Media_Review_System_Using_Claude_Desktop_and_Cloudinary_MCP-5.png
- Dimensions: 1024 × 1536 pixels
- File Size: 2.67 MB
The Google tagging analysis identified the following tags with confidence scores:
- One-piece garment (95.8% confidence)
- Day dress (95.5% confidence)
- Dress (90.7% confidence)
- Cocktail dress (85.6% confidence)
- A-line (65.1% confidence)
The analysis correctly identified this as a dress image, specifically recognizing it as a one-piece garment suitable for day wear, with characteristics of both day and cocktail dress styles. The A-line silhouette was also detected, indicating the dress’s classic cut and shape.
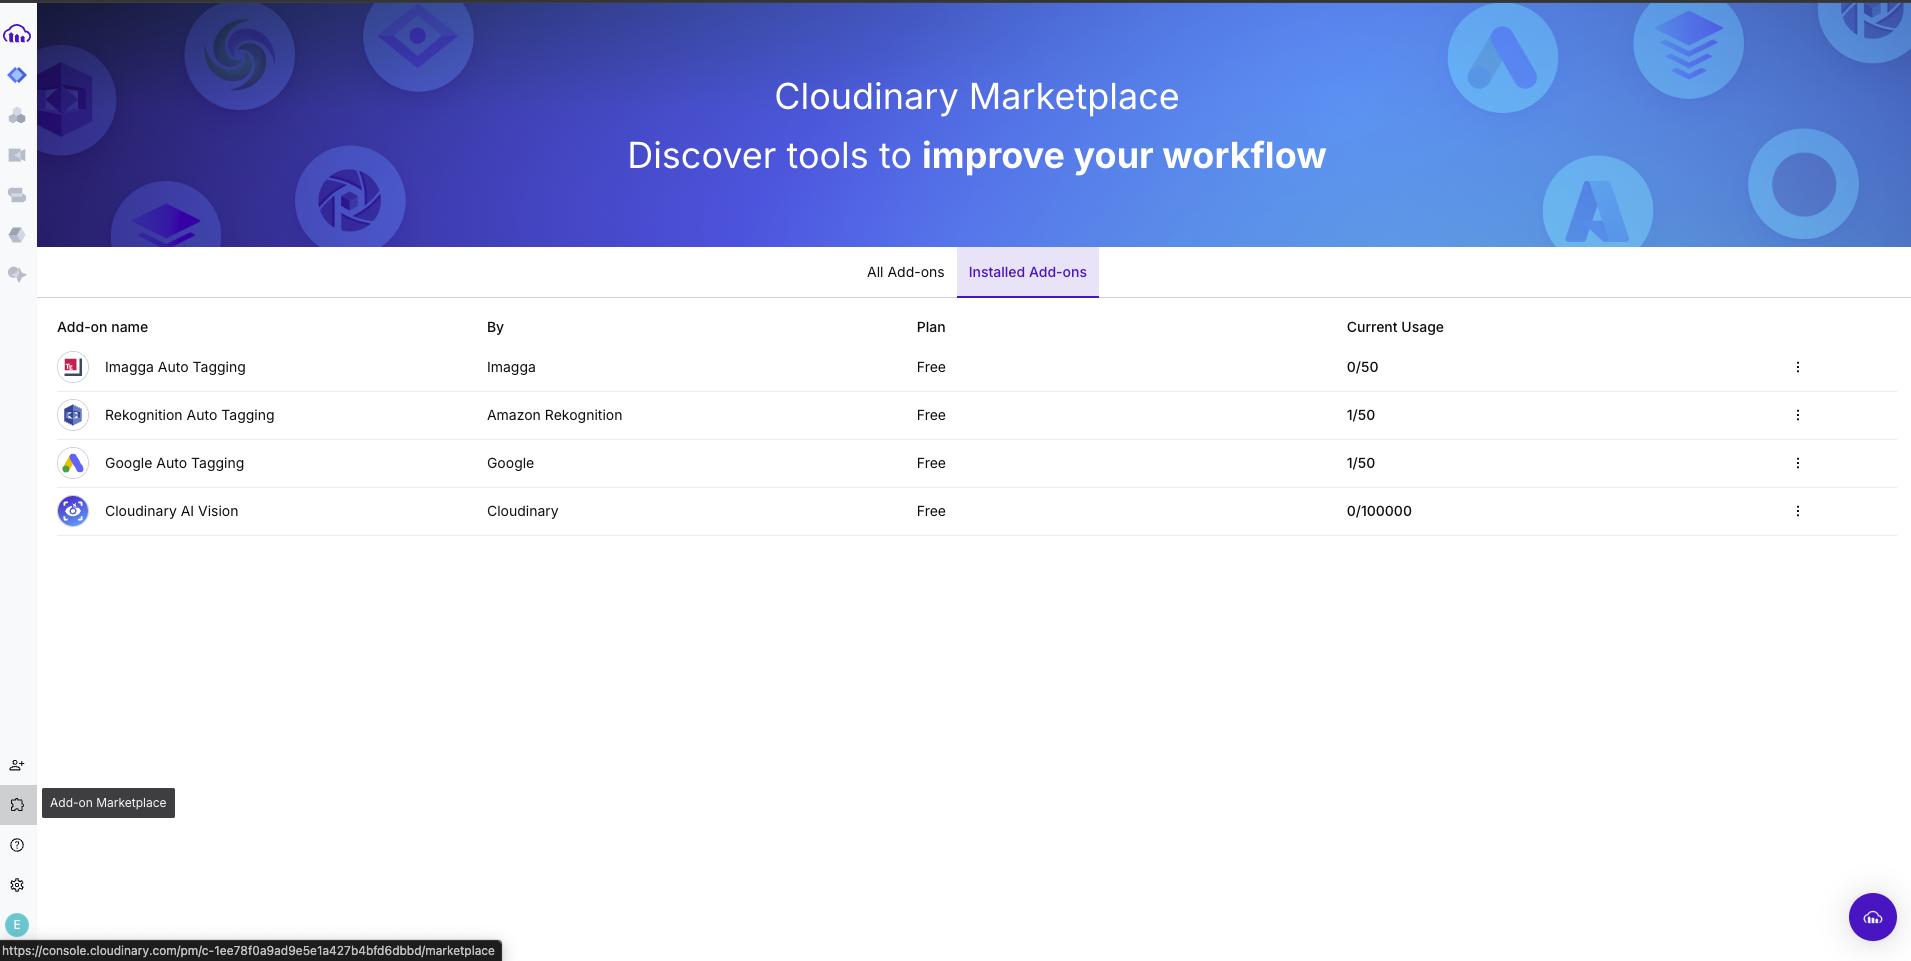
Some features like advanced tagging, OCR, or explicit content detection require Cloudinary add-ons.
Before using those tools, visit the Cloudinary Marketplace.
Enable all the add-ons you’d like to use (such as auto-tagging or AI vision). Once installed, confirm by checking the Installed Add-ons tab, as shown below:
After generating tags, alt text, and safety labels, you can ask Claude to save everything as a structured media report on your machine.
This works through the filesystem MCP server, which allows Claude to create and write files locally.
Try this:
Save a media report for the dress image as a .txt file on my Desktop.
Or:
Create a JSON file with the tags, alt text, and safety data in my Downloads folder.
Claude will:
- Format the data into
.txtor.json. - Write the file to your chosen folder.
- Confirm the save path and filename.
Tip: Be specific with file names and formats. For example:
Save this as 'dress-analysis.json' in /Users/eugenemusebe/Desktop/Reports
This helps keep your project folder organized.
At this point, your assets are uploaded, analyzed, and organized. To review everything, log in to your Cloudinary dashboard.
Go to your Media Library. Navigate to the folder you used earlier, such as mcp-tutorial-demo.
There you can:
- Preview uploaded images.
- See public URLs.
- View structured metadata (tags, alt text, AI analysis).
To view analysis results:
- Click any image.
- Open the Metadata or Analysis tab.
- Review tags, moderation results, and OCR output.
If Claude generates custom reports, those will be stored locally on your machine (in Desktop or Downloads, depending on your prompt).
You’ve just built a working, local AI-powered media review system using Claude Desktop and Cloudinary MCP servers. This workflow lets you manage, analyze, and document media files without writing any scripts. It’s also flexible and easy to extend: Scale it for teams, automate metadata generation, or plug it into a larger content pipeline.
Watch the full flow below:
You can explore additional Cloudinary MCP servers for structured metadata management, environment configuration, automated pipelines via MediaFlows, and more.
Check out our tools and documentation here.