Why Extract Text from Images?
Extracting text from an image refers to the process of converting the text shown in images into machine-readable text. This process is also known as Optical Character Recognition (OCR). OCR technology has many applications, such as digitizing printed documents, license plate recognition, and automated data entry.
As a high-level programming language, Python is widely used for extracting text from images due to its simplicity and the availability of image processing libraries. These libraries make the complex process of OCR easier for developers. They utilize advanced image processing techniques to accurately recognize and extract text from images.
Before we start
Need to extract text from images in Python? There is an easier way to extract text and use it for cool image effects.
Cloudinary is a cloud-based image management platform with a generous free plan and a Python SDK. Cloudinary can:
- Easily extract text from images or even multi-page TIFFs and PDF documents.
- Return text in JSON response or save it to a text file.
- Perform image effects like pixelating text, overlaying it with an image, or cropping images with text elements.
You can sign up free and try it for yourself or learn more below.
This is part of a series of articles about image optimization
In this article:
What is OCR technology?
OCR, or Optical Character Recognition, is a technology that allows for the conversion of different types of documents, such as scanned paper documents, PDF files, or images captured by a digital camera, into editable and searchable data. By analyzing the shapes of the characters in the image, OCR algorithms can extract the text content and convert it into a format that can be manipulated using word processing software like Microsoft Word.
This process eliminates the need for manual data entry, significantly speeding up workflows and ensuring higher accuracy in transferring written or printed information into digital form. OCR technology is widely used in various fields, including digitizing books and documents, automating data entry processes, and enhancing accessibility for individuals with visual impairments by enabling text-to-speech conversion.
Pros and Cons of Using Python to Extract Text from Images
Python provides an easy and expressive syntax and has an extensive selection of libraries that simplify the complex task of OCR.
However, Python can also have disadvantages for extracting text from images. One such disadvantage is its speed: Python is slower than some other programming languages like C++ or Java. This might not be a problem for small-scale projects, but this could be a setback for processing images on a large scale.
Python’s Global Interpreter Lock (GIL) is another potential issue. It allows only one thread to execute in a single process, which might be a roadblock for applications requiring multi-threading.
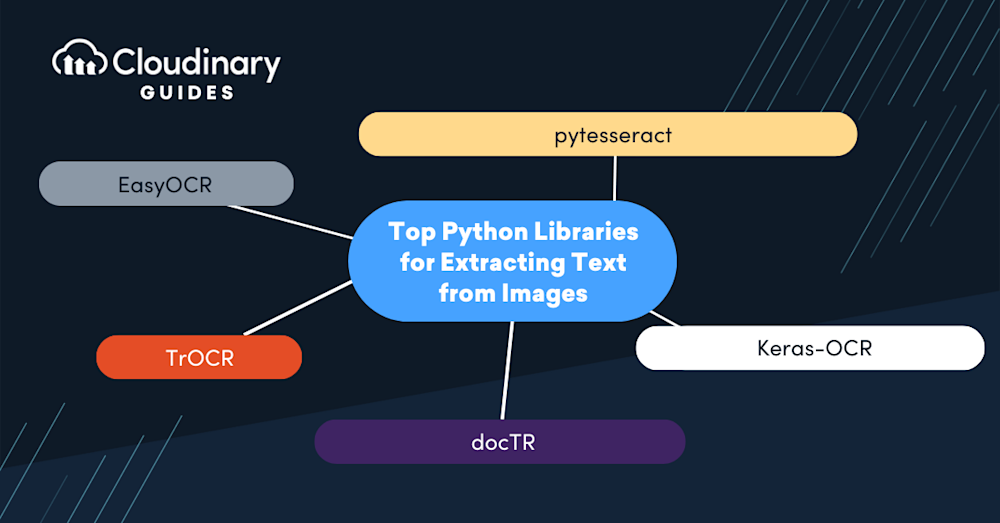
Python, with its rich ecosystem of libraries, is an excellent option for extracting text from images, offering a variety of tools designed to bridge the gap between visual information and actionable text data. Whether you’re building an OCR system, developing tools for content analysis, or simply exploring the possibilities of image-based text extraction, the right library can significantly streamline your workflow.
Let’s delve into some of the top Python libraries that have been instrumental in transforming images into readable, searchable, and analyzable text.
pytesseract
A Python wrapper at its core, Pytesseract simplifies extracting text from images, offering developers a user-friendly interface to leverage Tesseract’s capabilities. With just a few lines of code, you can convert images—ranging from scanned documents to photos of text in the wild—into manipulable strings of data. This integrates easily into Python applications, broadening the horizon for automated digital archiving, creating assistive technology, or feeding data into analytics tools.
However, pytesseract struggles with handwriting and performs poorly with low-resolution images. Also, it requires the Tesseract-OCR Engine to be installed on your system, which might be a hurdle for some users.
EasyOCR
Created with ease of use in mind, EasyOCR is built upon the robust framework of PyTorch and supports over 80 languages and various scripts, including Latin, Chinese, Cyrillic, and more. It thrives on processing a variety of image qualities, efficiently extracting readable text from the noise. What really sets EasyOCR apart is its easy implementation, aimed at getting your OCR project up and running swiftly without the steep learning curve. It’s ideal for quick projects or those stepping into the OCR space and can extend its functionalities to meet the demands of more complex text extraction.
However, with simplicity comes trade-offs. EasyOCR may lag behind in speed when processing a high volume of images or struggle with accuracy in complex image scenarios where precision is paramount. It’s a superb starting point and a reliable, quick solution, but it may not satisfy the rigorous demands of high-stakes enterprise environments that process extensive documentation.
Keras-OCR
Keras-OCR is a high-level OCR tool built on the Keras and TensorFlow framework. Its alignment with Keras means leveraging a user-friendly API that takes advantage of deep learning’s strengths and is complemented by pre-trained models to kick-start the OCR process. It comes primed with pre-trained models, significantly reducing the initial workload of model training.
Despite these advantages, the intensity of computational resources required for Keras-OCR might be a hurdle. Developers working in resource-constrained environments or those requiring speedy text extraction might find the performance less than optimal. Additionally, for those unfamiliar with neural networks and deep learning, the initial learning curve could be steep, making Keras-OCR a more fitting choice for projects where precision outweighs the need for simplicity and speed.
TrOCR
TrOCR is a recently introduced OCR tool from Microsoft. It uses transformers, a deep learning model, to recognize text from images. Leveraging models from the Hugging Face Transformers library, it stands at the forefront of OCR technology, providing an advanced understanding of text in various conditions.
The flip side of these cutting-edge capabilities is their demand for substantial computational resources and processing power. Additionally, while pre-trained models can provide excellent results, fine-tuning TrOCR for custom needs might require an additional investment of time and data, making it less accessible for developers seeking a quick solution or for those working with limited hardware capabilities.
docTR
DocTR, short for Document Text Recognition, is a library designed to extract text from document images. With a modular design aimed at flexibility, it tailors its OCR capabilities for various needs, presenting a pleasant API experience for both TensorFlow and Python enthusiasts. Its deep-learning architecture gives developers the ability to handle complex documents with ease.
However, the very modularity that makes DocTR versatile can also mean it needs a higher degree of setup and customization—potentially a setback for those looking for out-of-the-box solutions. As it is relatively new to the scene, the community and support around DocTR might not be as robust as more established libraries, possibly affecting troubleshooting and integration efforts for complex OCR tasks.

Tutorial: Extracting Text from Images Using Tesseract and Pytesseract
Let’s look at how to extract text from an image using Python and Tesseract. The instructions assume you already have Python installed.
Download and Install Tesseract
Tesseract can be downloaded from its GitHub repository. Choose the appropriate version for your operating system under the Releases section. After downloading, open the installer and follow the instructions to install Tesseract on your system.
Once the installation is complete, you need to set the Tesseract path in the script so that Python can access the OCR engine. This can usually be done through your system’s environment variables section, and the process would differ slightly based on your operating system.
Install the Pillow and pytesseract packages
Now, we need to install some Python packages that will enable us to extract text from images. The two packages we need are Pillow and pytesseract. Pillow is a fork of the Python Imaging Library (PIL), which provides support for multiple image formats and powerful image processing capabilities.
To install these packages, open your command line interface and type the following commands:
pip install Pillow
pip install pytesseract
Now that we have all the necessary tools, we can start writing our Python script to extract text from images. Here’s a basic example of how you can do this:
from PIL import Image
import pytesseract

def extract_text_from_image(image_path):
    image = Image.open(image_path)
    text = pytesseract.image_to_string(image)
    return text

print(extract_text_from_image('path_to_your_image.png'))
In this script, we first import the necessary libraries. We then define a function extract_text_from_image that takes an image path as input, opens the image, and then uses pytesseract to extract the text.
Easily Extract Text from Images and Use It for Image Effects with Cloudinary
Extracting text from images using pytesseract or a similar library is relatively straightforward, but what if you want to utilize the resulting text to perform actions on the image? For example, what if you could pixelate the text or overlay an image directly over a specific text element? You can do all that and more with Cloudinary.
Cloudinary is a cloud-based, end-to-end image and video management solution offering a generous free plan and a Python SDK. The OCR Text Detection and Extraction add-on, powered by the Google Vision API, extracts all detected text from images, including multi-page documents like TIFFs and PDFs.
You can use the extracted text directly for various purposes, such as organizing or tagging images. Additionally, you can take advantage of special OCR-based transformations, such as blurring, pixelating, or overlaying other images on all detected text with simple transformation parameters. You can also ensure that important texts aren’t cut off when you crop your images.
In order to try out the instructions below with your own images, sign up for a free Cloudinary account and upload it.
Extracting Detected Text
You can upload any image to Cloudinary and return all text detected in an image file in the JSON response of any upload or update call. The returned content includes a summary of all returned text, the bounding box coordinates of the captured text, and a breakdown of each text element and its bounding box.
To request text extraction, when uploading or updating an image, set the ocr parameter to adv_ocr (for photos or images containing text elements) or adv_ocr:document (for text-heavy images such as scanned documents).
For example, this code uploads a restaurant receipt to Cloudinary and requests text extraction:
import requests
url = "https://api.cloudinary.com/v1_1/demo/image/upload"
files = {'file': ('receipt.jpg', open('test-image-pytesseract.jpg', 'rb'))}
data = {
    'ocr': 'adv_ocr',
    'timestamp': '173719931',
    'api_key': '436464676',
    'signature': 'a781d61f86a6f818af'
}
response = requests.post(url, files=files, data=data)
print(response.json())
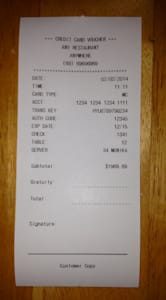
The JSON response from a scanned restaurant receipt image looks something like this:
"info": {
  "ocr": {
    "adv_ocr": {
      "status": "complete",
      "data": [
        { "textAnnotations": [
            { "locale": "en",
              "boundingPoly": {
                "vertices": [
                  { "y": 373,
                    "x": 297 },
                  { "y": 373,
                    "x": 1306 },
                  { "y": 2735,
                    "x": 1306 },
                  { "y": 2735,
                    "x": 297 }
                ]
              },
              "description": "CREDIT CARD VOUCHERnANY RESTAURANTnANYWHEREn(69)
                69696969nDATEn02/02/2014nTIMEn11:11nCARD TYPEnMCnACCTn1234 1234
                1234 1111nTRANS KEYnHYU87 89798234nAUTH CODE:n12345nEXP
                DATE:n12/15nCHECK:n1341nTABLEn12nSERVERn34
                MONIKAnSubtotaln$1969.69nGratuitynTotalnSignature:nCustomer Copyn"
            },
            { "boundingPoly": {
                "vertices": [
                  { "y": 373,
                    "x": 561 },
                  { "y": 373,
                    "x": 726 },
                  { "y": 426,
                    "x": 726 },
                  { "y": 426,
                    "x": 561 }
                ]
              },
              "description": "CREDIT"
            },
            { "boundingPoly": {
                "vertices": [
                  {
        ...
        ...
        ...
}
You can save the extracted text to a file or even use it to tag your images in Cloudinary automatically. But let’s see some more powerful uses of image text extraction.
Blurring or Pixelating Detected Text
Many images may have text, such as phone numbers, website addresses, license plates, or other personal data you don’t want to show on your website or application.
To blur or pixelate all detected text in an image, you can use Cloudinary’s built-in pixelate_region or blur_region effect, with the gravity parameter set to ocr_text.
For example, this code blurs out the brand and model names on the smartphone:
https://res.cloudinary.com/demo/image/upload/e_blur_region:800,g_ocr_text/smartphone2.jpg
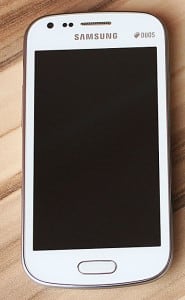
Original

Blur branding texts
Overlaying Detected Text with Images
Now, imagine that instead of blurring, you want to overlay the detected text with a custom image.
For example, suppose you run a real estate website where individuals or companies can list homes for sale. It’s essential that the listings do not display private phone numbers or those of other real estate organizations. So, instead, you overlay an image with your site’s contact information that covers any detected text in the uploaded images:
https://res.cloudinary.com/demo/image/upload/l_call_text/c_scale,fl_region_relative,w_1.1/fl_layer_apply,g_ocr_text/home_4_sale.jpg


Original sign

Sign with your text overlay
Text-Based Cropping
Another option is to ensure that an image’s text is retained during a crop transformation. You can specify ocr_text as the gravity (g_ocr_text in URLs).
For example, this image contains some text:

Original
You can use this code to crop it while retaining the text in the image:
https://res.cloudinary.com/demo/image/upload/c_fill,g_ocr_text,h_250,w_250/snacktime.jpg

ocr_text gravity
Sign up for free and try Cloudinary for text extraction today!
