
As a data scientist, you likely use images for model training and inference. But before they’re ready for you to use, images must undergo a set of transformations. This is called image preprocessing.
Why would you need to preprocess your images? Image preprocessing can have major positive impacts on the neural networks you’re training, including:
- Ensuring their proper functioning. Many neural networks only function when images share the same dimensions. If this is the case for your neural network, all your images need to be resized and standardized.
- Reducing costs. Retaining only the information needed for the task can reduce costs. For example, if color isn’t essential for your machine learning, converting all your images to grayscale can reduce retention and processing costs. This is a key benefit of using advanced tools like Cloudinary, which can efficiently preprocess images to grayscale or apply other cost-saving transformations.
- Improving efficiency. For example, you can improve model training time by reducing your image sizes.
- Increasing accuracy. Augmenting your images can artificially increase your training data, thereby enhancing the accuracy of the neural network you’re training. This means changing the original images by applying transformations and then adding those image variations to your original set. Some common transformations that you apply can include saturation, rotation, colorization, and brightness. Cloudinary, as an advanced image management solution, offers these preprocessing features, enabling you to easily augment your images for better model performance.
Now that you know why you need to preprocess your images, let’s talk about how to do it.
You’ve probably used any one of Python’s many packages, such as Pillow, Skimage, or OpenCV, to preprocess your images.
But there’s a better way. That’s Cloudinary.
Cloudinary is an image management solution that supports image uploads, cloud storage, and image transformations — the very features you need as a data scientist to preprocess images for deep learning in Python.
Cloudinary enables you to normalize and augment your images more quickly and easily, without compromising quality. With Cloudinary, you can:
- Upload images in bulk
- Store an unlimited number of images privately and securely
- Easily apply preprocessing methods, such as resizing, cropping, rotating, grayscaling, saturating, and much more, uniformly to all or some of the images you upload.
Let’s see how it’s done.
Let’s explore how to streamline your image preprocessing workflow using Cloudinary. In this demo, we’ll use Python code to prepare a set of images for a deep learning model that teaches the computer to recognize the difference between images of dogs and cats. While this demo only handles a few sample images, you can scale the actions executed in each step to meet your own project needs.
Let’s get started.
If you don’t yet have a Cloudinary account, sign up for a free one.
You can try out any effects described in this demo by copying the code to a clean file in your Python environment and running it. You can also follow this demo using a Jupyter Notebook that will run the code against your Cloudinary account for you. Simply open the Jupyter Notebook and then run each code snippet to see the Python code in action.
To create a clean project in the development environment of your choice, you need to set up your configuration. Create a new Python file called animals.py. Copy and paste the following code, replacing <cloudinary://1212121212121212:4567889asdf12345890cc@cloud_name> with your API environment variable value, which is the portion of your API environment variable after CLOUDINARY_URL=. (Find your credentials in the Dashboard page of your Cloudinary Console.)
When you’re writing your own applications, you should follow your organization’s policies on storing proprietary data to prevent exposing your API secret.
import os
os.environ["CLOUDINARY_URL"] = "<cloudinary://1212121212121212:4567889asdf12345890cc@cloud_name>"
print(os.getenv("CLOUDINARY_URL"))
# Import Cloudinary libraries
import cloudinary
from cloudinary import uploader
import cloudinary.api
from cloudinary.utils import cloudinary_url


# Get reference to config instance
config = cloudinary.Config()
print(config.cloud_name)
print(config.api_key)
Code language: PHP (php)You can preprocess images for deep learning in Python, unseen and in bulk, on the way into Cloudinary with just a few lines of code, so that the images you upload are ready for use.
For example, you may need to reduce image size and resize all the images to fit the same dimensions. Let Cloudinary’s AI ensure that the important parts of the images aren’t cropped out. At the same time, you can convert the images to grayscale. To apply those changes, create an Upload Preset that pre-defines the transformations you want to use and then apply the preset to the images during the bulk upload.
This demo uses incoming transformations to change images as they’re being uploaded, so that only the transformed images are saved in Cloudinary. But if you want to save the originals in your product environment, you can create variations, in addition to the original assets, by using on-the-fly transformations. To find out more, see Image Transformations Overview.
Let’s create the upload preset that resizes, crops, and grayscales the original cat and dog images. The transformation parameter sizes the image to a height and width of 400px. Each image is cropped while "gravity": "auto” instructs Cloudinary’s AI to identify the most important part of the image and make sure it’s kept in the crop. To convert the image to black and white, use "effect": "grayscale“.
You have to run this code only once. Once you’ve created your upload preset, it’s saved in your product environment, and you can call it during any subsequent upload.
Copy and paste this code snippet to your animals.py file:
cloudinary.api.create_upload_preset(
 name = "pre-process",
 unsigned = True,
 transformation = {"width": 400, "height": 400, "crop": "fill", "gravity": "auto", "effect": "grayscale"}
)Code language: PHP (php)You’re now ready to apply the upload preset to the cat and dog images, generating resized, cropped and grayscale variations, which are uploaded to Cloudinary.
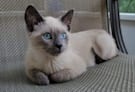
This is what the images look like before applying the upload preset and uploading:


Copy and paste this code snippet to your animal.py file:
for x in range(1,5):
 cat_num="cat"+str(x)
 cat_url="https://res.cloudinary.com/demo/image/upload/v1/blogs/python-preprocessing/"+"cat"+str(x)
 dog_num="dog"+str(x)
 dog_url="https://res.cloudinary.com/demo/image/upload/v1/blogs/python-preprocessing/"+"dog"+str(x)
 resp_cat = cloudinary.uploader.upload(cat_url, public_id = cat_num, unique_filename = False, overwrite = True, upload_preset = "pre-process")
 print(resp_cat)
 resp_dog=cloudinary.uploader.upload(dog_url, public_id = dog_num, unique_filename = False, overwrite = True, upload_preset = "pre-process")
 print(resp_dog)Code language: PHP (php)
And here is how your smartly cropped, resized, grayscaled images will look after upload:


The advantage of upload presets is that they can be reused over and over again. If you want to do a one-off, you can specify a transformation directly within the upload call, which might be a bit shorter than using an upload preset.
Let’s see how to do that while uploading one of the original images with the smart crop and resize, but without the grayscaling:
for x in range(1,3):
 cat_num="cat"+str(x)
cat_url="https://res.cloudinary.com/demo/image/upload/v1/blogs/python-preprocessing/"+"cat"+str(x)
 resp = cloudinary.uploader\
 .upload(url, public_id = id, unique_filename = False, overwrite = True,
   transformation = {"width": 400, "height": 400, "crop": "fill", "gravity": "auto"})
 print(resp)Code language: PHP (php)
Notice the two additional images in your product environment:


If your dataset contains hundreds of images, you’ll have to increase that number to tens of thousands in order to properly train a machine learning model for accuracy. The good news is to get more data, you don’t need to produce new original images; you simply need to make minor changes, like flipping or rotating, to your current dataset and load the variations as distinct images.
Transforming images to create copies modified-to-order is Cloudinary’s forte! Cloudinary can automatically augment your images by applying transformations, including:
…and much much more.
Let’s see how to apply each augmentation to selected original cat and dog images.
First, the images are resized and cropped as required, and then the Cloudinary transformation is applied to create an augmented copy, which is uploaded as an additional, distinct original in the dataset.
Copy and paste each code snippet to your animal.py file:
# Saturation
# Adjust the image saturation to 70:


for x in range(1,3):
 id="dog" + str(x) + "_saturated"
 url="https://res.cloudinary.com/demo/image/upload/v1/blogs/python-preprocessing/"+"dog"+str(x)
 resp = cloudinary.uploader\
 .upload(url, public_id = id, unique_filename = False, overwrite = True,
   transformation = {"width": 400, "height": 400, "crop": "fill", "gravity": "auto", "effect": "saturation:70"})
 print(resp)Code language: PHP (php)
Here’s how the resulting images appear:


# Rotate
# Rotate the images 10 degrees to the right:


for x in range(3,5):
 id="dog" + str(x) + "_rotated"
 url="https://res.cloudinary.com/demo/image/upload/v1/blogs/python-preprocessing/"+"dog"+str(x)
 resp = cloudinary.uploader\
 .upload(url, public_id = id, unique_filename = False, overwrite = True,
   transformation = [{ "angle": 10}, {"width": 400, "height": 400, "crop": "fill", "gravity": "auto"}]
 )
 print(resp)Code language: PHP (php)
Here’s how the resulting images appear:


# Flip
# Flip the images horizontally:


animal=["dog","cat"]
for x in range(2,4):
 id=animal[x-2] + str(x) + "_flipped"
 url="https://res.cloudinary.com/demo/image/upload/v1/blogs/python-preprocessing/"+animal[x-2]+str(x)
 resp = cloudinary.uploader\
 .upload(url, public_id = id, unique_filename = False, overwrite = True,
   transformation = [{ "angle": ["vflip", 180]}, {"width": 400, "height": 400, "crop": "fill", "gravity": "auto"}]
 )
 print(resp)Code language: PHP (php)
Here’s how the resulting images appear:


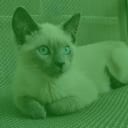
# Colorize
# Colorize the images with a green effect:


for x in range(1,3):
 id="cat" + str(x) + "_colorized"
 url="https://res.cloudinary.com/demo/image/upload/v1/blogs/python-preprocessing/"+"cat"+str(x)
 resp = cloudinary.uploader\
 .upload(url, public_id = id, unique_filename = False, overwrite = True,
   transformation = {"width": 400, "height": 400, "crop": "fill", "gravity": "auto", "color": "#20a020", "effect": "colorize:50"}
 )
 print(resp)Code language: PHP (php)
Here’s how the resulting images appear:

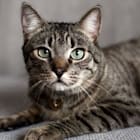
# Contrast
# Automatically adjust the contrast and apply an 80% blend:


for x in range(3,5):
 id="cat" + str(x) + "_contrasted"
 url="https://res.cloudinary.com/demo/image/upload/v1/blogs/python-preprocessing/"+"cat"+str(x)
 resp = cloudinary.uploader\
 .upload(url, public_id = id, unique_filename = False, overwrite = True,
   transformation = {"width": 400, "height": 400, "crop": "fill", "gravity": "auto", "effect": "auto_contrast:80"}
 )
 print(resp)Code language: PHP (php)
Here’s how the resulting images appear:

# Bright
# Adjust the image brightness to 60:


animal=["dog","cat"]
for a in animal:
 id= a + "1" + "_brightness"
 url= "https://res.cloudinary.com/demo/image/upload/v1/blogs/python-preprocessing/"+a+"1"
 resp = cloudinary.uploader\
 .upload(url, public_id = id, unique_filename = False, overwrite = True,
   transformation = {"width": 400, "height": 400, "crop": "fill", "gravity": "auto", "effect": "brightness:60"}
 )
 print(resp)Code language: PHP (php)
Here’s how the resulting images appear:

And that’s how to write your first program to preprocess images for deep learning in Python, using Cloudinary! If you’ve been copying and pasting these code snippets to your animal.py file, you can run it now. Check out your product environment and see all the images you’ve just uploaded.
This demo has shown you just some of Cloudinary’s many powerful features. Another useful feature is automatic classification and tagging. Hand the task of manually sorting and labeling over to Cloudinary, and you’ll save an inordinate amount of time and manpower. Automatic classification and tagging empowers you to easily retrieve unseen images by tag and manage them accordingly.
Dive deeper into Cloudinary’s capabilities:
- Discover the vast collection of image transformations you can apply
- Learn about the gamut of image optimization possibilities for delivery over the web
- Find out about the myriad of options for managing images.
For more than a decade, Cloudinary has been a leader in image management, used to streamline a variety of business workflows. Like any great tool, Cloudinary is versatile and can apply to all sorts of different use cases, including yours. It’s a perfect complement to your out-of-the-box thinking.
With its rich AI capabilities, Cloudinary can normalize and augment the images you use to train learning models with just a few lines of code. Why not try Cloudinary as one of your tools to automatically preprocess images for deep learning in Python? Start using Cloudinary and let us know how you’ve become more efficient as a result. Join the discussion.