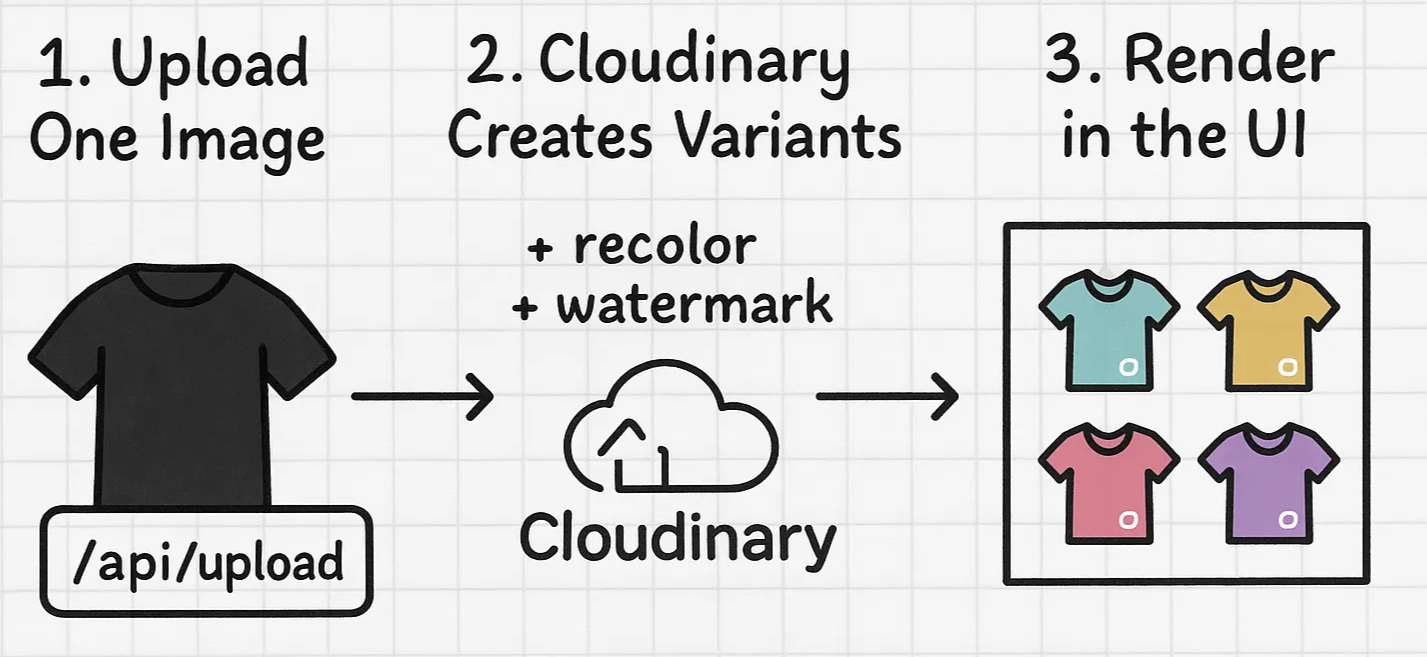
You’ve got a clean product image. Let’s say a black t-shirt. You want to sell it in eight different colors. Easy, right? Until you realize you need eight recolored versions that each have to be watermarked, optimized, and ready for your store.
What if you could skip all that?
With Cloudinary’s Generative AI Recolor, you can upload one image and automatically:
- Recolor it into multiple variants using AI-powered prompts.
- Add your brand watermark with a reusable overlay.
- Serve optimized images instantly, no extra work.
This guide walks you through building that workflow into a modern Next.js 15 store using Cloudinary, shadcn/ui, and Motion.dev. No manual editing or extra storage.
To get started, we’ll create a new Next.js 15 application, install the Cloudinary SDKs, configure our environment, upload a watermark, and enable Next.js to serve Cloudinary‑hosted images. You can follow along with the complete code in the GitHub repo.
Use the official installer to scaffold a fresh project:
npx  create-next-app@latest  cloudinary-ai-recolor

cd  cloudinary-ai-recolor
Code language: CSS (css)
During setup, enable:
-
App Router (the new
app/directory). - Tailwind CSS (for styling).
- TypeScript (optional but recommended).
Add both client‑side and server‑side Cloudinary libraries:
npm  install  @cloudinary/url-gen  cloudinary
Code language: CSS (css)-
@cloudinary/url‑gen builds URLs with your generative‑recolor and overlay transformations (see
lib/buildVariant.ts). -
cloudinary handles uploads, eager transforms, and webhooks (see
api/upload/route.ts).
- Sign up or log in at cloudinary.com.
- In your Dashboard, copy your Cloud Name, API Key, and API Secret.
- Create a folder named (for example)
demo-storein your Media Library—this keeps all product assets organized.
Create a .env.local in your project root with:
NEXT_PUBLIC_CLOUDINARY_CLOUD_NAME=your-cloud-name

NEXT_PUBLIC_CLOUDINARY_FOLDER=demo-store

CLOUDINARY_API_KEY=your-api-key

CLOUDINARY_API_SECRET=your-api-secret

REDIS_URL=your-redis-url
Cloudinary uses these to generate and process images.
We’ll use Redis for quick JSON-based product storage (not required, but nice for demos).
Place a watermark.png in your project root (this is your branded logo or badge). Then run:
node  -e  "require('cloudinary').v2.config({cloud_name:process.env.NEXT_PUBLIC_CLOUDINARY_CLOUD_NAME,api_key:process.env.CLOUDINARY_API_KEY,api_secret:process.env.CLOUDINARY_API_SECRET}); require('cloudinary').v2.uploader.upload('watermark.png',{folder:process.env.NEXT_PUBLIC_CLOUDINARY_FOLDER,public_id:'watermark'}).then(r=>console.log(r.secure_url));"

Code language: JavaScript (javascript)
This creates demo-store/watermark in Cloudinary, referenced later in your overlay logic.
In next.config.ts , permit images from your Cloudinary domain:
import type { NextConfig } from "next";

const nextConfig: NextConfig = {
  images: {
    remotePatterns: [
      {
        protocol: "https",
        hostname: "res.cloudinary.com",
        pathname: `/${process.env.NEXT_PUBLIC_CLOUDINARY_CLOUD_NAME}/**`,
      },
    ],
  },
};

export default nextConfig;
Code language: JavaScript (javascript)
The process starts with uploading one base product image. Cloudinary then uses Generative AI Recolor to create multiple color variants and applies your brand watermark using overlays. The transformed images are automatically optimized and sent back, ready to be displayed in your UI.
Inside the ImageUploader component, the user interacts with a simple form and:
- Selects a product image (e.g. a black t-shirt).
- Types in the product name and price.
- Chooses from the available colors (like red, blue, beige…).
Once they hit Upload & Generate, we’ll bundle everything up using FormData and send it to the server:
const body = new FormData();
body.append('file', file);
body.append('name', name);
body.append('price', price);
body.append('colors', JSON.stringify(picked));

await fetch('/api/upload', { method: 'POST', body });
Code language: JavaScript (javascript)
This is the moment we hand the work off to our backend.
The API route at /api/upload picks up the request.
We’ll extract the file and other fields from the request:
const form = await req.formData();
const file = form.get("file") as File;
const colors = JSON.parse(form.get("colors") as string);
const name = form.get("name");
const price = Number(form.get("price") || 0);
Code language: JavaScript (javascript)
Now we know what image to transform, and what colors the user wants it in.
This is where Cloudinary gets involved.
We’ll prepare an eager array, a list of transformation strings that tells Cloudinary what to do for each color:
const eager = colors.map(c =>
  [
    `e_gen_recolor:prompt_tshirt;to-color_${c}`,
    `l_${FOLDER}:watermark,g_south_east,x_20,y_20`,
    "f_auto",
    "q_auto"
  ].join("/")
);
Code language: JavaScript (javascript)
Let’s break that down:
-
e_gen_recoloruses Generative AI to recolor just the shirt, based on the word “tshirt”. -
l_:watermark...overlays your uploaded watermark image in the bottom right. -
f_auto+q_autotells Cloudinary to deliver optimized image formats and compression.
Each color in the list gets its own transformation pipeline. These are all generated in the background, so we don’t block the upload.
We’ll now upload the image stream to Cloudinary using its Node SDK:
cloudinary.v2.uploader.upload_stream(
  {
    folder: FOLDER,
    eager,
    eager_async: true,
    notification_url: WEBHOOK,
  },
  (err, result) => { ... }
).end(buffer);

Code language: PHP (php)- The original image is saved right away.
- The color variants and watermarking start generating in the background.
- When those are done, Cloudinary pings our webhook (we’ll get to that soon).
Before the variants are ready, we’ll save a new product in our local database (in this case, just Redis):
const product = {
  id: uuid(),
  name,
  price,
  publicId: uploadResult.public_id,
  thumb: cld.image(uploadResult.public_id)
             .format("auto")
             .quality("auto")
             .toURL(),
  variants: []
};

Code language: JavaScript (javascript)
This means the user sees the product right away, and we can update it once the variants are ready.
Full implementation: upload/route.ts
At this point, Cloudinary is doing its thing in the background. All we did was upload a single image and, behind the scenes, we’ve launched a fully automated process to generate a full set of branded, recolored images.
Up next, we’ll show how Cloudinary gets back to us when those are ready.
Once we upload the image and pass in our transformation instructions, Cloudinary uses its Generative AI Recolor engine to do something pretty remarkable: It looks at the image, understands what the “t-shirt” is, and recolors just the relevant parts. Pixel-perfect, context-aware, and fully automatic.
Let’s take a closer look at how it works under the hood.
Inside the upload API route, we created this transformation string for every color the user picked:
const eager = colors.map(c =>
  [
    `e_gen_recolor:prompt_tshirt;to-color_${c}`,
    `l_${FOLDER}:watermark,g_south_east,x_20,y_20`,
    "f_auto",
    "q_auto"
  ].join("/")
);

Code language: JavaScript (javascript)
Let’s focus on the first part:
`e_gen_recolor:prompt_tshirt;to-color_red`
Code language: JavaScript (javascript)
This tells Cloudinary:
“Use generative AI to find the area that looks like a t-shirt, and recolor it to red.”
You don’t need to manually mask or define that area. Cloudinary understands common objects (like shirts, shoes, pants) using trained AI models, and recolors only the parts that match the prompt.
You could replace tshirt with shoe, hat, bag, etc. depending on what your product is.
Normally, recoloring a product in multiple shades means:
- Masking the product in Photoshop.
- Tweaking hue/saturation.
- Exporting five to 10 new image files.
- Uploading them all.
Cloudinary’s e_gen_recolor turns all of that into one short line of code.
You send the image once. Cloudinary figures out what to recolor, how to do it cleanly, and delivers a set of variants — ready for your site.
Want to explore more prompts or object types? Check the official docs: Cloudinary Generative Recolor
Right after recoloring, we apply your brand watermark automatically, on every variant.
This happens inside the same eager transformation string:
`l_${FOLDER}:watermark,g_south_east,x_20,y_20`
Code language: JavaScript (javascript)
Here’s what it does:
-
l_loads the layer (in this case, your watermark image). -
g_south_eastp ositions it in the bottom-right corner.
This overlay works with any image you upload, as long as you’ve placed a watermark.png in your Cloudinary folder.
It’s reusable, automatic, and stays consistent across every product image.
Want to customize position or transparency? Check Cloudinary’s overlay docs.
Once Cloudinary finishes generating all the recolored, watermarked variants, it sends a webhook back to your app. This step connects the dots — adding the final image URLs to each product.
In your upload step, we passed this:
notification_url:  WEBHOOK
Code language: HTTP (http)
That’s a URL pointing to:
/api/cloudinary/webhook
Cloudinary calls this route when the background processing is done.
Inside api/cloudinary/webhook/route.ts, we:
- Receive the
public_id(so we know which product this is for). - Grab the final
eager[].secure_urlvalues (the new images). - Update the product in storage with those URLs.
products[idx].variants = eager.map((e: any) => e.secure_url);
await writeProducts(products);
Code language: JavaScript (javascript)
The product now has a full set of AI-generated, branded image variants!
Once Cloudinary returns the recolored images, your UI will display them automatically using the variants[] array.
-
ProductCard→ Shows the first variant or thumbnail in product listings. -
ProductDetail→ Renders a scrollable gallery of all color variants. -
ProductGrid→ Maps through products and loadsProductCardcomponents.
Each component pulls directly from the variants array, which was updated via the Cloudinary webhook.
The result: A single uploaded image has turned into multiple branded, optimized variants shown across your store. No extra dev work required.
With Cloudinary’s Generative AI Recolor, you automatically turned a single image into multiple branded, optimized variants. It’s a fast, scalable way to handle product visuals in modern e-commerce.
Want to do more? Explore other Cloudinary generative AI tools like:
- Background Removal.
- Object-aware cropping.
- Generative Fill and Generative Replace.
Check them out in the Cloudinary docs.
Full code: github.com/musebe/cloudinary-ai-recolor
Live demo: cloudinary-ai-recolor.vercel.app


