
Managing and optimizing campaign visual media assets involves: organizing different file types, following compliance rules, and adapting content for various platforms and audiences. With large volumes of assets, workflows can quickly become hard to manage, especially when you’re working on tight deadlines or ensuring brand consistency across campaigns.
Modern digital asset management (DAM) systems with AI can help handle these challenges. Features like automatic tagging, content moderation, and insights extraction simplify the process and make it more efficient.
This blog post will show you how AI-powered tools in DAM systems can help manage your media assets, improve your campaign results, and generate insights and recommendations on image assets. We’ll set up Cloudinary AI Vision for automatic tagging and metadata analysis and share an example of how to optimize a retail banner ad for better click-through rates (CTR).
Cloudinary Assets is the all-in-one DAM for organizing and managing digital content, and provides secure access for admin, employees, and other stakeholders. It unites developers, commerce teams, and marketers by providing a single source of truth, enabling seamless file uploads and connections to any application through integrations, APIs, and widgets.
To use Cloudinary Assets, you must have a Cloudinary account; you can create one for free. After successfully creating your account, upload your images to Cloudinary:
- Navigate to the Assets page by clicking its icon on the sidebar.
- Then click Upload on the top-right corner of the screen.
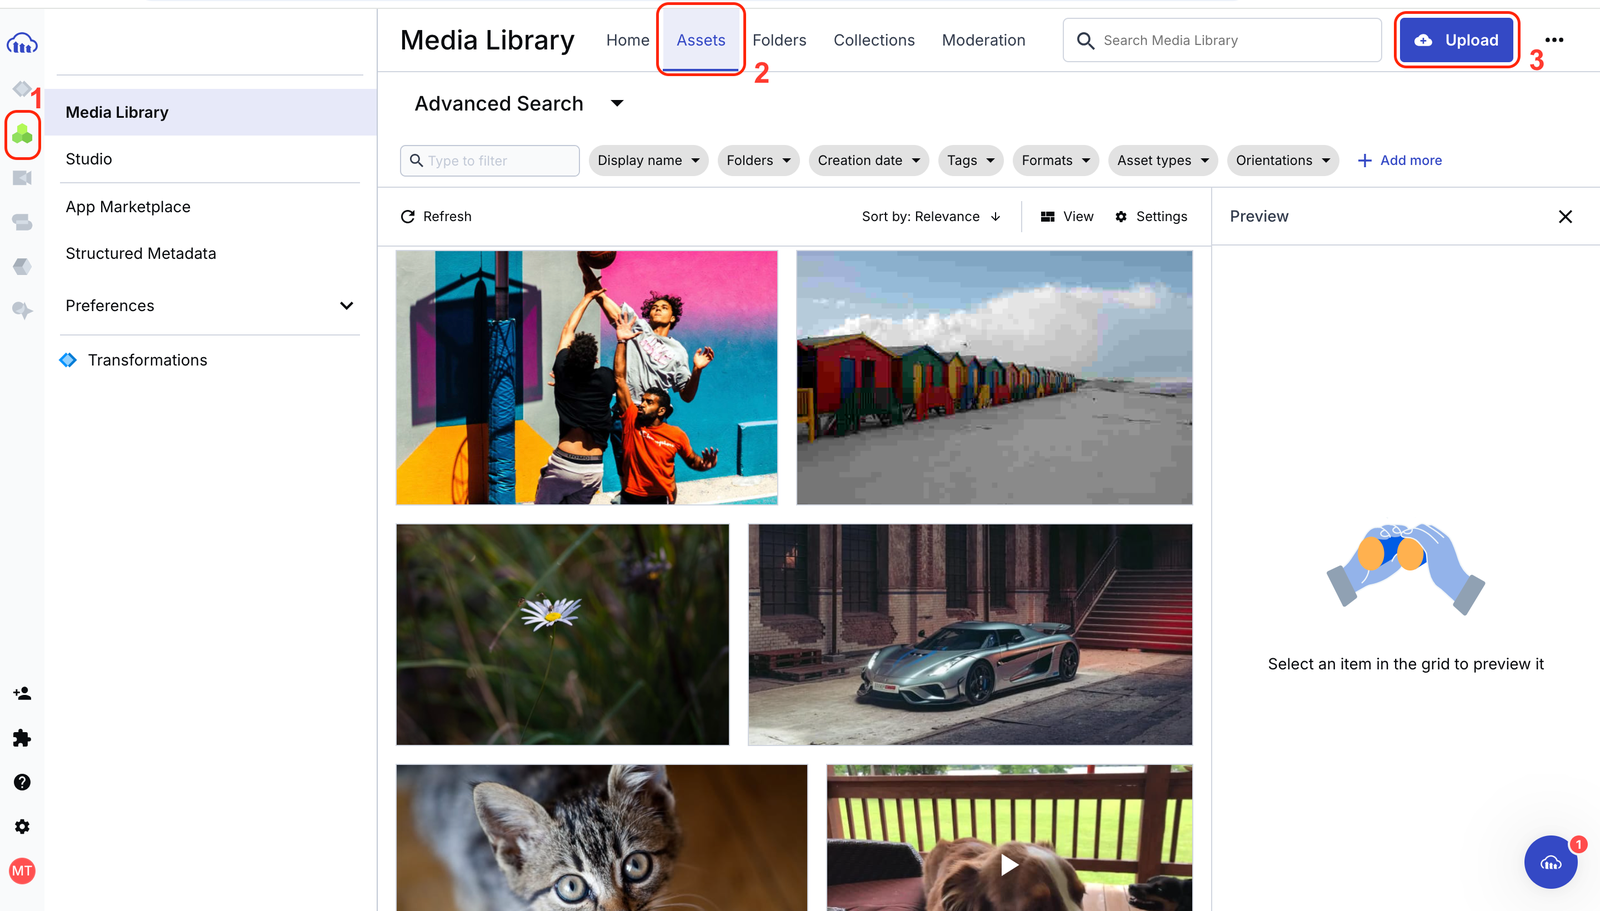
Clicking Upload will open up the Cloudinary Upload widget with several options. Choose any convenient option and any image of your choice. Cloudinary’s DAM has multiple features for effectively managing your visual media assets, such as automatic tagging, metadata analysis, and so on, but this post will focus on just automatic tagging.
Automatic tagging uses AI to analyze and identify objects in your media asset, generating tags based on image analysis. It gives accurate and consistent tags and improves searchability, making it easier to locate assets when needed, enhancing efficiency, and saving time.
Cloudinary’s DAM leverages one or more auto tagging add-ons that apply deep-learning AI models to identify objects within your images and generate a list of detected categories. You can adjust the confidence level to expand the list with more categories or narrow it down to those with higher confidence. Then select specific categories to add to your asset or apply all displayed categories as tags.
To automatically tag any of your image assets, follow these steps:
- Log in to your Cloudinary console and navigate to the Media Library page as you did in the last section.
- Double-click any one of your image assets.
- On the image preview page, click the Analysis tab.
- You can adjust the confidence level to any value you want on the Analysis tab. You can also choose which auto tagging add-on you’d like to use or just go with the default.
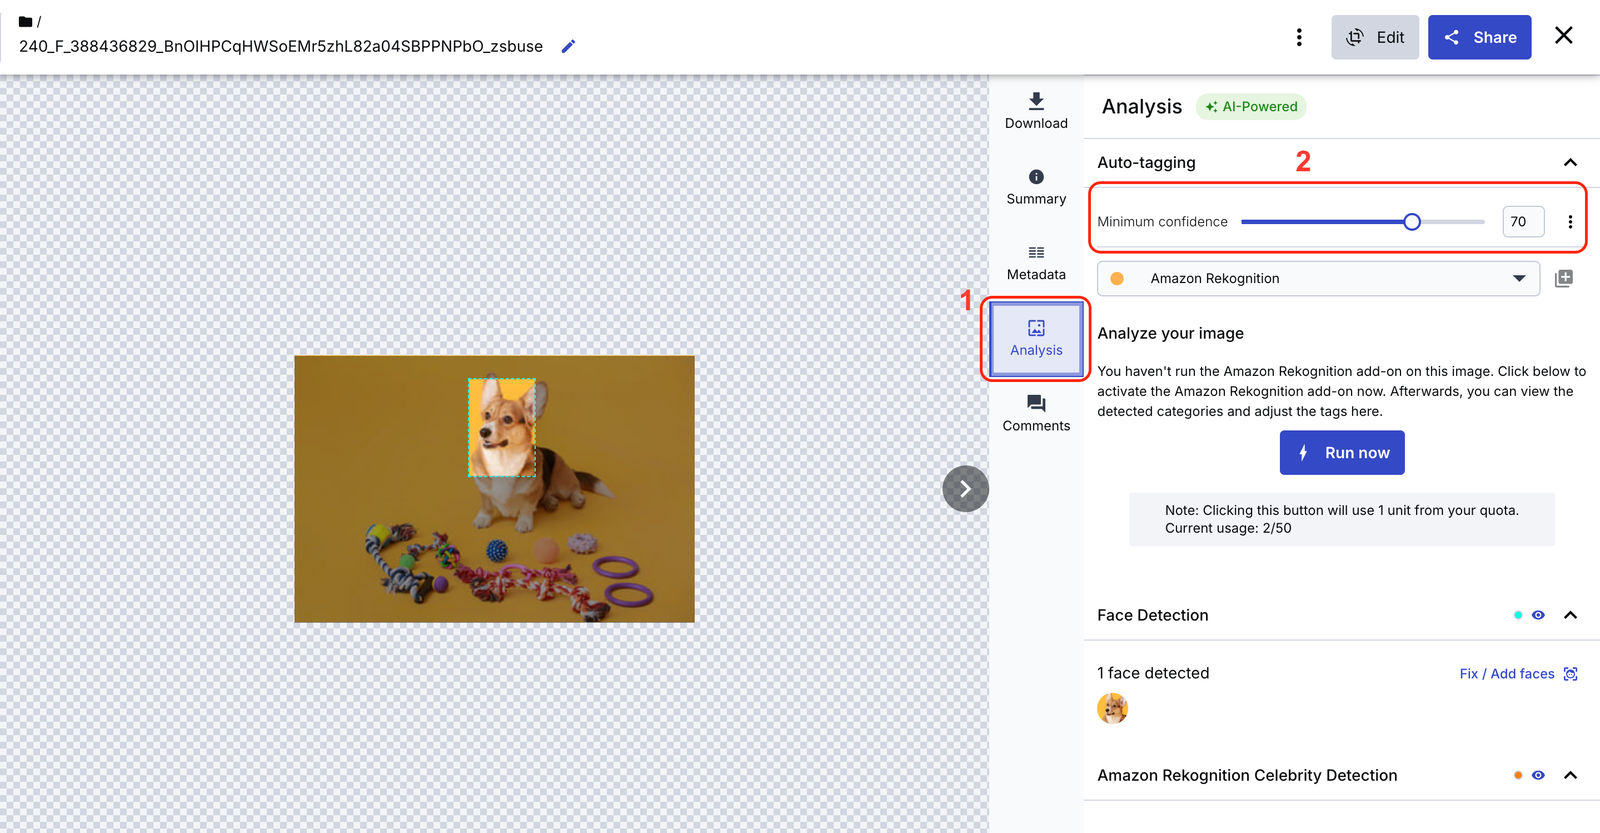
- Next, click Run now, and the AI add-on will analyze the image and generate several tags based on its components.
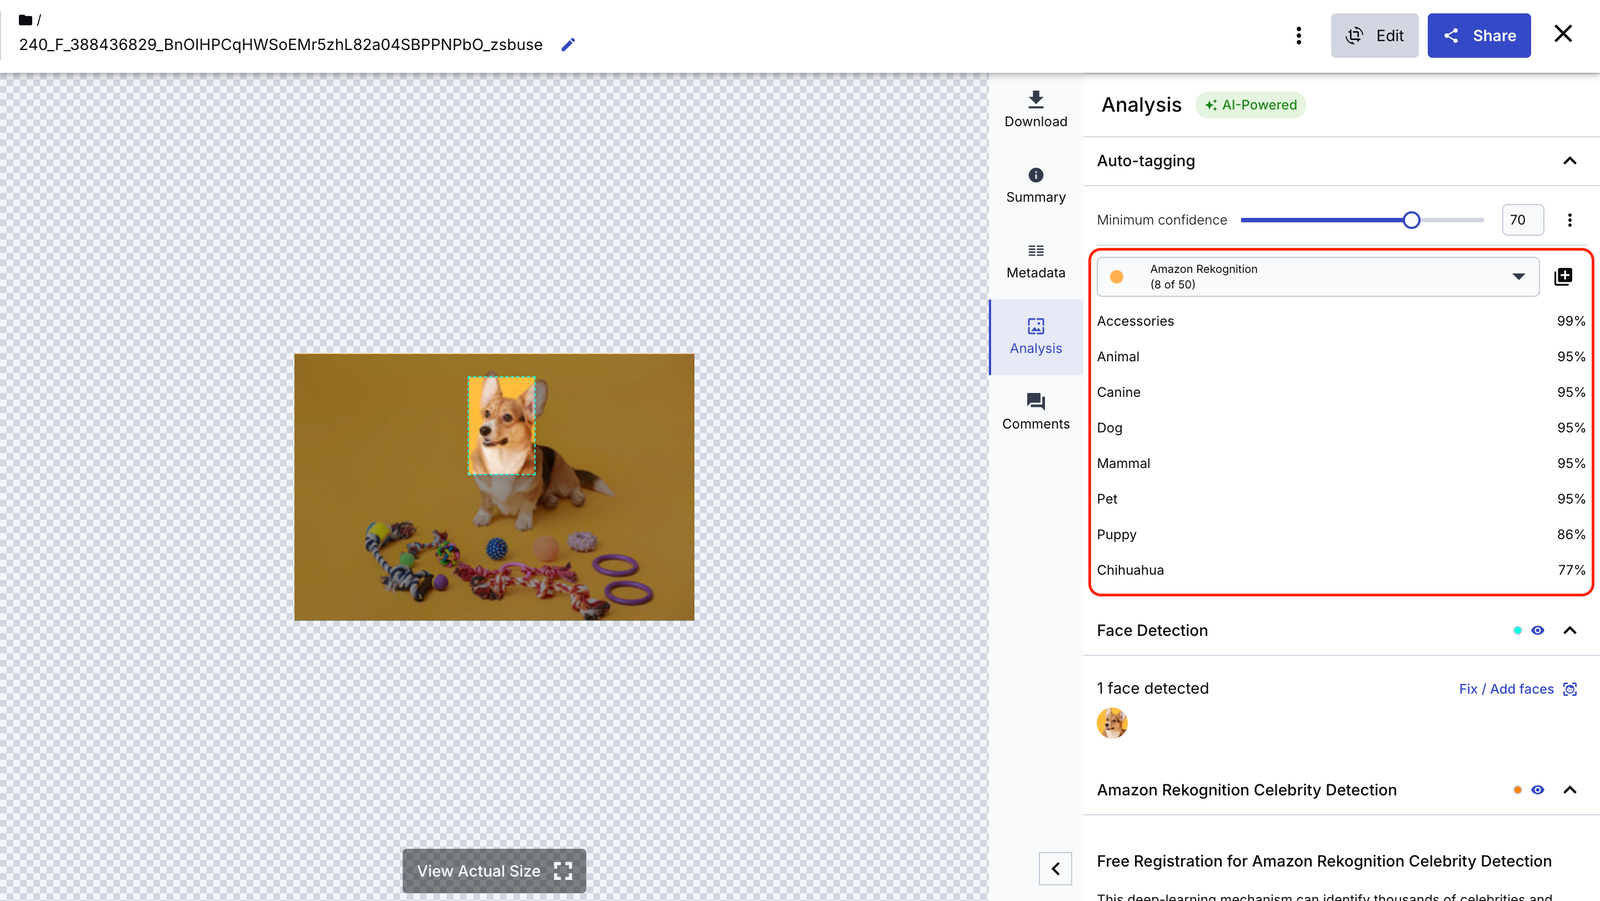
After the tags have been successfully generated, you can select the ones that you want by clicking on the individual tags or clicking the + icon at the top-right corner of the red rectangle in the image above to add all the tags.
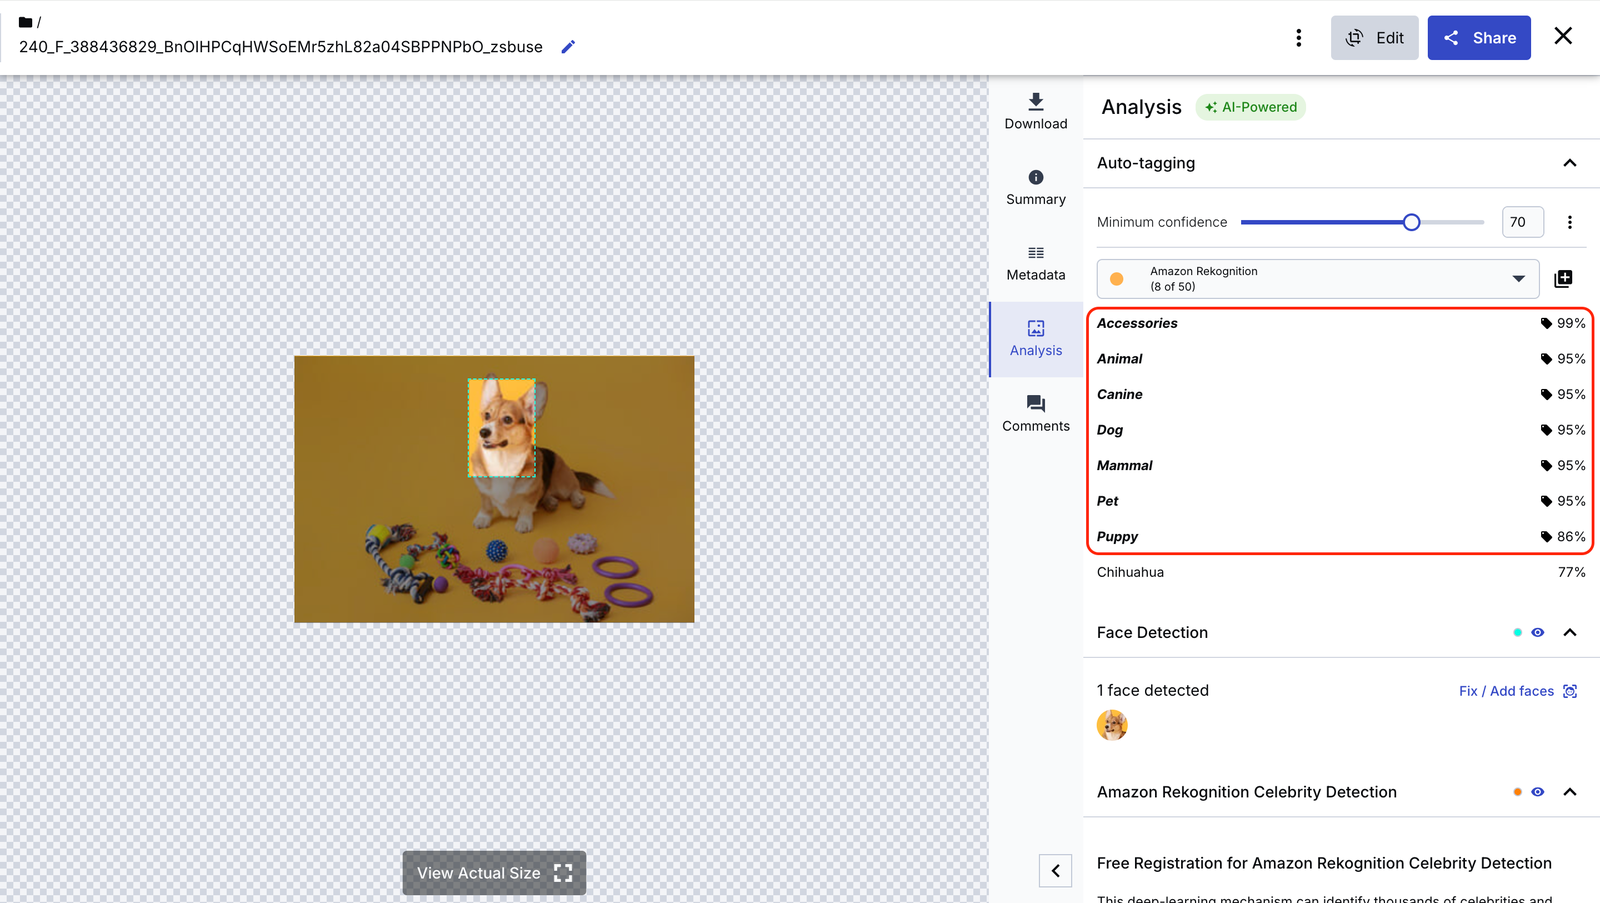
The tags you select will show up like this, meaning your image asset has been tagged in these categories.
Next, you’ll use AI Vision to optimize the image asset. It’ll generate AI-powered recommendations to improve the image asset for your campaigns.
Cloudinary’s AI Vision add-on leverages advanced technologies, including large language models (LLMs), specialized AI models, sophisticated algorithms, and prompt engineering. This combination enables the service to understand and respond intelligently to user inquiries about images.
For instance, it can identify objects within an image, such as determining if a specific product is present in a user-uploaded photo, or it can provide detailed descriptions of scenes, like “A bustling city street with a red double-decker bus passing by.” AI Vision can also do metadata analysis on the image, examining and interpreting the metadata to extract meaningful insights, such as file type, size, or keywords associated with the image.
To set up AI Vision, follow these steps:
- If you still haven’t made a Cloudinary account yet, you need to create one first (for free!).
- Ensure you’re logged in to your account and navigate the Add-ons page. Look for Cloudinary AI Vision, as shown in the image below, then choose the plan that you want to subscribe to. Cloudinary does have a free plan with limited usage.
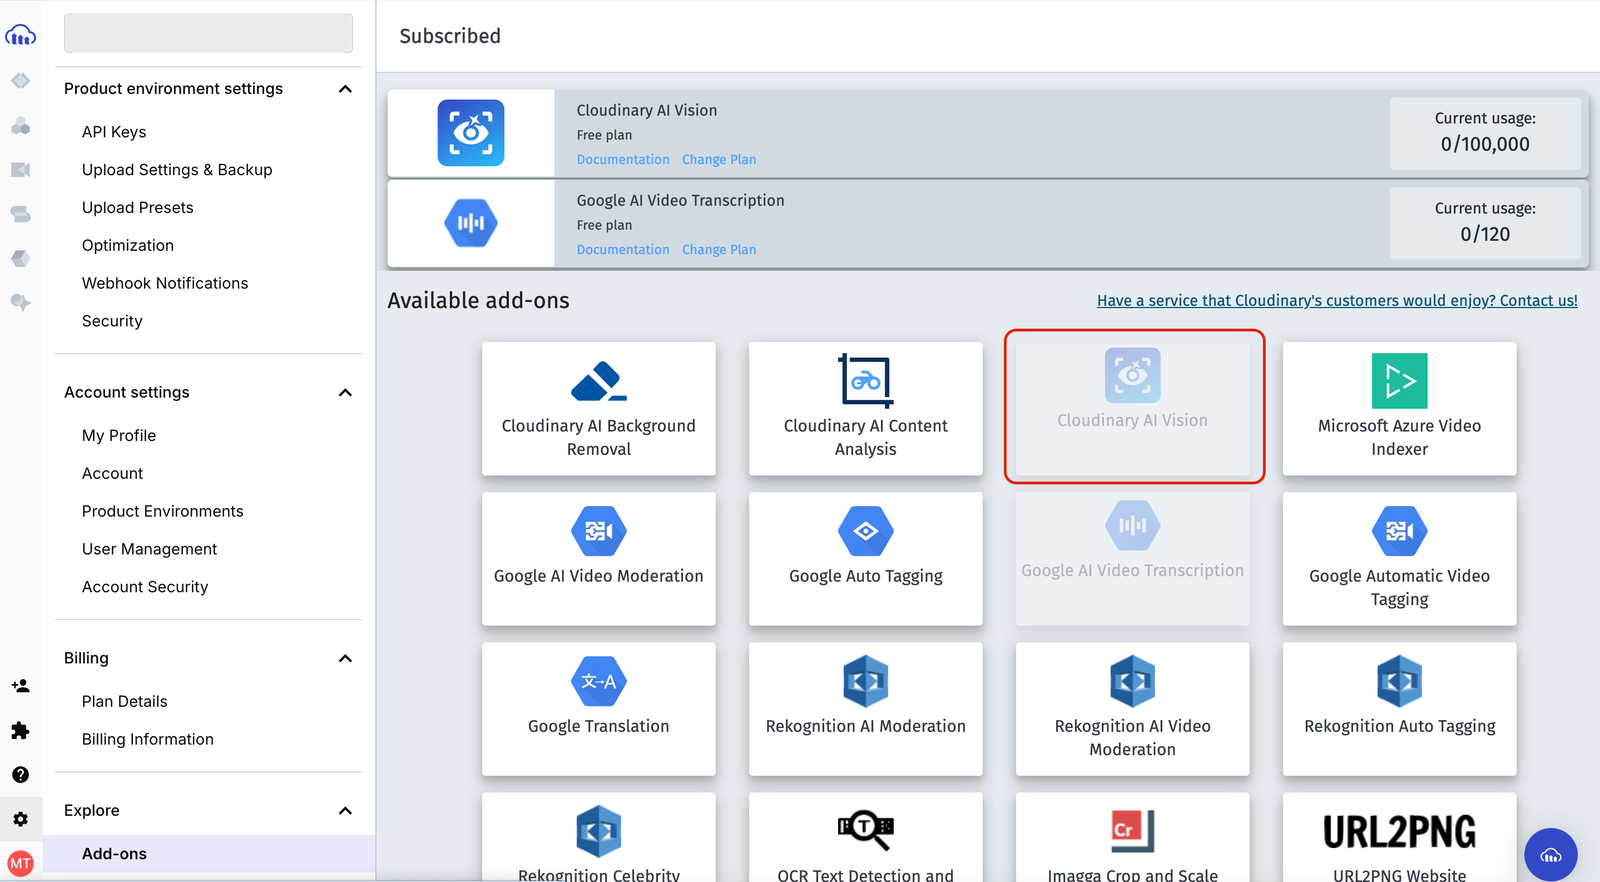
- Once you’ve subscribed to a plan, it will appear in your Cloudinary console, as shown in the image above.
You can now start automatically tagging images, moderating assets, and generating insights and recommendations on image assets.
Cloudinary’s AI Vision can generate an in-depth analysis of an image asset and provide suggestions for improvements. It uses prompt engineering to achieve this and using this feature requires a developer. It requires making a request to the Cloudinary API, supplying the image to be analyzed, along with a prompt or a list of prompts, and Cloudinary will return a response with answers to each prompt.
AI Vision is beneficial for optimizing campaign assets to achieve the best results. You will use the image asset you automatically tagged in the previous section and optimize it further using AI Vision. Assuming it’s one of your campaign assets, you will ask AI Vision for an in-depth image analysis and suggestions for improvement to optimize the asset for good results.
You’ll need your Cloudinary API key, secret key, and cloud name to make a request to the AI Vision API, which you can retrieve from your Cloudinary console. Follow these steps to get these details from your Cloudinary console.
- Go to the settings page in your Cloudinary console.
- Under the API Keys section, your cloud name should be beside the section title.
- Generate a new API key if you don’t already have one.

Now that you have your Cloudinary keys, you’ll make a POST request to the Cloudinary API, supplying your keys in the API URL as follows.
<code>// Cloudinary API</code>
https://<API_KEY>:<API_SECRET>@api.cloudinary.com/v2/analysis/<CLOUD_NAME>/analyze/ai_vision_generalCode language: HTML, XML (xml)
As shown in the snippet below, the request payload will contain the URL to your image asset on Cloudinary as the uri source. Then, you’ll supply some key prompts to the API that will help the API gain insights into the image and suggest ways to improve it.
// Request Payload

{

    "source": {

        "uri": "https://res.cloudinary.com/<CLOUD_NAME>/image/upload/v1737657514/240_F_388436829_BnOIHPCqHWSoEMr5zhL82a04SBPPNPbO_zsbuse.jpg"

    },

    "prompts": [

        "What call-to-action text would work best to engage pet owners looking at this banner ad?",

        "What color schemes or additional elements could enhance the appeal of the current image?",

        "Propose variations of this banner design that could be A/B tested to optimize click-through rates.",

        "What interactive elements could be added to the banner to boost engagement without overwhelming the design?"

    ]

}Code language: JSON / JSON with Comments (json)
Below is the response from making the request above and supplying the image above to the AI Vision API.
{
  "data": {
      "entity": "https://res.cloudinary.com/<CLOUD_NAME>/image/upload/v1737657514/240_F_388436829_BnOIHPCqHWSoEMr5zhL82a04SBPPNPbO_zsbuse.jpg",
      "analysis": {
          "responses": [
              {
                  "value": "Based on this charming image of a Corgi surrounded by colorful dog toys, here are some engaging call-to-action ideas that could resonate with pet owners:\n\n1. \"Treat Your Pup to Playtime Paradise!\"\n\n2. \"Unleash the Fun - Shop Dog Toys Now!\"\n\n3. \"Make Tails Wag - Explore Our Toy Collection!\"\n\n4. \"Playful Pups Deserve the Best - Browse Toys!\"\n\n5. \"Bring Home the Joy - Find Your Dog's New Favorite Toy!\"\n\n6. \"Spoil Your Furry Friend - Discover Fun Toys Today!\"\n\n7. \"Playtime Perfection Awaits - Shop for Your Pooch!\"\n\nThese call-to-actions aim to evoke the joy of treating one's pet, emphasize the fun aspect of the toys, and create a sense of excitement around exploring new playthings for their furry companions. The bright, cheerful image of the Corgi with an array of toys sets a perfect backdrop for encouraging pet owners to engage with the ad and potentially make a purchase."
              },
              {
                  "value": "The current image already has a vibrant and appealing color scheme with the bright yellow background and the natural colors of the Corgi. However, to enhance its appeal further, we could consider the following color schemes and additional elements:\n\n1. Color Schemes:\n   - Introduce pastel tones to complement the yellow, such as light blue, mint green, or soft pink. This could create a playful, pet-friendly atmosphere.\n   - Use a color gradient background, transitioning from yellow to a soft orange, to add depth and warmth.\n   - Incorporate the colors of the toys more prominently in graphic elements or text.\n\n2. Additional Elements:\n   - Add a colorful, playful border with paw prints or bone shapes.\n   - Include cartoon-style speech bubbles with fun phrases like \"Woof!\" or \"Play with me!\"\n   - Overlay subtle patterns like polka dots or stripes in complementary colors.\n   - Add a logo or brand name in a corner, using a fun, pet-themed font.\n   - Include small icons representing different types of pets (cats, birds, etc.) to broaden appeal.\n   - Incorporate a subtle shadow under the dog and toys for depth.\n   - Add a \"New!\" or \"Sale!\" burst in a contrasting color to draw attention.\n   - Include a small clock icon to suggest \"playtime\" or limited-time offers.\n\n3. Layout Enhancements:\n   - Arrange the toys in a more deliberate pattern, perhaps spelling out a word like \"PLAY\".\n   - Add a subtle vignette effect to focus attention on the center of the image.\n   - Include a small infographic showing benefits of playtime for pets.\n\nThese additions could make the image more engaging and effective as an advertisement while maintaining its cheerful and pet-friendly appeal. The key is to enhance without overwhelming the charming simplicity of the original composition."
              },
              {
                  "value": "Excellent idea to consider A/B testing for optimizing click-through rates. Here are several variations of the banner design that could be tested:\n\n1. Focused Product Shot:\n   - Zoom in on the Corgi's face with just one or two toys visible.\n   - Test if a more intimate, emotive image drives more engagement.\n\n2. Action Shot:\n   - Show the Corgi playing with one of the toys.\n   - Test if dynamic content increases interest.\n\n3. Before/After Layout:\n   - Split the banner: left side shows a bored Corgi, right side shows the happy Corgi with toys.\n   - Test if this narrative approach resonates more with pet owners.\n\n4. Multiple Pets:\n   - Include other dog breeds or even a cat with toys.\n   - Test if variety appeals to a broader audience.\n\n5. Human Element:\n   - Add a human hand offering a toy to the Corgi.\n   - Test if this creates a stronger connection with potential buyers.\n\n6. Seasonal Variation:\n   - Adjust the background and toy selection to reflect current season/holiday.\n   - Test if timely content improves relevance and clicks.\n\n7. Text-Heavy Version:\n   - Reduce image size and include more text about benefits or a special offer.\n   - Test if more information drives decision-making.\n\n8. Minimalist Approach:\n   - Show only colorful toy silhouettes against the yellow background with a small Corgi icon.\n   - Test if a cleaner, simpler design stands out more.\n\n9. Interactive Element:\n   - Add a GIF of the Corgi's tail wagging or toys bouncing.\n   - Test if movement captures more attention.\n\n10. Social Proof:\n    - Include a star rating or customer review quote.\n    - Test if trust indicators increase click-through rates.\n\n11. Urgent Call-to-Action:\n    - Add a countdown timer or \"Limited Time Offer\" text.\n    - Test if creating urgency boosts immediate action.\n\n12. Product Variety:\n    - Show a wider range of pet products, not just toys.\n    - Test if showcasing more options appeals to different needs.\n\nFor each variation, ensure that only one major element is changed at a time for clear A/B test results. Track not only click-through rates but also conversion rates to understand which designs drive the most valuable customer actions."
              },
              {
                  "value": "Adding interactive elements to the banner can significantly boost engagement without cluttering the design. Here are some ideas that could work well:\n\n1. Hover Effects:\n   - Make the toys gently wiggle or bounce when the cursor hovers over them.\n   - Have the Corgi's ears perk up or tail wag on mouse-over.\n\n2. Simple Animation:\n   - Animate the Corgi to occasionally blink or tilt its head.\n   - Create a subtle looping animation of toys rotating or moving slightly.\n\n3. Click-to-Play:\n   - Allow users to click on a toy, making a soft squeak sound.\n   - Enable a short animation of the Corgi \"catching\" a clicked toy.\n\n4. Color Customization:\n   - Let users change the background color with a small color palette.\n   - Allow toggling between day and night modes for the scene.\n\n5. Mini-Game:\n   - Incorporate a simple \"fetch\" game where users can throw a toy for the Corgi.\n   - Add a \"find the hidden bone\" feature where users can click to reveal it.\n\n6. Expandable Information:\n   - Include small \"+\" icons that expand to show toy details or benefits when clicked.\n   - Create a flip-card effect for the Corgi, revealing fun facts about the breed on the back.\n\n7. Dynamic Text:\n   - Rotate through different call-to-action phrases or product names.\n   - Implement a typewriter effect for text appearing gradually.\n\n8. Countdown Timer:\n   - Add a subtle timer for a special offer, creating urgency without being intrusive.\n\n9. Social Media Integration:\n   - Include small, clickable social media icons that pop up share options.\n\n10. Interactive Poll:\n    - Add a simple one-question poll about pet preferences that shows results instantly.\n\n11. Cursor Interaction:\n    - Make the Corgi's eyes follow the cursor movement across the banner.\n\n12. Sound Option:\n    - Include a small speaker icon that, when clicked, plays a short, cute bark or toy squeak.\n\nWhen implementing these interactive elements, it's crucial to:\n- Ensure they don't significantly increase load time.\n- Make them subtle enough not to distract from the main message.\n- Provide value to the user experience rather than just being gimmicky.\n- Keep accessibility in mind, ensuring the banner remains functional without the interactive elements.\n\nBy thoughtfully incorporating one or two of these elements, you can create a more engaging experience that encourages users to interact with the banner, potentially increasing both time spent viewing the ad and click-through rates."
              }
          ],
          "model_version": 1
      }
  }
}Code language: JSON / JSON with Comments (json)
You can see how detailed and useful the suggestions are in getting better results from the ad banner.
You can post the old banner and optimized versions on whichever social media platform you wish to see each image’s performance. Most social media platforms, like TikTok and Instagram, have analytics tools to help you see how your ad is performing.
In this post, you read how Cloudinary’s AI Vision can help marketing teams optimize campaign banners for better results, and explored Cloudinary features like automatic tagging and metadata analysis. If you enjoyed this post and want to experiment with social ad variations using dynamic URLs and AI tools, you can start by signing up for Cloudinary.


