
There are many dimensions to Cloudinary’s capabilities, from image and video transformations to intelligent digital asset management and beyond. Functionality around 3D models is up and coming, so it’s time to check in and see where we’re at, bearing in mind that there’s plenty more functionality to come.
Forget the ABCs of using 3D with Cloudinary, we’re going straight for the 3 Ds: Display, Deliver and Discover.
The beauty of 3D models is the ability to view an object from any angle. So, if you just want to capture some realistic images from your model, rather than wasting time and money on a real photo shoot, use the camera effect on your model instead.
If you don’t yet have a Cloudinary account, you can sign up for free, then upload your 3D models as image asset types to your Media Library. You can try out any of the effects in this post by adding transformation parameters to the delivery URLs of your models, which you can do by hand or using an SDK.
The camera effect accepts many different parameters including horizontal and vertical positions, zoom, environment and exposure – each giving you the ability to find your perfect shot.
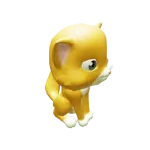
Here are the e_camera parameters used in the following example of the cute kitty model:
- Position the camera at an angle of 45 degrees above the cat (
up_45) - Rotate the camera 60 degrees to the left (
right_-60) - Zoom in to 120% (
zoom_1.2) - Use ‘whipple_creek’ lighting (
env_whipple_creek) - Apply 1.8 amount of exposure (
exposure_1.8)
To convert the model to an image, set the format parameter to an image format such as JPG (f_jpg).

Or, to preserve transparency, convert to a PNG, allowing you to apply an underlay as a background, like this:
Try out this interactive demo to capture the kitty with different settings:
Use the controls to set up the camera, then capture your shot!
May take a few seconds to generate*

*It can take a few seconds to generate a new image on the fly if you’ve tried a combination of settings that hasn’t been tried before. Once an image has been generated though, it’s cached on the CDN, so future requests to the same transformation are much faster. You can learn more about that in our Service overview.
If you want an easy way to show off all sides of your model, you can capture an animation of the object spinning by combining the camera effect with the animated flag and an image file format that supports animation, such as WebP (f_webp,fl_animated), or video file format, such as MP4 (f_mp4,fl_animated).
If you’ve got several variants of a product to display, then you can use the swap_image effect to change the model’s texture. Here, a file reference variable is defined, called new, set to the raindrops image with public ID docs/raindrops ($new_ref:!docs:raindrops!). The image parameter of the swap_image effect is set to this variable, and the index of the layer to swap is specified as 0 (e_swap_image:image_$new;index_0):
 Original texture
 Texture swapped
In the examples above, we’ve already seen how easy it is to transform a model to an image or video format, but you can also use Cloudinary to convert your 3D model to a different model format.
For example, you can convert an FBX file to a GLB file, simply by setting the format/fetch format parameter to glb:
Or even by changing the file extension in the URL:
Note that some formats aren’t supported, so make sure to check out these docs to find out which formats you can convert to.
If you’re working with glTF files, you can apply Draco compression to optimize your models for faster delivery using the draco flag:
Let your visitor interact with and discover more about your objects by using an appropriate viewer.
The Cloudinary Product Gallery has built-in support for 3D models in the glTF format, but if your model is in a different format, it can automatically convert it. For example, here are a few models of different formats being displayed in the product gallery. Feel free to zoom in and out of each model, and twist them round to all angles:
Here’s the code you need to create the Product Gallery – just make sure to set the mediaType of each model to 3d:
<script src="https://product-gallery.cloudinary.com/all.js" type="text/javascript">
</script>

<div id="my-gallery" style="max-width:80%;margin:auto">
</div>

<script type="text/javascript">
const myGallery= cloudinary.galleryWidget({
  container: "#my-gallery",
  cloudName: "demo",
  mediaAssets: [
    {publicId: "docs/cute-kitty", mediaType: "3d"},
    {publicId: "docs/CldLogo3D", mediaType: "3d"},
    {publicId: "DamagedHelmet3D", mediaType: "3d"}
  ]
});

myGallery.render();
</script>
Code language: HTML, XML (xml)
To show just one model, without the carousel options, you can specify carouselStyle: "none", with one mediaAsset:
<script src="https://product-gallery.cloudinary.com/all.js" type="text/javascript">
</script>

<div id="my-gallery2" style="max-width:80%;margin:auto">
</div>

<script type="text/javascript">
const myGallery2= cloudinary.galleryWidget({
  container: "#my-gallery2",
  cloudName: "demo",
  carouselStyle: "none",
  mediaAssets: [
    {publicId: "docs/cute-kitty", mediaType: "3d"}
  ]
});

myGallery2.render();
</script>
Code language: HTML, XML (xml)
Then, you can interact with the single model in its own viewer:
If you like that, then you’ll love the Cloudinary AR/3D viewer, a project that’s being developed under Cloudinary Labs. Not only does this let you interact with your models, like the Product Gallery does, but it also lets you see your models in real world environments through augmented reality.
The basic viewer is very easy to set up – just copy and paste this code into your HTML, setting cloud to the name of your product environment (a.k.a cloud name), and models to the public ID of a model in your Media Library.
<script src="https://ar-3d-viewer.cloudinary.com/main.js"></script>

<div style="width: 100%;">
<ar-3d-viewer cloud="demo" models="docs/CldLogo3D">
</ar-3d-viewer>
</div>
Code language: HTML, XML (xml)
It’s that simple, and here’s what you get:
If you click the ‘View in AR’ button, you can use a mobile device to see the model in your environment.
There are loads of ways to customize the viewer, including applying dynamic lighting, skyboxes, texture variants, animations and more.
<script src="https://ar-3d-viewer.cloudinary.com/main.js"></script>
<div style="width: 100%;">
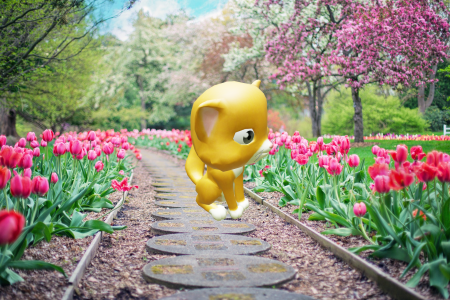
<ar-3d-viewer cloud="demo" models="docs/3d/cute-kitty" variants="true" hdr="docs/park.hdr" skybox="true" animation-name="Walk" animation-play="true" shadow="true">
</ar-3d-viewer>
</div>
Code language: HTML, XML (xml)You can play with the features in this demo and learn all about them in the docs.
So, now you know the basics of how to display, deliver and discover more about your 3D models, how will you approach your next 3D challenge? We’d love to hear about your use cases and solutions – join the discussion!
These are the models used in the post:
- CldLogo3D.glb: a GLB file.
-
DamagedHelmet3D.gltz: a zip file, uploaded as an
imageasset type, containing a glTF file and other associated files. -
foyer-table.fbxz: a zip file, uploaded as an
imageasset type, containing an FBX file and other associated files. [© HippoStance] - cute-kitty.glb: a GLB file. [“Cute Little Kitty” https://skfb.ly/ospAT by Diskette96 is licensed under Creative Commons Attribution.]


