
In many use cases, assets uploaded to Cloudinary should be publicly accessible. However, there are situations where assets are sensitive or confidential (for example, scans of legal documents, in-house guides, etc.). If you need to distribute these sensitive materials to another party or system through Cloudinary, it’s important to ensure that only authorized individuals can access them.
This blog post focuses on the Access Control feature of Cloudinary, which enables the management of sensitive assets. We will be using the Node SDK for the code examples, although this feature is also supported on other SDKs.
Access Control can be managed on any asset through the Cloudinary DAM dashboard or the Cloudinary API. In the dashboard, one of the ways this can be done is by clicking the asset and then clicking the Access control dropdown on the right sidebar:
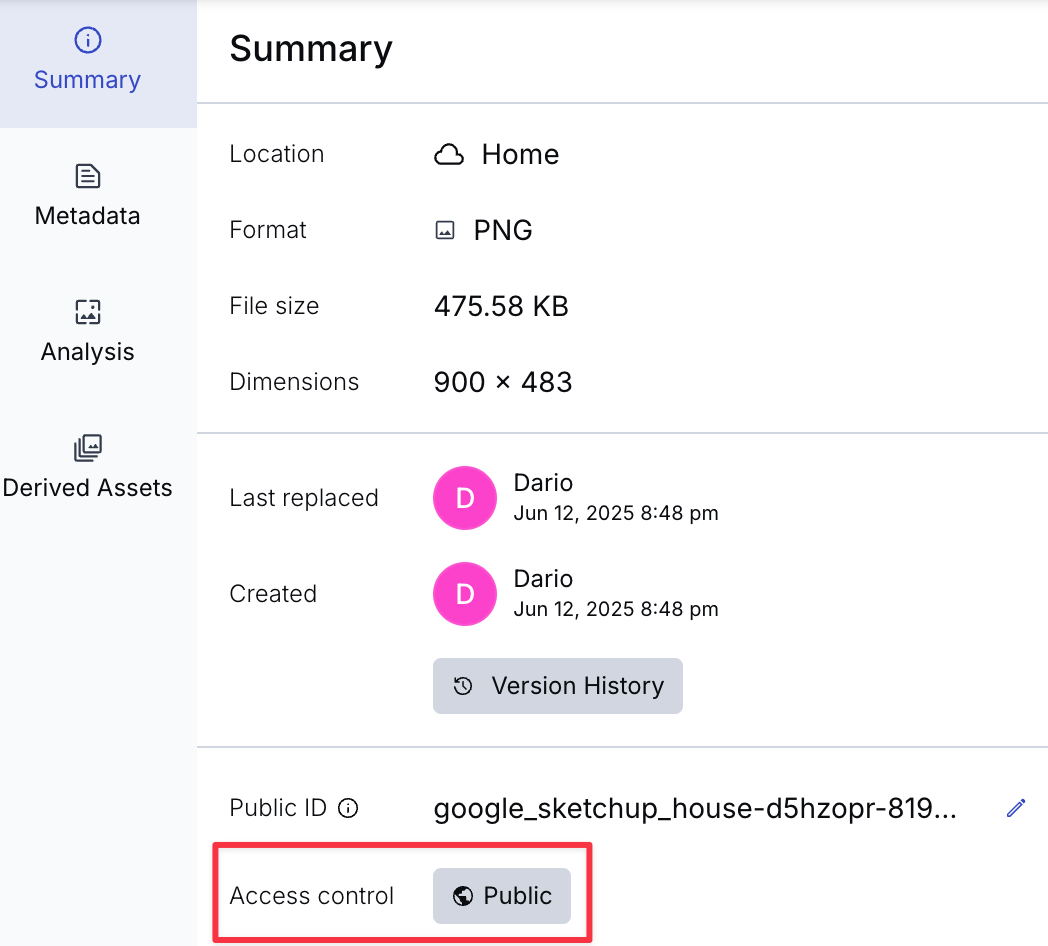
This opens a small dialog where you can choose between two options: Public and Restricted:

The Public option is selected by default, which means that anyone can view the asset. Selecting the Restricted option only allows access with a specialized token (we’ll come back to this in a bit), while there’s an additional option that also allows public access within a given period:

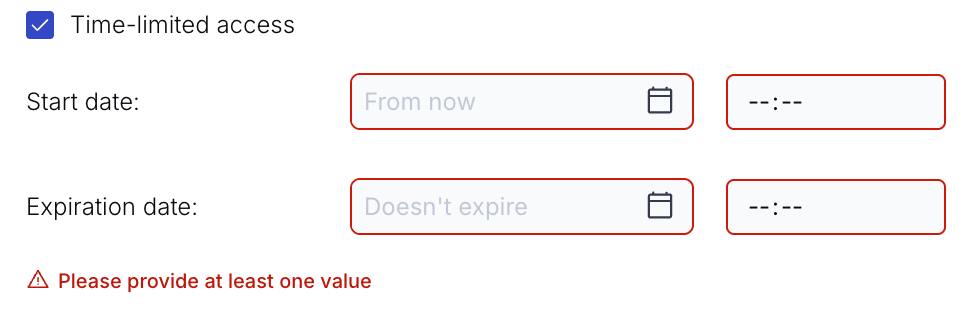
If Time-limited access is checked, we can choose a period and set a start date, an end date, or both. If any of these options are selected, the asset will be publicly available during the specified period.
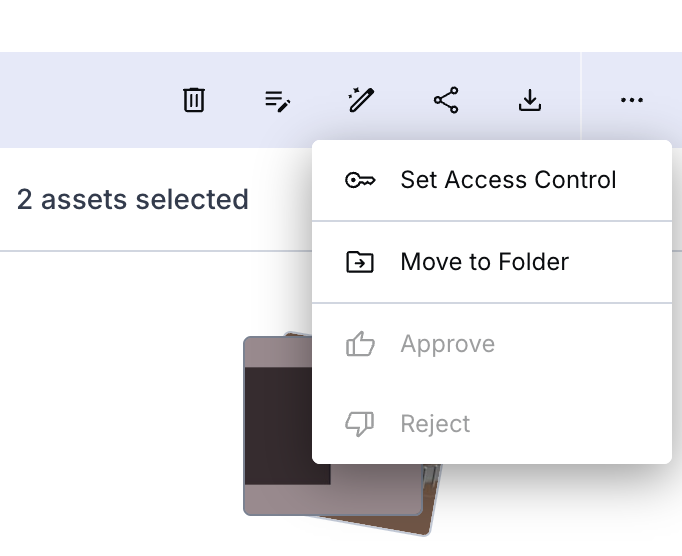
The dashboard also allows you to perform this in bulk. To do that, all you need to do is multiple-select the assets, click the three-dot menu in the top-right corner, and click Set Access Control:
To accomplish the same using the Cloudinary SDK, you can use the access_control property when uploading or updating an image. The parameter accepts an array of access types, determining how the asset is accessible. Supported types include: token and anonymous (allowing public access with optional ISO 8601 date ranges, with only one anonymous type allowed). The following example effectively makes the asset restricted to token-based access, except between June 10th and July 20th of 2025, when it’s publicly available:
// Cloudinary setup
const cloudinary = require('cloudinary').v2;

cloudinary.config({
  cloud_name: 'your-cloud-name',
  api_key: 'your-api-key',
  api_secret: 'your-api-secret'
});

// Upload with access control settings
cloudinary.uploader.upload("sample.jpg",
  { access_control: [
    { access_type: "token" },
    {
      access_type: "anonymous",
      start: "2025-06-10T12:00Z",
      end: "2025-07-20T12:00Z"
    }
  ]}
)
.then(result => console.log(result))
.catch(error => console.error(error));
Code language: JavaScript (javascript)If you have set a token-based access type (either by setting Restricted in the dashboard without time-based access or with access_type of the token through the SDK), you also need to generate a token for external parties to access the asset. However, please note that this is only possible if you have enabled this feature by submitting a request to Cloudinary. This is needed because setting up token-based access also requires some additional configuration on the CDN. Once you’ve gained access to the feature, you will also be provided with an encryption key, which is then used to generate an access token.
A token is simply a cryptographic string generated through the SDK. While generating it, you can also control the token’s validity by:
- Setting an expiration date or time frame.
- Restricting access to specific IP addresses.
- Applying predefined Access Control Lists (ACLs), which are essentially URL patterns like
/video/authenticated/*. - Limiting access to authenticated users or sessions.
Tokens can be used in either token-based URLs or cookies. The first option is helpful if you want to use it in shareable URLs (such as in emails, documents shared externally, or users that may not be authenticated to your site). In contrast, the second option is useful when you want to restrict access based on user authentication or session (e.g., a user logged in to your site). The methods for generating the token differ slightly for these two cases, and they also have different requirements. Both methods are available only for accounts on the Advanced plan or higher, while the token-based URL method also requires using a Custom delivery hostname (CNAME).
To generate a token-based URL, you can call cloudinary.image with the source image as well as an options object that needs to have the encryption key at a minimum and a few other optional properties, such as:
-
acl. An optional Access Control List (ACL) for path restrictions (e.g.,/video/authenticated/*). -
ip. Optional IP address restriction. -
start_time&duration/expiration. Control URL validity with a start time and either a duration or an expiration timestamp.
For example:
const imageTag = cloudinary.image("sample.jpg", {
  type: "authenticated",
  auth_token: {
    key: "MyKey", // Your encryption key
    duration: 300 // Token valid for 300 seconds (5 minutes)
  },
  sign_url: true // Sign the URL for security
});

console.log(imageTag);
Code language: JavaScript (javascript)
To use the cookie method, you need to call the cloudinary.utils.generate_auth_token function. This function also accepts a configuration object but has two mandatory properties: the key, which is the encryption key, and ACL, which is a URL pattern restricting the allowed URL path to a specified pattern. Other optional properties include:
-
ip. Optional IP address restriction. -
start_time&duration/expiration. Control cookie validity with a start time and either a duration or an expiration timestamp.
For example:
const cookie_token = cloudinary.utils.generate_auth_token({
  duration: 300, // Token valid for 300 seconds (5 minutes)
  acl: '*/image/authenticated/*', // Access Control List path
  key: 'MY_KEY' // Your encryption key
});
Code language: PHP (php)Cloudinary’s Access Control is a simple-to-use feature that allows you to safeguard sensitive assets, whether you need to restrict access to a specific timeframe or share them only with certain groups. We hope this blog post was a helpful introduction to this feature. As always, we encourage you to browse our documentation for more advanced configurations, and to sign up for a free Cloudinary.


