
Roommate matching can be a pain—especially during the COVID pandemic when people don’t want to meet in person. Matching apps like Flatmates, Roomster, and roommates.com are helpful, and if you’re in the roommate-matching space, you know that great video is essential for those seeking roommates. Fortunately, Cloudinary can help.
Cloudinary is a cloud-based SaaS with which you as developers can upload and manage videos in the cloud, editing, transforming, and optimizing them for any screen. You can then insert those videos into a website through a video-player app. This article shows you how to build a sample app for matching roommates by leveraging video capabilities.
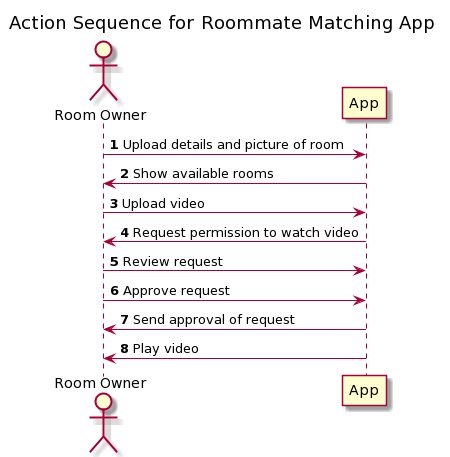
This sample Roommate-Matching App is based on a simplified use case of a typical apartment-and-room rental app: owners input details about their properties and room seekers might then signal interest. Before closing the deal, both parties exchange profiles, make an appointment, and meet at the location.
To avoid meeting in person during the pandemic, owners would upload a 10-minute video that showcases the room and the rest of the property. The video also talks about their hobbies, likes, and dislikes. To protect privacy, the video is restricted for access. To watch it, the room seeker must secure the owner’s approval.
The following diagram illustrates the sequence of events within the app:
This app boasts a tech stack that’s ready for the modern web and rapid development:
-
Next.js for the user interface (UI): Next.js is a React-based framework that enables such functions as server-side rendering and static generation.
-
Netlify with Jamstack for hosting: Unlike traditional web apps, Netlify’s simple architecture works on prebuilt files served over a content delivery network (CDN). Such an approach results in higher performance, security, and scalability along with lower costs and an enhanced developer experience.
-
Sanity as a storage back end: Given the app’s serverless scenario, Sanity Data Store provides data access and stores room details as a collection of documents. You’ll use Sanity’s JavaScript client library to conveniently encapsulate low-level operations.
-
Cloudinary for media management: For an optimal user experience, this app delivers optimized images and video streaming on Cloudinary, whose dashboard and tools offer an end-to-end solution for easily managing media assets.
This section steps you through the procedure for creating the sample Roommate-Matching App with the tech stack described earlier. For brevity, the description also contains code samples from the key parts of the app, emphasizing those sections that use the Cloudinary API. Click here to claim your free forever Cloudinary account.
-
Create a GitHub repository and then install Node.js and the Next.js command-line tool.
-
Create a standard Next.js project:
create-next-app -
Open the project in a code editor and create a
Next.config.jsfile that contains this snippet:module.exports = { distDir: "dist", target: "serverless" } -
Build and test on
localhostwith the commands npminstall,npm run build, and npm run dev; and then go tohttp://localhost:3000. Commit the local changes and push them to GitHub:git commit git push

Now deploy your app to the Netlify cloud for hosting:
-
Sign up for a free Netlify account and then create a Netlify site from your GitHub repository by clicking New Site from Git. Choose the repository you want to link to your site on Netlify. When you push to Git, Netlify will run your build tool of choice on its servers and deploy the result. Change the build settings on your dashboard to read like this:
Build command: `next build` Publish directory: `dist/` -
Click the Plugins tab and add Next to the Netlify plugin. That plugin will then build and deploy your Next.js app with no other configurations required.
-
From the Deploy tab for your site, force a new deployment, and test the deployed website:
https://YOUR-SITE-NAME.netlify.app/.
Your Netlify project is now ready for continuous integration: every time you push a commit, Netlify will connect to your app repository and automatically publish your website.
-
Open your Netlify dashboard, view the Functions tab, and note that Netlify has automatically exported the Hello API endpoint as a serverless function at
https://YOUR-SITE-NAME.netlify.app/.netlify/functions/next_api_hello, which gives you the same result as thehttp://localhost:3000/api/helloendpoint:{"name":"John Doe"}
Every time your app calls the /api/hello endpoint, Netlify will redirect it internally to the /functions/next_api_hello path of your deployed website.
Recall that you created the Next.config.js file with this code before:
module.exports = { distDir: “dist”, target: “serverless” }
When Netlify builds your app with the next build command, the settings above cause Next.js to prepare a serverless deployment, which splits your app into small parts, called lambdas. Here’s how Next.js builds and deploys pages and APIs to the distribution (dist) folder:
-
/pages/index.js => /dist/serverless/pages/index.js -
/pages/api/rooms/[id].js => /dist/serverless/pages/api/rooms/[id].js
Despite having the same name, the target files in the dist folder are different from their source files because each lambda file contains a complete bundle that can run without dependencies. When you deploy your app as a serverless website in Netlify, those lambdas greatly improve the app’s reliability and scalability.
Netlify Identity’s convenient authentication service is easy to integrate into your app. Follow these steps:
-
Open the Identity tab of your Netlify project and click Enable Identity.
-
Install on the command line the Netlify Identity Widget, Bootstrap, React Bootstrap, and FontAwesome with
npm:npm install netlify-identity-widget npm install bootstrap npm install react-bootstrap npm install fontawesome -
Add the
LayoutandHeadercomponents to the/componentsfolder of your project:/components/ /Layout.js /Header.js -
Add the
netlify-identity-widgetscript below to the Layout component:return ( <> <Head> <title>Your Roommate Matching App</title> <script type="text/javascript" src="https://identity.netlify.com/v1/netlify-identity-widget.js"></script> </Head> . . . <Header /> <main> <link rel="stylesheet" type="text/css" href="../app.css" /> <div className="container">{children}</div> </main> -
Add the
data-netlify-identity-menucomponent below to theHeadercomponent:<div data-netlify-identity-menu></div> -
In the Index page, wrap the UI with the
Layoutcomponent:return ( <Layout> [...] </Layout> -
Run the app again, click the Sign Up link in the Netlify Identity menu, and register for a new account.
-
Open your email to confirm the registration and then log in to the new account:


For data access, outsource your data store to Sanity. Integrate Sanity into the app, as follows:
-
Create two folders, name them
/public/imgand/data, and then add some pictures of a room for rent under/public/img. In thedatafolder, add a dummy JSON file calleddata.jswith information on the room. -
Edit the index page to display the room-catalog data from a static JSON file.
-
Sign up for a free Sanity account. Create a Sanity project and then add a collection named
rooms. -
Install the
@sanity/client npmpackage. -
Create a
.envfile and add the credentials of your Sanity project to it:SANITY_PROJECT_ID=XXXXXXXXXX SANITY_API_TOKEN=xxxxxxxxxxxxxxxx -
Edit the
Next.config.jsfile to export your Sanity credentials:const sanityProjectId = process.env.SANITY_PROJECT_ID; const sanityApiToken = process.env.SANITY_API_TOKEN; module.exports = { distDir: 'dist', target: 'serverless', publicRuntimeConfig: { sanityProjectId: sanityProjectId, sanityApiToken: sanityApiToken } } -
Go to the Environment Variables section of your Netlify project settings and add the same Sanity credentials from the
Next.config.jsfile. -
Create the
Pages/API/rooms/[id].jsendpoint with theGETandPOSTmethods to connect to your Sanity data store with your credentials and perform data operations on theroomscollection. Within your API methods, use the Sanity API JavaScript client and call the getDocument, fetch, and createOrUpdate methods of the Sanity client to get a single room document, to retrieve all the room documents, and to update a room document, respectively. -
Build, run, and test the new API endpoint on
localhost. -
Install the SWR React Hooks library package for fetching and caching remote data:
>npm i swr -
Edit the index page to fetch room data from the new API endpoint instead of the static JSON file.
-
Run the app again. The room information along with images are now displayed on the homepage, for example:

Media access is the last piece in the puzzle. Follow the steps below to integrate your app with Cloudinary’s services and components.
1. Sign up for a free Cloudinary account and create a Cloudinary project. Click Settings > Upload and, under Upload presets, look for the preset with the Mode = Unsigned setting.
2. Click Settings > Security and, under Restricted media types, deselect the Resource list option.
3. Add your Cloudinary project’s credentials to the .env file:
```
CLOUDINARY_CLOUD_NAME=XXXXXX
CLOUDINARY_UPLOAD_PRESET=XXXXXX
SANITY_PROJECT_ID=XXXXXXXXXX
SANITY_API_TOKEN=xxxxxxxxxxxxxxxx
```
4. Edit the Next.config.js file to export your Cloudinary credentials.
5. Add the following section under module.exports in the Next.config.js file:
```
const cloudinaryCloudName = process.env.CLOUDINARY_CLOUD_NAME;
const cloudinaryUploadPreset = process.env.CLOUDINARY_UPLOAD_PRESET;
const sanityProjectId = process.env.SANITY_PROJECT_ID;
const sanityApiToken = process.env.SANITY_API_TOKEN;
module.exports = {
  distDir: 'dist',
  target: 'serverless',
  publicRuntimeConfig: {
    cloudinaryCloudName: cloudinaryCloudName,
    cloudinaryUploadPreset: cloudinaryUploadPreset,
    sanityProjectId: sanityProjectId,
    sanityApiToken: sanityApiToken
  },
  images: {
    domains: ['res.cloudinary.com']
  }
}
```
6. Add the Cloudinary script below to the Layout.js file:
```
[…]
  return (
    <>
      <Head>
        <style>{dom.css()}</style>
        <title>Your Roommate-Matching App</title>
        <script src="https://widget.cloudinary.com/v2.0/global/all.js" type="text/javascript"></script>
[…]
```
7. Add to the Netlify settings your Cloudinary credentials as environment variables with the same names and values as those declared in the Next.config.js file.
8. Replace the <img> tag with the <Image> component from next/image to eliminate the layout-shift effect on pages that contain images.
9. Create button components to enable users to upload, play, request access to, and approve requests for videos.
10. Modify the upload-button component (the UploadButton.js file) to open the Cloudinary upload widget and call the API endpoint to update the room’s image and video URLs:
```
    var myWidget = cloudinary.createUploadWidget({
      cloudName: publicRuntimeConfig.cloudinaryCloudName,
      upload_preset: publicRuntimeConfig.cloudinaryUploadPreset,
      showAdvancedOptions: true
    }, (error, result) => {

      if (result.event == "success") {

        console.log(result.info);

        if (result.info.resource_type == "image") {
          fetch('/api/rooms/' + room._id, {
            method: 'POST',
            body: JSON.stringify({ pic: result.info.secure_url }),
            headers: {
              'Content-Type': 'application/json'
            },
          })
          .then(res => mutate('/api/rooms/' + room._id));
        }

        if (result.info.resource_type == "video") {
          fetch('/api/rooms/' + room._id, {
            method: 'POST',
            body: JSON.stringify({ videoId: result.info.public_id }),
            headers: {
              'Content-Type': 'application/json'
            },
          })
          .then(res => mutate('/api/rooms/' + room._id));
        }
      }
      else {
        console.log(error);
      }
    })

    myWidget.update({tags: ['room-' + room._id]});
    myWidget.open();
  }
```
On Cloudinary’s free plan, the maximum image-file size you can upload is 100 MB. For all the upload limits, see the right-hand side of your account settings page.
11. Create a new Details page under the pages/details/[id].js file and add to the page a component named VideoPlayer so that users can watch video and review video requests.
12. Add Cloudinary’s embedded video player to the VideoPlayer.js file:
```
import getConfig from 'next/config';

const { publicRuntimeConfig } = getConfig();

const VideoPlayer = (props) => {

  const videoUrl = 'https://player.cloudinary.com/embed/'
  + '?cloud_name=' + publicRuntimeConfig.cloudinaryCloudName
  + '&public_id=' + props.room.videoId
  + '&fluid=true&controls=true&source_types%5B0%5D=mp4';

  return <iframe
    src={videoUrl}
    height="400"
    allow="autoplay; fullscreen; encrypted-media; picture-in-picture"
    allowFullScreen
    frameBorder="0"></iframe>
}

export default VideoPlayer
```
Below is how the app works.
-
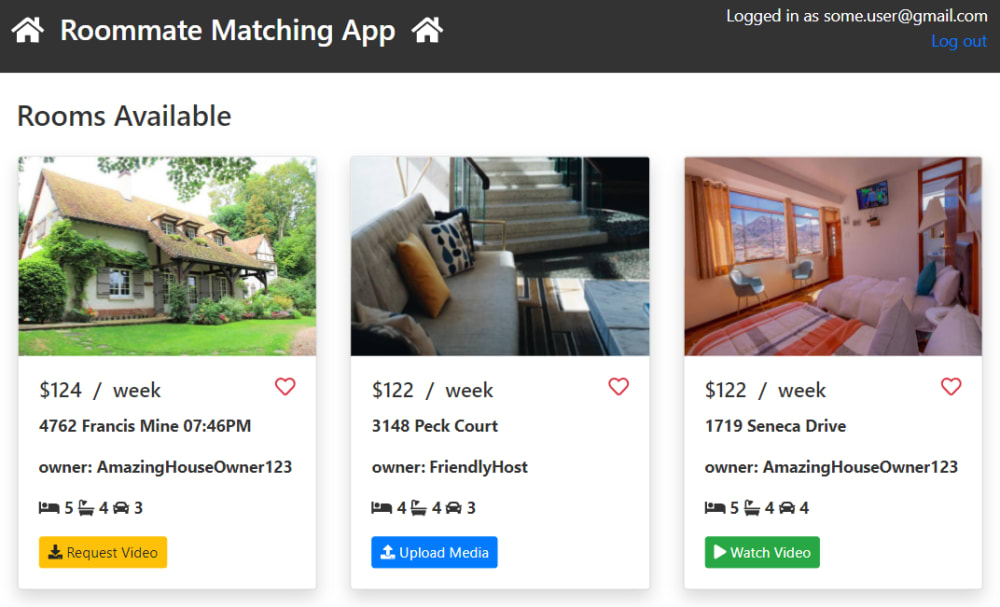
The owner opens the homepage and, if rooms available for rent are displayed, logs in with the user name and password previously registered with Netlify Identity:

-
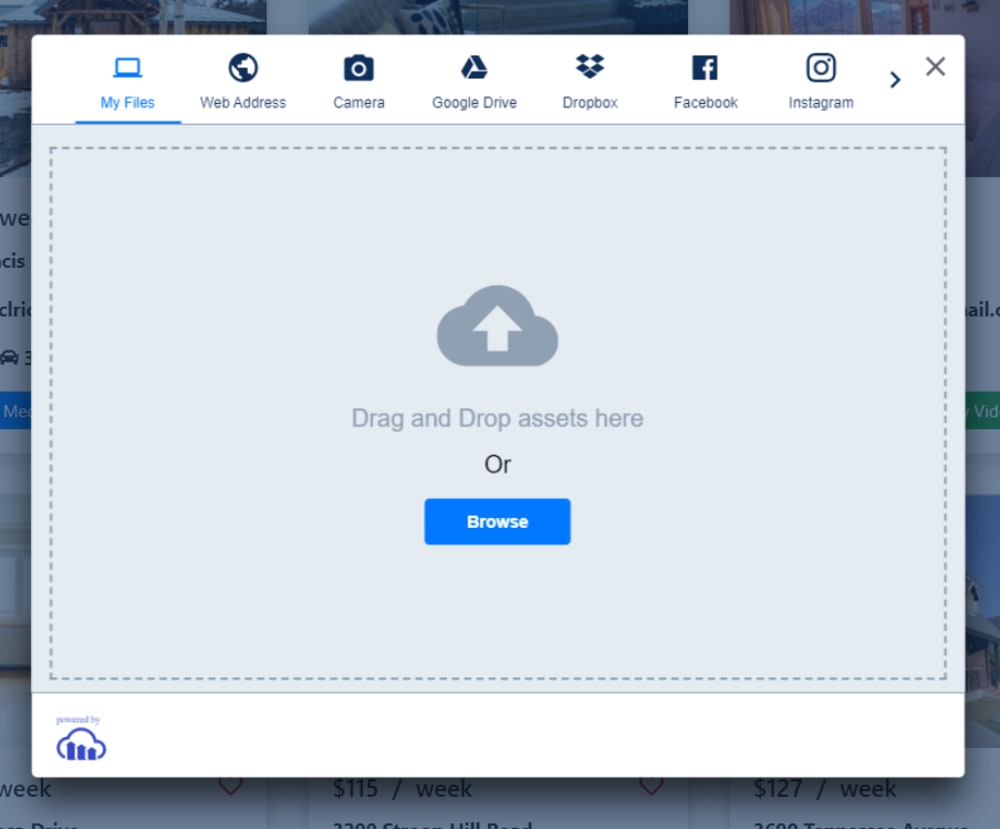
When users log in, they can upload videos for the rooms they own by clicking Upload Media:

-
Cloudinary’s upload widget uploads the media (images or videos) for a specific room:
-
The app automatically assigns the media to the room in question.

-
The API’s
POSTmethod in the app accesses theroomscollection of the Sanity data store and updates the image and video URLs in the current room’s document.
At this point, the owner can click the play button to verify that the video is in good shape (see the screenshot below). This details page is powered by Cloudinary’s cloud-hosted player, which you can conveniently embed in an <iframe> element.

Now that the video has been uploaded, the room seeker can log in to the app with his or her Netlify Identity credentials:

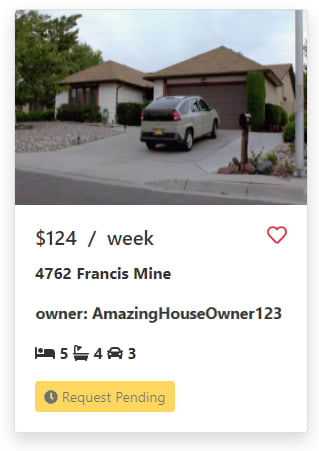
Afterwards, the Request Video button appears for the room with video uploaded by its owner. The room seeker can then click the button to request permission to watch.
The app then displays the Request Pending button:
Since the match event is an agreement between two parties, the room seeker must wait till the room owner opens the room-details page again, takes note of the request, and approves it by clicking Approve:

Afterwards, the app displays the Watch Video button on the room seeker’s page:

By clicking Watch Video, the room seeker is redirected to the room-details page to watch the video:

The Roommate-Matching App described above demonstrates how to easily configure and integrate frameworks, libraries, and platforms, such as Next.js, Netifly, Sanity, and Cloudinary, to build robust, cloud-based solutions. In particular, by integrating Cloudinary’s first-class APIs and components with your app, you can enable room owners to quickly upload, retrieve, and manage media assets as helpful details for room seekers in quest of the ideal match.
Feel free to use the code and API methods you learned above to integrate video into other apps. To leverage the Cloudinary platform to effectively manage media assets for your apps, first sign up for a free account.
Here are more resources offered by Cloudinary:
- The Dashboard Console
- The command line
- APIs, widgets, and SDKs for creating personalized media experiences
- The media-search feature
Also, check out the serverless architecture of Next.js.
To obtain the source code of the sample app, download or fork the GitHub repository.
Marcelo Ricardo de Oliveira is a senior freelance software developer who lives with his lovely wife, Luciana, and his little buddy and stepson, Kauê, in Guarulhos, Brazil. He is the cofounder of the Brazilian TV Guide and currently works for Alura Cursos Online.