
Over recent years, ‘unboxing’ videos have become a popular internet phenomenon. Mostly, these involve people discovering what’s inside physical packages, with great anticipation and excitement. They can be strangely addictive!
Cloudinary’s AI Content Analysis add-on effectively does the same thing, automatically, for images. Using highly-trained AI models, it can discover what’s present in an image, and even provide further details about the objects it finds.
I decided to create an object detection demo for the docs to expose the add-on’s capabilities. You can see me trying it out in my own ‘unboxing’ video, here:
So, you’re probably thinking, that’s a cute demo, but what is object detection used for in the real world? Why do you need to automatically detect objects when you can clearly see what’s in the image yourself?
Well, for a start, not everyone can see what’s in an image. Visually impaired people may be using a screen reader to digest content, and the more descriptive you can make your alt text for each image, the more they’ll understand what the image is showing. You can certainly use the detected content for that.
Another use case is for user-generated content – the general public uploading images to your website. You may want to implement an automatic check to make sure the images contain expected content, like a car for a car sales site. Then your app can use the location of the object to center a crop on it, or avoid overlaying text on it.
For e-commerce, wouldn’t it be great to categorize your products automatically, adding metadata to the images based on detected attributes? Then you could search for say, garments with full-length sleeves, or dresses with pockets.
At present, there are six content-aware detection models to choose from, each focusing on different objects.
As with any AI, mistakes can happen, and sometimes objects can appear to be something they’re not. The confidence score can help you or your app make decisions about whether to trust a model’s detections. You may find that some models work better than others, depending on the content of your images, due to how the model has been trained.
I invoked each model on the same ice skating image to show how the different models detect different objects. You can see the results below.
In the following images, only the first 20 detected items alphabetically are shown. So, for example, in the human-anatomy example only the left body parts are highlighted, but the response does also contain right body parts. If you want to see for yourself, upload this image to the demo and take a look at the JSON.
| Model | Description | Detected objects (click for full size) |
|---|---|---|
| lvis | The Large Vocabulary Instance Segmentation model contains thousands of general objects. In this example, it finds mainly items of clothing, but also detects a couple of banners. |  |
| coco | The Common Objects in Context model contains just 80 common objects. In this example, the only ‘objects’ found are the people. |  |
| openimages | Google’s Open Images Dataset model contains 600 general objects. In this example, it detects mainly the people and footwear, and even identifies one of the ice-skates as sports equipment. |  |
| cld-fashion | Cloudinary’s fashion model is specifically dedicated to items of clothing. As shown in the video, the response also contains more specific attributes of each clothing item. | 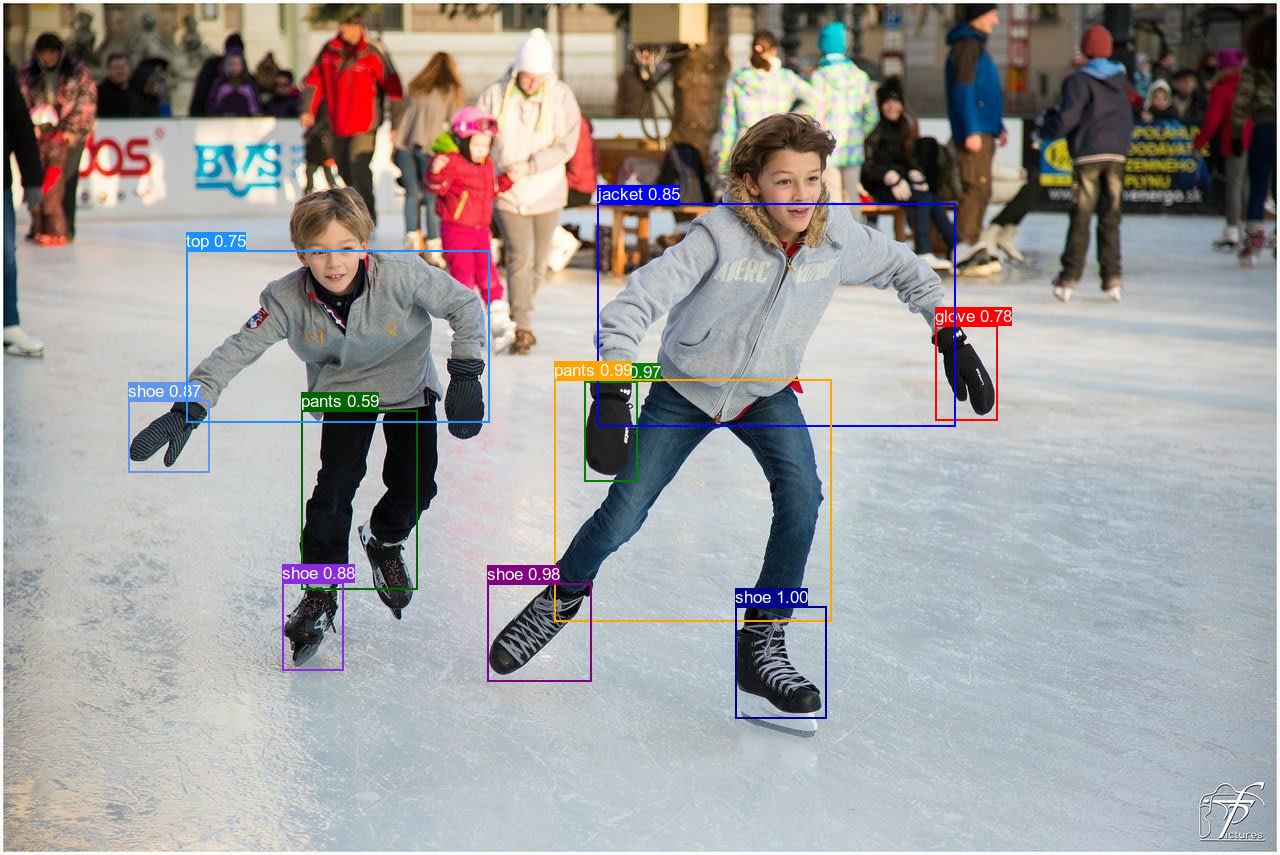 |
| cld-text | Cloudinary’s text model specifically looks for blocks of text in an image. In this example, it finds two text blocks. |  |
| human-anatomy | The human anatomy model specifically looks for parts of the human body. In this example, you’ll see it looks very one-sided, but that’s just a limitation of this demo (see the note above). |  |
If none of these models are specific enough to meet your needs, you can also request to have your own private models integrated, for your use only, to cater to objects that you’re interested in.
In the rest of this post I’m going to unbox the object detection demo itself, and show you the numerous Cloudinary features that I put into it.
Its contents include:
- The upload widget
- Upload presets
- Image and text overlays
- Effects and visual enhancements
- User-defined variables
- Named transformations
Cloudinary’s upload widget is a prime example of the adage, “good things come in small packages”. With a ridiculously small amount of JavaScript, you can implement this fully-customizable widget, which lets you upload all types of media files to Cloudinary from numerous sources.
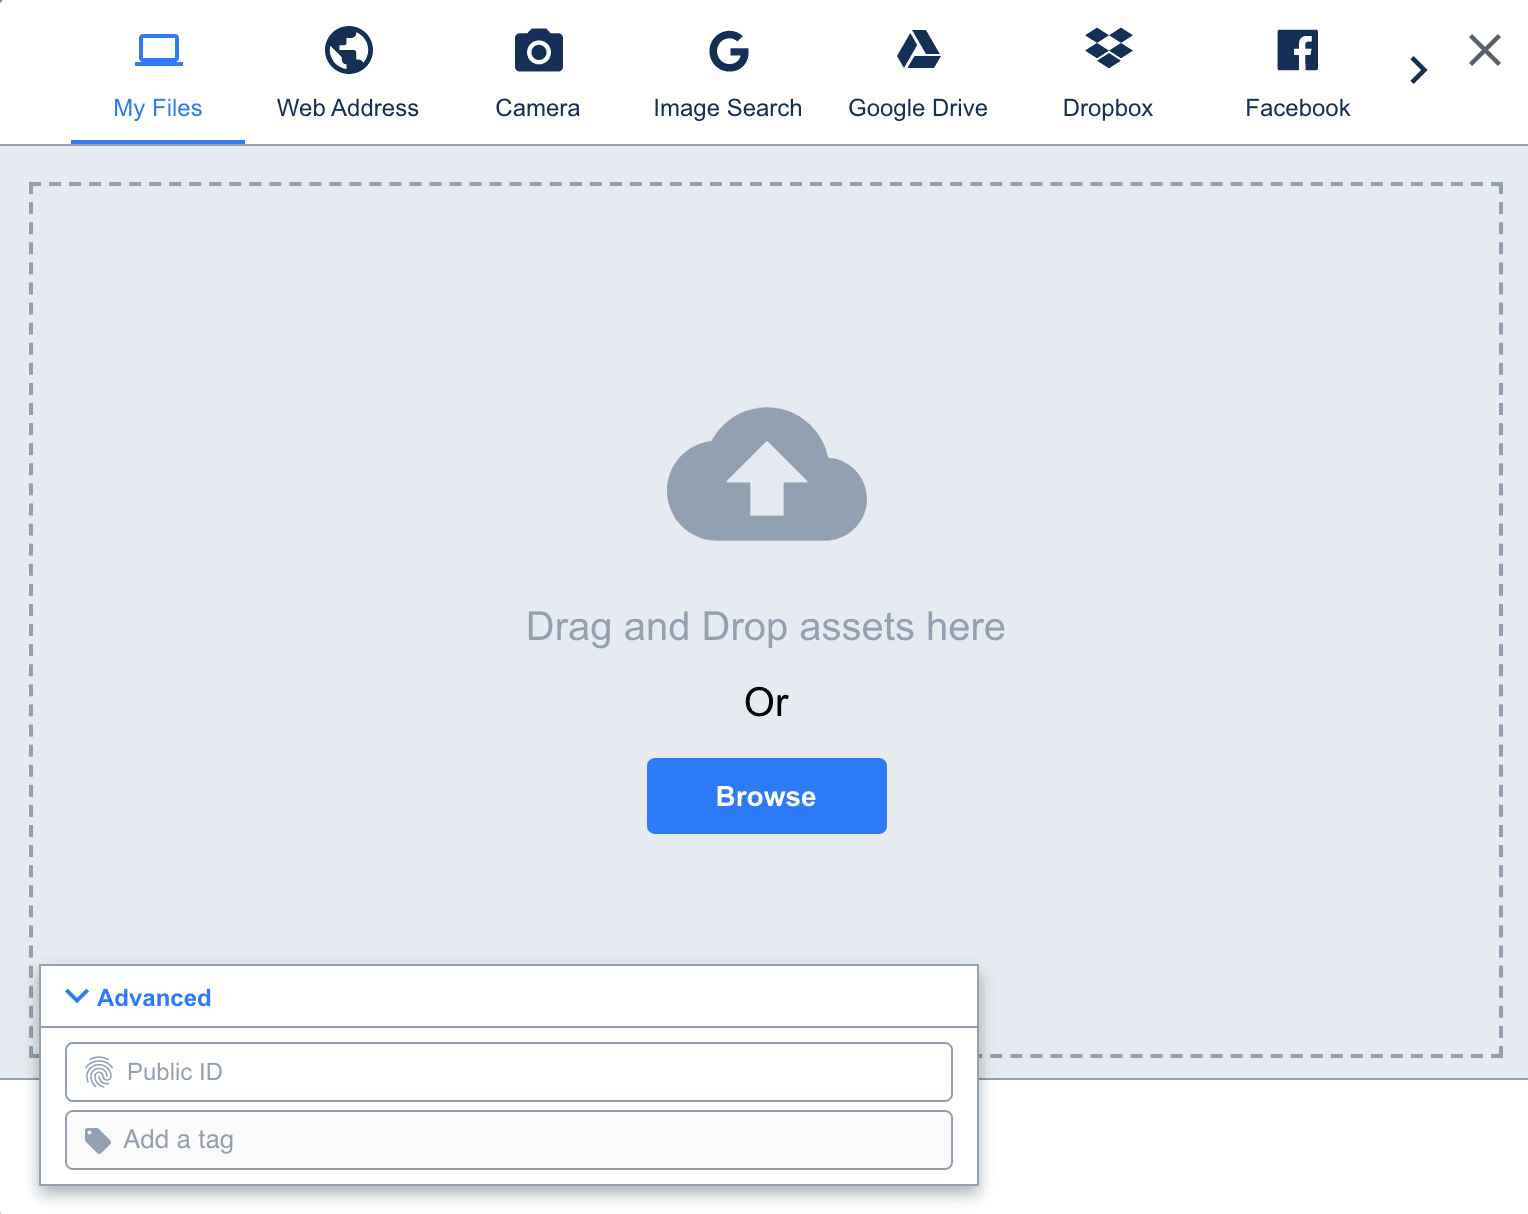
Check out the upload widget demo to get a feel for how it’s implemented.
Upload presets are a set of predefined upload options. You can set the uploadPreset parameter of the widget to the name of an upload preset, so that it uploads everything in the same way. In the case of the demo, I created six upload presets, one for each content-aware detection model, and the widget gets updated based on the user’s model selection:
function updateWidget() {
  myWidget.update({uploadPreset: document.getElementById("model").value});
}
Code language: JavaScript (javascript)
where the model select element is defined as follows:
<select class="select-css" id="model" name="model" onchange="updateWidget()">
  <option value="docs_detect_lvis" id="lvis" selected="true">lvis</option>
  <option value="docs_detect_coco" id="coco">coco</option>
  <option value="docs_detect_openimages" id="openimages">openimages</option>
  <option value="docs_detect_cld-fashion" id="cldfashion">cld-fashion</option>
  <option value="docs_detect_cld-text" id="cldtext">cld-text</option>
  <option value="docs_detect_human-anatomy" id="humananatomy">human-anatomy</option>
</select>
Code language: HTML, XML (xml)
Each upload preset differs only in the upload method’s detection parameter. Setting it to a model name invokes the automatic image tagging feature of the Cloudinary AI Content Analysis add-on.
This is the upload preset for the cld-fashion model:

I used unsigned upload presets, because the demo is implemented purely on the client side, with no server to provide a signature. The auto_tagging parameter is set to add a tag to the image for each detected object that has a confidence score of over 0.6. These tags aren’t actually required for this demo, but I included it anyway as it could be useful for some analysis at a later date.
The bounding boxes added to the displayed image in the demo are applied as overlays using the coordinates and dimensions returned in the upload response. So, a response like this:
"bounding-box": [
597.1850564726325,
202.6171875,
354.7523892267594,
220.4296875
],
would mean overlaying a box at x=597, y=202 (assuming a gravity of northwest) with a width of 355 pixels and and a height of 220 pixels, like this:

Similarly, the text overlay, stating the object and confidence score, is applied to the top of the box in white font with a colored background (in this case red):
b_red,co_white,l_text:Arial_17:jacket%25200.85/fl_layer_apply,g_north_west,x_597,y_185

Obviously, we want to be able to see the image beneath the bounding box, so I tried using an image of a frame, but because it gets stretched and squashed according to the dimensions, it didn’t look good. Instead, I decided to make the red square transparent using the background removal effect (e_bgremoval:red) and apply a border to it (bo_3px_solid_blue), resulting in the border being the only visible part of the overlay:

Clearly, each bounding box is different, so having created a specific transformation for one, I needed to generalize it to work for any bounding box. This is where user defined variables came into play. Each value in the bounding box would need its own variable:
-
$tlx– top left x coordinate -
$tly– top left y coordinate -
$boxw– width of the bounding box -
$boxh– height of the bounding box -
$color– the color of the bounding box and background to the text overlay -
$object– the detected object -
$conf– the confidence score -
$fontsize– the font size of the text overlay -
$pix– the size of the border -
$style– the style of the text overlay
To cater for different image resolutions, I decided to make the font size and border size dependent on the height of the image – this was calculated in the JavaScript.
This is the transformation with variables:
%20$(conf)/fl_layer_apply,g_north_west,x_$tlx,y_$tly_sub_$fontsize/ice_skating.jpg)
The (rather huge) generic transformation could now be saved as a named transformation to allow for easy re-use and to make the final URL less complex.
I used the Cloudinary CLI to create the named transformation:
cld admin create_transformation bboxup 'l_docs:filled-square/c_scale,h_$boxh,w_$boxw/e_bgremoval:red/bo_$pix_solid_$color/fl_layer_apply,g_north_west,x_$tlx,y_$tly/b_$color,co_white,l_text:$style:$(object)%20$(conf)/fl_layer_apply,g_north_west,x_$tlx,y_$tly_sub_$fontsize'
Here’s the much shorter transformation, passing the variable values to the named transformation (t_bboxup):

I created a similar one for adding the object and confidence score text overlay to the bottom of the bounding box, rather than the top, in case the detected object is near the top of the image. The only difference is the arithmetic used for the y-coordinate of the text layer:
- For bboxup:
y_$tly_sub_$fontsize - For bboxdown:
y_$tly_add_$boxh_add_$pix

Cloudinary is a box full of tricks, a few of which I used in my object detection demo. I hope you enjoy using it to unbox some of your own images!
In terms of Cloudinary features, there’s so much more to unwrap. Head over to the docs to learn about uploading media, image transformations, video transformations, media delivery, asset administration, widgets and players, add-ons and much, much more…