
Part 1 of this series discusses the optimal way of delivering progressive video streams by taking advantage of modern, efficient codecs. That approach is ideal for short-form (under 60 seconds) videos and for videos displayed at a low resolution, such as ads and previews. But what if you’re delivering longer videos with a higher resolution? No matter that you could offer them as a single file through progressive streaming, your viewers might still run into issues, such as buffering, slow start of playbacks, or even playback failures.
As sharp as modern mobile-device screens have become, they can’t display all the pixels in high-resolution videos (above 1,080p). Hence, delivering a video too large for the screen is not only a waste of resources and increased bandwidth costs on your part, but also a drain on your audience’s bandwidth, lengthening the processing time on devices, consuming more battery, and rendering buffering a likely occurrence.
An effective solution is Adaptive Bitrate Streaming. Read on to find out how to combine modern codecs with ABR to deliver, through automation with Cloudinary, a lightweight and optimal experience to viewers.
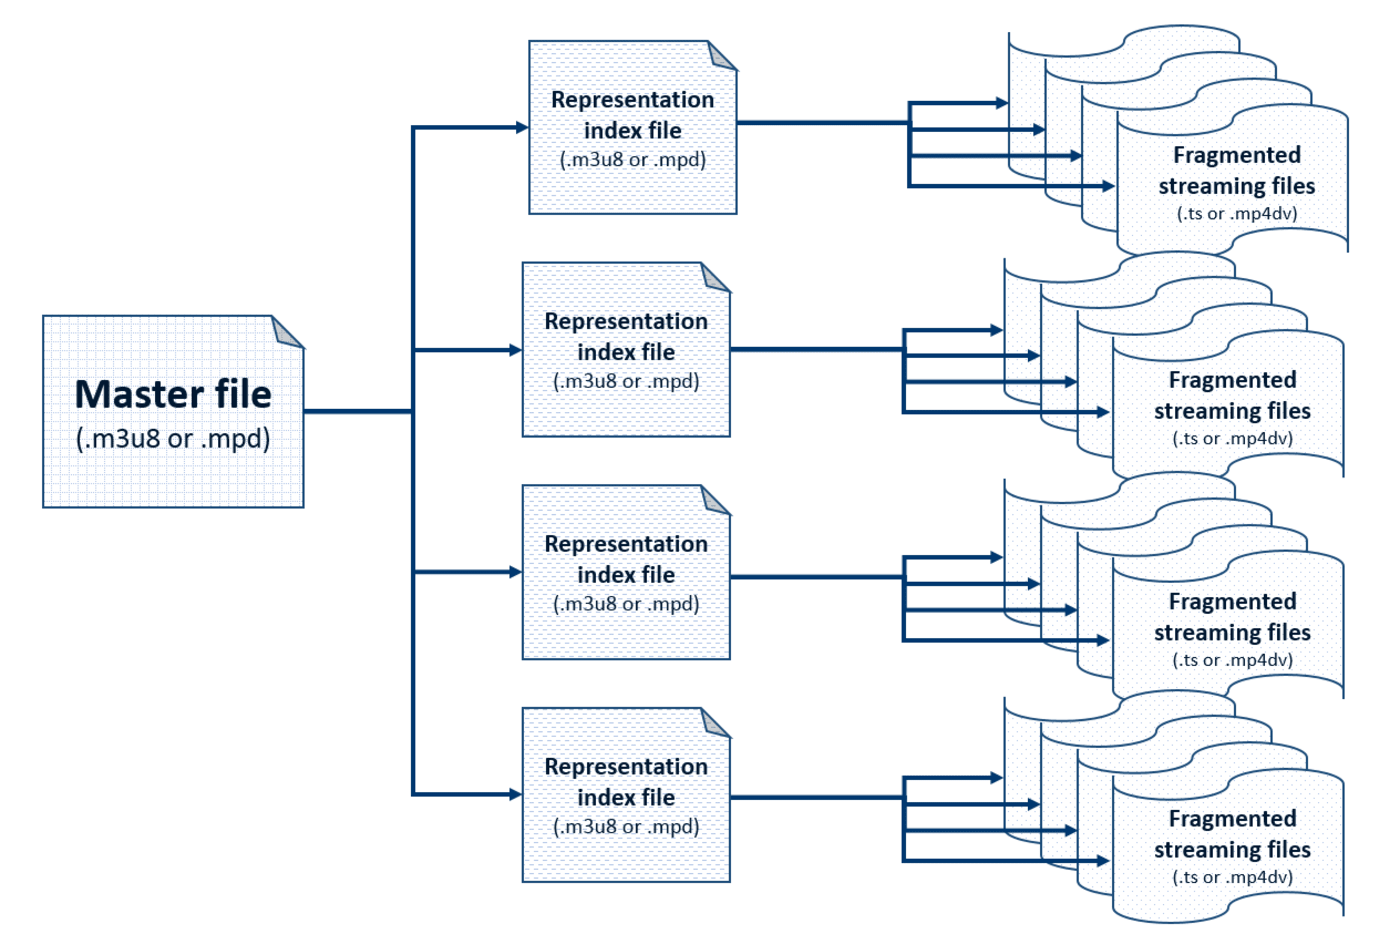
While on YouTube, Netflix, Hulu, or a similar service, if you notice the picture quality changing from good to pixelated or vice versa, that’s ABR. Behind the scenes, instead of buffering your video when the network is slow, ABR switches dynamically to a lower-bitrate (lower-quality) version of the video that can be handled by the connection speed.
ABR also takes into account your device’s resolution. So, if you’re watching a video on an iPhone X, ABR does not deliver the video’s 4K version—even if your bandwidth can accommodate such a large file—because not enough pixels are available in the display for that higher-resolution version. The magic here is that all that happens automatically with Cloudinary; you just need to configure the Cloudinary Video Player with the relevant options.
For a more in-depth discussion of ABR, see the post Plug-and-Play Adaptive Bitrate Streaming With HLS and MPEG-DASH.
Before delving into how to deliver an optimal adaptive experience, let’s talk about the main prerequisite. Bitrate refers to the number of bits it takes to encode a one-second video. Thus, a 10-second video with a 10-MB file size has an average bitrate of 8 mbps (1 megabyte per second * 8 bits per byte). To change the video bitrate, first note this formula:
Bitrate = total pixels/second _bits/pixels * or total pixels/frame x frames/second * bits/total pixels
Hence, for a lower bitrate, you can reduce the total number of pixels by doing one of the following:
- Reduce the resolution of the video.
- Lower the frame rate.
- Compress the bits per pixel with a more advanced video codec—akin to what you would do for an image.
Part 1 elaborates on modern codecs, such as HEVC (H.265) and VP9, which render sharing pixels across frames more efficient, encoding the key frames while maintaining the visual fidelity of videos. In fact, they are about 30-50 percent more efficient than the H.264 standard. Currently, however, HEVC and VP9 do not enjoy universal browser or device support.
Not to worry. As described in Part 1, you can present your video player with multiple codec options in the adaptive bitrate manifest, which would then choose the first codec it knows how to decode. In fact, about 85 percent of Internet traffic uses one of the [modern codecs](https://caniuse.com/#feat=webm, https://caniuse.com/#feat=hevc), meaning that your total bandwidth would be reduced by 25 to 43 percent. You can easily calculate how cost-effective this approach would be for you.
To set up codec options, first create the streaming profiles to build the manifests. Think of a streaming profile as a list of all the variations you want to create for ABR of your videos. You can specify in a profile the aspect ratio, the resolutions, the bitrates, and any additional Cloudinary transformations for your videos, such as watermarks, subtitles, other text, and splicing in other videos.
Create a maximum of three streaming profiles, one for each codec you want to support: VP9, H.265, and H.264. Before doing that, remember that your goal is to deliver the best quality with the available bitrate given the bandwidth constraint. Also note that—
- Since H.265 and VP9 are more efficient, you can get the same picture quality for a lower bitrate. If saving bandwidth costs is your primary concern, this is probably the way to go.
- At a given bandwidth availability, users whose devices support those modern codecs get a more superior visual experience.
Keep in mind that the content of your video could also affect your decision. For instance, for sports or action content, you might want to maintain a higher bitrate at lower resolutions.
Before creating the profiles, see the Cloudinary API code for creating a streaming profile for H.264: Creating Custom Streaming Profiles
cloudinary.v2.api.create_streaming_profile('16x9_h264',
  {
    display_name: "16x9 H264 Codec",
    representations: [
    {transformation:{crop: "pad", width: 1920, aspect_ratio: "16:9", bit_rate: "8500k"}},
    {transformation:{crop: "pad", width: 1280, aspect_ratio: "16:9", bit_rate: "5500k"}},
    {transformation:{crop: "pad", width: 960, aspect_ratio: "16:9", bit_rate: "3500k"}},
    {transformation:{crop: "pad", width: 640, aspect_ratio: "16:9", bit_rate: "2000k"}},
    {transformation:{crop: "pad", width: 480, aspect_ratio: "16:9", bit_rate: "800k"}}
  ] },
  function(error, result){console.log(result);});
Copy that code, paste it into another version, and make the necessary edits for H.265, as follows:
cloudinary.v2.api.create_streaming_profile('16x9_h265',
  {
    display_name: "16x9 H265 Codec",
    representations: [
    {transformation:{crop: "pad", video_codec: "h265", width: 1920, aspect_ratio: "16:9", bit_rate: "5500k"}},
    {transformation:{crop: "pad", video_codec: "h265", width: 1280, aspect_ratio: "16:9", bit_rate: "3500k"}},
    {transformation:{crop: "pad", video_codec: "h265", width: 960, aspect_ratio: "16:9", bit_rate: "2000k"}},
    {transformation:{crop: "pad", video_codec: "h265", width: 640, aspect_ratio: "16:9", bit_rate: "800k"}},
    {transformation:{crop: "pad", video_codec: "h265", width: 480, aspect_ratio: "16:9", bit_rate: "500k"}}
  ] },
  function(error, result){console.log(result);});
Notice the lower bitrates on H.265.
Now create a profile for VP9 by using the same bitrates you did for H.265:
  cloudinary.v2.api.create_streaming_profile('16x9_vp9',
  {
    display_name: "16x9 vp9 Codec",
    representations: [
    {transformation:{crop: "pad", video_codec: "vp9", width: 1920, aspect_ratio: "16:9", bit_rate: "5500k"}},
    {transformation:{crop: "pad", video_codec: "vp9", width: 1280, aspect_ratio: "16:9", bit_rate: "3500k"}},
    {transformation:{crop: "pad", video_codec: "vp9", width: 960, aspect_ratio: "16:9", bit_rate: "2000k"}},
    {transformation:{crop: "pad", video_codec: "vp9", width: 640, aspect_ratio: "16:9", bit_rate: "800k"}},
    {transformation:{crop: "pad", video_codec: "vp9", width: 480, aspect_ratio: "16:9", bit_rate: "500k"}}
  ] },
  function(error, result){console.log(result);});
The above bitrates are examples only. Though they should work fine in most cases, be sure to test them out and tweak the bitrates to meet your own standards. Keep in mind that a given bitrate at a constant resolution would result in a video of higher visual quality in VP9 and H.265 than in H.264.
Now create all those versions upon upload of a new video, as follows:
CAUTION: This approach results in numerous transformations—something well worth considering because video encoding is expensive. You can offset part or even all of that cost by reducing the bandwidth, depending on the ratio of bandwidth consumption to the number of videos to be encoded. All in all, it’s cost effective for situations in which the bandwidth savings are higher than the processing cost you incur.
As stated earlier, the above approach yields a 25- to 43-percent reduction in total outgoing video bandwidth. With Cloudinary, 1 TB of outgoing bandwidth equals the cost of one million transformations. You can easily calculate the total cost or cost savings.
Next, upload a new video and create the various versions. The above example would read like this:
cloudinary.v2.uploader.upload('video-file.mp4', {resource_type: 'video',
    eager: [{format: 'm3u8', streaming_profile: '16x9_h264'},
      {format: 'm3u8', streaming_profile: '16x9_h265'},
      {format: 'mpd', streaming_profile: '16x9_vp9'}
      ],
    eager_async: true,
    eager_notification_url: `https://`mysite`/notify_endpoint', public_id:`yourPublicId`}, function(result) {console.log(result); });
Replace all the variables in bold font with the actual values. When your files are ready, you’ll get an async response to the endpoint under eager_notification_url. Remember that you’re creating a lot of files here and, even though VP9 and H.265 codecs are extremely efficient consumers of bandwidth, they take three to five times as long to encode than H.264. However, with parallel processing, the operation would take the same amount of time despite a higher CPU requirement.
When the upload is complete, the following three manifests are displayed, which you’ll need for the next step:
https://res.cloudinary.com/demo-robert/video/upload/sp_16x9_h264/yourPublicId.m3u8
https://res.cloudinary.com/demo-robert/video/upload/sp_16x9_h265/yourPublicId.m3u8
https://res.cloudinary.com/demo-robert/video/upload/sp_16x9_vp9/yourPublicId.mpd
Now decide which manifest to pick for each visitor. (As reference, see this multi-codec HLS/DASH CodePen). Check for support for H.265 and for VP9. If neither works, fall back to the H.264 manifest.
This CodePen contains a real working example.
See the Pen Cloudinary – Multi-Codec Adaptive Bitrate Streaming by Robert Moseley (@mosedart) on CodePen.
At Cloudinary, we’re continuously conducting research on ABR and developing enhancements to make it easier to run codecs. Try out the process for yourself and tell us about your experience in the Comments section below. Also, do check out our HTML5 Video Player.
- Video API
- Top 10 Mistakes in Handling Website Videos and How to Solve Them
- How to Compress Video Size Automatically With One Line of Code
- ExoPlayer Android Tutorial: Easy Video Delivery and Editing
- Ultimate HTML5 Video Player Showdown: 10 Players Compared
- How to Generate Waveform Images From Audio Files
- Auto-Generate Subtitles Based on Video Transcript
- Auto-Generate Video Previews with Great Results Every Time
- Adaptive HLS Streaming Using the HTML5 Video Tag
- Video Optimization Part 1: Cloudinary and the HTML5 Video Player
- Converting Android Videos to Animated GIF Images With Cloudinary: A Tutorial